Playing With Designer Series Paper!

Hello! Today I am sharing a few projects I worked on this week using some of the Designer Series Papers featured in the Stampin' Up! May 2023-April 2024 Annual Catalogue. I am trying to make good on my New Year's resolution to use my Designer Series Papers and not just hoard them! The great thing about these Designer Series Papers is that while they are great compliments to stamped and die cut images there are also many papers that don't need a lot of extra embellishments - great cards and other projects can be made without a lot of extra effort - and images on many of the papers that are part of suites with co-ordinating stamp and die sets can of course be "fussy" cut - just a little patience required if you don't have the dies! For the cut out images I used on my projects I went the "fussy" cutting route - I do need the practice!
For my projects I used the following Designer Series Papers (all of which are included in the 15% Off Select Designer Series Paper Promotion that is on now until June 30, 2023!):
- Les Shoppes 12" x 12" Designer Series Paper (item 161322);
- Zoo Crew 12" x 12" Designer Series Paper (item 161304);
- Bright & Beautiful 6" x 6" Designer Series Paper (item 161449);
- Let's Go Fishing 12" x 12" Designer Series Paper (item 161534); and
- Masterfully Made 12" x 12" Designer Series Paper (item 161192);

Just a quick note about the standard tools and supplies I used to complete my projects this week:
- Paper Trimmer (item 152392) - for cutting cardstock and paper (can also be used for scoring);
- stylus and scoreboard (Simply Scored Scoring Tool - item 122334) - for scoring cardstock - to burnish all scored line to ensure crisp folds I used a Bone Folder (item 102300);
- Paper Snips Scissors (item 103579) - a nice sharp pair of scissors that makes "fussy" cutting a lot easier - a very important tool this week!;
- Stampin' Cut & Emboss Machine (item 149653) - for all die cutting and embossing;
- Take Your Pick Tool (item 144107) - the paper piercer, mini spatula, and tacky putty tips are great assists in picking up and placing small die cuts and embellishments; and
- for the main adhesive, Multipurpose Liquid Glue (item 110755).
On with the projects!
Les Shoppes Art Supply Shop Purse and Gift Card Holder


My idea for this project came from a comment made by my sister about using as a purse a handled tool box styled gift box I had made for my brother-in-law - I thought why not an art supply shop purse with gift card holder for a favourite budding artist - making a trip to a favourite art supply shop to purchase supplies using a gift card even more fun! The purse is a smaller version of my Farmhouse and Yellow Cottage gift bags (https://archiesatelier.blogspot.com/2022/04/a-few-projects-using-window-flower-box.html) and Window Wishes Bundle Christmas Cottage gift bag (https://archiesatelier.blogspot.com/2022/10/with-window-wishes-bundle-few-christmas.html). For the purse, which measures 6" tall (excluding handles) x 3 1/2" wide x 1 1/2" deep I used the following additional supplies:
- for the box a 10 1/2" x 7 1/4" piece of Basic Black cardstock (item 121045) - scored on the 10 1/2" side at 1 1/2", 5", 6 1/2" and 10" (1/2" tab is the glue tab); and scored on the 7 1/4" side at 1 1/2" on each side. When trimming the top flaps I cut straight down the center of the fold lines (angle cutting only the top of the glue tab) - I angle cut all the bottom flap tabs. Before assembling the box I glued on the DSP panels - each cut 1/8" smaller than the corresponding cardstock panels;
- for the roof sections - two 4" x 2 1/4" pieces of Basic Black cardstock - each scored at 1/2" on the 2 1/4" side (the 1/2" tab is the top of the "roof" and the handles are glued to the inner sides approximately 3/8" in from each end - the small magnetic discs - one "+" and one "-" - are glued to the middle of the inner sides - then the 7/16" x 3 15/16" DSP strips are glued on). To attach the roof sections to the top front and back flaps of the box - done before the handles and magnetic discs are attached - I drew placement lines down the inner sides of the roof sections - 1/4" in from each edge from the top fold line then applied glue to the top front and back flaps of the box. Before gluing the roof sections to the box I glued on the DSP panels (except for the strips on the inner side of the 1/2" tab) - each DSP panel cut 1/16" smaller than the corresponding cardstock panel;
- for the handles - two 8 1/2" x 1/2" strips of Basic Black cardstock - scored 3 times down the length at 1/8" intervals - before attaching the handles I slightly curved the handles using my Bone Folder;
- Pecan Pie ink (item 161665) - sponged around the edges of the cut out art shop and potted shrubs; and
- Stampin' Dimensionals (item 104430) - to attach the art shop cut out, and the potted shrub next to the door. To add a little more support to the shop cut out to the back of it I glued a piece of cardstock on which I had traced the outline of the shop cut out - cutting just inside the pencil lines. I cut one Dimensional in half and stacked them on the far left side of the potted shrub next to the door - using Multipurpose Liquid Glue on the right side.
To make the gift card holder I used the Mini Pocket Envelope dies (item 159167 - available as one of the Online Exclusives) - cutting one complete pocket envelope from Les Shoppes DSP and then an additional back inside portion from a small piece of Zoo Crew DSP. The hedgehog artist was cut from the Zoo Crew DSP. I added an eyelet, and tied the gift card holder to the purse handle using some 3/8" gross grain "almost Azure Afternoon" ribbon I picked up at Dollar Tree. The yellow and white striped DSP used on the roof is also from Les Shoppes DSP.
Les Shoppes Small Art Supply Shop Gift Tote


Continuing the art supply shop theme . . . for this gift tote that measures 3 1/4" tall (excluding handles) x 3 1/4" wide x 1" deep (just the right size to hold a few tubes of watercolour paint!) I used the following additional supplies:
- a 9" x 4 1/4" piece of Calypso Coral cardstock (item 122925), scored on the 9" side at 1", 4 1/4", 5 1/4", and 8 1/2" (1/2" tab is the glue tab); and scored on the 4 1/4" side at 1" (bottom flaps);
- Calypso Coral cardstock for four circle frames used for the handles - cut using the largest and third largest circle dies from Stylish Shapes dies (item 159183) - for each handle I glued two frames together, wrong sides together, so that there would be a finished edge on both sides;
- Calypso Coral cardstock for the matting tag - both the cardstock and paint tube tags were cut using the Tailor Made Tags dies (item 155563);
- Pecan Pie ink (item 161665) - sponged around the edges of all cut outs, the paint tube and Calypso Coral cardstock tags, and the edges of the top and bottom DSP strips; and
- Mini Stampin' Dimensionals (item 144108) - to attach the potted shrub next to the door and the flower pot.
I added an eyelet to the top of the double tag and tied the tag to the handle with some more of my Dollar Tree "almost Azure Afternoon" 3/8" gross grain ribbon. The "sidewalk" paper is also from Les Shoppes DSP.
Zoo Crew Cards - and a Tag Too!


- Basic Black cardstock (item 121045) for the card base;
- Basic White cardstock (item 159276) for the clouds (stamped and die cut using the Playing In The Rain stamp set - item 160542 - and co-ordinating Playing In The Rain dies - item 160550), and the inside panel;
- Stazon Jet Black Ink (item 101406) to stamp the clouds, and the sentiment from the Lighting The Way stamp set (item 160868);
- Pretty Peacock/Lost Lagoon patterned paper from the Masterfully Made 12" x 12" Designer Series Paper (item 161192) for the 3 1/4" x 1 7/8" front background panel and 2 3/4" x 1/2" strip on the inside panel (I cut the flag end using my Paper Snips Scissors); and
- Nested Essentials dies (item 161597) to cut the banner from a black & white patterned piece of the Zoo Crew DSP.


For this 4" x 3" top-fold card I used the following additional supplies:
- Pretty Peacock cardstock (item 150880) for the card base;
- Basic White cardstock (item 159276) for the inside panel;
- Pretty Peacock/Lost Lagoon striped patterned paper from Bright & Beautiful 6" x 6" Designer Series Paper (item 161449) for the background panel;
- Nested Essentials dies (item 161597) to cut the small banner from a piece of black & white patterned Zoo Crew DSP; and
- Stazon Jet Black Ink (item 101406) to stamp the sentiment, from the Crafting With You stamp set (item 161219).


- Basic Black cardstock (item 121045) for the card base, and the small die cut leafy sprigs;
- Pecan Pie cardstock (item 161717) for the 4 3/8" x 2 3/8" embossed panel - embossed using the Timber 3D Embossing Folder (item 156406) that had been inked with Pecan Pie ink (item 161665) - additional Pecan Pie ink sponged around the edges;
- Lemon Lime Twist cardstock (item 144245) for the inside panel;
- Lemon Lime Twist patterned paper from Bright & Beautiful 6" x 6" Designer Series Paper (item 161449) for the 3 3/4" x 1 3/8" embossed panel - embossed using the Splatters Embossing Folder from the Stripes & Splatters 3D Embossing Folders (item 157980) - Old Olive ink (item 147090) sponged over the embossed panel;
- Coastal Cabana cardstock (item 131297) for the 4" x 1 1/2" panel - splatters added using the Stampin' Write Basic Black Marker (item 162481) by flicking the brush tip against the marker lid - and the sentiment rectangle (cut using the Nested Essentials dies - item 161597);
- Grove dies (item 157844) to cut the three large leafy sprigs from black & white patterned Zoo Crew DSP and the two small leafy sprigs from Basic Black cardstock;
- Stylish Shapes dies (item 159183) to cut the sentiment-backing circle from black & white patterned paper from Zoo Crew DSP; and
- eight Parakeet Party and Tahitian Tide shaded dots from the recently retired 2022-2024 In Colour Matte Decorative Dots (item 159186) added to the front panel (including the center of the flower on the dancing deer's skirt).


For this leopard ballerina tag I used the following additional supplies:
- Pretty Peacock cardstock (item 150880) for the base tag;
- Pretty Peacock patterned paper from the Hello, Irresistible 6" x 6" Designer Series Paper (item 161139 - one of the Online Exclusives - although not currently available Stampin' Up! has advised that it is expected to be available to order the week of June 26, 2023) for the torn main background;
- black & white patterned paper from Zoo Crew DSP for the bottom strip and the circle;
- Tailor Made Tags dies (item 155563) to cut the cardstock and DSP tags/tag sections, and the Basic Black cardstock (item 121045) hole re-enforcer;
- Stylish Shapes dies (item 159183) to cut the small DSP circle;
- Mini Stampin' Dimensionals (item 144108) to attach the ballerina to the tag; and
- Black & White 1/4" Gingham Ribbon (item 156485) for the bow.
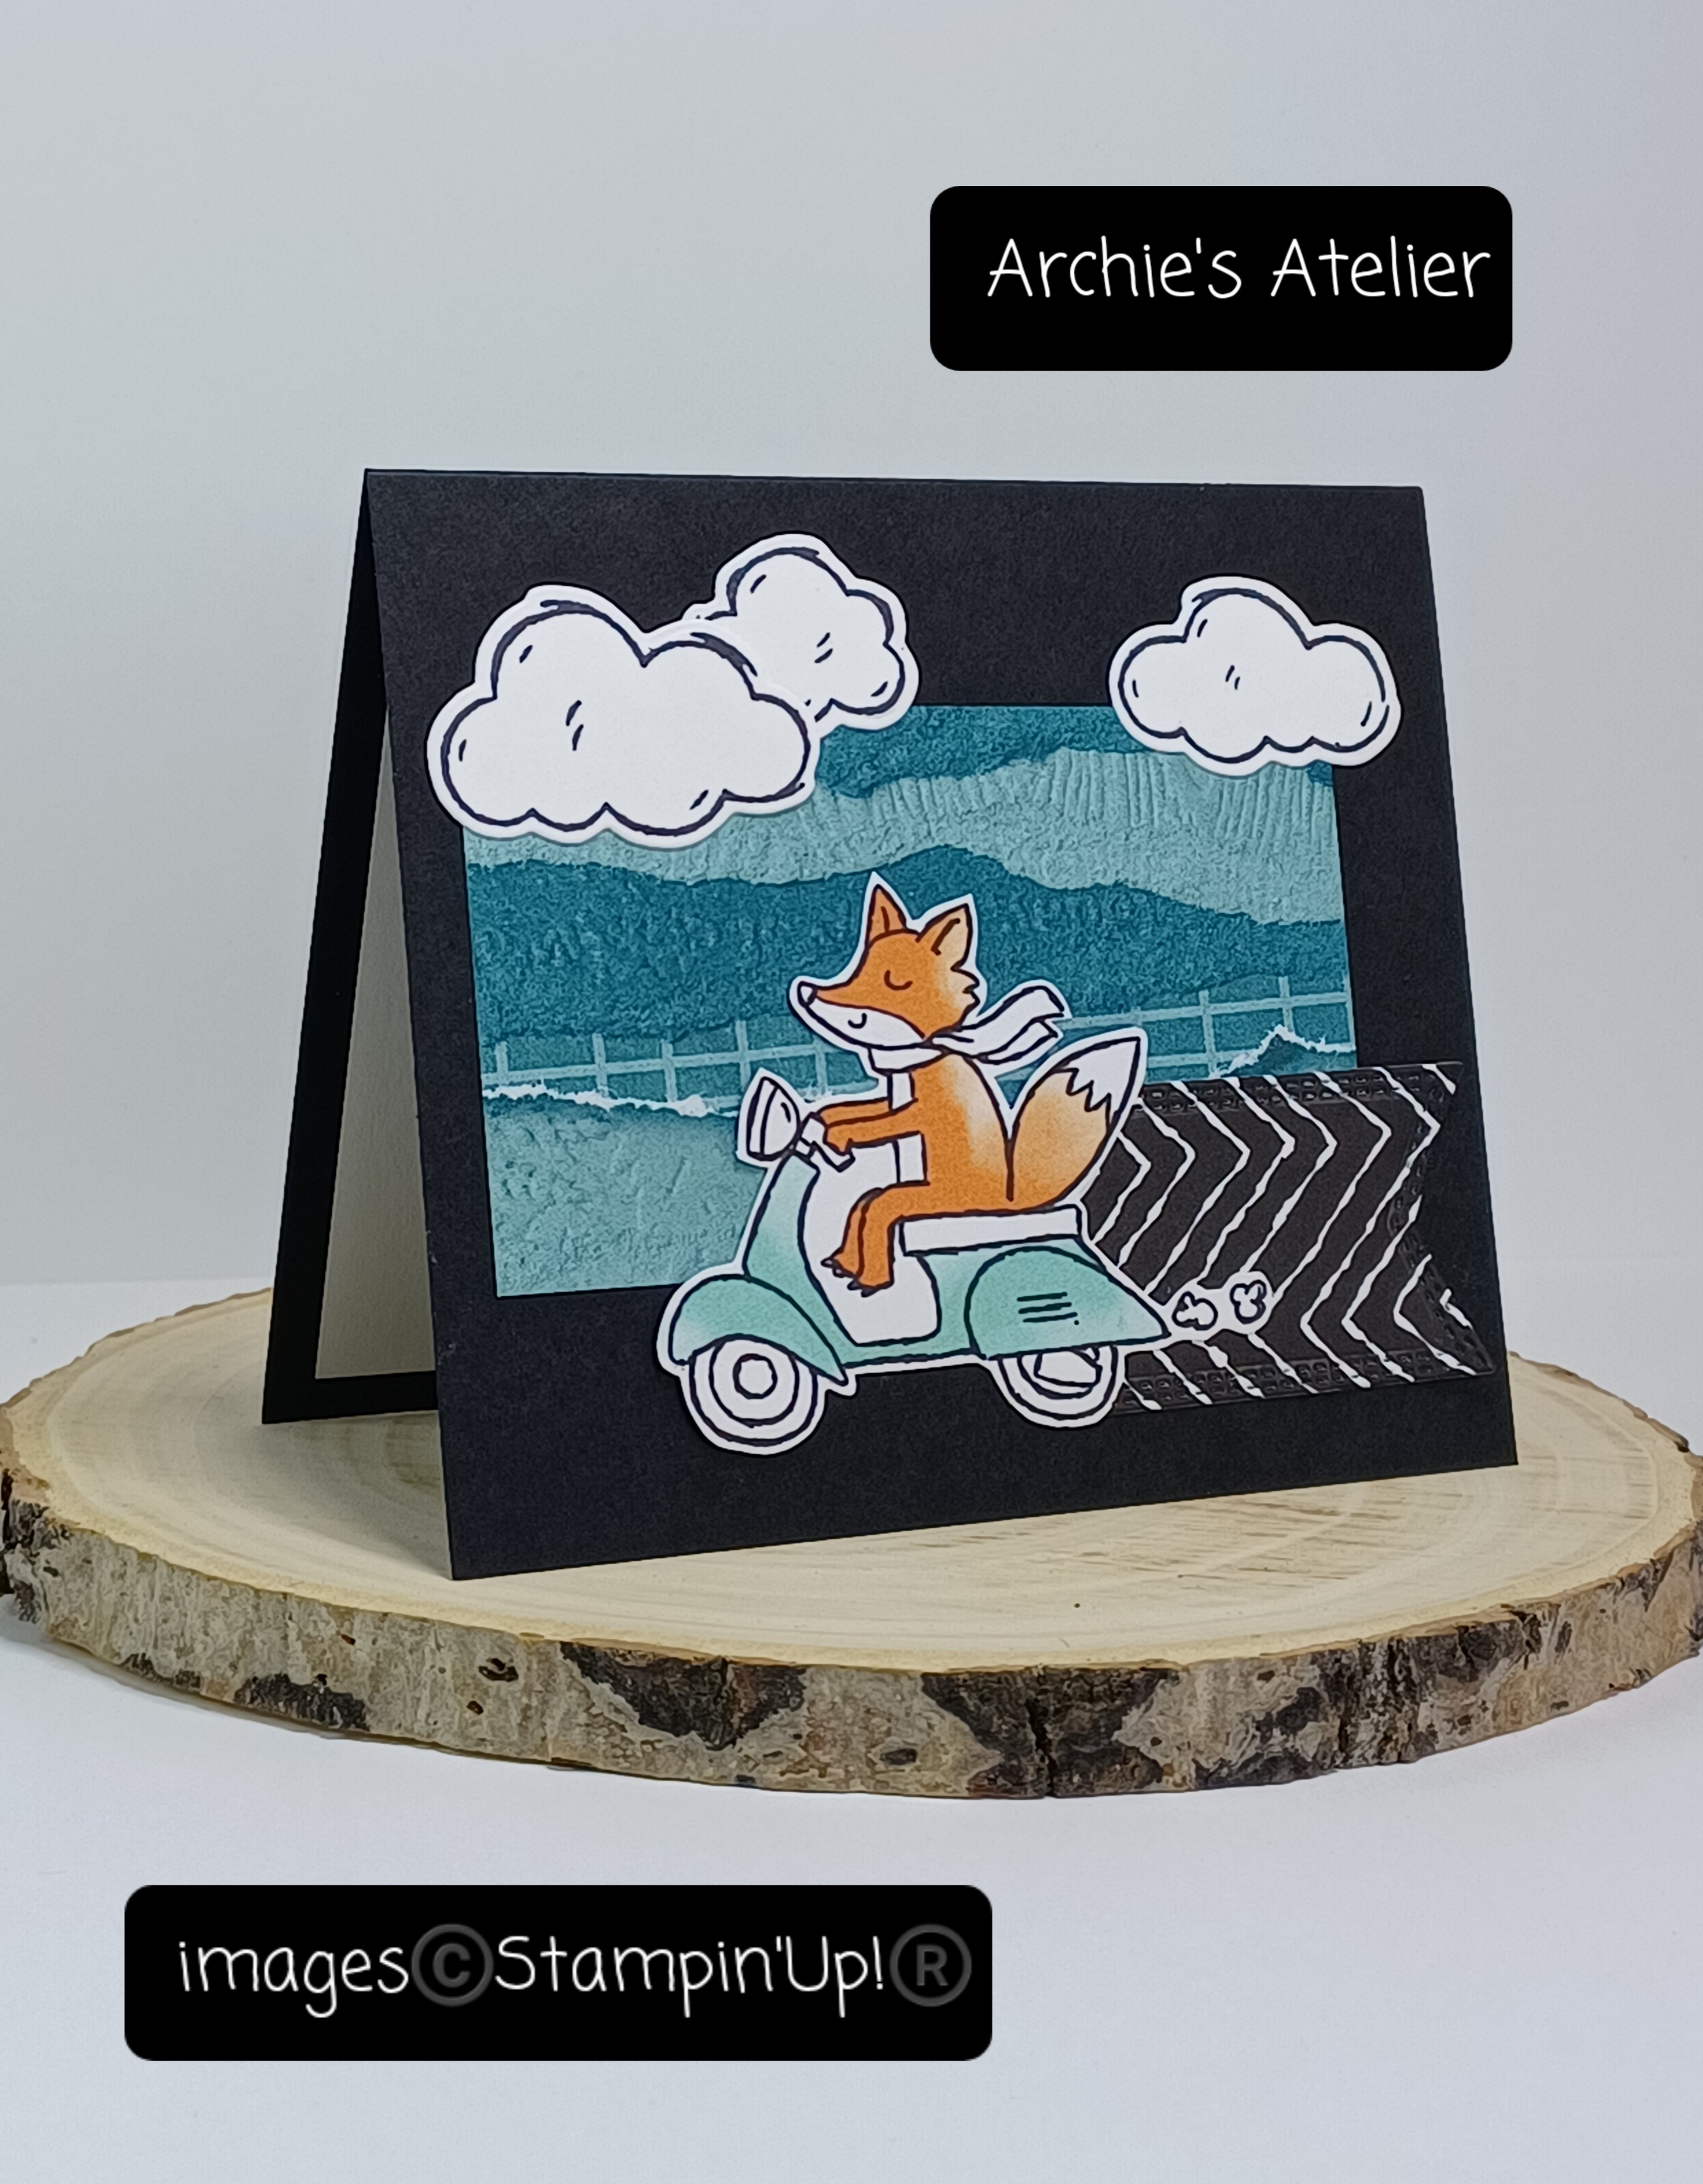
Let's Go Fishing Card


- Very Vanilla Thick cardstock (item 144237) for the card base and sentiment rectangle;
- Night of Navy cardstock (item 100867) for the matting panels (cut to allow a 1/16" border);
- watercolour paper for the double circle frame - two frames cut using circle dies from Stylish Shapes dies (item 159183) and sponged with Pecan Pie ink (item 161665), lightly spritzed with water (Stampin' Spritzers - item 126185) and blotted dry with paper towel;
- Pecan Pie ink to sponge the edges of the DSP panels and edges of all cut outs;
- Stazon Jet Black Ink (item 101406) to stamp the sentiment, from the Gone Fishing stamp set (item 161535);
- Nested Essentials dies (item 161597) to cut the sentiment rectangle;
- Stampin' Dimensionals (item 104430) to attach the cut out fish on the card front;
- Rustic Metallic Adhesive-Backed Dots (item 159082) - four large dots added to the "port hole" frame;
- Very Vanilla baker's twine (Baker's Twine Essentials Pack - item 155475) for the bow - the bow and the ends secured with tiny dabs of Multipurpose Liquid Glue.
I "freelanced" the envelope - just folding the DSP to fit the card - using a corner-rounder punch to cut the top flap corners and then sponging all edges with Pecan Pie ink.
And finally . . .
Masterfully Made Friend Card


The Masterfully Made DSP is perfect for "no fuss" collage cards! To complete this 5" x 3 1/2" top-fold card I used the following additional supplies:
- Basic Black cardstock (item 121045) for the card base;
- Basic White cardstock (item 159276) for the inside panel;
- Lemon Lime Twist cardstock (item 144245) for the sentiment tag (cut after the sentiment was stamped using the small tag die included with the Mini Pocket Envelope dies - item 159167 - available as one of the Online Exclusives); and
- Stazon Jet Black Ink (item 101406) to stamp "friend" from the "You're a great friend" sentiment from the Gorgeously Made stamp set (item 161193) - before inking the stamp I used a sticky note to cover up the remainder of the sentiment - removing the sticky note before stamping - sometimes in the excitement this step can be forgotten!
I used some black paper ribbon from Dollarama for the bow and some tiny staples to secure the ribbon. I added the tiny staples to the inside panel before the completed panel was glued to the card base.
For the envelope I used some leftover paper from the recently retired Perfectly Penciled 12" x 12" Designer Series Paper (item 159244) - using an opened up envelope as a template that I traced around onto the DSP.
Thank you for visiting my blog! As always I had a lot of fun working on these projects!
If you are interested in purchasing any of the available Stampin' Up! products I have used in my projects, and you live in Canada and do not have a Stampin' Up! demonstrator, please do not hesitate to visit my online store found on my website https://archiesatelier.stampinup.net/ at your convenience, or simply click under the "Shop With Me" tab on the right sidebar of my blog, which will take you directly to my website and online store. I very much appreciate your business! The digital version of the May 2023-April 2024 Annual Catalogue is available for browsing at your convenience on my website. Don't forget to also check out the Clearance Rack and the full selection of the products available as Online Exclusives! New Online Exclusives will be introduced on July 6, 2023!
Have fun creating!
Laurel
*It has come to my attention that quite often email correspondence from me is delivered to the recipient's spam or junk mail folder - if you have corresponded with me I have replied so be sure to check your spam or junk mail folder! Thank you!!

Comments
Post a Comment