Birds Of A Feather Flocking Together!


All the bird images I used I stamped on watercolour paper using Stazon Jet Black Ink (item 101406), and coloured using Stampin' Up! Classic Stampin' Pad inks. The images from both Bird's Eye View and Perched In A Tree were fussy cut using my Paper Snips Scissors (item 103579 - although currently unavailable Stampin' Up! advises that the Paper Snips Scissors should again be available for ordering the week of September 11. 2023).
For die cut foliage and flowers I used the following dies - cutting some from cardstock, and some from watercolour paper and colouring with inks:
- Aspen Tree dies (item 159798) - foliage "cluster";
.jpg)
Aspen Tree dies - 159798
- Around The Bend dies (item 160649) - double leaf;
.jpg)
- Grove dies (item 157844) - 5-leaf and 3-leaf sprigs;
.jpg)
- Splendid Stems dies (item 159676 - currently available on the Clearance Rack) - leafy outline branches; and
.jpg)
- Dainty Delight dies (item 160674) - Queen Anne's Lace, small daisies, and flower centers.
All sentiments used are from the Gorgeously Made stamp set (item 161193), and were stamped using Stazon Jet Black Ink.

Just a quick note about the additional standard tools and supplies used to complete the projects this week:
- Paper Trimmer (item 152392) - for cutting cardstock and paper, and to score card fold lines. To ensure crisp folds I burnished the folds with my Bone Folder (item 102300);
- Stampin' Cut & Emboss Machine (item 149653) - for all die cutting and embossing;
- Take Your Pick Tool (item 144107) - tacky putty tip very handy for picking up and placing small die cuts and embellishments; and
- for the main adhesive, Multipurpose Liquid Glue (item 110755).
Now on with the projects!


Additional supplies used to complete this small hanging project:
- Basic Black cardstock (item 121045) for the 4 3/8" x 3 5/8" base matting panel (the edges scraped with the blade of my craft knife), and for the die cut flag - cut using the largest flag die from Nested Essentials dies (item 161597);
.jpg)
Nested Essentials dies - 161597
- watercolour paper for the 4 1/4" x 3 1/2" base panel - this was trimmed from a larger panel I had leftover from a few weeks ago when I was playing with the "bubble technique" (https://archiesatelier.blogspot.com/2023/08/it-all-starts-with-ink-hello-one-of-my.html) using Memento Tuxedo Black Ink Refill (item 133456) - and for the four die cut foliage clusters, three flowers and flower centers, birds, and sentiment banner;
- small piece of Pretty Peacock patterned paper from the Online Exclusive Hello, Irresistible 6" x 6" Designer Series Paper (item 161139) for the 1 1/2" x 2: panel for the center of die cut Basic Black cardstock flag;
- Gorgeously Made dies (item 161202) to cut the sentiment label, over which I sponged Pool Party ink (item 147107) and then spritzed with water (Stampin' Spritzers - item 126185), blotting dry with paper towel. To take advantage of the 10% Bundle Savings the Gorgeously Made stamp set and co-ordinating Gorgeously Made dies can be purchased together as the Gorgeously Made Bundle (item 161203). Although the dies, and consequently the Bundle, are not currently available for ordering Stampin' Up! advises that the dies, and consequently the Bundle, should again be available for ordering the week of September 18, 2023;
.jpg)
Gorgeously Made dies - 161202
(Bundle - item 161203)
- Pool Party ink and Pumpkin Pie ink (item 147086) to colour the birds;
- Blending Brushes (item 153611) and Small Blending Brushes (item 160518) to apply ink to the die cut foliage, flowers, and flower centers: Old Olive ink (item 147090) and Mossy Meadow ink (item 147111) for the foliage; Daffodil Delight ink (item 147094) for the flowers; and Pecan Pie ink (item 161665) for the flower centers;
- Stampin' Dimensionals (item 104430) to attach the birds to the flag panel - I added little dabs of Multipurpose Liquid Glue to attach the feet to the sentiment label; and
- Linen Thread (item 104199) to tie the completed panel to the approximately 5 1/2" long stick (freshly pruned from my hedge!).
The light grey eyelets added to the top of the panel were purchased at my local scrapbooking shop.


On a piece of all-over sticky note I stamped the bird and book images and cut them out to use as masks over the bird and book images I had stamped on a piece of watercolour paper. After securing the masks I used the fractured text stamp from the Gorgeously Made stamp set (item 161193) and Stazon Jet Black Ink to stamp over the watercolour paper images. After removing the masks I coloured the images - using Berry Burst ink (item 147143) and Daffodil Delight ink (item 147094) for the bird; Shaded Spruce ink (item 147088) and Pecan Pie ink (item 161665) for the books; and Shaded Spruce ink around the images. The image circle was cut using the largest circle die from the Stylish Shapes dies (item 159183). The sentiment was stamped on watercolour paper, coloured with Shaded Spruce ink (applied in a wash using a paint brush), and the sentiment label was cut using the long narrow banner die from Stylish Shapes dies - both ends torn.

Stylish Shapes dies - 159183
Additional supplies used to complete this 5" square top-fold card:
- Shaded Spruce cardstock (item 146981) for the card base;
- Basic Black cardstock (item 121045) for the 4 7/8" square and 4 1/8" square matting panels, and for the sentiment matting label - which was also cut using the long narrow banner die from Stylish Shapes dies with ends torn;
- Basic White cardstock (item 159276) for the 4 3/4" square inside panel;
- Shaded Spruce wavy checked pattern paper from the new Joy of Christmas 12" x 12" Designer Series Paper (item 161958 from the September-December 2023 Mini Catalogue) for the 4 3/4" square matting panel, and 3 7/8" x 3/4" strip for inside panel;
- Berry Burst patterned paper from Masterfully Made 12" x 12" Designer Series Paper (item 161192) for the 4" square panel, and 2 1/2" x 1/2" strip for inside panel; and
- four Pretty Peacock gems from the Tinsel Gems Four-Pack (item 161623) added to the front panel.


Additional supplies to complete this 2 7/8" x 2 1/4" top-fold card:
- Gray Granite cardstock (item 146983) for the card base;
- Basic Black cardstock (item 121045) for the 2 3/4" x 2 1/8" matting panel;
- Pebbled Path cardstock (item 161722) for the die cut circle (cut using the Stylish Shapes dies - item 159183), die cut flower (cut using the Dainty Delight dies and with a little Basic Gray ink - item 149165 - sponged around the petal tips), and die cut leafy outline branch (cut using the Splendid Stems dies);
- Basic Gray ink, Garden Apple Green ink (item 147095), and Pumpkin Pie ink (item 147086) to colour the bird - I used the bullet end of the Basic Black Stampin' Write Marker (item 162481) to darken the frames of the glasses, and then "painted" the frames and upper part of the lenses with Wink of Stella Clear Glitter Brush (item 141897) - at least I can give my little stamped bird some style! Unfortunately the Wink of Stella Clear Glitter Brush is not currently available for ordering and as of this date Stampin' Up! is not able to confirm timing of when it will again become available for ordering😞;
- Stampin' Dimensionals (item 104430) to attach the bird; and
- three Basic Gray dots from Classic Matte Dots (item 158146) added to front panel - including one large dot for the flower center.
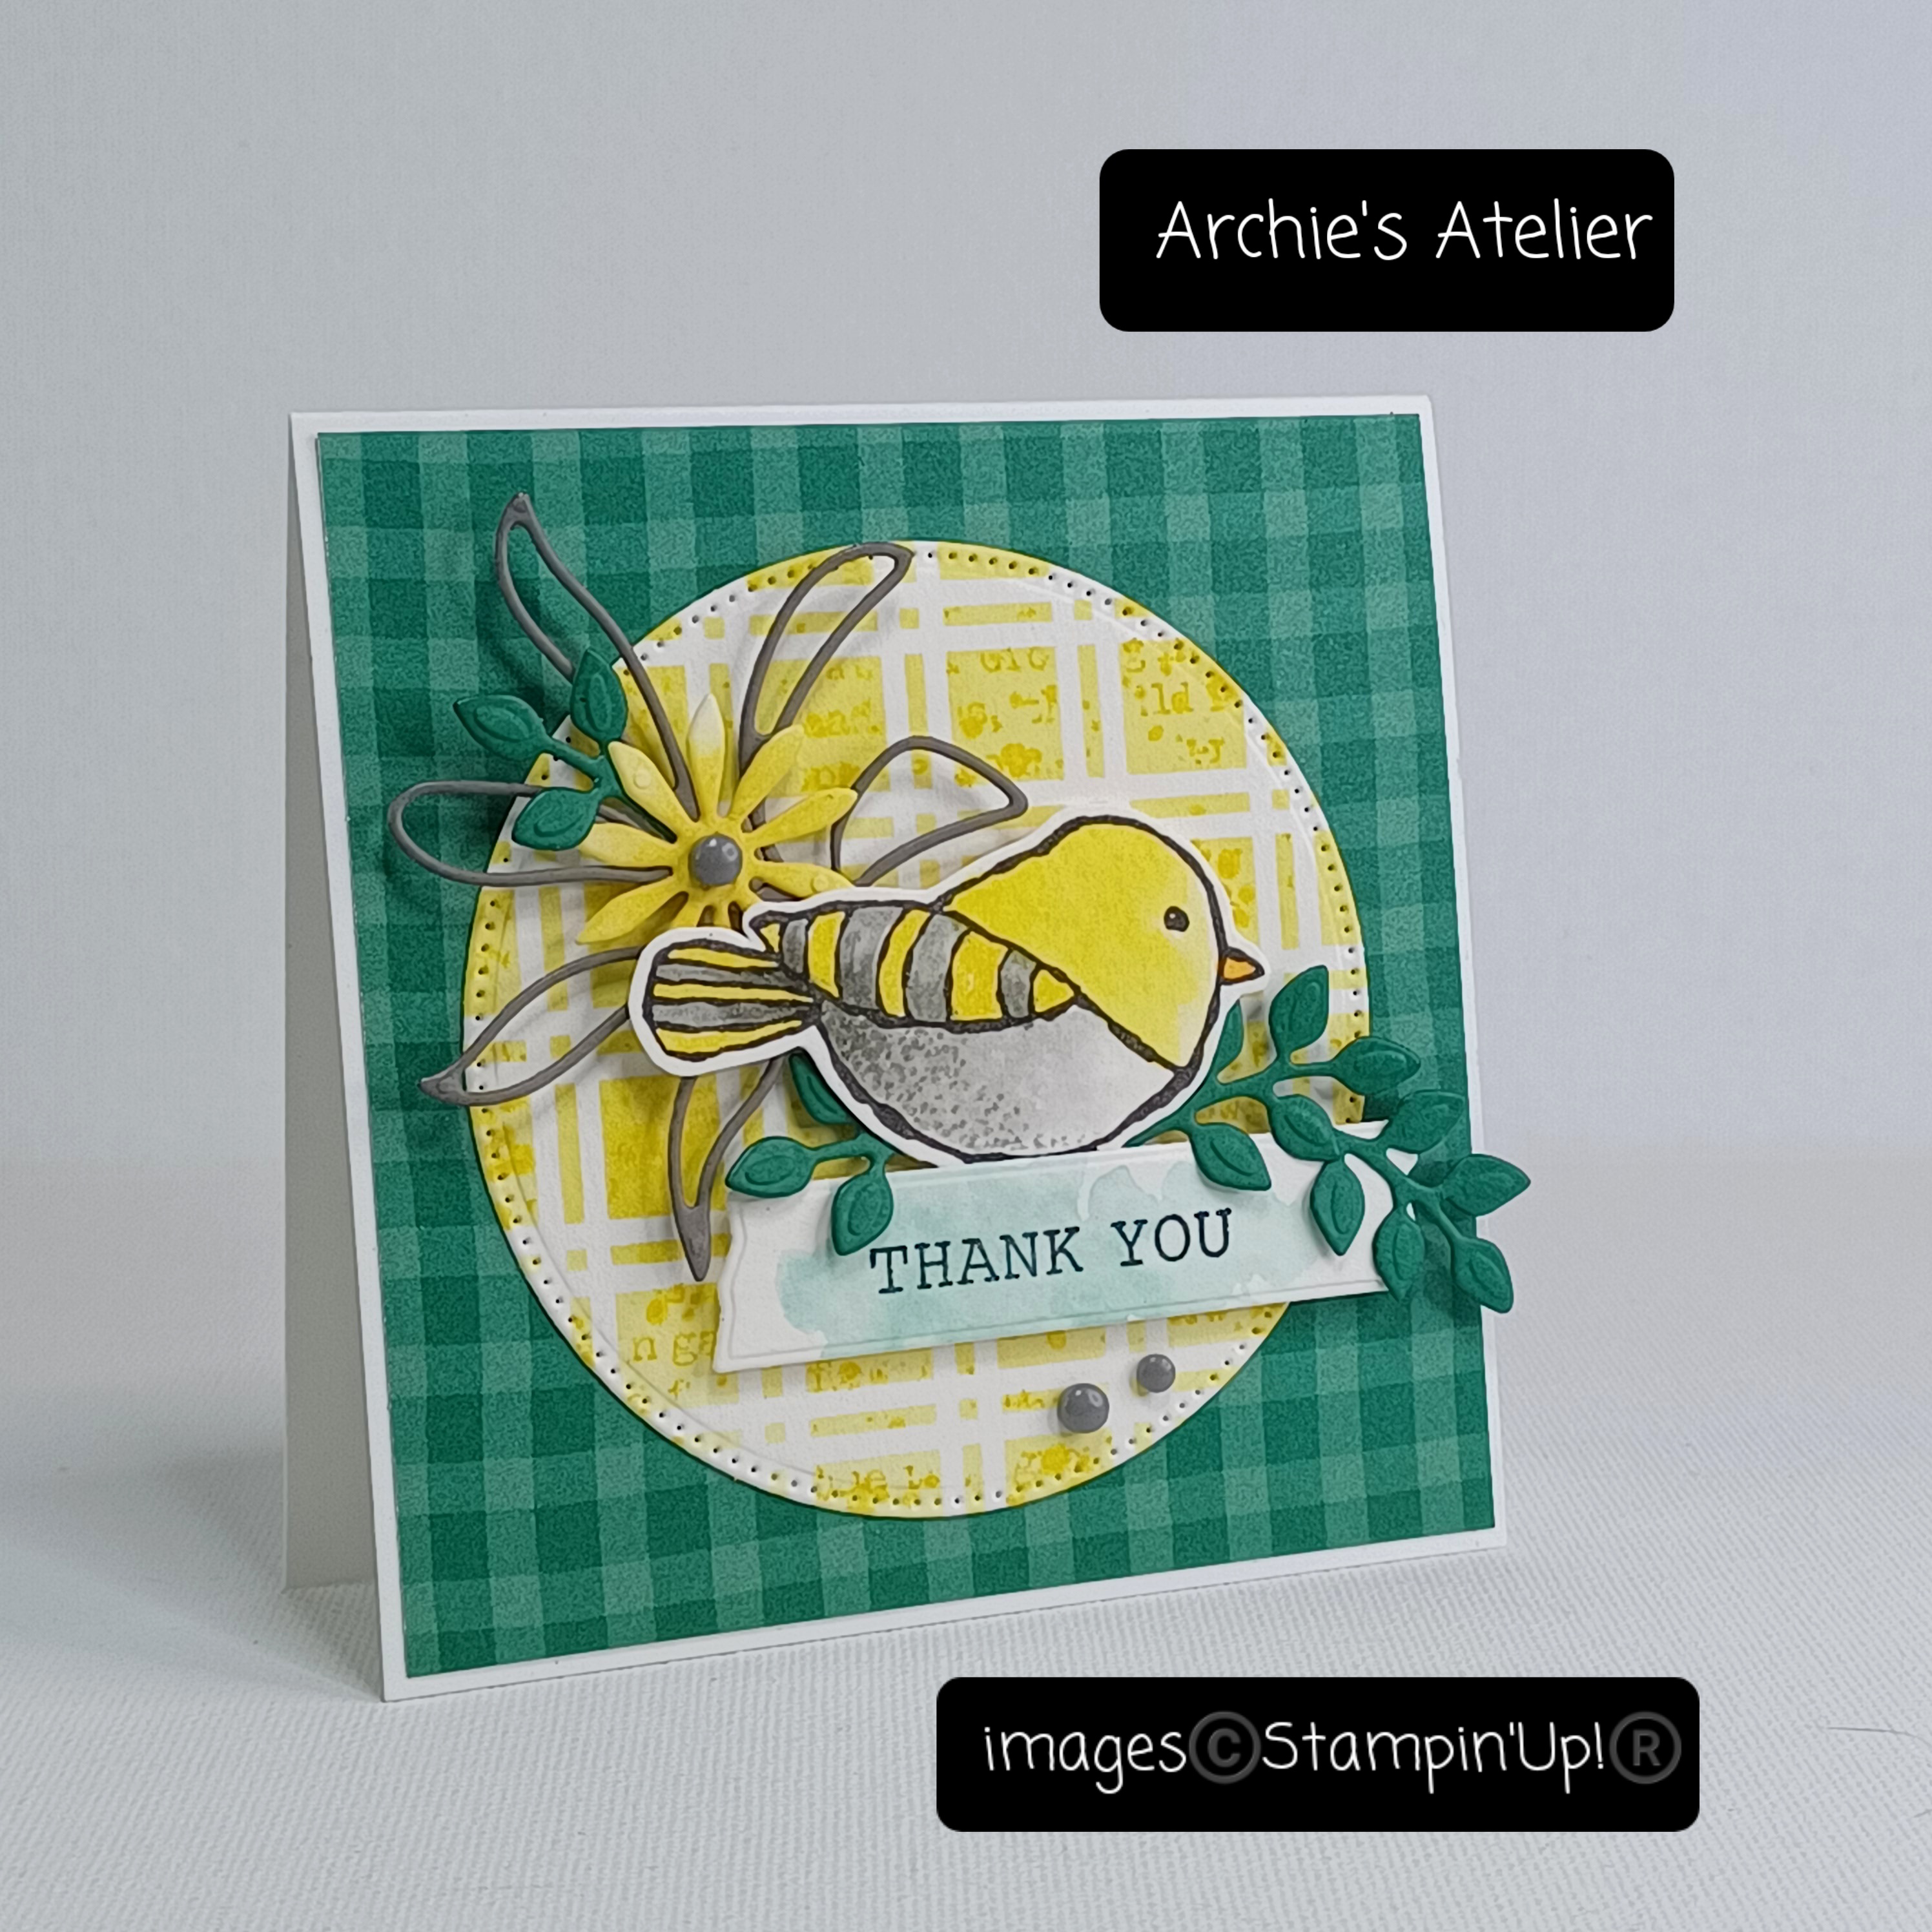


Additional supplies used to complete this 3 3/4" square top-fold card:
- Basic White Thick cardstock (item 159229) for the card base;
- Shaded Spruce wavy checked patterned paper from Joy of Christmas 12" x 12" Designer Series Paper (item 161958 - from the September-December 2023 Mini Catalogue) for the 3 5/8" square matting panel, and the 2 3/8" x 1/2" strip for the inside panel;
- Shaded Spruce cardstock (item 146981) for the 5- and 3-leaf sprigs - cut using the Grove dies, and for the inside panel's trimmed leafy outline branch cut using the Splendid Stems dies;
- Pebbled Path cardstock (item 161722) for large leafy outline branch (cut using the Splendid Stems dies);
- watercolour paper for the die cut/stenciled/stamped circle, bird, two small flowers, and sentiment label. Using one of the Blending Brushes (item 153611) I applied Daffodil Delight ink (item 147094) through the small checked design stencil from Artistic Mix Decorative Masks (item 159178) onto the die cut watercolour paper circle - while mask was still held in place with some low-tack tape, I used Daffodil Delight ink and the fractured text and splatter stamps from the Quiet Meadow stamp set (item 155082) to stamp through the stencil. I also used some low-tack tape (folded back on itself and attached to the back of the watercolour paper circle) to hold the watercolour paper circle in place while stenciling and stamping;
.jpg)
Artistic Mix Decorative Masks (2 of the designs used in this week's projects) - 159178

- Daffodil Delight ink, Basic Gray ink (item 149165), and Pumpkin Pie ink (item 147086) to colour the bird;
- Daffodil Delight ink (applied with one of the Blending Brushes) to colour the two flowers;
- Gorgeously Made dies (item 161202) to cut the sentiment label, which - was coloured with Pool Party ink (item 147107) applied in a wash using a paint brush;
- Stampin' Dimensionals (item 104430) to attach bird and sentiment label to circle; and
- three Basic Gray dots from Classic Matte Dots (item 158146) added to card front - including one large dot added to flower center.
And finally . . .


Using the largest circle die from Stylish Shapes dies I cut two circles: one from watercolour paper (which I stenciled/stamped using Pool Party ink - item 147107 - used the stencil from Artistic Mix Decorative Masks shown on the left in the photo provided with the previous project - and the splatter stamp from the Quiet Meadow stamp set - item 155082 - and then after removing stencil lightly splattered with water and blotted dry with paper towel; and one from lightweight corrugated cardboard (salvaged from a packing box), which I tore approximately in half and glued to the bottom of the watercolour paper circle.
Additional supplies used to complete this 4 1/2" x 3 1/2" top-fold card:
- Very Vanilla Thick cardstock (item 144237) for the card base;
- watercolour paper for the bird, sentiment tag, and die cut Queen Anne's Lace and foliage;
- Pecan Pie cardstock (item 161717) for the 4 3/8" x 3 3/8" matting panel;
- map patterned paper from Let's Go Fishing 12" x 12" Designer Series Paper (item 161534) for the 4 1/4" x 3 1/4" panel;
- Pool Party ink to colour the three Queen Anne's Lace stems (cut using Dainty Delight dies);
- Lost Lagoon ink (item 161678) to colour the two double leaves (cut using the Around The Bend dies);
- Old Olive ink (item 147090) and Mossy Meadow ink (item 147111), applied with Blending Brushes (item 153611) to colour the two leafy clusters (cut using the Aspen Tree dies);
- Basic Gray ink, Pool Party ink, and Pecan Pie ink (item 161665) to colour the bird;
- small tag die included with the Online Exclusive Mini Pocket Envelope dies (item 159167) to cut sentiment label, which was coloured with Pecan Pie ink applied as a wash using a paint brush;
;.jpg)
.jpg)
Mini Pocket Envelope dies - 159167
- Stampin' Dimensionals (item 104430) to attach bird - I glued the two foliage clusters under the bird before adding the Stampin' Dimensionals; and
- Very Vanilla baker's twine (Baker's Twine Essentials Pack - item 155475) wrapped twice around bottom of front of card - I used tiny dabs of Multipurpose Liquid Glue to secure the center of the bow and the knotted ends.
Thank you for visiting my blog! I certainly had a lot of fun working on these projects - inspired by the birds that visit my backyard - although admittedly I have not been visited yet by any Berry Burst coloured birds!
If you are interested in purchasing any of the available Stampin' Up! products I have used in my projects, and you live in Canada and do not have a Stampin' Up! demonstrator, please do not hesitate to visit my online store found on my website https://archiesatelier.stampinup.net/ at your convenience, or simply click under the "Shop With Me" tab on the right sidebar of my blog, which will take you directly to my website and online store. I very much appreciate your business and if you need any assistance please do not hesitate to contact me (lmccoyarchie@gmail.com)! The digital versions of both the May 2023-April 2024 Annual Catalogue and the September-December 2023 Mini Catalogue can be accessed at your convenience on my website!


On September 6, 2023, Stampin' Up! also released five new Designer Series Papers - including Christmas designs - which will be available, while supplies last, as Online Exclusives. These new designs, together with all additional products available as Online Exclusives, can be viewed in my online store under the Online Exclusives category.
Be sure to also check out at your convenience in my online store all the offerings on the Clearance Rack - there are certainly some great deals - like one of my favourites - the Splendid Stems dies at just $11.25 CDN! - but products are only available while supplies last!
Have fun creating!
Laurel
*It has come to my attention that quite often email correspondence from me is delivered to the recipient's spam or junk mail folder - if you have corresponded with me I have replied so be sure to check your spam or junk mail folder! Thank you!!

these are all so cute!
ReplyDeleteThank you very much!
Delete