It All Starts With Ink!

Hello! One of my favourite things to do is to play with ink on watercolour paper panels - applying the ink using a paint brush and water or sponges and blending brushes - maybe spritzing with water and/or using stencils, and then over stamping using a variety of text/image stamps, and cutting out shapes or strips! When I don't like the initial results of a panel I may attempt to salvage it by cutting it into strips and re-assembling the strips - maybe with strips cut from another panel - on a piece of cardstock and then either die cutting or using that panel as is.
Today I am sharing a few card projects I worked on this week using as the base for each project shapes die cut from inked/stamped/stenciled/spritzed watercolour paper panels. For these projects I used no more than two colours of ink for any watercolour paper panel - and usually just one as you can get quite a variety of shades depending on the water to ink ratio (and whether using Classic Stampin' Pads or Classic Stampin' Ink Refills). For stamping text/images I used the same colour of ink as I used to colour the panel. For the stenciling used in my shared projects I used the two checked designs from the Artistic Mix Decorative Masks (item 159178) - applying ink through the masks using Blending Brushes (item 153611) and Small Blending Brushes (item 160518). I also did some stamping while the masks were still in place over the panels - I find that some low-tack tape comes in very handy to hold the masks and watercolour paper in place. After removing the masks I sometimes spritzed the panel with water (Stampin' Spriters - item 126185), blotting dry with paper towel.
To cut the base shapes I used the Stylish Shapes dies (item 159183) and the Nested Essentials dies (item 161597); and for the interior cut outs I used the Splendid Stems dies (item 159676 - and currently available on the Clearance Rack!). The base and inside shapes were cut together - I used low-tack tape to keep the dies secured on the watercolour paper panel while I passed the panel through the Stampin' Cut & Emboss Machine (item 149653).


the two checked design masks from Artistic Mix Decorative Masks - 159178

Stylish Shapes dies - 159183
.jpg)
Nested Essentials dies - 161597
.jpg)
Splendid Stems dies - 159676
For the simple cards shared this week the final watercolour paper panels are combined with additional die cuts and sometimes some Designer Series Paper! With two exceptions I used Basic White Thick cardstock (item 159229) for the card bases - for the last two cards I used Basic Gray cardstock (item 121044) for the card bases.
A few additional basic tools and supplies used this week:
- Paper Trimmer (item 152392) - for cutting cardstock and paper, and for scoring card fold lines. To ensure sharp folds I also burnished the folded lines using my Bone Folder (item 102300);
- Stampin' Cut & Emboss Machine (item 149653) - for all die cutting;
- Take Your Pick Tool (item 144107) - the tacky putty tip is extremely helpful in picking up and placing small die cuts (i.e. inset pieces for the outline stems) and embellishments; and
- for the main adhesive, Multipurpose Liquid Glue (item 110755) - I transfer the glue to a fine-tipped bottle - this makes putting glue on small pieces so much easier!
Now on with the projects!


- fractured text and splatter stamps from Quiet Meadow stamp set (item 155082) for the over stamping;

- Basic Black cardstock (item 121045) for the die cut outline stem;
- Black & White 1/4" Gingham Ribbon (item 156485) for the bow; and
- two of the Basic Black dots (one of each of the two sizes) from Classic Matte Dots (item 158146) added to each of the upper left and lower right corners of the card front.


Additional supplies to complete this 4" x 3 1/2" top-fold card:
- splatter stamp from Quiet Meadow stamp set (item 155082) for the over stamping (stamping done while mask still in place);
- Dragonflies Punch (item 154240) to punch large dragonfly from watercolour paper - coloured with Shaded Spruce ink, spritzed with water, and blotted dry with paper towel;
- small scrap of Basic White Thick cardstock for dragonfly backing panel - cut using the smallest rounded corner rectangle die from Nested Essentials dies;
- Wink of Stella Clear Glitter Brush (item 141897) - punched dragonfly and backing panel edges "painted", and backing panel splattered (splatters done by hitting the Brush against side of Bone Folder); and
- Stampin' Dimensionals (item 104430) - to attach backing panel to die cut watercolour paper circle, and Mini Stampin' Dimensionals (item 144108) - trimmed as required - to attach punched dragonfly to backing panel.
To tie the bow around the dragonfly/backing panel I used three strands of gold metallic embroidery thread.


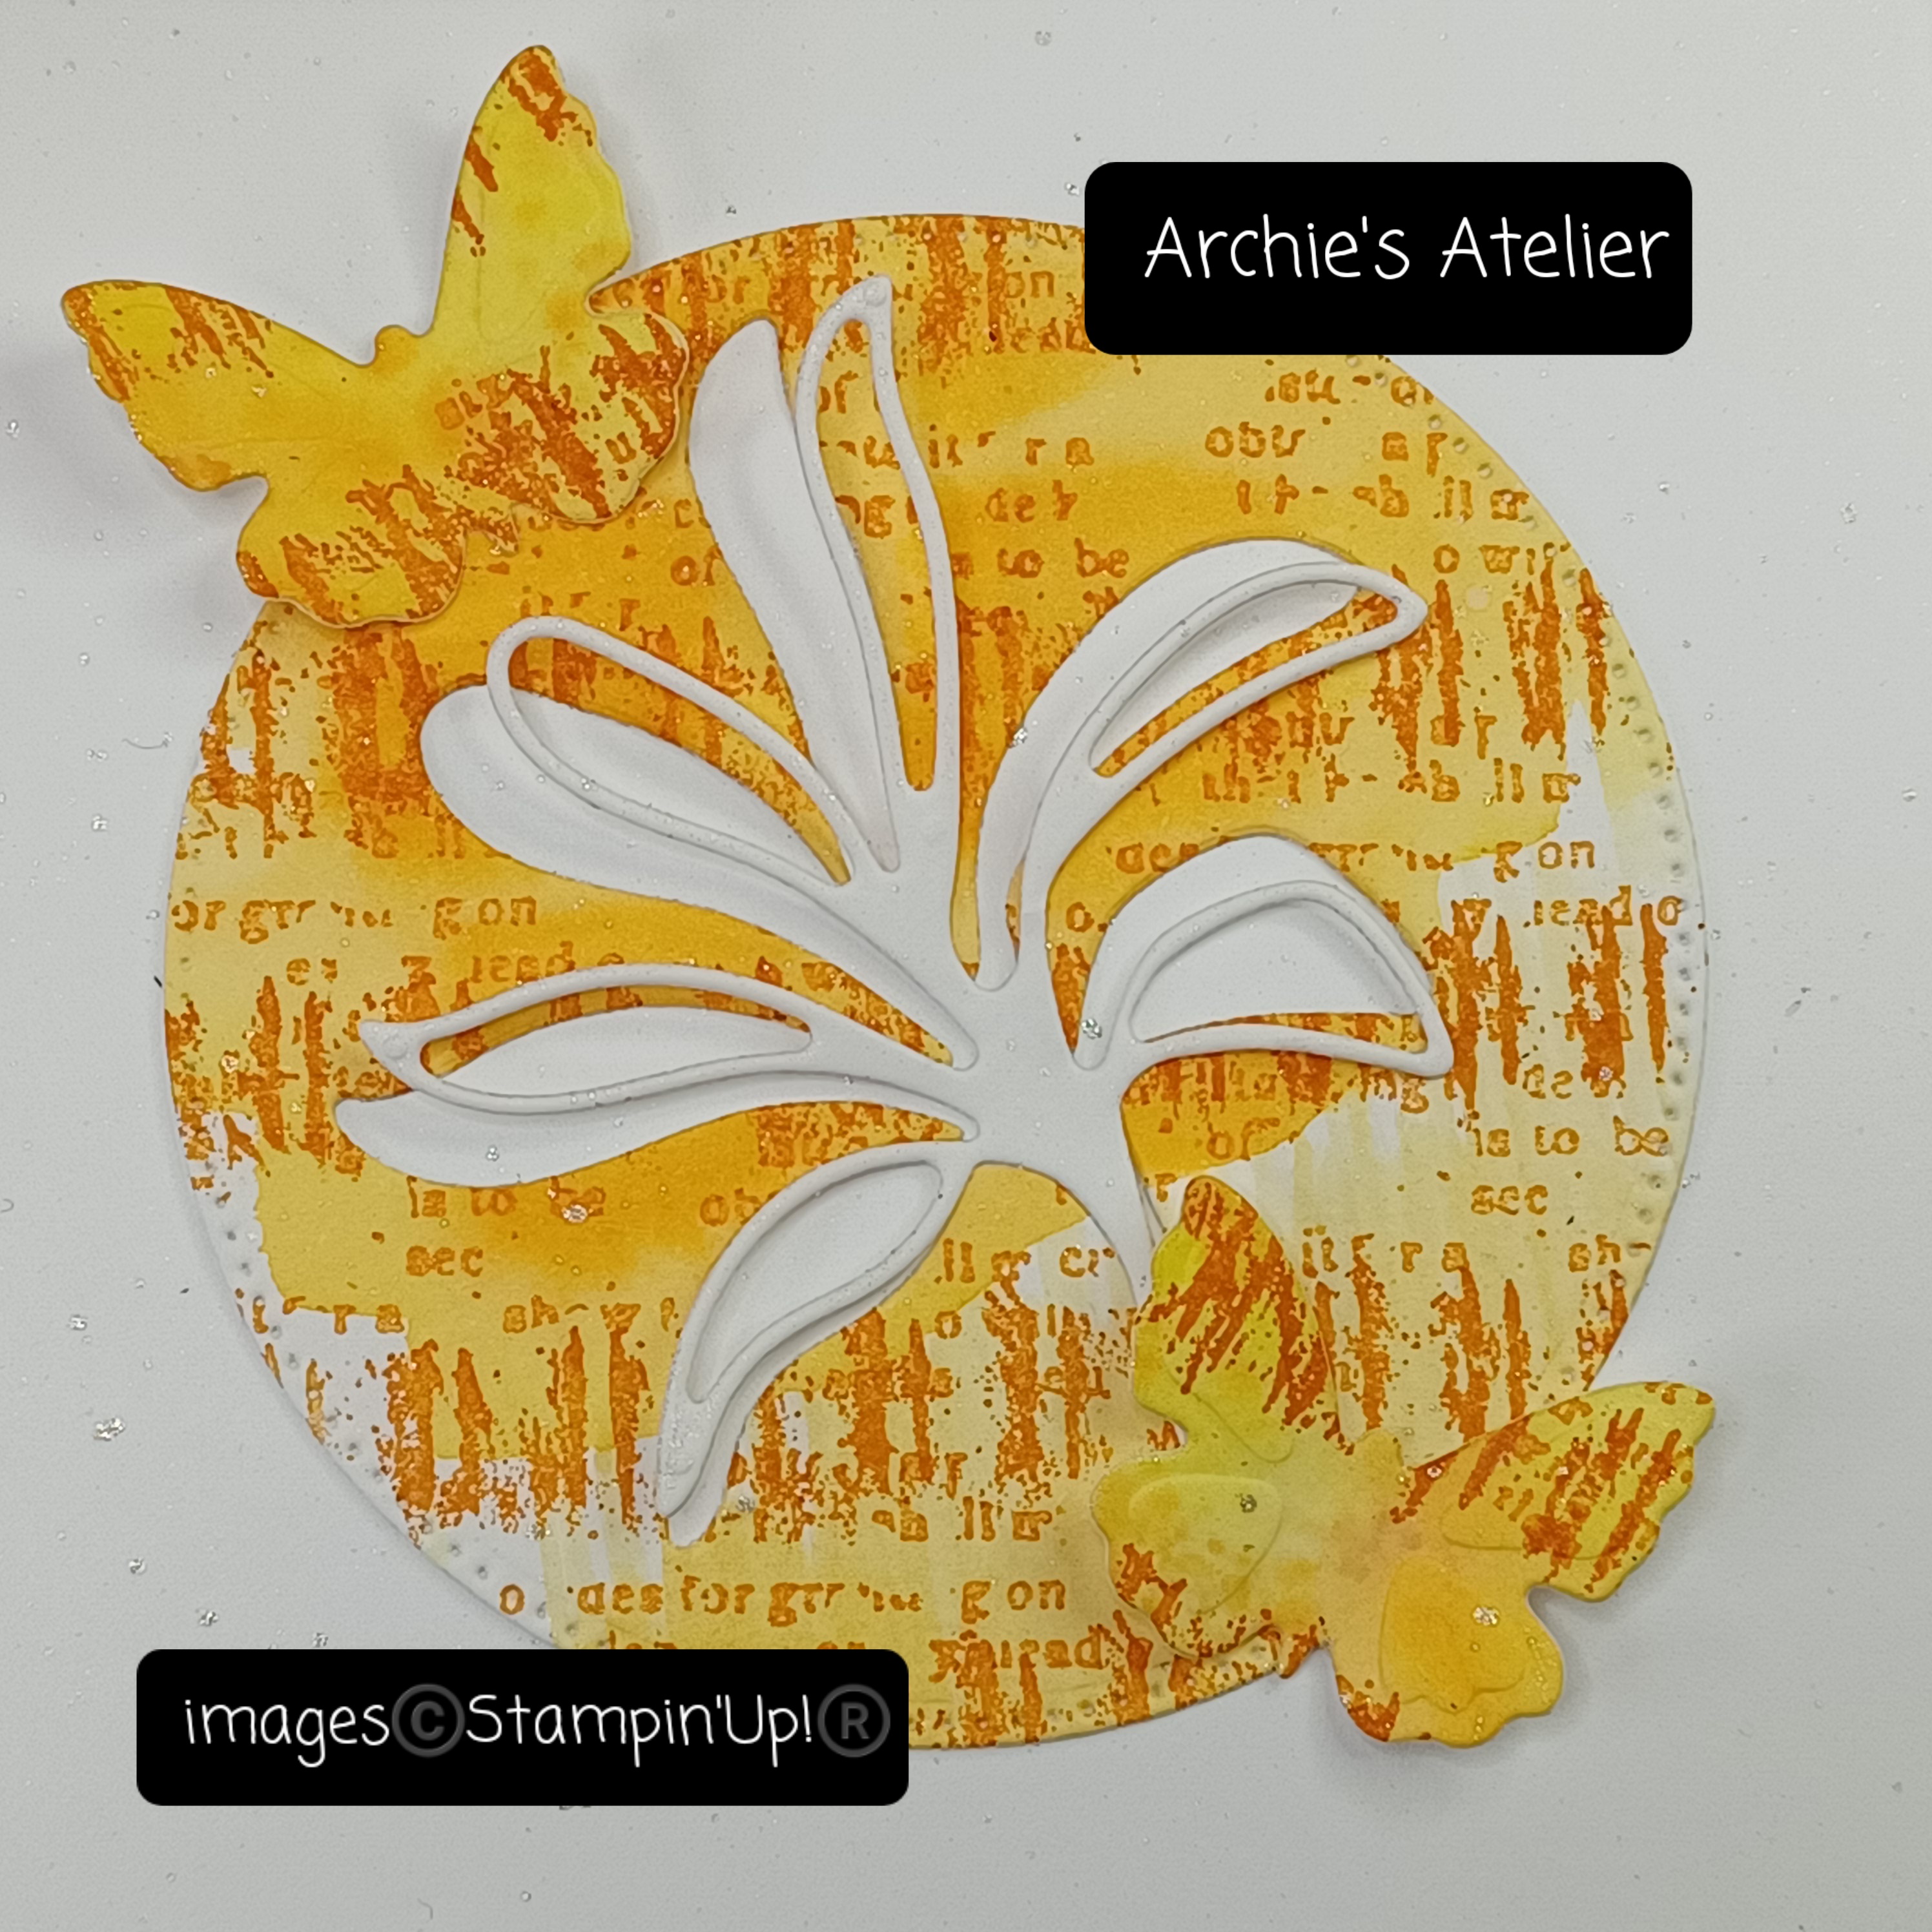
The die cut base watercolour paper rectangle and circle for these two cards (and the die cut butterflies on the second card) were cut from one large watercolour paper panel that was inked using Pumpkin Pie ink (item 147086) and Daffodil Delight ink (item 147094). The over stamping was done using Pumpkin Pie ink, and the border and fractured text stamps from the Gorgeously Made stamp set (item 161193).


Additional supplies to complete this 5 1/2" x 4 1/2" top-fold card:
- Basic Black cardstock (item 121045) for the die cut outline stem;
- black & white patterned paper from Zoo Crew 12" x 12" Designer Series Paper (item 161304) for the 2 7/8" x 3/4" and 2 3/4" X 1/2" strips along the bottom; and
- two Basic Black dots (one in each of the two sizes) from Classic Matte Dots (item 158146) added above the upper right and below the lower left corners of the die cut watercolour paper square.


Additional supplies to complete this 4" square top-fold card:
- Basic White Thick cardstock for the die cut outline stem;
- full butterfly die from Meadow dies (item 155852) to cut the two butterflies (I applied glue only to the center of the bodies and gently pulled up the sides of the wings); and
.jpg)
- Wink of Stella Clear Glitter Brush (item 141897) - to add splatters to the entire card front and to "paint" around the leaves of the outline stem and butterfly wings.


Additional supplies used to complete this 4 1/2" square top-fold card:
- Old Olive ink (item 147090) to colour and to over stamp the watercolour paper panel - large flower and splatter stamps from Quiet Meadow stamp set (item 155082) used for the over stamping;
- Grove dies (item 157844) to die cut the four leafy sprigs from the same watercolour paper panel from which the square was cut. The leafy sprigs were glued to the back of the square panel (I did not apply any glue to the leaves of the stems);
.jpg)
- Lighting The Way dies (item 160496) to cut flying insect's upper and lower body sections from watercolour paper and large wings from Vellum 8 1/2" x 11" cardstock (item 101856);
- Basic Gray ink (item 149165) and Pool Party ink (item 147107) to colour upper body - spritzed with water (Stampin' Spritzers - item 126185) and blotted dry with paper towel;
- Daffodil Delight ink (item 147094) to colour lower body;
- Wink of Stella Clear Glitter Brush (item 141897) to "paint" all wings and to add splatters to card front (I used a sticky note to cover the square when adding the splatters); and
- Mini Stampin' Dimensionals (item 144108) to attach the flying insect.
And finally . . .
The base watercolour paper shapes for the last two cards were die cut from the same watercolour paper panel that had been coloured, stenciled (using the large check decorative mask), and over stamped using Basic Gray ink (item 149165). For the over stamping I used the fractured text stamp from the Queen Bee stamp set (item 160476) and the splatter stamp from the Quiet Meadow stamp set (item 155082). Around the edges of the die cut rounded corner rectangle on the last card I sponged Pecan Pie ink (item 161665).


Additional supplies used to complete this 5 1/4" x 3 1/2" top-fold card:
- Cheerful Daisies dies (item 161296) to cut middle and detailed overlay flower sections from watercolour paper, and bottom solid section from Basic Black cardstock (item 121045);
.jpg)
- Daffodil Delight ink (item 147094) and Pecan Pie ink to colour top and middle large daisy sections;
- Dainty Delight dies (item 160674) to cut small daisy from watercolour paper (center sponged with Daffodil Delight ink);
.jpg)
- Basic Black cardstock for the two die cut outline stems;
- Basic White cardstock (item 159276) for 4 1/2" x 3" inside panel;
- large Basic Gray dot from Classic Matte Dots (item 158146) for center of small daisy; and
- Daffodil Delight/white patterned paper from Les Shoppes 12" x 12" Designer Series Paper (item 161322) for the 4 3/4" x 2 1/4" front panel, and 2 1/2" x 3/4" inside strip.


Additional supplies used to complete this 4 1/4" x 3 1/2" top-fold card:
- Basic Black cardstock (item 121045) for the 3 3/4" x 3" front matting panel, and die cut outline stem;
- Smoky Slate cardstock (item 131202) for the 3 1/2" x 2 3/4" front matting panel - splatters added using a Basic Black Stampin' Write Marker (item 162481) by flicking the brush tip against the marker lid - and the 3 3/4" x 3" inside panel;
- the smallest and third smallest circle dies from Stylish Shapes dies to cut "washer" from watercolour paper - coloured using Pecan Pie ink (item 161665) and Basic Gray ink (item 149165) - I love "rusty" bits and pieces and Pecan Pie makes the perfect rust!; and
- Gray Granite baker's twine from Baker's Twine Essentials Pack (item 155475) for the bow - ends secured with tiny dabs of Multipurpose Liquid Glue.
I did not add any sentiments to these cards - for now they are simply blank note style cards, which are always handy to have on hand. I can always add a suitable sentiment when/if needed.
Thank you for visiting my blog! I certainly had a lot of fun working on these projects - you can spend several hours (or days!) playing with inking/stenciling/stamping and die cutting watercolour paper panels so that you will have plenty on hand for future projects! Another inking technique my sister and I had a lot of fun playing with was the "bubble technique" after watching The Creativity Cave's (Dena Rekow - U.S. Stampin' Up! demonstrator) You Tube video (https://www.youtube.com/watch?v=ioPoWzJgS1c) - all that is needed is a small relatively shallow container, dish detergent, a little bit of water, ink refills (despite only having Pecan Pie [item 161669] and Memento Tuxedo Black [133456] refills on hand we still had a lot of fun!), a straw (any excuse to go to Harvey's!), and some watercolour paper. Although I didn't use any of the "bubble technique" panels in this week's shared projects I certainly now have a few on hand . . .


If you are interested in purchasing any of the available Stampin' Up! products I have used in my projects, and you live in Canada and do not have a Stampin' Up! demonstrator, please do not hesitate to visit my online store found on my website https://archiesatelier.stampinup.net/ at your convenience, or simply click under the "Shop With Me" tab on the right sidebar of my blog, which will take you directly to my website and online store. I very much appreciate your business! The digital version of the May 2023-April 2024 Annual Catalogue is available for browsing at your convenience on my website - and the digital version of the September-December 2023 Mini Catalogue will be available on September 6, 2023!

Don't forget that the coupons earned during the July Bonus Days must be redeemed on orders placed by August 31, 2023 - only a few days away! When placing your orders be sure to include the coupon codes that Stampin' Up! provided to you by email upon placement of your qualifying July orders!

Be sure to also check out at your convenience in my online store all the offerings on the Clearance Rack - there are certainly some great deals - like the Splendid Stems dies at just $11.25 CDN! - but products are only available while supplies last!
Have fun creating!
Laurel
*It has come to my attention that quite often email correspondence from me is delivered to the recipient's spam or junk mail folder - if you have corresponded with me I have replied so be sure to check your spam or junk mail folder! Thank you!!


Many shoes are called but few are chosen . . .
Comments
Post a Comment