Starting To Play With The Trucking Along Stamp Set!

Hello! Today I am sharing a few projects I worked on this week using the Stampin' Up! Trucking Along stamp set (item 162299). This stamp set is one of the Online Exclusives, and the Trucking Along Bundle (item 162306) includes both the photopolymer stamp set and the Trucking Along Builder Punch (item 162305). Although the stamp set is available for ordering the bad news is that the Bundle and Punch currently are not - Stampin' Up! advises that the Bundle and Punch are not expected to be available for ordering until the week of October 16, 2023. The good news is that the stamp set images are easy to fussy cut! This stamp set is one of the "two-step" stamping sets - including outline images and corresponding "fill-in" images. "Fill-in" images can be augmented with additional colouring in your medium of choice (inks, watercolour pencils, markers, blends etc.). Or you may choose to forego the "fill-in" images altogether and use your colouring medium of choice to "free hand" colour the outline images - or simply keep with a monochramatic colour scheme - all are great ways to use your stamps!

Just a quick summary of the standard tools and supplies I used to complete my projects this week:
- Paper Trimmer (item 152392) - for cutting paper and cardstock - can also be used for scoring but I used a stylus and scoreboard (Simply Scored Scoring Tool - item 1122334) to score cardstock fold lines and the lines on the beach tote handles. For crisp folds I burnished fold lines with my Bone Folder (item 102300). I also used the Bone Folder to gently curve the cardstock handle pieces for my projects;
- Paper Snips Scissors (item 103579) - a nice sharp pair of scissors makes fussy cutting a lot easier! Unfortunately these scissors are currently unavailable but Stampin' Up! advises that they are expected to be available for ordering the week of September 11, 2023;
- Stampin' Cut & Emboss Machine (item 149653) - for all die cutting and embossing; and
- for the main adhesive, Multipurpose Liquid Glue (item 110755).
All of the images were stamped on watercolour paper using Stazon Jet Black Ink (item 101406), and coloured with Stampin' Up! Classic Inks (using a combination of "fill-in" stamped images and watercolouring - applying stamp pad ink with small paint brushes and a little water). For watercolouring, I pressed the closed ink pad between my hands to transfer ink to the inside of the lid - ink can also be applied to a clean plastic surface. I also used Stazon Jet Black Ink for stamping all sentiments.
For three of the projects I used Pecan Pie cardstock (item 161717) that I embossed using the Timber 3D Embossing Folder (item 156406). Before embossing the cardstock I dragged my Basic Gray ink pad (item 149165) across the raised design on one inside panel of the embossing folder - when the cardstock was embossed the ink was pushed into the debossed sections of the design - adding just a little more dimension to the embossed cardstock. After trimming the embossed cardstock into the desired lengths/panel dimensions I sponged additional Basic Gray ink along all edges.

On with the projects!
Every Day Is A Fresh Start Shadow Box
(or 3D card!)

For the base of my first project I used a 4" x 4" x 1 1/2" deep wood box from Dollar Tree - these little boxes come in a few sizes and are great bases for shadow box/diorama projects. I used embossed cardstock panels for the sides, top and front, and inside bottom sections of the box. I used plain Pecan Pie cardstock panels for the bottom and back of the box - for the back panel I scored at 3/8" on all four sides - gluing the panel so that the raised lines would face out - all edges sponged with Basic Gray ink. For cutting the corners of the 3/8" wide front embossed cardstock strips I used an old art class plastic triangle with a 45 degree angle and a sharp blade in my craft knife - gluing on these strips was the final step of the project. The embossed strips on the inside bottom of the box are also 3/8" wide. To add a little dimension I used Mini Stampin' Dimensionals (item 144108) to attach the truck, clouds, and behind the first tree at the front of the truck.


To complete this little project I also used the following additional supplies:
- Pecan Pie patterned paper from Glorious Gingham 6" x 6" Designer Series Paper (item 163170) - back and bottom panels;
- Boho Blue/Azure Afternoon patterned paper from Fresh As A Daisy 12" x 12" Designer Series Paper (item 161289) for inside side and top panels;
- Pecan Pie cardstock cut with the curved die from Basic Borders dies (item 155558) for the hill;
.jpg)
Basic Borders dies - 155558
- smallest circle die from Stylish Shapes dies (item 159183) to cut the sun from Daffodil Delight cardstock (item 119683);

- Misty Moonlight ink (item 153118), Pecan Pie ink (item 161665), Basic Gray ink (item 149165), Daffodil Delight ink (item 147094), Pumpkin Pie ink (item 147086), Old Olive ink (item 147090), Mossy Meadow ink (item 147111), and Pool Party ink (item 147107) to colour truck, flowers, trees, and clouds;
- 1 1/2" square die from Stylish Shapes dies to cut sentiment square;
- Basic Black cardstock (item 121045) for 1 5/8" x 1 5/8" sentiment square matting panel - edges scraped with the blade of my craft knife; and
- Basic Black Stampin' Write Marker (item 162481) to add splatters to back panel by flicking brush tip against marker lid - I used a small scrap of copy paper to cover the sentiment square while splattering.
Farm Fresh Basket


To complete this little box basket, which measures 1 3/4" tall (excluding handle) x 3 1/2" wide x 1 1/2" deep, I used the following additional supplies:
- for the box (basket base) a 10 1/2" x 3 1/4" piece of Basic Black cardstock (item 121045), scored on the 10 1/2" side at 3 1/2", 5", 8 1/2", and 10" (1/2" tab is the glue tab); and scored on the 3 1/4" side at 1 1/2" (bottom flaps);
- 8" x 3/4" strip of Basic Black cardstock for the handle base;
- for each of the front and back of the basket box: two 3 3/8" x 3/4" strips of embossed Pecan Pie cardstock;
- for each end of the basket box: one 1 3/8" x 1 5/8" panel of embossed Pecan Pie cardstock;
- for the handle: one 6" x 1/2" strip of embossed Pecan Pie cardstock;
- Around the Bend dies (item 160649) to cut the foliage from watercolour paper - coloured with Old Olive ink (item 147090) and Mossy Meadow ink (item 147111) applied with Small Blending Brushes (item 160518);
.jpg)
- circle dies from Stylish Shapes dies (item 159183) to cut sentiment circle from watercolour paper (which was coloured with Pool Party ink - item 147107 - lightly spritzed with water - Stampin' Spritzers (item 126185) - and blotted dry with paper towel before sentiment stamped), and matting circle from Basic Black cardstock;
- Pool Party ink, Pecan Pie ink (item 161665), Basic Gray ink (item 149165), Old Olive and Mossy Meadow inks to colour truck, buckets, and greenery;
- Very Vanilla baker's twine (Baker's Twine Essentials Pack - item 155475) - to which I added a little Pecan Pie ink using a blending brush - to tie matted sentiment circle to handle.
Yellow Truck Note Card


For this 4" square top-fold note card I used the following additional supplies:
- Basic White Thick cardstock (item 159229) for the card base;
- Pecan Pie ink (item 161665) to add splatters to card front (ink mixed with a little water and flicked on with a paint brush);
- Pecan Pie patterned paper from Glorious Gingham 6" x 6" Designer Series Paper (item 163170) for the 3 7/8" x 1" and 3 3/8" x 3/8" strips;
- 3 3/4" x 1/2" and 2 3/8" x 7/8" strips of embossed Pecan Pie cardstock;
- Daffodil Delight ink (item 147094), Pool Party ink (item 147107), Basic Gray ink (item 149165), Pecan Pie ink, Pumpkin Pie ink (item 147086), Old Olive ink (item 147090), and Mossy Meadow ink (item 147111) to colour truck, flowers, and trees;
- Playing In The Rain stamp set (item 160542) and co-ordinating Playing In The Rain dies (item 160550) to stamp and die cut the two watercolour paper clouds - coloured using Pool Party ink;

Playing In The Rain stamp set - 160542
.jpg)
Playing In The Rain dies - 160550
- Stampin' Dimensionals (item 104430) - to attach upper back of truck (Multipurpose Liquid Glue used to secure lower portion of truck image to embossed cardstock strips), and small cloud;
- Mini Stampin' Dimensionals (item 144108) added to upper portion of front left tree; and
- Linen Thread (item 104199) - wrapped three times around lower portion of card front - ends secured with tiny dabs of Multipurpose Liquid Glue.
From a leftover woodgrain patterned piece of retired In Good Taste 12" x 12" Designer Series Paper (item 152494) I made an envelope using an envelope punch board.
Beach Tote Bag


This 4" tall (excluding handles) x 4" wide (excluding slightly expanded side panels) tote bag was constructed in the same manner as the smaller of the Paper Quilt Block Tote Bags (February 10, 2023 - https://archiesatelier.blogspot.com/2023/02/paper-quilt-block-tote-bags-and-card.html) and I used the following additional supplies:
- for the bag - two 6 1/4" x 5 3/4" pieces of Coastal Cabana cardstock (item 131297), scored on the 6 1/4" side at 4", 4 7/8" (down to 3"), and 5 3/4" (1/2" tab is the glue tab), and scored on the 5 3/4" side at 1 3/4" (bottom flaps);
- for the handles - two 8 1/2" x 1/2" strips of Pecan Pie cardstock (item 161717) - scored three times along the length at 1/8" intervals;
- two 3 7/8" x 3 7/8" panels of Pumpkin Pie patterned paper from Stargazing 12" x 12" Designer Series Paper (item 161175) for the front and back panels;
- large "wreath" die from Natural Prints dies (item 158800) to cut from watercolour paper the "wreath" for front panel - coloured with Mossy Meadow ink (item 147111) applied with Blending Brushes (item 153611);
.jpg)
- Pool Party ink (item 147107), Pecan Pie ink (item 161665), Daffodil Delight ink (item 147094), Pumpkin Pie ink (item 147086), Old Olive ink (item 147090), Basic Gray ink (item 149165), and Starry Sky ink (item 159212) to colour truck image - splatters added with Pecan Pie ink;
- largest circle die from Stylish Shapes dies (item 159183) to cut image circle;
- Stampin' Dimensionals (item 104430) to attach image circle;
- Linen Thread (item 104199) for bow - ends secured with tiny dabs of Multipurpose Liquid Glue; and
- Pool Party dots from Glossy Dots Assortment (item 158827) - six dots added to bag front.
The little corked glass bottle with tiny screw eye is from Dollar Tree (as is the decorative sand added to the bottle) - and the little ball chain and small jump ring used to attach the bottle to the handle were from my stash. I secured the cork to the bottle and the tiny screw eye in the cork with dabs of Multipurpose Liquid Glue.
Special Delivery Card
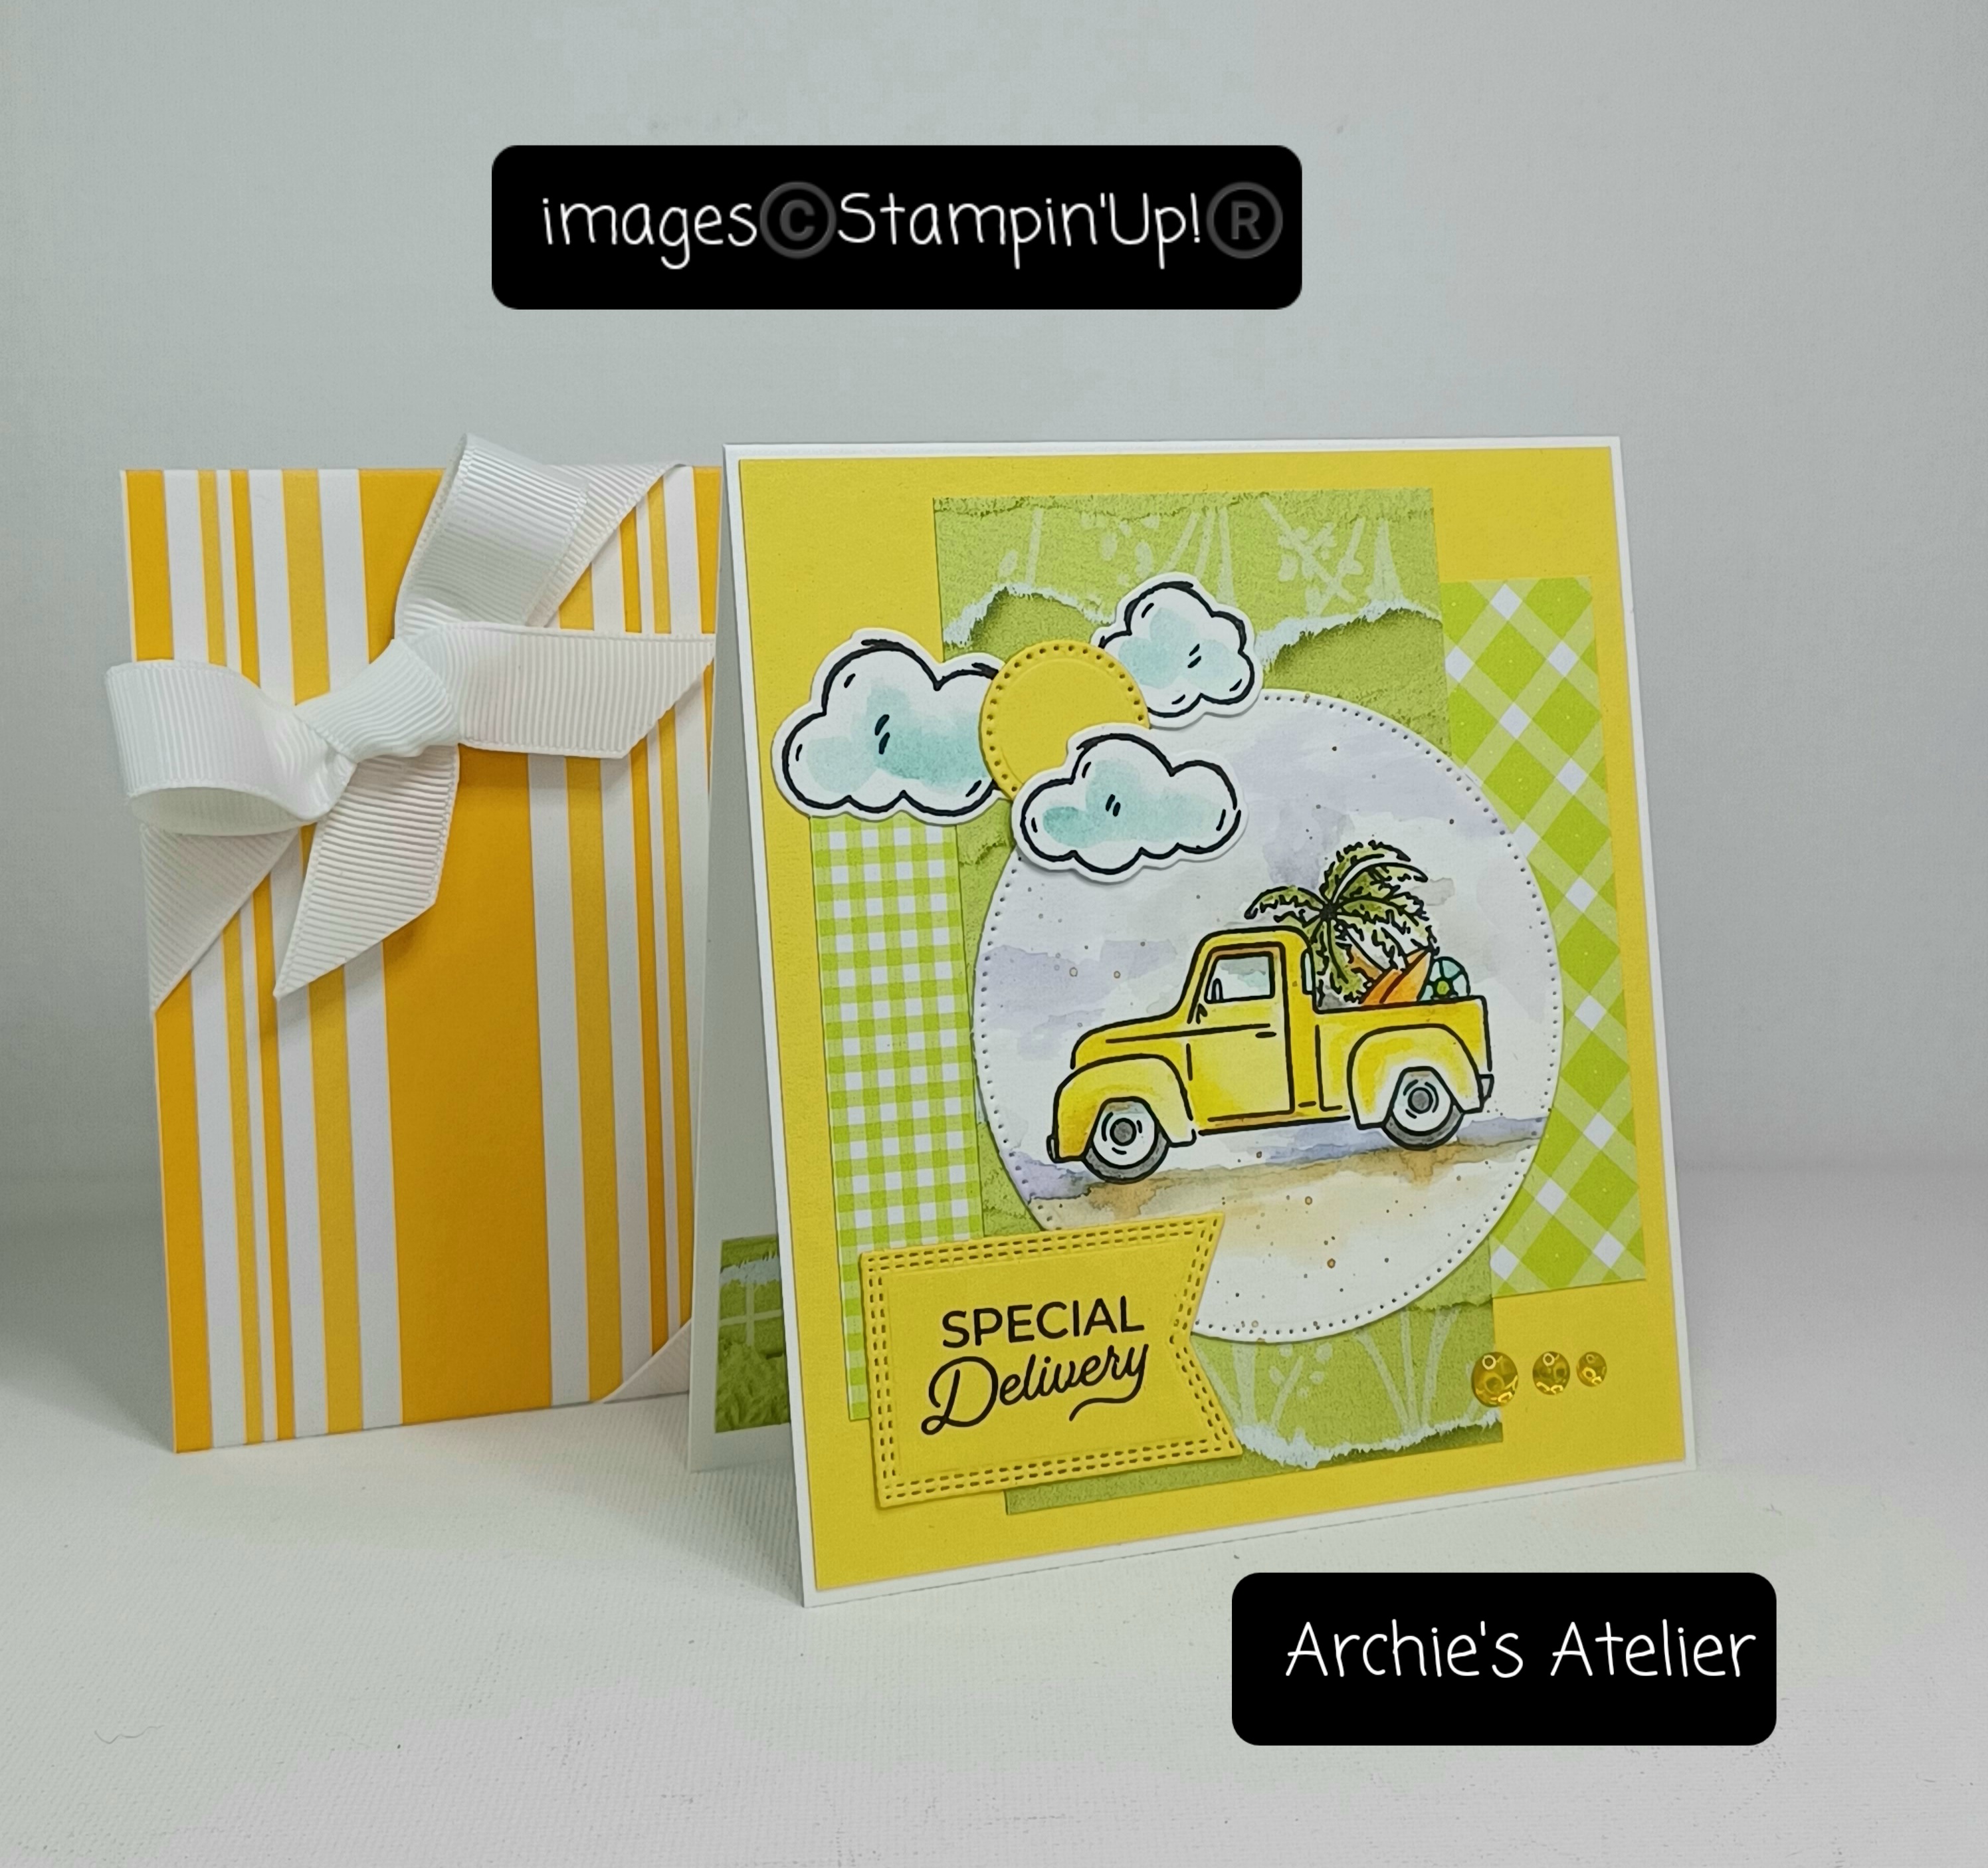


Additional supplies used to complete this 5" x 4 1/2" top-fold card:
- Basic White Thick cardstock (item 159229) for the card base;
- Daffodil Delight cardstock (item 119683) for the 4 7/8" x 4 3/8" front panel, sun - cut using the smallest circle die from Stylish Shapes dies (item 159183) - inside sentiment strip (edges scraped with blade of my craft knife), and front sentiment banner (cut using the Nested Essentials dies - item 161597);
.jpg)
- Playing In The Rain stamp set (item 160542) and co-ordinating Playing In The Rain dies (item 160550) to stamp and cut from watercolour paper the three clouds - coloured with Pool Party ink (item 147107);
- Lemon Lime Twist patterned paper from Glorious Gingham 6" x 6" Designer Series Paper (item 163170) for 3" x 1" and 3 3/8" x 1 1/4" panels;
- Lemon Lime Twist patterned paper from Masterfully Made 12" x 12" Designer Series Paper (item 161192) for 4 1/2" x 2 1/2" center panel, and 4 1/4" x 1" inside strip;
- Daffodil Delight ink (item 147094), Pecan Pie ink (item 161665), Starry Sky ink (item 159212), Basic Gray ink (item 149165), Old Olive ink (item 147090), Mossy Meadow ink (item 147111), Pumpkin Pie ink (item 147086), Pool Party ink, and Granny Apple Green ink (item 147095) to colour truck image - splatters added with Pecan Pie ink; and
- three Daffodil Delight dots from Glossy Dots Assortment (item 158827) added to the lower right corner of front panel.
For the envelope (made using an envelope punch board) I used a leftover piece of Mango Melody patterned paper from the January 5-February 28, 2023 Sale-A-Bration Dandy Designs 12" x 12" Designer Series Paper (item 160836), adding a 5/8' white gross grain ribbon bow.
And finally . . .
Sending You Sunny Thoughts Card


Additional supplies used to complete this 5 1/2" x 3 5/8" top-fold card:
- Basic White Thick cardstock (item 159229) for the card base;
- black & white patterned paper from Zoo Crew 12" x 12" Designer Series Paper (item 161304) for the front 4 1/2" x 3 1/2" panel, and inside 1/2" x 3 1/2" strip;
- Around The Bend dies (item 160649) to cut from watercolour paper the three foliage pieces - coloured with Old Olive ink (item 147090) and Mossy Meadow ink (item 147111) applied with Small Blending Brushes (item 160518);
- Dainty Delight dies (item 160674) to cut small daisy from watercolour paper - center coloured with Daffodil Delight ink (item 147094) applied with pointed-tip makeup sponge;
.jpg)
Dainty Delight dies - 160674
- Basic Black Stampin' Write Marker (item 162481) to add splatters to sentiment section of front panel by flicking brush tip against the marker lid;
- Sweet Sorbet ink (item 159216), Pool Party ink (item 147107), Basic Gray ink (item 149165), Daffodil Delight ink, Pumpkin Pie ink (item 147086), Old Olive ink, and Mossy Meadow ink to colour front panel's truck image;
- Daffodil Delight ink, Pecan Pie ink (item 161665), Pool Party ink, Basic Gray ink, Old Olive ink, and Mossy Meadow ink to colour inside panel's truck image; and
- one Lemon Lime Twist gem from Tinsel Gems Four-Pack (item 161623) added to flower center. Stampin' Up! advises that the Tinsel Gems Four-Pack should again be available to order the week of September 11, 2023.
Using an envelope punch board and a leftover piece of the retired Beautifully Penned 12" x 12" Designer Series Paper (item 156630) I made the envelope - using Real Red ribbon from the Real Red & Garden Green 3/8" Ribbon Combo Pack (item 159577) for the bow.
Thank you for visiting my blog! I certainly had a lot of fun working on these projects!
If you are interested in purchasing any of the available Stampin' Up! products I have used in my projects, and you live in Canada and do not have a Stampin' Up! demonstrator, please do not hesitate to visit my online store found on my website https://archiesatelier.stampinup.net/ at your convenience, or simply click under the "Shop With Me" tab on the right sidebar of my blog, which will take you directly to my website and online store. I very much appreciate your business! The digital version of the May 2023-April 2024 Annual Catalogue is available for browsing at your convenience on my website.
Don't forget that the coupons earned during the July Bonus Days must be redeemed on orders placed during August (until August 31, 2023)! When placing your orders be sure to include the coupon codes that Stampin' Up! provided to you by email upon placement of your qualifying July orders!

Be sure to also check out at your convenience in my online store all the offerings on the Clearance Rack - some great deals but products are only available while supplies last! - and the full selection of products available as Online Exclusives.
Have fun creating!
Laurel
*It has come to my attention that quite often email correspondence from me is delivered to the recipient's spam or junk mail folder - if you have corresponded with me I have replied so be sure to check your spam or junk mail folder! Thank you!!

How best to cope with yet another severe thunderstorm warning!
Comments
Post a Comment