Paper Quilt Block Tote Bags - and a card too!
(using Designer Series Paper)

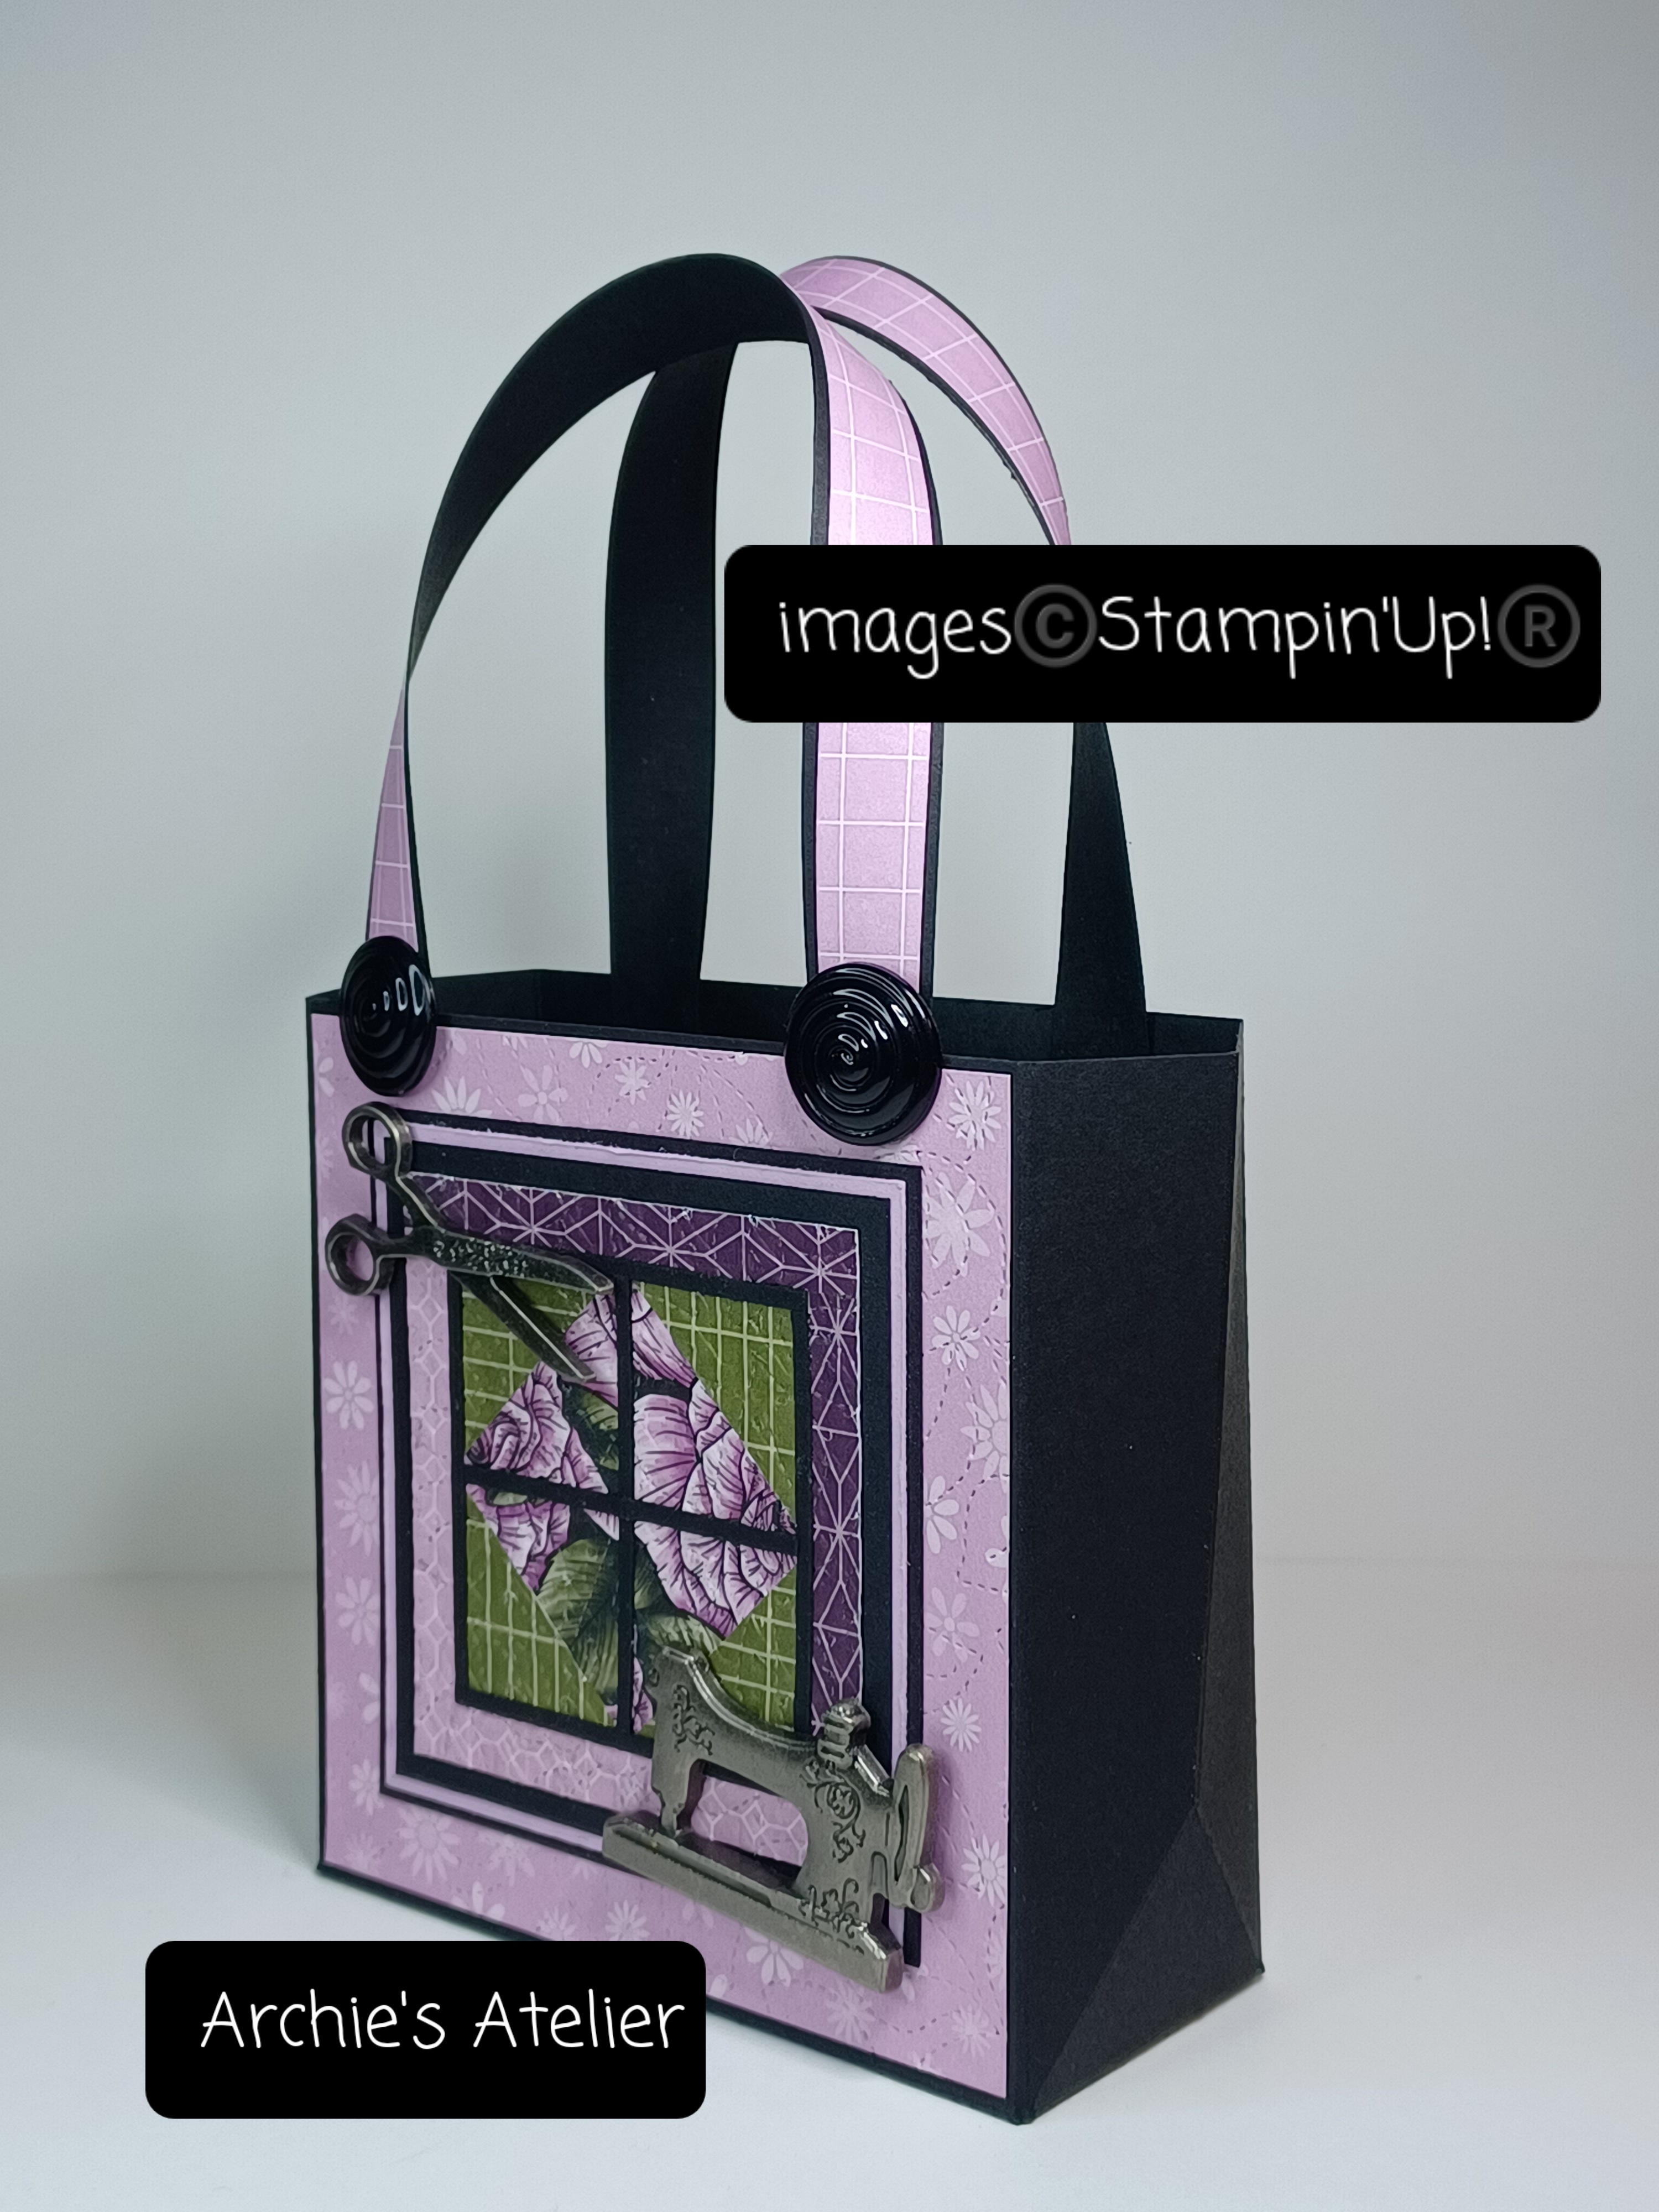
Hello! Several weeks ago my sister and I were having fun making some paper quilt blocks based on a couple of Maymay Made It Crafts You Tube videos I had watched, and that was the inspiration for this week's projects. I am not a quilter so have undoubtedly made many mistakes in putting together my "quilt blocks" but I had fun playing with the colours and designs of a variety of Stampin' Up! Designer Series Papers and that was after all the point of the exercise! In considering what to do with the paper quilt blocks I thought it would be fun to make "quilted" tote bags that could hold a few small gifts for a quilter/sewer - such as a couple of fat quarters, and, what all crafters - whether they work with paper or fabric could appreciate - small containers of hand lotion. The bags could also hold several quilt block note cards with co-ordinating envelopes.
I made two sizes of bags: the smaller bag measures 4" tall (excluding handles) x 4" wide (excluding the slightly expanded side panels) x 1 3/4" deep and I used the 4" dimension to accommodate a 3" x 3" block (allowing for a small "binding" around the trimmed block if desired); and the larger bag measures 5" tall (excluding handles) x 5" wide (excluding the slightly expanded side panels) x 1 3/4" deep and I used the 5" dimension to accommodate a 4" x 4" block (again allowing for a small "binding" around the trimmed block if desired).
For the smaller bag I used two 6 1/4" x 5 3/4" pieces of cardstock - each scored on the 6 1/4" side at 4" and 5 3/4" (the 1/2" tab is the glue tab); scored on the 5 3/4" side at 1 3/4" (bottom flaps); and then scored again on the 6 1/4" side at 4 7/8" down to 3" from the top edge Removing the cardstock from the scoring board and using a stylus and ruler I then scored from the bottom of this score line out to each bottom corner of the panel as indicated on the template photo below.

For the handles I cut two 1/2" x 8 1/2" strips of cardstock, making a pencil line at 1/2" from each end - this is where I applied the glue to attach the handles to the inside of the front and back panels of the bag. For decoration on several of the handles I scored the cardstock strips lengthwise at 1/8" intervals (3 score lines) - or glued a slightly narrower strip of Designer Series Paper along the cardstock strips. I used my Bone Folder (item 102300) to give a slight curl to each handle to help prevent any creases in the handles when attaching them to the bag.
On a few of the bags, before gluing the two main pieces together, to give a quilted stitched effect to the bag, I used the Stitched Greenery die (item 155451) on the two panels - lining the die up with the glue tab score line and the bottom score line on each panel. The "quilt block" was glued to the front panel before the assembly of the bag was completed. Once the body of the bag was assembled I then added the handles.
For the larger bag I used two 7 1/4" x 6 3/4" pieces of cardstock - each scored on the 7 1/4" side at 5" and 6 3/4" (1/2" tab is the glue tab); scored on the 6 3/4" side at 1 3/4" (bottom flaps); and then scored again on the 7 1/4" side at 5 7/8" down to 4" from the top edge. After removing the cardstock from the scoreboard and using a ruler and stylus I then scored from the bottom of this score line out to each corner as indicated on the template photo below.

To give some texture to the body of the bag I scored along the width of the back side of each panel every 1/8" - on the side panels stopping at the score lines forming the triangle. By scoring on the backside the raised lines appear on the front side creating an almost corduroy effect - I also did the same on the handles. After scoring the panels I attached the "quilt block" to the front panel and then assembled the bag.
For the handles I cut two 1/2" x 11" strips of cardstock and two 1/2" x 1 3/4" strips of cardstock - I scored the longer strips at 3/4" from each end, and the smaller strips scored in half at 7/8". To attach the handles I used four key chain rings (purchased at Dollarama) - the smaller strips of cardstock were used to secure the rings to the front and back panels of the bag.
For quilt block patterns I found at the library a very informative book - "130 Mini Quilt Blocks" by Susan Briscoe (2011) - and am definitely looking forward to playing with more quilt block ideas - especially the ones that are not so structured! After playing with these projects I certainly appreciate all the skill and effort quilters need to be able to assemble their blocks so precisely! With the exception of the eight-pointed star pattern and the log cabin pattern, I used 1" squares - combining full squares with squares cut diagonally in half. For the eight-pointed star pattern - a template photo is included below - I started with a 4" square for the base, then a 2" square placed in the center, and then four 1" squares cut diagonally in half for the "points" of the star - this pattern and the log cabin pattern were provided by Maymay Made It Crafts.

For the log cabin pattern I started with a 1" square in the center and then 1/2" wide strips, and as advised by Maymay Made It Crafts, marked the cutting lengths of each strip with a pencil as I proceeded to build up the strips around the center square.
All blocks were assembled on scrap cardstock bases - I cut the bases to be larger than the finished block size - after the blocks were trimmed no portion of the scrap cardstock base was visible.
Die cuts are perfect for adding "applique" pieces on the block.
To give a "quilted" effect to my blocks (and to help obscure some of the piecing errors!!) I used, with the exception of the eight-pointed star block, both the Cane Weave 3D Embossing Folder (item 160580) and the Stitched Greenery die (item 155451) on the blocks before adding the "binding" (aka matting panels) - usually I used the Embossing Folder first followed by the Stitched Greenery die.
To complete my projects I used the following standard tools and supplies:
- Paper Trimmer (item 152392) - for trimming all cardstock and paper;
- stylus and scoreboard (Simply Scored Scoring Tool - item 122334) - for scoring cardstock;
- Bone Folder (item 102300) - for burnishing all score lines and for curling the handle strips;
- Stampin' Cut & Emboss Machine (item 149653) for all embossing and die cutting; and
- for the main adhesive, Multipurpose Liquid Glue (item 110755).
To embellish the bags I used ribbon from my stash (with the exception of the Black & White 1/4" Gingham Ribbon - item 156485 - used on the Blackberry Bliss bag), wooden buttons and spools from Dollarama, and a variety of sewing themed buttons and charms from my stash.


- Cajun Craze cardstock (item 119684) for the base of the bag and for the front and back matting panels on which I used the Stitched Greenery die;
- Basic Black cardstock (item 121045) for the handles, matting panels (aka "binding"), quilt block dividing strips, and side panel top strips; and
- the Sale-A-Bration Favoured Flowers 12" x 12" Designer Series Paper (item 160833) for the 1" squares (three patterns - 1 full square and 4 squares cut diagonally in half of one pattern; and 2 squares each of two additional patterns cut diagonally in half), and side panels - I also used the Stitched Greenery die on the DSP side panels.


- Starry Sky cardstock (item 159263) for the base of the bag and handles (I scored the back and side panels and handles vertically every 1/8" - scored on the right side of the cardstock so the embossed lines are recessed);
- Basic White cardstock (item 159276) for the matting panel;
- Daffodil Delight cardstock (item 119683) for the matting panel;
- Starry Sky and Orchid Oasis patterned paper from the 2022-2024 In Colour 6" x 6" Designer Series Paper Assortments (item 159253) for the log cabin strips;
- Daffodil Delight patterned paper from the 6" x 6" Designer Series Paper Assortments - Brights (item 159258) for the center 1" square; and
- Real Red patterned paper from the 6" x 6" Designer Series Paper Assortments - Regals (item 159256) for the die cut heart (cut using the large heart die from the Teacup dies - item 160186).

Teacup dies - 160186
Threaded through the buttons and for the "thread" on the needle button I used embroidery thread (DMC 3839 - a pretty good match to Orchid Oasis).


- Balmy Blue cardstock (item 146982) for the base of the bag and handles;
- Basic White cardstock (item 159276) for matting panel; and
- the Sale-A-Bration Dandy Designs 12" x 12" Designer Series Paper (item 160836) for the front and back matting panels (on which I used the Stitched Greenery die), the handle strips, and the block (3 patterns - 1 full block and 4 blocks cut diagonally in half of one pattern, and 2 blocks from each of two additional patterns cut diagonally in half).


- Basic Black cardstock (item 121045) for the base of the bag, handles, matting panels, and block strips;
- Fresh Freesia cardstock (item 155613) for the matting panel (I distressed the edges by scraping the blade of my craft knife along the edges); and
- the Sale-A-Bration Favoured Flowers 12" x 12" Designer Series Paper (item 160833) for the front and back matting panels (on which I used the Stitched Greenery die), the handle strips, and the block (4 patterns - two 1" blocks cut diagonally in half of two patterns, two 1/2" wide strips from each of the two additional patterns).


Additional supplies used for the fifth bag and 3 1/2" x 3 1/2" side-fold card:
- Blackberry Bliss cardstock (item 133675) for the base of the bag (on which I used the Stitched Greenery die), the handles, and the tag (cut using the label die from the Queen Bee dies - item 160484);

Queen Bee dies - 160484
- Basic Black cardstock (item 121045) for matting panel and strips on the block, and for the matting panel on the card;
- Basic White cardstock (item 159276) for the matting panel;
- Basic White Thick cardstock (item 159229) for the card base; and
- the Sale-A-Bration Favoured Flowers 12" x 12" Designer Series Paper (item 160833) for the tag strip, and the block for both bag and card - for the bag 3 patterns: 4 full 1" squares of one pattern, 1 full square and 2 squares cut diagonally in half of the second pattern, and 2 squares cut diagonally in half of the third pattern. For the card - 3 patterns: 1 full square and 4 squares cut diagonally in half of one pattern, and 2 squares cut diagonally in half of each of the second and third patterns; and
- Black & White 1/4" Gingham Ribbon (item 156485) - to tie the embellished tag to the bag handle. For the tag I also used a silver eyelet (purchased at my local scrapbooking store).
From an additional piece of the Favoured Flowers DSP I made a co-ordinating envelope for the card using an envelope punch board.


- Shaded Spruce cardstock (item 146981) for the base of the bag (on which I used the Stitched Greenery die), and the handle strips (which I scored vertically on the wrong side);
- Soft Suede cardstock (item 115318) for the handles and matting panel;
- for the block I used DSP from the following 6" x 6" Designer Series Paper Assortments recently added to the Clearance Rack:
- for the 4" base square Pool Party patterned paper from the Subtles Assortments - item 155229;
- for the 2" center square Bermuda Bay patterned paper from the Brights Assortments - item 155228; and
- for the four 1" squares cut diagonally in half Soft Suede patterned paper from the Neutrals Assortments - item 155226;
- Coastal Cabana twine from the Three Twine Combo Pack (item 160597 - which includes Pumpkin Pie and Garden Green) - threaded through the two wooden buttons attached at the base of the handles on the front panel; and
- Linen Thread (item 104199) - threaded through the wooden spools and buttons and tied to the bag handle.
I used embroidery thread to wrap the two spools - DMC 992 and DMC 3818.


- Basic Black cardstock (item 121045) for the bag base (on which I used the Stitched Greenery die), and the handles (scored lengthwise every 1/8");
- Real Red cardstock (item 102482) for the matting panel;
- Basic White cardstock (item 159276) for the matting panel;
- Real Red patterned paper from the 6" x 6" Designer Series Paper Assortments - Regals (item 159256) for the center 1" square;
- from the recent addition to the Clearance Rack, All Together 6" x 6" Designer Series Paper (item 160039) four patterns - 2 squares cut diagonally in half from each of the four patterns; and
- also a recent addition to the Clearance Rack, Real Red 3/8" Faux Linen Ribbon (item 158129) for the handle bow.
For the needle's "thread" I used embroidery thread (DMC 498).
And finally . . .


- Mossy Meadow cardstock (item 133676) for the bag base, handles, and die cut leafy sprig and heart;
- Basic White cardstock (item 159276) for the matting panel;
- Fresh Freesia cardstock (item 155613) for the matting panel and die cut flower;
- Queen Bee dies (item 160484) to cut the leafy sprig, heart, and flower;
- Awash In Beauty 12" x 12" Designer Series Paper (item 158973) for the Mossy Meadow patterned paper for the squares surrounding the heart portion of the block (six 1" blocks cut diagonally in half); and
- the Sale-A-Bration Dandy Designs 12" x 12" Designer Series Paper (item 160836) for the heart squares (2 patterns - of each of the two patterns 3 full squares and 2 squares cut diagonally in half).
Thank you for visiting my blog! I had lots of fun working on these projects!
If you are interested in purchasing any of the available Stampin' Up! products I have used in my projects, and you live in Canada and do not have a Stampin' Up! demonstrator, please do not hesitate to visit my online store found on my website https://archiesatelier.stampinup.net/ at your convenience, or simply click under the "Shop With Me" tab on the right sidebar of my blog, which will take you directly to my website and online store. I very much appreciate your business! You can browse the PDF versions of the May 2022-April 2023 Annual Catalogue, January-April 2023 Mini Catalogue, and the Sale-A-Bration Brochure anytime on my website. Remember that Stampin' Up! will only be having this one Sale-A-Bration for 2023 and it will end on February 28, 2023 - just over two weeks away! Don't forget to check the Clearance Rack too!!

Have fun creating!
Laurel
*It has come to my attention that quite often email correspondence from me is delivered to the recipient's spam or junk mail folder - if you have corresponded with me I have replied so be sure to check your spam or junk mail folder! Thank you!!

Comments
Post a Comment