Mini Christmas Album
(and co-ordinating box)!

Hello! Today I am sharing a mini Christmas album - and co-ordinating box that will come in handy for storage of the album and possibly a gift box for the album - that I worked on this week, featuring a few of my favourite festive Designer Series Papers, dies, and stamp sets from the July-December 2022 Mini Catalogue, as well as a few of my favourite festive products from past years. I think it is important not to forget about the products that we might have in our collections from past releases, and to have fun combining them with the new products! An album project like this is also a good chance to find a home for the Designer Series Paper and the small finished or semi-finished bits left over from other projects! The album is made using six 6" x 6" pieces of cardstock and measures 6" tall x 5 1/2" wide. I used two 12" x 12" sheets of cardstock to make the box and lid - the box measures 6 1/2" x 6 1/2" x 2" deep.
Four of my favourite products from the recent past that I have used in this mini album are: the Snow Globe Scenes dies (item 150655) - for the die cut church, and opening to accommodate the shaker dome - and Snow Globe Shaker Domes (item 15-442), which were both featured in the Creativity Is Calling 2019 Holiday Catalogue (September 4, 2019 - January 2, 2020); the Sounds of the Season dies - that includes four sizes of sleigh bells - (item 154043), and which was featured in the Handmade For You August-December 2020 Mini Catalogue; and the July 1-August 31, 2022 Sale-A-Bration feature, Tree Lot dies (item 159938) - for the two trees with white detail overlays.
With the exception of the Regal Reindeer stamp set (item 159722), the Reindeer dies (item 159727), and the Garden Green 3/8" ribbon from the Real Red & Garden Green 3/8" Ribbon Combo Pack (item 159577), the festive items from the July-December 2022 Mini Catalogue listed below that I used in my project are retiring items:
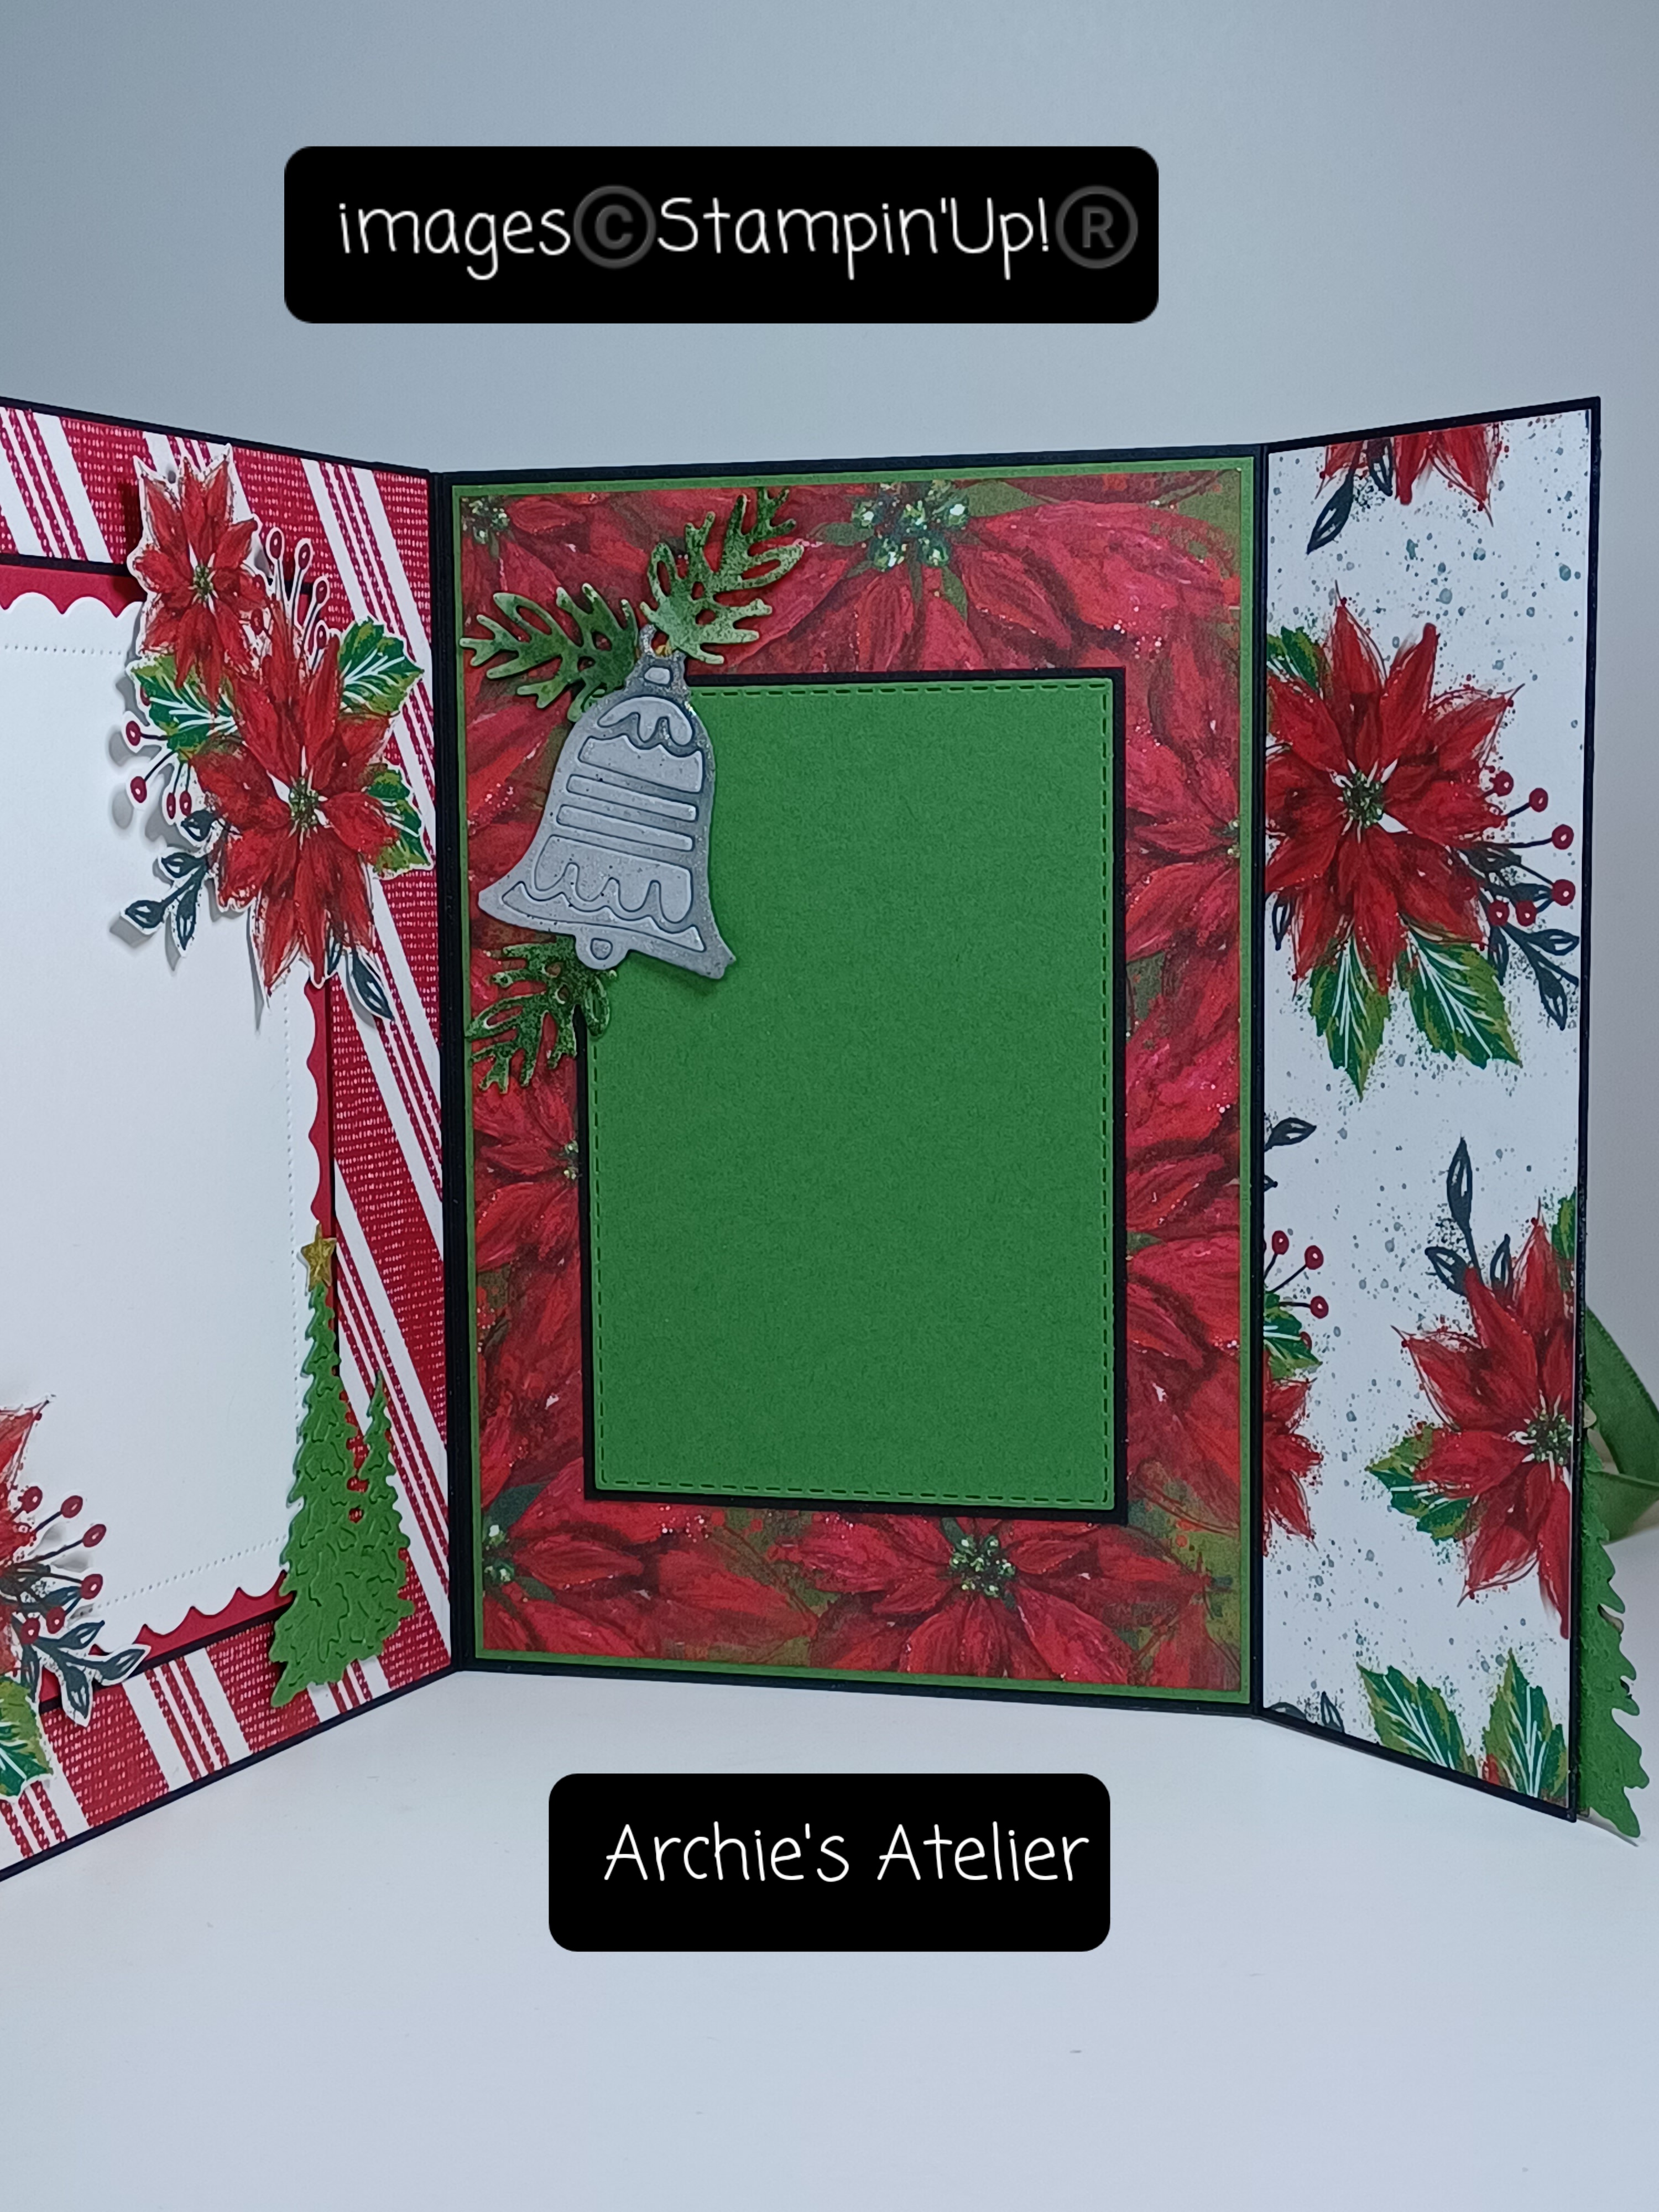
- Boughs of Holly 12" x 12" Designer Series Paper (item 159600) - poinsettia patterned papers - including the paper from which I fussy cut the poinsettias - and red-on-red polka dot paper;
- Sweetest Christmas 12" x 12" Designer Series Paper (item 159559) - red/white striped paper, red/white/green striped paper, green/white striped paper, and green and white dot paper;
- white glimmer paper (Real Red & White 6" x 6" Glimmer Paper - item 159578) - snow hills, snowflakes, and snowman body;
- Sweet Gingerbread stamp set (item 159714) and Gingerbread House dies (item 159718);
- Scottie Dog Punch (item 159743) - dog and his bow;
- Snowman Magic stamp set (item 159816) and Snowman dies (item 159817); and
- Decorated Pine dies (item 159710) - large (trimmed) and small pine branches, large gray church bell, and gold stars.
*During the Last Chance Promotion, which runs until January 4, 2023, the retiring items from the July-December 2022 Mini Catalogue are available - while supplies last - with several at substantial discounts including the Decorated Pine dies (50% off), Gingerbread House dies (40% off), Scottie Dog Punch (30% off), and Snowman dies (30% off).*
The additional products that I used in my project:
- for the album, box and lid - Basic Black 12" x 12" cardstock (item 124267) - also a (very unfortunately!) retiring item from the July-December 2022 Mini Catalogue. For the album six 6" x 6" pieces - 1st and 2nd pages scored at 1/2", 3rd page scored at 4", 4th page scored at 1/2" and 4", and 5th and 6th pages scored at 1/2" (I have made several versions of this album and have provided the link to my October 30, 2021, blogpost that includes assembly details - https://archiesatelier.blogspot.com/2021/10/halloween-mini-albumscrapbook-featuring.html - for the current version the 2nd page is a full page and I have added a full 6th page). The 2" flaps can either be kept as flip outs or glued along the top and bottom edges to create pockets. For the box an 11 15/16" x 11 15/16" piece scored at 3/4" and 2 3/4" on all four sides; and for the lid a full 12" x 12" piece scored at 1 3/8" and 2 3/4" on all four sides - the double scores are to create re-enforced sides for the lid and box. For the box, because I only had a 3/4" turn over for the sides, to the inside of each side I glued an additional 1 1/2" x 6 3/8" strip of Basic Black cardstock to add the extra strength. Although I have included a few photos showing the basic scoring/cutting/folding over for creating re-enforced sides, Sam Calcott (UK) of Mixed Up Craft (www.mixedupcraft.com) has excellent video tutorials for creating boxes and bags with re-enforced sides.


- Basic Black cardstock (item 121045) - for the base of the snow globe (the cardstock was first embossed using the Timber 3D Embossing Folder - item 156406), matting panels, scottie dog (the edges were sponged with Craft Stampin' White Ink - item 147277), and die cut snowman hat, eyes and mouth;
- Real Red cardstock (item 102482) - for matting panels, scalloped edge strip (cut using the scallop edge die from Scalloped Contours dies - item 155560), snow globe tag heart (cut using the small heart dies from Full Basket dies - item 158679), die cut gingerbread house bow, and punched dog bow;
- Basic White cardstock (item 159276) - for the snow globe church (cut using the Snow Globe Scenes dies). snow globe tag (cut using the small tag die from Mini Pocket Envelope dies - item 159167), die cut tree overlays, stamped snowman and hat, stamped knitted background panel (stamped using the Knit Together background stamp - item 156416 - and Evening Evergreen ink - item 155576 - then over sponged with Evening Evergreen ink), stamped and die cut holly/berry snowman hat adornment, "I love you snow much" sentiment strip, "It's the most magical time of the year" sentiment circle (cut using the Stylish Shapes dies - item 159183), matting panels, and photo mats;
- Garden Green cardstock (item 102584) - for the large (and trimmed) die cut pine branch, small branch on snow globe tag (cut using the Full Basket dies). photo mats, matting panel, and die cut trees;
- Crumb Cake cardstock (item 120953) - for the die cut deer antlers, embossed die cut tree and house (the cardstock was first embossed using the Timber 3D Embossing Folder), for the stamped and die cut gingerbread house, the stamped and die cut little girl and reindeer, and the small die cut deer;
- Smoky Slate cardstock (item 131202) - for the die cut church bell - the edges were sponged with Basic Gray ink (item 149165) and splatters added with Basic Black Stampin' Write Marker (item 100082) by flicking the brush tip against the marker lid;
- Soft Suede cardstock (item 115318) - for the die cut deer with antlers, and die cut arms for the stamped snowman;
- Early Espresso cardstock (item 119686) - for the die cut arms for the white glimmer paper snowman;
- tiny scrap of Pumpkin Pie cardstock (item 105117) - nose on white glimmer paper snowman;
- Regal Reindeer stamp set (item 159722) and Reindeer dies (item 159727) - currently available together as the Regal Reindeer Bundle - item 159728 - stamped and die cut little girl holding apple and reindeer, and die cut trees and the reindeer with antlers;
- Scalloped Contours dies (item 155560) and Stitched Rectangles dies (item 151820) - for photo mats and matting panels;
- Distressed Gold 12" x 12" Specialty Paper (item 159237) - for the church window backing panels, snow globe base detail, and stars;
- Grove dies (item 157844) - for the small die cut deer;
- watercolour paper (Fluid 100 5" x 7" Watercolour Paper - item 149612) - for the small die cut pine branches (coloured using Evening Evergreen ink and Soft Suede ink - item 147115), and die cut sleigh bells (coloured using Basic Gray ink and Memento Tuxedo Black Ink - item 132708);
- Memento Tuxedo Black Ink - to stamp snowman and hat; gingerbread house roof trim, house decoration, and window and door frames; "I love you snow much" sentiment; and little girl and reindeer;
- Real Red ink (item 147084) - to stamp gingerbread house heart and door, and to stamp the Real Red cardstock snow globe matting panel using the splatter stamp from the Quiet Meadow stamp set (item 155082);
- Soft Suede ink - to sponge snow globe tag, both die cut deer, antlers, the die cut wood grain tree and house, the edges of the stamped and die cut gingerbread house, and to stamp the gingerbread house windows;
- Craft Stampin' White Ink - to sponge the nose and chest of the small die cut deer;
- Evening Evergreen ink - to stamp the holly leaves and berry outlines of the white glimmer paper snowman's hat adornment;
- Real Red watercolour pencil (Watercolour Pencils - Assortment 1 - item 1417089) - to colour in the berries on the snowman's hat adornment;
- Basic Black Stampin' Write Marker - to add splatters to the stamped and die cut gingerbread house;
- VersaMark Ink (item 102283) and gold embossing powder (Stampin' Emboss Powders - Metallics - item 155555) - to stamp and emboss the "It's the most magical time of the year" sentiment - after the sentiment circle was cut I lightly sponged over it with Soft Suede ink and then splattered it with a little water (Stampin Spritzers - item 126185), blotting the water dry with a paper towel;
- Mini Pocket Envelope dies (item 159167) - to die cut the gift card pocket (this gift card pocket was one of the projects I shared last week on my blog);
- Chic dies (item 158815) - to die cut the two large white glimmer paper snowflakes'
- Crumb Cake baker's twine (Baker's Twine Essentials Pack - item 155475) - to tie the tag to the base of the snow globe - before gluing the matted snow globe panel to the front of the album, using a piercing tool I made a small hole on each side of the snow globe base just below the globe through which I threaded the baker's twine;
- Starry Sky polka dot patterned paper from the 2022-2024 In Colour 6" x 6" Designer Series Paper Assortments (item 159253) for the snow globe's background panel;
- Wink of Stella Clear Glitter Brush (item 141897) - to add a little sparkle to the embossed Basic Black cardstock snow globe base, the die cut watercolour paper sleigh bells, and the die cut Smoky Slate cardstock church bell;
- Multipurpose Liquid Glue (item 110755) - adhesive for all items;
- Stampin' Cut & Emboss Machine (item 149653) - for all die cutting and embossing;
- Paper Snips Scissors (item 103579) - for fussy cutting the poinsettias;
- Paper Trimmer (item 152392) - for paper cutting and some scoring;
- stylus and scoring board (Simply Scored Scoring Tool - item 122334) - for scoring cardstock;
- Bone Folder (item 102300) - burnishing score lines; and
- Take Your Pick tool (item 144107) - the putty tip is great for picking up and placing small die cuts such as the little gold stars.
I glued an approximately 14" length of the Garden Green ribbon to each of the front and back covers of the album before gluing on the decorative panels. Since I was not putting photos in while making the album I only partially glued the decorative elements around the photo mats so that I (or someone else!) would be able to slip photos in after the album was completed - a sample photo has been used to demonstrate this in some of my project photos. For the "shaker" bits inside the globe I used a combination of white and silver chunky glitter, very fine white and gold glitter, little silver balls, and a few larger clear beads. For the snow globe scene I used the church (cut using the Snow Globe Scenes dies), two trees cut using the Reindeer dies, and a white glimmer paper snow hill (also cut using the Reindeer dies).


Thank you for visiting my blog! I had a lot of fun working on this project!
If you are interested in purchasing any of the available Stampin' Up! products I have used in my projects, and you live in Canada and do not have a Stampin' Up! demonstrator, please do not hesitate to visit my online store found on my website https://archiesatelier.stampinup.net/ at your convenience, or simply click under the "Shop With Me" tab on the right sidebar of my blog, which will take you directly to my website and online store. I very much appreciate your business! You can browse the PDF versions of the July-December 2022 Mini Catalogue and the May 2022-April 2023 Annual Catalogue anytime on my website. Don't forget to check out the Clearance Rack too!
There is good news that may also be a good cure for the post-Christmas letdown - the January-April 2023 Mini Catalogue will launch on January 5, 2023, and Sale-A-Bration - the opportunity to receive some very fun free products - will run from January 5, 2023, to February 28, 2023! The PDF versions of the January-April 2023 Mini Catalogue and the Sale-A-Bration Brochure will be available for viewing on my website on January 5, 2023.

Have fun creating and Merry Christmas!
Laurel
*It has come to my attention that quite often email correspondence from me is delivered to the recipient's spam or junk mail folder - if you have corresponded with me I have replied so be sure to check your spam or junk mail folder! Thank you!!

Keeping watch for Santa Claws!
Comments
Post a Comment