A Few More Sale-A-Bration Projects!
(Part 1 of 2)
Hello! Today I am sharing a few projects I worked on this week using some of the Stampin' Up! Sale-A-Bration items. Sale-A-Bration continues just until August 31, 2022!
The Sale-A-Bration items are available only while supplies last, and, although the Tree Lot dies (item 159938) are unfortunately no longer available, I really enjoy playing with the trailer die so had to use it in a few more projects! I guess these dies were just too popular!
For all my projects I have used Multipurpose Liquid Glue (item 110755) as the primary adhesive, and for all die cutting and embossing I used my Stampin' Cut & Emboss Machine (item 149653). Additional tools that come in very handy: Paper Snips Scissors (item 103579), Paper Trimmer (item 152392), Take Your Pick Tool (item 144107); and Simply Scored Scoring Tool (item 122334).
On with the projects!
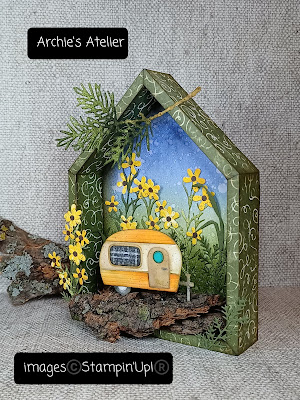
For the base of my first project - a decor piece - I used a house-shaped shadow box frame from Dollar Tree that measures approximately 6 1/4" tall from the base to the peak x 4 3/4" wide x 1 1/8" deep. I have also used two small chunks of tree bark (a few of the "mementos" from the May 21, 2022, windstorm!), which I secured using hot glue. To provide a glue base for the trailer I glued small pieces of cardboard behind the wheel and hitch. The trailer, flowers and stems, pine bough, and inside back panel were cut from watercolour paper (Fluid 100 5" x 7" Watercolour Paper - item 149612) and coloured with Stampin' Up! inks. Additional foliage was cut from Mossy Meadow cardstock (item 133676). I used a 1/16" hole punch to cut the flower centers from Early Espresso cardstock (item 119686). To cut the inside back panel I traced around the shadow box and then trimmed off from each side of the paper an amount equal to the depth of the wood - approximately 1/4". I sponged the watercolour paper panel with Starry Sky ink (item 159212), Old Olive ink (item 147090), and Mossy Meadow ink (item 147111) and then spritzed with water (Stampin' Spritzers - item 126185). The Mossy Meadow decorative paper that I used to cover the sides, front edges, and back of the frame is from the Rustic Harvest 12" x 12" Designer Series Paper (item 159633). I measured and cut each piece individually and inked all edges with Soft Suede ink (item 147115). Additional items used:
- Sale-A-Bration Hippo dies (item 159928) to cut the flowers from watercolour paper that had been coloured with Mango Melody ink (item 147093);
- Honeybee Blooms dies (item 157951) to cut the grass and flower stems (grass from Mossy Meadow cardstock);
Honeybee Blooms dies - item 157951
- Old Olive ink and Mossy Meadow ink to colour the watercolour paper flower stems;
- Full Basket dies (item 158679) to cut the Mossy Meadow cardstock sprigs;
- Soft Suede ink, Basic Gray ink (item 149165), and Pumpkin Pie ink (item 147086) to colour the trailer;
- small scrap of Bermuda Bay cardstock (item 131197) for the trailer door window (the edges sponged with Soft Suede ink);
- small scrap of Perfectly Penciled 12" x 12" Designer Series Paper (item 159244) for the window (the edges sponged with Soft Suede ink);
- Decorated Pine dies (item 159710) to cut the pine bough;
- Old Olive ink, Mossy Meadow ink, and Soft Suede ink to colour the pine bough; and
- Basic Black Stampin' Write Marker (item 100082) to add the splatters to the flowers and the trailer (by flicking the brush end of the marker against the marker lid).
And a few cards:
In addition to the Tree Lot dies for the trailer, and bow on the hitch, I used the following supplies for this 5 1/4" x 4" top-fold card:
- Early Espresso cardstock (item 119686) for the card base;
- Soft Suede cardstock (item 115318) for the embossed panel - embossed using the Leaf Fall 3D Embossing Folder (item 159847) - and the strip along the bottom of the inside panel;;
- Starry Sky cardstock (item 159263) for the matting panel, and for the bow on the trailer hitch;
- Orchid Oasis cardstock (item 159267) for the sentiment and inside panels;
- Poppy Parade cardstock (item 119793) for the hearts - cut using the Hippo dies (item 159928);
- Starry Sky ink (item 159212) to stamp the sentiment - from the Happiness Abounds stamp set (item 159238) - and to colour the top and bottom portions of the trailer;
- Soft Suede ink (item 147115) to colour the body of the trailer, and to sponge all edges of the trailer and inserts;
- scraps of Orchid Oasis patterned paper from the 6" x 6" Designer Series Paper Assortments - 2022-2024 In Colour (item 159253) for the trailer window and for the strip along the bottom of the inside panel;
- scrap of Tea Boutique 6" x 6" Designer Series Paper (item 158659) for the trailer door window;
- Stitched Rectangles dies (item 151820) to cut the sentiment panel;
- Basic Gray ink (item 149165) to colour the wheel and hitch of the trailer;
- Basic Black Stampin' Write Marker (item 100082) to add the splatters on the trailer; and
- 2022-2024 In Colour Matte Decorative Dots (item 159186) - one small Orchid Oasis shaded dot used for the trailer door handle.
For this 4 1/8" x 2 3/4" top-fold card I used the following supplies:
- Smoky Slate cardstock (item 131202) for the card base, torn embossed panel (embossed using the Timeworn Type 3D Embossing Folder - item 156505), sentiment tag, and inside panel;
- Basic Gray cardstock (item 121044) and Old Olive cardstock (item 100702) for the leaf sprigs cut using the Grove dies (item 157844);
- Basic Gray and Smoky Slate patterned paper from the 6" x 6" Designer Series Paper Assortments - Neutrals (item 159257) for the matting panels and the torn "tape" strips;
- Basic Black cardstock (item 121045) for the washtub and scalloped edge (which is the waste strip leftover from cutting a fence using the fence die from the Gingerbread House dies - item 159811);
- Hippo dies (item 159928) to cut the Basic Black cardstock washtub and the watercolour paper flowers (coloured using Sweet Sorbet ink - item 159216);
- Honeybee Blooms dies (item 157951) to cut the flower stem (watercolour paper coloured using Old Olive ink - item 147090 - and Mossy Meadow ink - item 147111);
- Full Basket dies (item 158679) to cut the individual Old Olive cardstock leaves, and Mossy Meadow cardstock sprigs;
- Meadow dies (item 155852) to cut the Smoky Slate cardstock sentiment tag, and the large Mossy Meadow cardstock leaf sprigs;
- Memento Tuxedo Black Ink (item 132708) to stamp the "Love" sentiment (from the Quiet Meadow stamp set - item 155082);
- Craft Stampin' White Ink (item 147277) to sponge the edges of the Basic Black cardstock washtub;
- Basic Black Stampin' Write Marker (item 100082) to add splatters to the embossed panel;
- Basic Black baker's twine (Baker's Twine Essentials Pack - item 155475) for the sentiment tag bow; and
- Classic Matte Dots (item 158146) - Basic Gray dots added to the flower centers.
Using an envelope punch board I made a co-ordinating envelope from a piece of the Perfectly Penciled 12" x 12" Designer Series Paper (item 159244).
Thank you for visiting my blog! I had a lot of fun working on these projects! I hope that Stampin' Up! might bring back the Tree Lot dies - they are so much fun to play with!
If you are interested in purchasing any of the available Stampin' Up! products I have used in my projects, and you live in Canada and do not have a Stampin' Up! demonstrator, please do not hesitate to visit my online store found on my website https://archiesatelier.stampinup.net/ at your convenience, or simply click under the "Shop With Me" tab on the right sidebar of my blog, which will take you directly to my website and online store. I very much appreciate your business! You can browse the PDF versions of the July-December 2022 Mini Catalogue, the May 2022-April 2023 Annual Catalogue, and the July 1 - August 31, 2022 Sale-A-Bration Brochure, anytime on my website. Be sure to take advantage of Sale-A-Bration to get some fun and exciting free products - including the new additions - while stocking up on your art and crafting supplies for fall and Christmas projects! Please check my August 4, 2022, blogpost ("Playing With The Perched In A Tree Bundle!" - https://archiesatelier.blogspot.com/2022/08/playing-with-perched-in-tree-bundle.html) to see the additional Sale-A-Bration products added for August. Remember that the Sale-A-Bration products are available only while supplies last so don't miss out!
Have fun creating!
Laurel


Comments
Post a Comment