Garden Shed Gift Boxes
(featuring the Home & Garden Bundle)

Hello! Today I am sharing two garden shed gift boxes I worked on this week featuring the Stampin' Up! Home & Garden Bundle (item 157919) from the January-June 2022 Mini Catalogue. The bundle includes the Home & Garden stamp set (item 157910) and the Garden dies (item 157918) - each of which can of course also be purchased separately!


At the end of my blog post I will list all of the Stampin' Up! products I used in these projects that are retiring products from the May 2021-April 2022 Annual Catalogue and that are available, while supplies last, during the Last Chance Promotion, which ends on May 2, 2022. Some of the retiring products are available at quite a substantial discount!
Now on with the projects!!
These gift boxes measure 7" tall x 4" wide x 4" deep and for the base of the boxes I used two pieces of 8 1/2" x 11" cardstock scored as follows:
- on the 8 1/2" side at 4" and 8" (the 1/2" tab is the glue tab); and
- on the 11" side at 2" and 7".


Since the roof panels will be adhered to the 4" x 2" tabs on the sides of the box, I did not angle cut when cutting along the vertical score lines - although I did angle cut for the bottom score lines.

For each of the boxes the additional cardstock gable panels were cut using the Stitched Triangles dies (item 152710) and glued on to the front and back gable panels before assembling the box.

Before gluing the bottom sections of the box I used some low-tack tape to temporarily hold the top of the box together:


For the box fasteners I used two of the small Basic Grey slim self-adhesive magnetic discs, purchased at my local scrapbooking store.

For the shingles I cut cardstock strips 4 3/4" long x 3/4" wide - i embossed the strips using the Stripes embossing folder (Stripes & Splatters 3D Embossing Folders - item 157980) and then cut into the strips to create squarish shingles. After cutting I inked the strips (including the cut edges of the "shingles").

The shingle strips were glued to the roof panels, slightly overlapping each strip.
The doors for each box were cut using the Stitched Rectangles dies (item 151820) - for the "birthday wishes" box I cut two doors, using another of the Stitched Rectangles dies to cut the window opening in one door. Behind the window opening I glued a piece of Vellum Cardstock (item 101856), which I had embossed using the Tasteful Textile 3D Embossing Folder (item 152718). I then glued the two door panels together. Before gluing on the Vellum Cardstock window I inked all the edges of the door panel. For both boxes I used the shutter hardware die from the Window Flower Box dies (item 154335) to cut the door hinges from Basic Black cardstock (item 121045). For the door handles I used one of the large black Classic Matte Dots (item 158146).
It is a lot of fun to use a variety of dies for the flowers, grass and foliage - snipping and trimming to create the desired plants - almost like gardening! [https://archiesatelier.blogspot.com/2022/04/a-few-projects-using-window-flower-box.html] Dies used were: Pierced Blooms (item 154312); Birds & More (item 152721); Rain Boots (item 157690); Garden (item 157918); Horizon (item 157778); Honeybee Blooms (item 157951); Grove (item 157844); Dandy Wishes (item 154315); and Meadow (item 155852).
Birthday Wishes Garden Shed


For the box base I used Cinnamon Cider cardstock (item 153078); Misty Moonlight cardstock (item 153081) for the panels; and Gray Granite cardstock (item 146983) for the door, shingle strips, spade and trowel handles, and sentiment panels. The brick paper for the "foundation" is from Bloom Where You're Planted 12" x 12" Designer Series Paper (item 155696). I cut the Misty Moonlight cardstock panels for the front, back, and sides to be 1/8" smaller than the box panels and each panel was scored every 1/8". The scored panels were lightly sponged with Misty Moonlight Ink (item 153118). The shingle strips and door were sponged with Soft Suede Ink (item 47115). For the vertical strips separating the gable panels from the front and back panels I cut Soft Suede cardstock (item 115318) using the Garden dies. I used Crumb Cake cardstock (item 120953) for the ladder (stamped using Soft Suede Ink), the tool hanger (sponged with Soft Suede Ink), and for the trellis (cut using the Rain Boots dies (item 157690):

Dandylion May Good Things Grow Shed


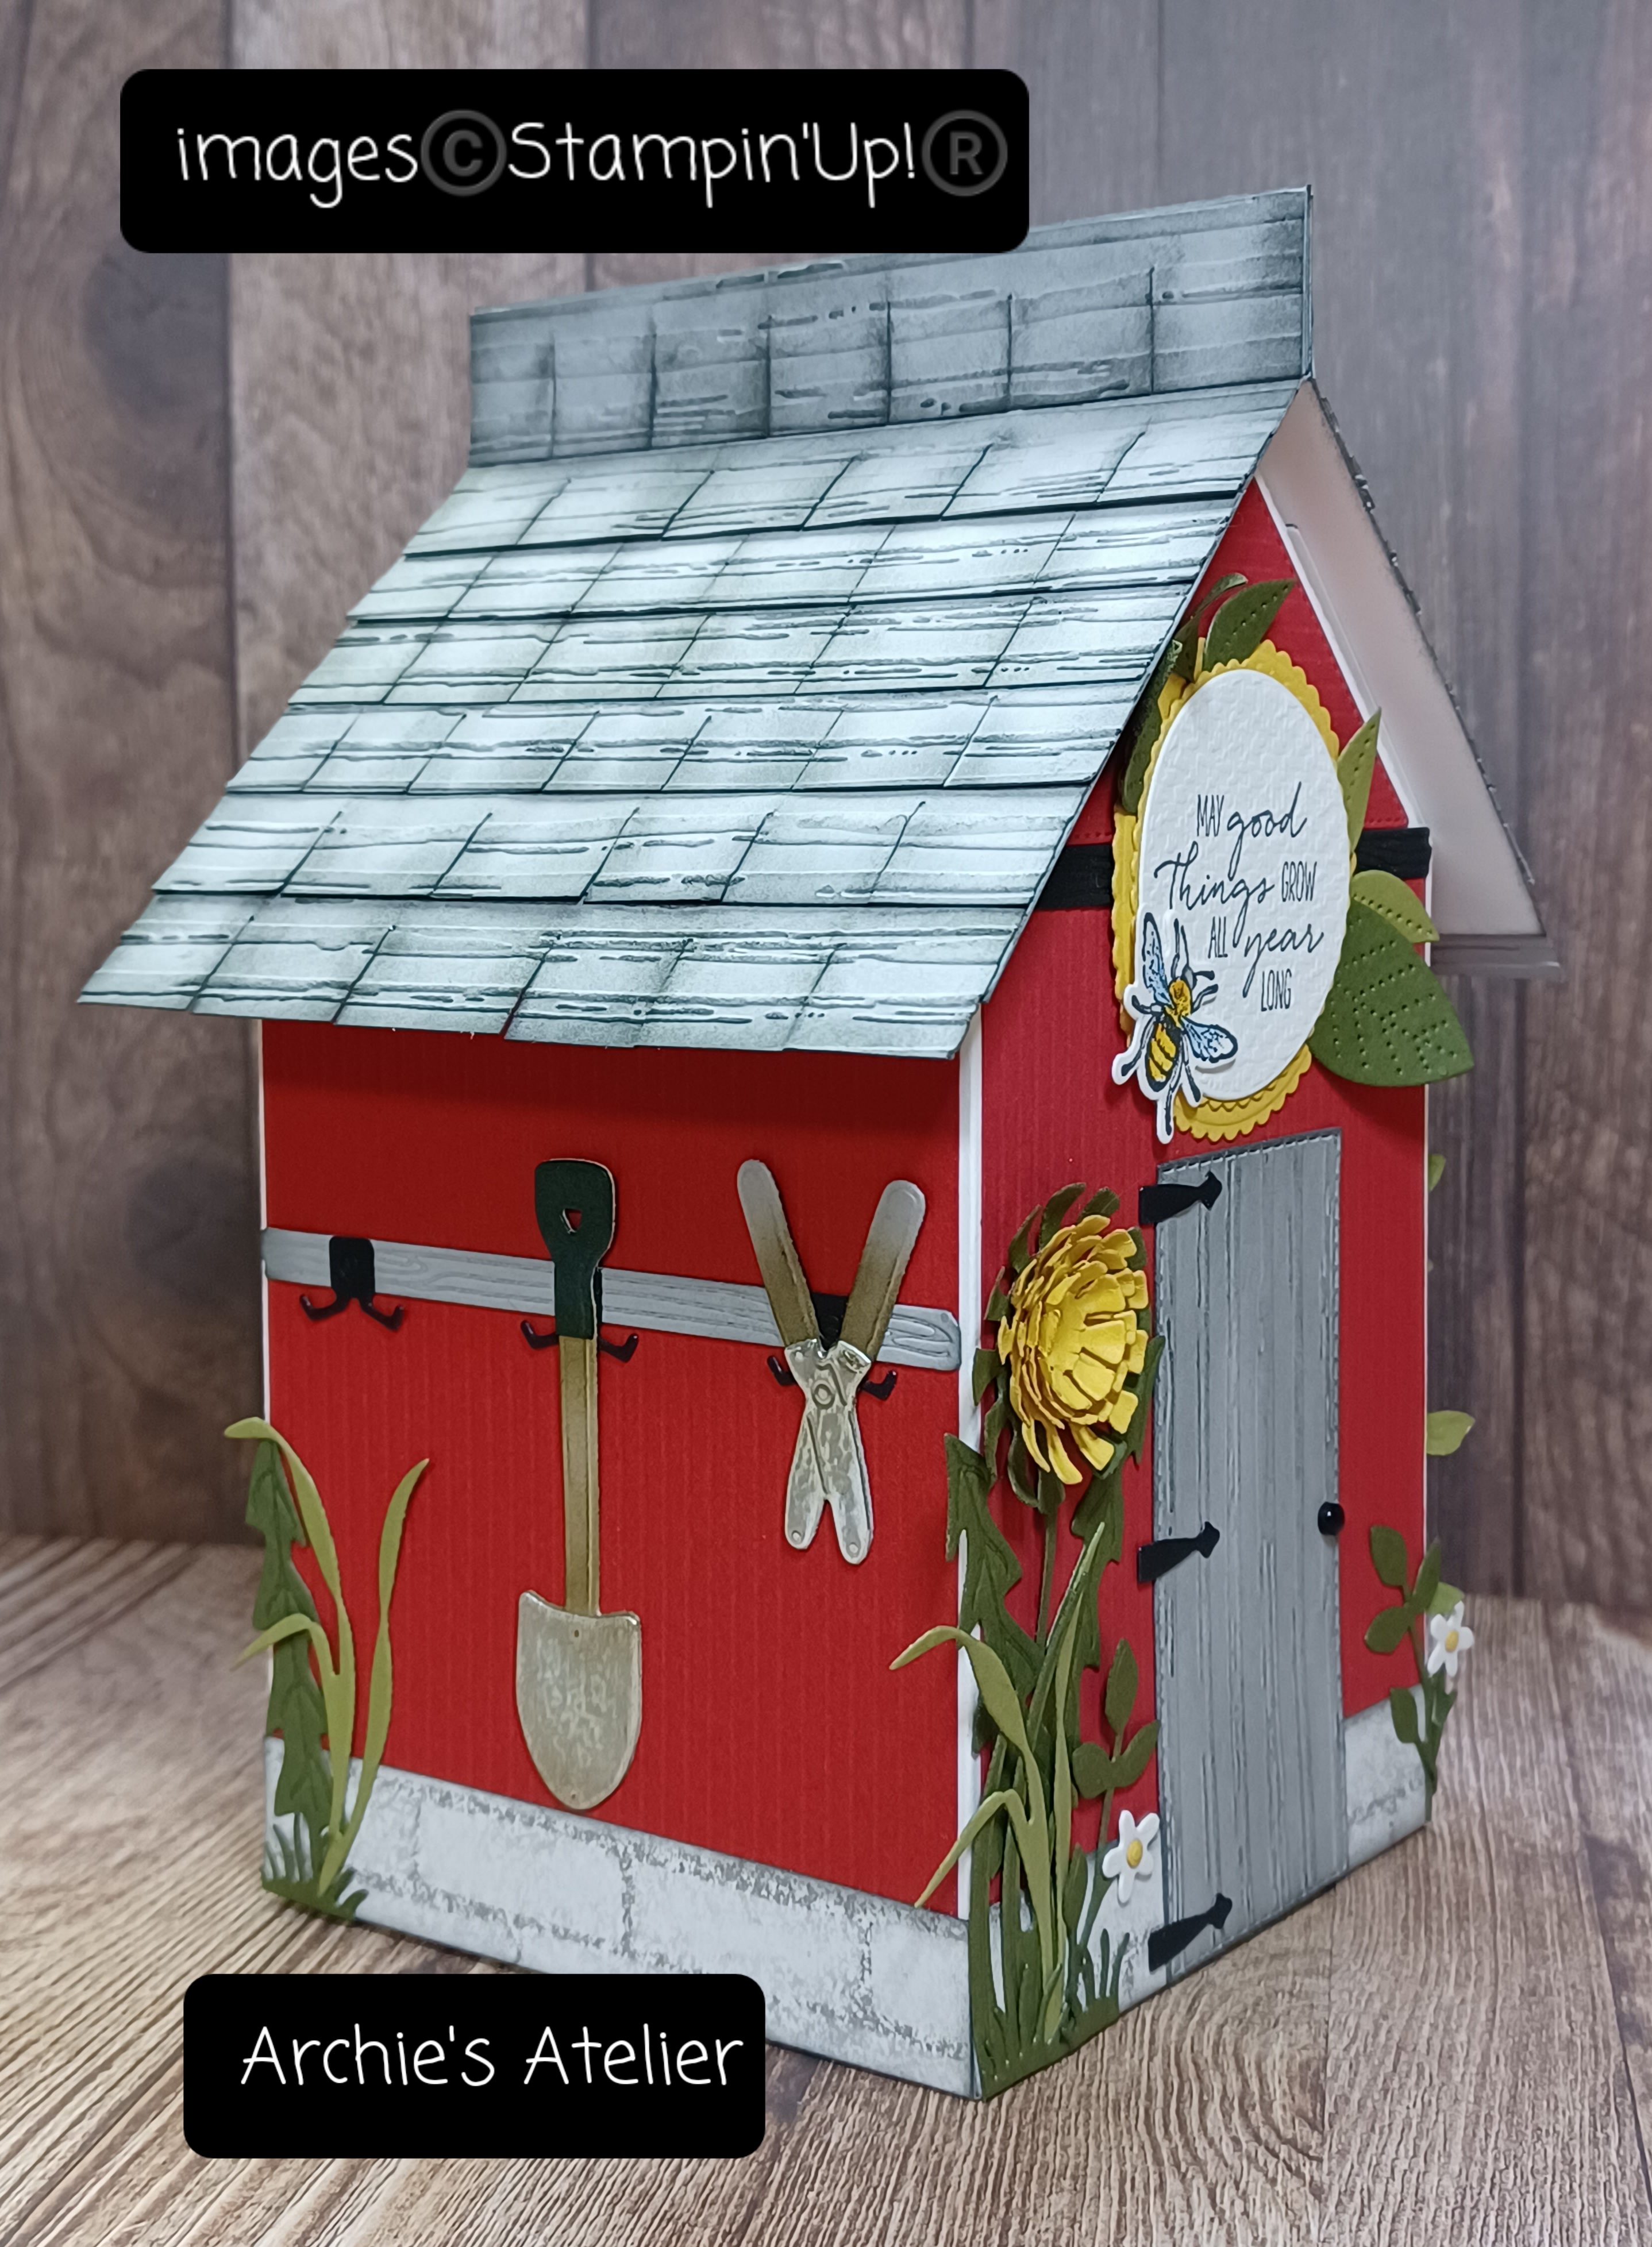


My inspiration (although that might not be the most accurate word to use!) for this shed was the feeling I experience every spring of being almost overwhelmed by the eruption of dandylions - they seem to get bigger and stronger every year! To create my monster flowers I used the Dandy Wishes dies (item 154315) and Bumblebee cardstock (item 153077) and Mossy Meadow cardstock (item 133676).

For the base of the box I used Thick Basic White cardstock (item 159229), with Real Red cardstock (item 102482) for the scored panels. For the door, shingles, and tool hanger I used Smoky Slate cardstock (item 131202) - I sponged the shingles and embossed door with Basic Gray Ink (item 149165). To emboss the door I also used the Stripes embossing folder (Stripes & Splatters 3D Embossing Folders - item 157980). The brick paper used for the "foundation" is from Bloom Where You're Planted 12" x 12" Designer Series Paper (item 155696) - the edges inked with Basic Gray Ink. I used Crumb Cake cardstock (item 120953) for the shaft of the spade and the shear handles - sponged with Soft Suede Ink (item 147115). The tool blades were cut from Silver Foil (Silver Foil 12" x 12" Specialty Pack - item 156457) - for a distressed look I lightly sanded the Silver Foil and then sponged with Soft Suede Ink. I used Basic Black cardstock (item 121045) for the gable panel separation bar (cut using the Garden dies), tool hanger hooks, door hinges, and window frame (cut using the Window Flower Box dies - item 154335). Basic Gray cardstock (item 121044) was used for the spade handle. For the backing for the window I used Balmy Blue cardstock (item 146982), embossed using the Tasteful Textile 3D Embossing Folder (item 152718). The sentiment, from the Dragonfly Garden stamp set (item 154411), was stamped on Basic White cardstock (item 159276) using Memento Tuxedo Black Ink (item 132708). The sentiment panel was embossed using the Tasteful Textile 3D Embossing Folder and then cut using the Layering Circles dies (item 151770), The scalloped circles were cut from Bumblebee cardstock also using the Layering Circles dies. The bee, from the Honeybee Home stamp set (item 157943 - also available as a bundle with the Honeybee Blooms dies - item 157952) was stamped on Basic White cardstock using Memento Tuxedo Black Ink and coloured with alcohol markers. I used the Pierced Blooms dies (item 154312) to cut the little flowers from Basic White cardstock and Bumblebee cardstock - the Bumblebee cardstock centers for the white flowers are the center holes from the reinforcer holes cut using the Tailor Made Tags dies (item 155563). The leaves and grasses were cut from Mossy Meadow cardstock and Old Olive cardstock (item 100702).

Here is the list of the retiring products from the April 2021-May 2022 Annual Catalogue that I used in my projects - available while supplies last during the Last Chance Promotion, which ends on May 2, 2022:
- Cinnamon Cider cardstock - item 153078;
- Misty Moonlight cardstock - item 153081;
- Misty Moonlight Ink - item 153118;
- Bumblebee cardstock - item 153077;
- Bloom Where You're Planted 12" x 12" Designer Series Paper - item 155696;
- Window Flower Box dies - item 154335 - at 20% discount;
- Birds & More dies - item 152721 - at 40% discount;
- Dandy Wishes dies - item 154315 - at 50% discount;
- Pierced Blooms dies - item 154312 - at 50% discount;
- Stitched Triangles dies - item 152710 - at 20% discount; and
- Tasteful Textile 3D Embossing Folder - item 152718 - at 20% discount.
Thank you for visiting my blog! As always I had a lot of fun working on these garden shed gift boxes - despite the monster dandylions!!
If you are interested in purchasing any of the available Stampin' Up! products I have used for these projects, and you live in Canada and do not have a Stampin' Up! demonstrator, please do not hesitate to visit my online store found on my website https://archiesatelier.stampinup.net/ at your convenience, or simply click under the "Shop With Me" tab on the right sidebar of my blog, which will take you directly to my website and online store. I very much appreciate your business! Don't miss out on the one-day only (today - Thursday April 21, 2022) free shipping offer!
Have fun creating!
Laurel
.jpg)
Watching for the UPS truck bringing our SU order!
.
Comments
Post a Comment