Hey What's Cookin'?
(playing with the What's Cookin' Bundle!)

Hello! Today I am sharing a few projects I have been working on this week featuring the Stampin' Up! What's Cookin' Bundle (item 155845), which is one of the selected stamp and die bundles being offered at a 20% savings during the Savings Are In Bloom promotion, which runs until March 31, 2022!

Sending You A Dash of Kindness Book Fold Card


I used Calypso Coral cardstock (item 122925) for the base of this 5" x 5" top-fold book-fold card - the 10" x 5" cardstock was scored on the 10" side at 5" and 6". The 1" "spine" is glued to the inside of the card so that the actual opening size of the card becomes 4" x 5". I used Soft Suede cardstock (item 115318) for the mats for the DSP panels; the large scalloped circle; and the cutting board. I stamped all images on Basic White Thick cardstock (item 159229) using Soft Suede Ink (item 147115), Misty Moonlight Ink (item 153118), and Memento Tuxedo Black Ink (item 132708). The sentiment was stamped with VersaMark Ink (item 102283) on Calypso Coral cardstock and embossed using clear embossing powder (Stampin' Emboss Powders - Basics - item 155554). The sentiment circle, Basic White Thick cardstock scalloped circle and large background circle, and the Soft Suede scalloped circle were all cut using the Layering Circle dies (item 151770). I stamped the splatters on the large white circle using Soft Suede Ink and the splatter stamp from the Forever Fern stamp set (item 152559). The DSP panels were cut from a Calypso Coral/white striped sheet from You're A Peach 12" x 12" Designer Series Paper (item 155685). The little hearts were cut from Poppy Parade cardstock (item 119793) using the small heart die from the Birds & More dies (item 152721). In adhering the mixing bowl and the measuring cups to the front of the card I used a couple of Stampin' Dimensionals (item 104430). Before adhering the matted panel to the "spine" I tied a bow around the panel using Linen Thread (item 104199). For the inside of the card I added a Basic White Thick cardstock panel embellished with a small strip of the DSP, a die cut wooden spoon, and a little heart. Using an envelope punch board I made the co-ordinating envelope from another piece of You're A Peach DSP.
Tip: When cutting stamped images out using co-ordinating dies I have found it very handy to first cut a template with the die from a piece of thick cardstock. Using low-tack tape (such as Washi Tape) I tack down the stamped image on my cutting plate, then tack down the template over the stamped image ensuring proper positioning for the die, which slips into the template. This can take a little time but in the long-run it does save a lot of aggravation caused by an improperly cut image!
Recipe Card Boxes
(to hold 3" x 5" Index Cards)

When I started working on these two little boxes I thought it might be a fun idea for a wedding shower, potluck dinner, cookie exchange etc. - each guest providing his or her recipe on an index card and then the bride or each guest could have a complete set of recipes and a box to hold them all! Maybe the boxes could be made to co-ordinate with the colours of the recipient's kitchen . . .
For each box, which measure 3 1/4" tall x 5 1/8" wide x 1 1/8" deep, I used one 8 1/2" x 11" sheet of cardstock to make both the base of the box and the lid. For the base I cut two pieces of cardstock each measuring 4 1/4" x 6 3/4" - scored on the 4 1/4" side at 1 1/8" (bottom flaps), and scored on the 6 3/4" side at 1/2" and 1 5/8". The 1/2" tabs are the glue tabs - glued to the underside of the edges of the front and back panels. For the lid I cut a piece of cardstock 6 11/16" x 2 11/16" and scored at 3/4" on all four sides.


For my second box I used Basic Black cardstock (item 121045) for both the base and lid with Daffodil Delight patterned paper from the 6" x 6" Designer Series Paper Assortments - Brights (item 155228) for the decorative paper panels for the front, back, and sides of the base, and for the top and sides of the lid. I stamped all images on Basic White Thick cardstock (item 159229) using Soft Suede Ink (item 147115), Misty Moonlight Ink (item 153118), and Memento Tuxedo Black Ink (item 132708). For the wooden spoon, rolling pin, salt & pepper holders, and measuring cups, I used a Blender Pen (item 102845) to
move the ink to "colour" the images before cutting them out with the co-ordinating dies. I did not use a Blender Pen on the mixing bowl. On the front of the box as a base for the images I glued one of the Heart & Home Doilies (item 157956), gluing the little folded section at the top to the inside of the front panel of the box. The large heart, cut from Real Red cardstock (item 102482), was cut using the Kiss Punch (item 154238 - which is currently available on the Clearance Rack!) For the "scalloped" trim on the front edge of the lid I used 4 stitched hearts cut from Daffodil Delight cardstock (item 119683) using the stitched heart die included with the Bouquet of Love Hybrid Embossing Folder (item 157641). The hearts were glued upside down to the inside of the front edge of the lid as shown in the photo below- with the two hearts at each end being slightly angled. Around the lid I tied a bow using the Black & White 1/4" Gingham Ribbon (item 156485).


Cupcake Box - for a sweet treat!


For the base of this 4" tall x 3 1/2" x 3 1/2" cupcake box I used two sheets of Basic Black cardstock (item 121045) each measuring 7 1/2" x 7 1/2" and each scored on one side at 1/2" and 4"; and then scored on the other side at 3 1/2" (bottom flaps). The box base was assembled the same way as the bases for the recipe card boxes. For the lid I cut a piece of Basic Black cardstock 5 9/16" x 5 9/16" and scored at 1" on all four sides. Before cutting the window in the top of the lid I glued the DSP panel to the top of the lid. The Mossy Meadow gingham paper I used for the DSP panels was a sheet I had left over from the Heartwarming Hugs 12" x 12" Designer Series Paper (July - December 2021 Mini Catalogue). The window was cut using the 2 7/16" circle from the Layering Circle dies (item 151770). After cutting the window, and before assembling the lid, I glued a piece of approximately 3" x 3" acetate (Window Sheets - item 142314) to the inside of the lid behind the window opening. After completing the assembly of the lid I glued around the window the three mixing bowls, spatula, and measuring cups - all stamped on Basic White Thick cardstock (item 159229) using Memento Tuxedo Black Ink (item 132708), Real Red Ink (item 147084), Mango Melody Ink (item 147093), and Misty Moonlight Ink (item 153118).
After partially assembling the base of the box - before gluing the bottom flaps and before adhering the DSP panels - I inserted a cupcake holder insert into the base by pushing it up through the bottom. Inside the box I had marked a line approximately 1/2" from the bottom edge of the box base and against this line I lined up the bottom edge of the insert - the insert fitted so snugly that I did not have to use glue to secure it. To make the insert I cut a piece of Basic Black cardstock 5" x 5" and scored at 3/4" on all four sides - before assembling the insert I cut a window opening in the center panel using the same circle die from the Layering Circle dies as I used for the lid window.


And finally . . .
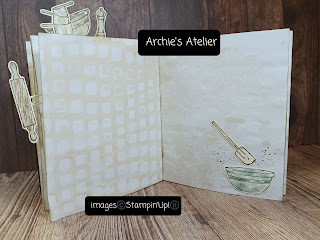
Junk Journal Recipe Book

The inspiration for my final project - a 6 1/2" x 5 1/2" "junk journal" recipe book - were a few of my mother's old recipe books:

I assembled my recipe book/junk journal in the same manner I used for my Ranunculus Romance junk journal/notebook (https://archiesatelier.blogspot.com/2022/02/a-few-projects-using-ranunculus-romance.html) For the cover I used Evening Evergreen cardstock (item 155574) - cut at 11" x 6 1/2" and scored at 5 1/2" on the 11" side. Before assembling the book I stamped the front and back covers using Evening Evergreen Ink (item 155576). For the book's one signature I used nine sheets of my coffee-stained printer paper for a total of thirty-six pages for the book. To sew in the signature I used Evening Evergreen baker's twine from Fan Baker's Twine (item 158143) and the "3-hole pamphlet stitch". I sponged Soft Suede Ink (item 147115) around the edges of all the pages. To the inside front and back covers I added a dimensional pocket - for the front I used Crumb Cake cardstock (item 120953) and for the back I used Evening Evergreen cardstock - cardstock cut at 6" x 4" and scored at 1/2" on the sides and bottom. For the front panel I cut two labels using the Stitched So Sweetly dies (item 151690) - the larger scalloped-edged rectangle cut from Crumb Cake cardstock and the smaller label cut from Soft Suede cardstock (item 115318). Using Soft Suede Ink and the splatter stamp from the Forever Fern stamp set (item 152559), I stamped a background on the Crumb Cake label. The images were stamped on Very Vanilla Thick cardstock (item 144237) using Soft Suede Ink and Evening Evergreen Ink. The knife, spatula, and whisk were cut from Silver Foil (Silver Foil 12" x 12" Specialty Pack - item 156457), and the handles cut from Soft Suede cardstock. I lightly sanded the Silver Foil and then sponged it with Soft Suede Ink to help add a time-worn effect. The little vegetable tag was cut using the small tag die from the Ornate Frames dies (item 150664), and I added a Linen Thread (item 104199) bow. To each corner of the Crumb Cake label I adhered one of the Brushed Metallic Adhesive-Backed Dots (item 156506). To decorate the book pages I used a combination of stamped and stamped/die cut images. To maintain the well-worn effect I limited the colour palette to Evening Evergreen, Crumb Cake, Soft Suede, and Very Vanilla. I also added a few of the stamped/die cut images to some gold paper clips - regular and jumbo size - for a few fun little place holders. All I have to do now is add the recipes!


I had a lot of fun working on these projects and I think that the What's Cookin' Bundle would also be great for making gift tags for anyone who likes to gift home-baked or home-cooked goodies!
Thank you for visiting my blog! If you are interested in purchasing any of the available Stampin' Up! products I have used in my projects, and you live in Canada and do not have a Stampin' Up! demonstrator, please do not hesitate to visit my online store found on my website https://archiesatelier.stampinup.net/ at your convenience, or simply click under the "Shop With Me" tab on the right sidebar of my blog, which will take you directly to my website and online store. I very much appreciate your business! You can also check out all the die and stamp bundles that are featured in the Savings Are In Bloom promotion that runs until March 31, 2022! And don't forget to check out the Clearance Rack!
Have fun creating!
Laurel
Comments
Post a Comment