A few projects using the Ranunculus Romance Bundle

Hello! Today I am sharing a few projects I worked on this week using the Stampin' Up! Ranunculus Romance Bundle (item 157977) from the January-June 2022 Mini Catalogue. The bundle includes the Ranunculus Romance stamp set (item 157968) and the Ranunculus dies (item 157976), each of which can also be purchased separately of course! I had a lot of fun playing with both the stamps and the dies!


I completed the journal cover before I sewed in the pages. I cut the photocopied photo using the Scalloped Contours dies (item 155560), and then glued the photo to a woodgrain DSP mat (from In Good Taste Designer Series Paper - item 152494), which was glued to a Very Vanilla cardstock (item 101650) mat allowing for a 1/8"wide border. To the base of the front cover I glued a mat of Sahara Sand cardstock (item 121043), topped with a tweed DSP mat (also from In Good Taste DSP). Before adding the photo mat to the front cover I glued one of the Heart & Home Doilies (item 157956) to the upper right corner. The doilies come in three colours - Cinnamon Cider, Basic Gray, and Misty Moonlight - but all are white on the reverse side, which allows for "freedom of expression" in colouring! I sponged the white side of the doily with Crumb Cake ink (item 147116). For the die-cut leaves, and the base of the large die-cut bloom, I used Soft Suede cardstock (item 115318); for the detail bloom I used Petal Pink cardstock (item 146985); and Very Vanilla Thick cardstock (item 144237) for the stamped flowers, text fragment, and sentiment. Immediately after inking the text fragment and sentiment I "buffed" the ink with a little piece of dry paper towel to help soften the edges and slightly "smear" the ink (another part of the distressing process!) I also lightly sponged the torn edges of the text fragment panel with Soft Suede ink (item 147115), and cut the sentiment circle using the Layering Circles dies (item 151770). I adhered the tiny scrap of Soft Suede cardstock to the side of the text fragment panel with a tiny staple, After assembling the journal I glued on two of the Bumblebee Trinkets (item 155568). To help with the distress look for the journal I "ruffled" the edges of the covers and the cardstock mats with the side of my craft knife.


I "sewed" the pages into the journal using the "3-hole pamphlet stitch" with Linen Thread (item 104199) threaded through an embroidery needle. Inserting the folded and aligned pages between the journal covers, and temporarily holding them in place with a couple of binder clips, I first marked and then poked - using the "pick" end of the Take Your Pick tool (item 144107) works great for this! - three holes down the center fold of the middle page through all pages and the spine of the cover - one hole in the middle and one approximately 1/2" from each of the top and bottom of the journal. I used a length of Linen Thread approximately three times the height of the journal and tied a bow in the middle center of the journal.

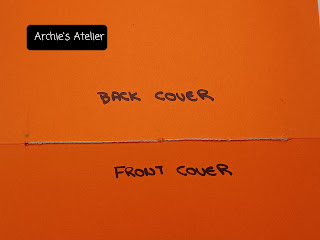
Although there are many excellent You Tube tutorials for the 3-hole pamphlet stitch I have included the following photos, which I hope will help clarify my explanation (for the sake of simplicity in these photos I am only showing the "cover" - but the holes would be punched through all the pages as well as the spine of the cover - and apologies for my atrocious printing!):


After assembling the journal I then embellished several of the pages:


I also made a few cards:


I must admit that I did not know exactly what kind of flower/plant a ranunculus was so why not type out a dictionary definition! For this 5 1/4" x 5 1/2" card I printed the definition sheet on a piece of Crumb Cake cardstock (item 120953) - after trimming the panel to 4 3/4" x 5 1/8" I sponged the edges with Soft Suede ink (item 147115) and then splattered it with white paint. I glued the definition panel to a Basic Black cardstsock (item 121045) panel allowing for a 1/8" border. I "ruffled" the edges of the Basic Black cardstock panel with the side of my craft knife. The text fragment, "Hello" sentiment, and Eiffel Tower images were all stamped using Memento Tuxedo Black Ink (item 132708) - the text fragment and Eiffel Tower images on Crumb Cake cardstock, and the "Hello" on Very Vanilla Thick cardstock (item 144237). The Eiffel Tower circles were cut using the Layering Circle dies (item 151770) - I adhered the circle to the front panel using two Stampin' Dimensionals (item 104430). I "ruffled" the edges of the text fragment, and sponged the edges of it and the Eiffel Tower circles with Soft Suede ink. The leaves were cut from Old Olive cardstock (item 100702), Mossy Meadow cardstock (item 133676), and for the sprig used on the inside panel, Pear Pizzazz cardstock (item 131201). The base of the flower bloom was cut from So Saffron cardstock (item 105118), and the detailed bloom was cut from Bumblebee cardstock (item 153077). As a little embellishment I added one of the Bumblebee Trinkets (item 155568). For the inside of the card I cut a Very Vanilla Thick cardstock panel, which was matted with a "ruffled" edge Basic Black cardstock panel.

For this very simple 4 3/4" x 3 1/4" card I stamped the flower and sentiment on watercolour paper using Stazon Jet Black Ink (item 101406). After tearing the top and bottom I "watercoloured" around the image and the edges of the paper using the Basic Gray and Basic Black watercolour pencils (Water Colour Pencils - Assortment 1 - item 141709). After wrapping some Linen Thread (item 104199) around the bottom of the paper (and tying a bow) I glued the watercolour panel to a Basic Black cardstock (item 121045) panel, which I then glued to the card front.


I used Basic Gray cardstock (item 121044) for the base of this 5 3/8" x 4" card. I used the Stitched Rectangle dies (item 151820) to cut the wood plank DSP panel (Heart & Home 12" x 12" Designer Series Paper - item 157928) as well as the "windows". For the backing of the "window" (and the background for the flowers that were stamped on Basic White Thick cardstock - item 159229 using Memento Tuxedo Black Ink - item 132708) I used another piece of Heart & Home DSP - it is actually the reverse side of the wood plank DSP. The wood plank DSP panel was adhered to a "ruffled" edge Basic Black cardstock (item 121045) panel, which was then glued to the card front. I used Garden Green cardstock (item 102584) to cut the leaves. The sentiment was also stamped on Basic White Thick cardstock using Memento Tuxedo Black Ink and "bubble cut" using my Paper Snips Scissors (item 103579), and adhered using a small strip of Foam Adhesive Strips (item 141825). The butterfly was cut from Basic Black cardstock and Bumblebee cardstock (item 153077) using the butterfly dies from Daffodil dies (item 157794), I brushed some Wink of Stella Clear Glitter (Brush) - item 141897 - on the Bumblebee cardstock portion of the butterfly and embellished the body by adding one of the Basic Gray small Classic Matte Dots (item 158146). I threaded a small piece of Linen Thread (item 104199) through the middle of the black button that was from my stash. I made the co-ordinating envelope from a piece of the Heart & Home DSP using an envelope punch board.
And finally . . .

I used Bumblebee cardstock (item 153077) for the base of this 5 3/8" x 3 7/8" card. The flower image was stamped on watercolour paper using Stazon Jet Black Ink (item 101406), and coloured using Daffodil Delight and Old Olive watercolour pencils from Watercolour Pencils - Assortment 1 (item 141709), and then cut using the Tailor Made Tags dies (item 155563) - the hole reinforcer was cut from Soft Suede cardstock (item 115318). Two additional tags were cut - Bumblebee cardstock and Basic Black cardstock (item 121045). The foliage was cut from Basic Gray cardstock (item 121044). The sentiment and text fragment were stamped on Very Vanilla cardstock (item 101650) using Memento Tuxedo Black Ink (item 132708), and cut using the Ornate Frames dies (item 150664). The little label was sponged lightly with Soft Suede ink (item 147115). The tags were adhered to a Basic Gray cardstock panel that was embossed using the Painted Texture 3D Embossing Folder (item 154317), and then glued to a Basic Black cardstock panel. The flower tag, adorned with a Linen Thread (item 104199) bow, was adhered using Foam Adhesive Strips (item 141825). To embellish the Basic Gray cardstock panel I added two of the black Classic Matte Dots (item 158146).
Thank you for visiting my blog! If you are interested in purchasing any of the available Stampin' Up! products I have used, and you live in Canada and do not have a Stampin' Up! demonstrator, please do not hesitate to visit my online store on my website https://archiesatelier.stampinup.net/, or click on the "Shop With Me" tab on the right sidebar of my blog which will take you directly to my website and online store. Your business is very much appreciated!
Have fun creating!
Laurel

Comments
Post a Comment