A Few More Scenic Adventures!
Hello! Today I am sharing a few more projects I worked on this week using the Stampin’ Up!® Online Exclusives Scenic Adventure dies (item 165467). These dies are also available together with the Scenic Adventure stamp set (item 165466) in the Scenic Adventure Bundle (item 165468). To complete my projects this week I used additional current, retiring, and recently retired Stampin’ Up!® products - including the very recently retired In The Grove dies (item 163511), which were featured in the May 2024-April 2025 Annual Catalogue, and are a great complement to the Scenic Adventure dies!
Additional dies used:
- recently retired Delicate Forest (item 162679) - edge die with two small leafy stems (small framed project);
- recently retired Country Birdhouse (item 163400) - small flowers;
- Online Exclusives Impressions Abloom (item 165610) - tiny flowers that were used on their own, and also layered with the two Country Birdhouse die cut flowers;
- Gallery Blooms (item 165211) - additional foliage and frames;
- recently retired Pocket Thoughts (item 163552) - there are three pocket dies included in this set of dies that were featured in the May 2024-April 2025 Annual Catalogue, and the middle size pocket is the perfect size to hold a gift card;
- Nested Essentials (item 161597) - I used the 1 5/8" x 2 3/8" rounded corner rectangle die to cut window openings in the Pocket Thoughts pocket die cuts (Scenic Adventure/In The Grove tag and the "Archie" Welcome card). I used low-tack tape to hold the Nested Essentials and Pocket Thoughts dies together while I passed the dies and Designer Series Paper through the Stampin' Cut & Emboss Machine (item 149653); and
- Stylish Shapes (item 159183) - square dies used to cut window openings in framing mats for the two Scenic Wonder/In The Grove cards.
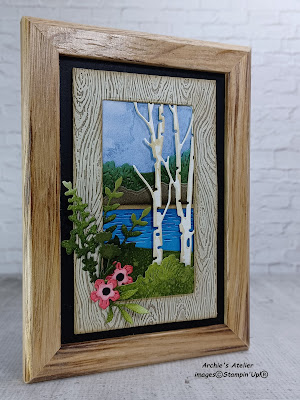
The Gallery Blooms frames were die cut from cardstock that had been embossed using the recently retired Timber 3D Embossing Folder (item 156406). Before embossing the cardstock I dragged an ink pad across the raised design on one of the inside panels of the embossing folder. The smaller frame was die cut from Basic Beige cardstock (item 164511), a Crumb Cake ink pad (item 147116) dragged across the embossing folder inside panel; the larger frame was die cut from Pecan Pie cardstock (item 161717), a Pecan Pie ink pad (item 161665) dragged across the embossing folder inside panel. The edges of the die cut frames were sponged, respectively, with Crumb Cake ink; and Pecan Pie ink and Early Espresso ink (item 147114).
I used watercolour paper for the birch tree die cuts - using a small paint brush to colour the trees with Crumb Cake ink refill (item 121029) mixed with a little water. The grass bases of the trees were coloured with Mossy Meadow ink refill (item 133651), also mixed with water and applied using a small paint brush. Additional die cuts were cut from cardstock, and - with the exception of the silhouette project - I used Small Blending Brushes (item 160518 - package of three) to apply Classic Stampin' inks to the cardstock die cuts for additional colour (shading). For some of the shaded cardstock die cuts I added a little additional visual texture by lightly spritzing the die cuts with water using one of the Stampin' Spritzers (item 126185 - package of two), allowing to air dry or blotting dry with paper towel.
For additional ground cover, evergreen trees (including tree lines), and other foliage - with the exception of the silhouette project - I used Lemon Lime Twist cardstock (item 144245), Old Olive cardstock (item 100702), Garden Green cardstock (item 102584), Lost Lagoon cardstock (item 133679), and Mossy Meadow cardstock (item 133676) - all shaded with Mossy Meadow ink (item 147111). I used Early Espresso ink to shade the trunks of the double evergreen tree die cuts.
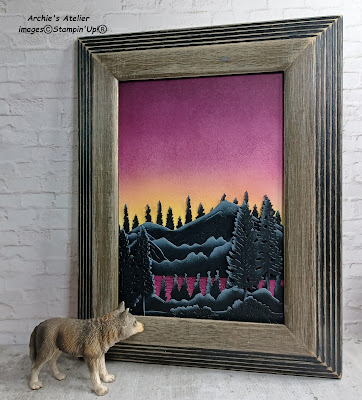
For water I used Azure Afternoon cardstock (item 161719), shaded with Misty Moonlight ink (item 153118); Coastal Cabana cardstock (item 131297), shaded with Shaded Spruce ink (item 147088); and, for the silhouette project, Berry Burst cardstock (item 144243), shaded with Berry Burst ink (item 147143).
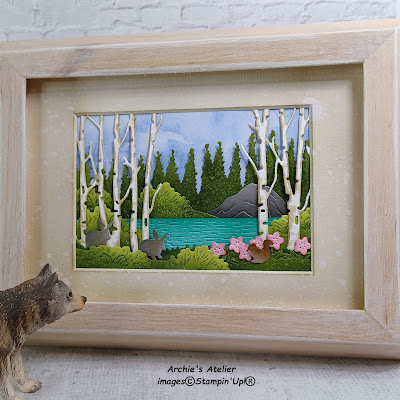
For the large rock (or small hill) on the bunnies at the water's edge project I used Gray Granite cardstock (item 146983), shaded with Basic Gray ink (item 149165).
For the two small bunny die cuts I used Gray Granite cardstock, shaded with Crumb Cake and Basic Gray inks, and highlighted with Craft Stampin' White Ink (item 147277) applied with one of the finger Sponge Daubers (item 133773 - package of five). For the squirrel die cuts I used Pecan Pie cardstock, shaded with Pecan Pie ink, and also highlighted with Craft Stampin' White Ink applied with one of the finger Sponge Daubers.
For the two Country Birdhouse flowers I used Strawberry Slush cardstock (item 165625), shaded with Real Red ink (item 147084); and Pretty In Pink cardstock (item 163793) for the small Impressions Abloom flowers, also shaded with Real Red ink. For the sandy shoreline on the small Gallery Blooms frame project I used a very narrow strip of Crumb Cake cardstock (item 120953), shaded with Crumb Cake and Early Espresso inks.
For the silhouette project all die cuts - with the exception of the water - were cut from Basic Black cardstock (item 121045), and highlighted with Craft Stampin' White Ink applied with one of the finger Sponge Daubers.
For the sky panel on the silhouette project I applied Daffodil Delight ink (item 147094), Berry Burst ink, and Blackberry Bliss ink (item 147092) with Blending Brushes (item 153611 - package of three) to a 7 1/8" x 5 1/8" panel of watercolour paper. For additional sky panels I used panels trimmed from the Thoughtful Journey 6" x 6" Designer Series Paper (item 163303), and the Online Exclusives Mixed Media Florals 12" x 12" Designer Series Paper (item 164638).
Just a brief note regarding the additional basic tools and supplies I used to complete the projects - in addition of course to the Stampin' Cut & Emboss Machine that was used for all die cutting and embossing:
- Paper Trimmer (item 152392) - for trimming cardstock, watercolour paper, and DSP, and for scoring card fold lines. To ensure crisp folds I used my Bone Folder (item 102300) to burnish the scored and folded lines;
- Paper Snips Scissors (item 103579) - these sharp little scissors are great for doing any necessary trimming of die cuts, and for fussy cutting the feline image on my "Archie" project. Unfortunately, Stampin' Up! advises that the manufacturer has ceased production of the Paper Snips Scissors, and, consequently Stampin' Up! is limited to the supply of the scissors currently on hand. As soon as the on hand supply is depleted the scissors will be removed from the online store. Stampin' Up! is exploring alternative manufacturing options with the hope that these scissors - or a very similar product - can be brought back in the not-too-distant future - in the meantime if you would like a pair - or additional pairs! - it would be advisable to order them sooner rather than later to avoid disappointment;
- Take Your Pick Tool (item 144107) - the spatula and tacky putty tips are definitely a great help for manipulating and placing small die cuts; and
- for the main adhesive, Multipurpose Liquid Glue (item 110755).
On with the projects!
Additional supplies used to complete this bunnies (and squirrel) at the water's edge project:
- a thrift store wood frame - glass removed - with outside dimensions of 8 3/8" x 6 3/8", and back opening of 7 1/4" x 5 1/4". After using a medium grit sandpaper to remove the varnish from the frame I used a paper towel to rub a "white wash" of white acrylic paint over the frame - I used paint picked up in the craft aisle of Dollarama; and
- a reclaimed off-white photo mat from my stash having an inside opening of 4 1/2" x 3". I lightly sponged Crumb Cake ink (item 147116) over the mat, spritzing lightly with water (Stampin' Spritzers - item 126185) and blotting dry with paper towel.
Additional supplies used to complete the second project:
- a dollar store wood frame, glass removed, with outside dimensions of 5 3/4" x 4 1/4", and back opening of 5" x 3 1/2";
- a 5 " x 3 1/2" panel of Basic Black cardstock (item 121045) for the backing panel;
- strips trimmed from Foam Adhesive Sheets (item 152815) to attach the framed scene to the Basic Black cardstock backing panel; and
- Basic Black cardstock for the small circles used for the flower centers, cut using a 1/8" hole punch.
Additional supplies used to complete the silhouette big sunset sky project:
- thrift store wood frame, glass removed, with outside dimensions of 9 5/8" x 7 1/2", back opening of 7 1/8" x 5 1/8". I used a medium grit sandpaper to further distress the frame; and
- Mini Stampin' Dimensionals (item 144108), trimmed as necessary, to attach, and slightly pop up, the two double evergreen tree die cuts.
Additional supplies used to complete this 5 1/2" square top-fold card:
- Basic White Thick cardstock (item 159 229) for the card base, and the 4 3/4" square inside panel;
- Gray Granite cardstock (item 131202) for the front and inside 5 1/8" square matting panels;
- Basic Gray cardstock (item 121044) for the front and inside 5" square matting panels; and
- watercolour paper for the scene framing mat(s) - I used the Stylish Shapes 2 1/2" square die to cut the window(s). This ended up being quite a substantial card - so definitely one to be hand delivered! - because I had initially glued the pieces for the scene directly to the back of the watercolour paper matting panel, and, because I didn't like the resulting lumpy effect on the front of the watercolour paper mat I ended up cutting another mat and securing it with double-sided tape (Tear & Tape Adhesive - item 154031) directly over the original mat. I also used the double-sided tape to attach all the card's matting panels, and to attach the completely matted scene to the card front.
I used an envelope punch board to make an envelope for this heavyweight card from woodgrain patterned paper from the retired In Good Taste 12" x 12" Designer Series Paper (item 152494), and sponged all edges with Early Espresso ink (item 147114).
Additional supplies used to complete this 5" square top-fold card:
- Basic White Thick cardstock (item 159229) for the card base;
- watercolour paper for the 3 3/4" square scene framing matting panel - I used the Stylish Shapes 2 1/2" square die to cut the window;
- Basic Black cardstock (item 121045) for the 4 1/4" square matting panel - I used the Stylish Shapes 2 15/16" square die to cut the window; and
- strips trimmed from Foam Adhesive Sheets (item 152815), applied to the back of the watercolour paper framing mat, to attach the scene (which I assembled on the Thoughtful Journey DSP sky panel) to the watercolour paper framing mat. I used doubled-sided tape (Tear & Tape Adhesive - item 154031) to attach the Basic Black cardstock matting panel over the watercolour paper framing mat, and Multipurpose Liquid Glue to attach the completely matted scene panel to the card front.
I used an envelope punch board to make an envelope for this card from one of the leftover black and white patterned sheets from the retired Rustic Harvest 12" x 12" Designer Series Paper (item 159633).
And finally . . .
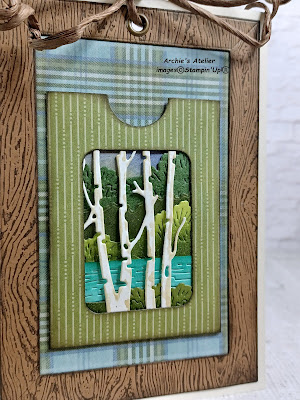
For this pocket tag project I again assembled the scene on the Thoughtful Journey DSP sky panel before gluing the completed, and trimmed, scene panel behind the window opening in the pocket. To complete this 5 5/8" x 3 7/8" tag project I used the following additional supplies:
- Very Vanilla cardstock (item 166784) for the tag base;
- Old Olive patterned paper from the Online Exclusives Floral Impressions 12" x 12" Designer Series Paper (item 165603) for the pocket - all edges of the die cut pocket (including around the window opening) sponged with Early Espresso ink (item 147114); and
- Lost Lagoon/Boho Blue/Old Olive patterned paper from the Timeless Plaid 6" x 6" Designer Series Paper (item 164678) for the 4 5/8" x 3" frame-backing panel.
I used my Crop-A-Dile to punch the hole for and to set the antique 1/4" brass eyelet (purchased at my local scrapbooking shop). I used some "almost Pecan Pie" paper wrapped ribbon picked up at Dollarama for the bow.
For my "Archie" project this week, included at the bottom of this blog post, I made a pocket card - the pocket will hold a gift card that is a "welcome" present for a friend's newest four-legged family member. For the base of the 4 1/4" x 3 1/4" top-fold card I used Basic White Thick cardstock (item 159229), adding a 4" x 3" Basic Black cardstock (item 121045) matting panel for the 3 7/8" x 2 7/8" panel trimmed from an Old Olive patterned paper from the retiring - and currently available as one of the discounted Last Chance Products - Season Of Green & Gold 12" x 12" Specialty Designer Series Paper (item 164324). For the pocket I used one of the denim designs from the Country Lace 12" x 12" Designer Series Paper (item 163415), sponging around all edges (including around the window opening) with Early Espresso ink (item 147114). Behind the window opening I glued a trimmed piece of Smoky Slate patterned paper from the Country Lace DSP, on which I had stamped script and splatter images from the Online Exclusives Elements Of Text stamp set (item 164774) using StāzOn Jet Black Ink (item 101406). I also used StāzOn Jet Black Ink to stamp the feline with tail so demurely curled from the retired Online Exclusives Pets & More stamp set (item 163607) on watercolour paper, colouring him using Pumpkin Pie ink (item 147086) and Real Red ink (item 147084). After fussy cutting the image I sponged Crumb Cake ink (item 147116) around the edges. The "Welcome" from the retiring - and currently available as one of the discounted Last Chance Products - Humble Home stamp set (item 164286) was stamped on a watercolour paper tag die cut using the Online Exclusives Tags To Go dies (item 165576), also using StāzOn Jet Black Ink. I shaded the sentiment tag with Crumb Cake ink. The Gallery Blooms and Scenic Adventure foliage was die cut from Lemon Lime Twist cardstock (item 144245), Old Olive cardstock (item 100702), and Mossy Meadow cardstock (item 133676), and shaded with Mossy Meadow ink (item 147111). After gluing the sentiment tag to the back of "Archie" I used Mini Stampin' Dimensionals (item 144108) - trimmed as necessary - to attach both to the front of the pocket. To the inside of the card I added strips trimmed from the DSP used for both the pocket and the back panel.
Thank you for visiting my blog! I had a lot of fun building more scenes this week!
Stampin' Up! advises that the following products I used this week are not currently available, but I have included the date that Stampin' Up! expects the products to again be available for ordering:
- StāzOn Jet Black Ink (item 101406) - week of July 21, 2025;
- Gallery Blooms dies (item 165212) - week of July 28, 2025; and
- Impressions Abloom dies (item 165610) - week of August 11, 2025.
If you are interested in purchasing any of the available Stampin’ Up!® products I have used in my projects, and you live in Canada and do not have a Stampin' Up! demonstrator, please do not hesitate to visit my online store found on my website https://archiesatelier.stampinup.net/ at your convenience, or simply click under the "Shop With Me" tab on the right sidebar of my blog, which will take you directly to my website and online store. I very much appreciate your business and would be very pleased to be your demonstrator! If you need any assistance please do not hesitate to contact me (lmccoyarchie@gmail.com) and I will try my best to help! The digital version of the May 2025-April 2026 Annual Catalogue is available for you to access at your convenience on my website. If visiting the online store don't forget to check out the entire line of Online Exclusives products - including all the new products released July 1 - as well as all the Last Chance Products! Just a reminder that all Last Chance Products remain available only while supplies last!
Have fun creating!
Laurel
*It has come to my attention that quite often email correspondence from me is delivered to the recipient's spam or junk mail folder - if you have corresponded with me I have replied so be sure to check your spam or junk mail folder! Thank you!!


.webp)
.jpg)
.webp)

.webp)


.webp)


Comments
Post a Comment