A Silly Safari!

Hello! Today I am sharing a few projects I worked on this week using the new Stampin’ Up!® Silly Safari stamp set (item 165254). This photopolymer stamp set is featured in the May 2025-April 2026 Annual Catalogue, and is also available together with the 1 7/8" Circle Punch (item 165259) in the Silly Safari Bundle (item 165260). When your craft room - which really means the whole house - feels a little too quiet and empty without your long-time feline companion and enthusiastic project supervisor, a little Silly Safari will certainly help lift your spirits!

For my projects this week I used Stazon Jet Black Ink (item 101406) to stamp the images for colouring on watercolour paper. I used a combination of Classic Stampin' inks and Classic Stampin' ink refills to colour the images - using small tipped paint brushes to apply the inks and ink refills that were mixed with a little water. Additional stamping of an image on cardstock, and a sentiment on Designer Series Paper was also done using Stazon Jet Black Ink.
Foliage and floral cardstock die cuts were shaded with Classic Stampin' inks applied using Small Blending Brushes (item 160518 - package of three). To add some additional visual texture (a mottled effect) to foliage die cuts I lightly spritzed the shaded cardstock die cuts with water using one of the Stampin' Spritzers (item 126185 - package of two), blotting dry with paper towel.


With one exception I used Basic White Thick cardstock (item 159229) for the card bases.
I used the following stamp sets and dies to complete the projects:
- Gallery Blooms stamp set (item 165211) for floral images, and the co-ordinating Gallery Blooms dies (item 165212) to die cut the images and to die cut additional foliage. *The Gallery Blooms stamp set and Gallery Blooms dies are also available together in the Gallery Blooms Bundle (item 165213)*;


- Online Exclusives Impressions Abloom dies (item 165610) to cut petals (framed zebra project), and long four-leafed stems;
.webp)
- "wonky" circle dies from the Online Exclusives Around It All dies (item 164725) to cut an image circle, and matting circle for the image circle; a "window" in a square frame cut using the Stylish Shapes dies (item 159183); and an image frame. When cutting the frame I used low-tack tape to hold together the two circle dies that created the frame when passing the dies and cardstock through the Stampin' Cut & Emboss Machine (item 149653). When cutting the circle window in the square frame I also used low-tack tape to hold together the square and circle dies when passing the dies and cardstock through the Stampin' Cut & Emboss Machine. I also used square dies from the Stylish Shapes dies to cut the "window" in the "Polaroid" frame on the monkey card, and the image square on the rhino card;


- Perennial Postage dies (item 162607) to cut the "party animal" cheetah image;

- the 2024 Sale-A-Bration Jungle Pals dies (item 162973) for the two tropical leaf die cuts; and
- for the "Archie" card (a photo included at the end of the blog post), the retired Cheerful Basket stamp set (item 158674) and co-ordinating Full Basket dies (item 158679) to stamp and die cut the cat and butterfly images. The Cheerful Basket stamp set and Full Basket dies were featured in the May 2022-April 2023 Annual Catalogue.
Foliage was die cut from Lemon Lime Twist cardstock (item 144245) and Granny Apple Green cardstock (item 146990), and shaded with Mossy Meadow ink (item 147111).
In addition to the Stampin' Cut & Emboss Machine, which was used for all die cutting, I used the following basic tools and supplies to complete my projects this week:
- Paper Trimmer (item 152392) - for trimming cardstock and Designer Series Paper, and for scoring card fold lines. To ensure crisp folds I used my Bone Folder (item 102300) to burnish the scored card folds;
- Paper Snips Scissors (item 103579) - these sharp little scissors certainly made fussy cutting the monkey and zebra images a whole lot easier!;
- Take Your Pick Tool (item 144107) - the tacky putty tip is definitely a great help for picking up and placing small die cuts and embellishments; and
- for the main adhesive, Multipurpose Liquid Glue (item 110755).


Additional supplies used to complete this 5" x 3 1/2" top-fold card:
- Basic White Thick cardstock (item 159229) for the "Polaroid" frame;
- linen patterned paper from the Online Exclusives Woven Textures 12" x 12" Designer Series Paper (item 165560) for the 4 7/8" x 3 3/8" background panel - all edges of the DSP panel sponged with Crumb Cake ink (item 147116);
.webp)
- Pecan Pie ink refill (item 161669), Crumb Cake ink refill (item 121029), and Real Red ink (item 147084) to colour the monkey images;
- Real Red ink, Old Olive ink refill (item 100531), and Pecan Pie ink refill to colour the floral image; and
- two large and three small of the Pretty In Pink dots from Party Dots (item 164602) added to card front.


Additional supplies used to complete this 4" square top-fold card:
- Basic Black cardstock (item 121045) for the square frame, and 3 3/4" square matting panel;
- Gorgeous Grape/Highland Heather patterned paper from Perennial Lavender 12" x 12" Designer Series Paper (item 162593) for the 3 5/8" square panel, and inside panel's 3/4" x 4" strip;

- Old Olive/Mossy Meadow striped patterned paper from Season Of Green & Gold 12" x 12" Specialty Designer Series Paper (item 164324) for inside panel's 1/2" x 3" strip;

- Old Olive striped patterned paper from the retiring - and currently available as one of the discounted Last Chance Products - Regals 6" x 6" Designer Series Paper Stack (item 163774) for the inside panel's 1/4" x 2 5/8" strip;

- Pumpkin Pie ink (item 147086), Pecan Pie ink refill (item 161669), Real Red ink (item 147084), and Basic Gray ink refill (item 149166) to colour the cheetah image panel;
- Highland Heather ink refill (item 147167), Old Olive ink refill (item 100531), and Pecan Pie ink refill to colour the floral images; and
- strips trimmed from Foam Adhesive Sheets (item 152815) to attach the framed cheetah image to card front.
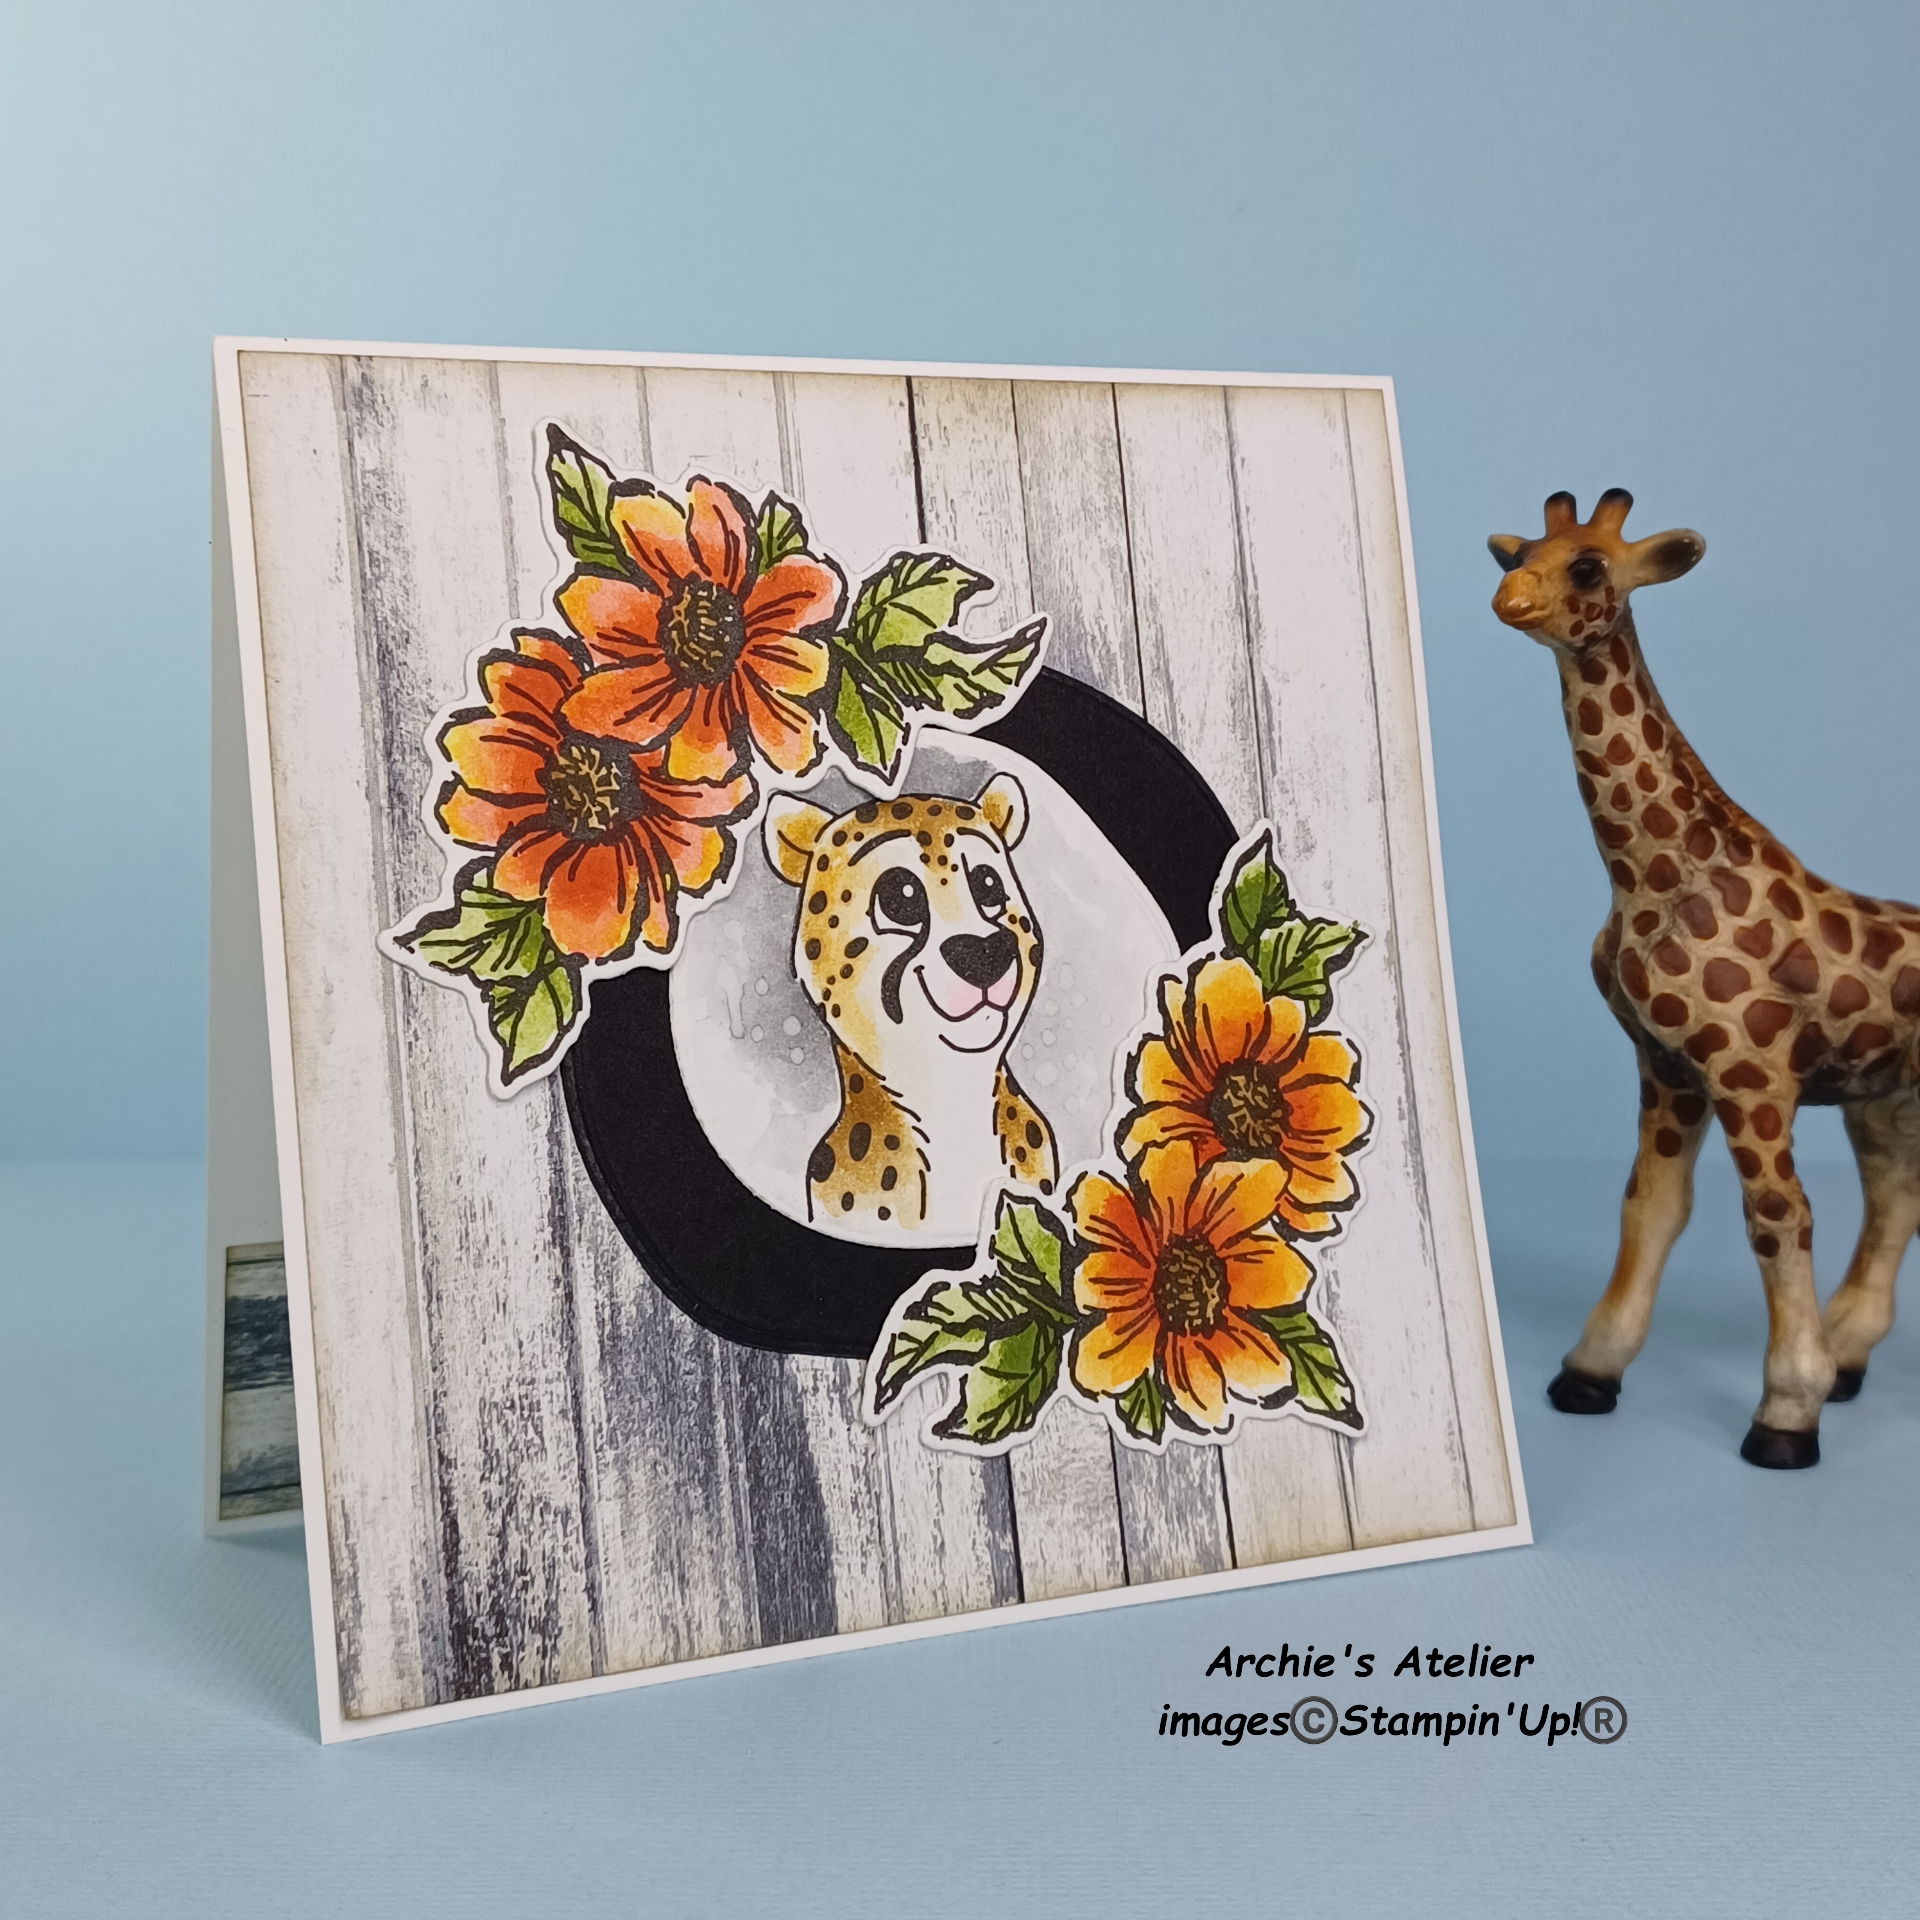

Additional supplies used to complete this 4 1/2" square top-fold card:
- wood grain patterned paper from Country Woods 12" x 12" Designer Series Paper (item 163393) for 4 3/8" square background panel, and for inside panel's 1 1/8" x 4 3/8" strip. All edges of the panel and strip sponged with Crumb Cake ink (item 147116);

- Basic Black cardstock (item 121045) for the image circle's matting "wonky" circle;
- Pumpkin Pie ink (item 147086), Pecan Pie ink refill (item 161669), Real Red ink (item 147084), and Basic Gray ink refill (item 149166) to colour the cheetah image panel; and
- Calypso Coral ink refill (item 122934), Old Olive ink refill (item 100531), and Pecan Pie ink refill (item 161669) to colour the floral images.

Additional supplies used to complete this 4" x 2 3/4" top-fold card:
- Smoky Slate patterned paper from Country Lace 12" x 12" Designer Series Paper (item 163415) for the 3 7/8" x 2 5/8" panel - all edges sponged with Basic Gray ink (item 149165);
- Pumpkin Pie ink (item 147086), Pecan Pie ink refill (item 161669), Real Red ink (item 147084), and Basic Gray ink refill (item 149166) to colour the cheetah image panel; and
- strips trimmed from Foam Adhesive Sheets (item 152815) to attach the cheetah image panel to card front.
The cheetah looks to me like a very strait-laced gentleman - the antithesis of a "party animal"!


Additional supplies used to complete this 4" square top-fold card:
- Lemon Lime Twist cardstock (item 144245) for the 2 1/2" square matting panel - splatters added by flicking the brush tip of my Basic Black Stampin' Write Marker (item 162481) against the marker lid;

- Basic Black cardstock (item 121045) for the 2 5/8" square matting panel (edges scraped with the blade of my craft knife); the 2" square matting panel; and the inside panel's 1/8" x 3 1/4" strip;
- Lemon Lime Twist striped and circle patterned papers from the retiring - and currently available as one of the discounted Last Chance Products - Brights 6" x 6" Designer Series Paper Stack (item 163775) for the front panel's 1 1/4" x 4" and 3/4" x 4" strips, and the inside panel's 3/4" x 3 7/8" strip;
- Basic Gray ink refill (item 149166), Crumb Cake ink refill (item 121029), Lemon Lime Twist ink refill (item 144092), Old Olive ink refill (item 100531), and Misty Moonlight ink (item 153118) to colour the rhino image panel; and
- strips trimmed from Foam Adhesive Sheets (item 152815) to attach the matted rhino image panel to the card front. Before I attached the matted image panel I wrapped a length of black and white baker's twine that I picked up at Dollar Tree around the card front - over the matted Lemon Lime Twist cardstock panel. After tying the bow I used tiny dabs of Multipurpose Liquid Glue to secure the knotted ends of the twine.


Additional supplies used to complete this 3" square top-fold card:
- Crumb Cake cardstock (item 120953) for the card base, and for the floral image die cut;
- Early Espresso cardstock (item 119686) for the "wonky" circle frame; front panel's 2 3/4" square matting panel; and inside panel's 2 7/8" square matting panel;
- Very Vanilla cardstock (item 166784) for the 2 3/4" square inside panel;
- wood grain patterned paper from Country Woods 12" x 12" Designer Series Paper (item 163393) for the card front's 2 5/8" square panel; and the inside panel's 1/2" x 2 3/4" strip - all edges of the panel and strip sponged with Crumb Cake ink (item 147116). I added splatters to the Very Vanilla cardstock panel by flicking over the panel the paint brush holding a mixture of Crumb Cake ink and water;
- Crumb Cake ink refill (item 121029), and Basic Gray ink refill (item 149166) to colour the zebra image panel; and
- Stampin' Dimensionals (item 104430) to attach the framed zebra image to the card front.
And finally . . .


This "Zebra Portrait" project began with a small $0.79 thrift store wood frame with a back opening of just under 3 5/8" by 2 3/4", from which I removed the glass. I trimmed to 2 1/4" x 1 7/8" a watercolour paper panel on which I had painted horizontal stripes using a flat paint brush and Real Red ink (item 147084) mixed with water. I glued the trimmed watercolour paper panel to a piece of Basic Black cardstock (item 121045) that I had trimmed to fit the frame's back opening. After securing the two panels into the frame I glued on the fussy cut zebra image - coloured using Crumb Cake ink refill (item 121029), and Basic Gray ink refill (item 149166). I used Poppy Parade cardstock (item 119793) for the die cut petals, shading the die cuts with Real Red ink (item 147084). After adding the floral and foliage die cuts I added a small wood button from my stash through which I had threaded some black embroidery thread - I secured the knotted ends of the embroidery thread to the frame with tiny dabs of Multipurpose Liquid Glue.
For the 4" square Basic White Thick cardstock "Archie" card included at the bottom of my blog post I used Pumpkin Pie ink (item 147086), Pecan Pie ink refill (item 161669), Real Red ink (item 147084), Pool Party ink (item 147107), Highland Heather ink refill (item 147167), Old Olive ink refill (item 100531), and Daffodil Delight ink refill (item 119672) to colour the images. I used my Wink Of Stella Glitter Brush (item 141897) to add a little sparkle to the butterfly; and used Stampin' Dimensionals (item 104430) - trimmed as necessary - to attach and slightly pop up "Archie".
Thank you for visiting my blog! I certainly had a lot of fun playing with the Silly Safari characters!
Unfortunately Stampin' Up! advises that the Stazon Jet Black Ink (item 101406) is not currently available for ordering but is expected to again be available the week of June 2, 2025. The Silly Safari Bundle (item 165260) is not currently available as the 1 7/8" Circle Punch (item 165259) is currently out of stock. Although the Silly Safari stamp set (item 165254) remains available the Circle Punch - and therefore the Bundle - are expected to again be available for ordering the week of May 26, 2025.
If you are interested in purchasing any of the available Stampin’ Up!® products I have used in my projects, and you live in Canada and do not have a Stampin' Up! demonstrator, please do not hesitate to visit my online store found on my website https://archiesatelier.stampinup.net/ at your convenience, or simply click under the "Shop With Me" tab on the right sidebar of my blog, which will take you directly to my website and online store. I very much appreciate your business and would be very pleased to be your demonstrator! If you need any assistance please do not hesitate to contact me (lmccoyarchie@gmail.com) and I will try my best to help! The digital version of the May 2025-April 2026 Annual Catalogue is available for you to access at your convenience on my website. If visiting the online store don't forget to check out the full line of Online Exclusives products! Just a reminder that all Last Chance Products remain available only while supplies last!
Have fun creating!
Laurel
*It has come to my attention that quite often email correspondence from me is delivered to the recipient's spam or junk mail folder - if you have corresponded with me I have replied so be sure to check your spam or junk mail folder! Thank you!!

Comments
Post a Comment