More Fun With Artist Trading Cards!

Hello! Today I am sharing a few ATC (artist trading card) projects I worked on this week using a variety of Stampin’ Up!® products. It has been a little while since I worked with ATCs and I had almost forgotten how much fun they are! There are very few rules with ATCs - only their size (2 1/2" x 3 1/2"), and the fact that they are intended to be exchanged or gifted and not sold. Consider ATCs as an alternative to cards for swaps with fellow crafters! The ATC can be flat or quite dimensional, and its size makes the ATC perfect for trying out new techniques, or for using up leftover pieces (including scraps of cardstock and Designer Series Paper) from other projects. You can devote any amount of time to completing an ATC - just be warned that ATCs are addictive! There are of course many possibilities for storage and/or gifting of your ATCs, and this week I have included a three-pocket folding album with belly band; a larger album with mats for mounting the ATCs; and a 4 1/4" tall x 3 1/2" wide x 1 1/2" deep lidded box that would accommodate either several ATCs or a few more dimensional ATCs. In my April 26, 2024, blog post I included a few other storage/presentation projects (https://archiesatelier.blogspot.com/2024/04/having-fun-with-artist-trading-cards.html). A completed ATC (or two or more) can of course also be used as a focal point on a larger card.
As with my previous ATC blog post, other than providing information about products used and a few general techniques, I will not burden you with excruciating details for each of my ATCs since I did make a few! For the most part I used watercolour paper for the main panels of each ATC, and used Basic Black cardstock (item 121045) for matting panels, which were cut to ensure that the finished ATC dimensions were 2 1/2" x 3 1/2". To stamp images for colouring I used Stazon Jet Black ink (item 101406) to stamp the images on watercolour paper, using small paint brushes to apply Classic Stampin' inks/Classic Stampin' ink refills mixed with a little water. For colouring I used the following inks/ink refills:
- Pumpkin Pie ink (item 147086);
- Pool Party ink (item 147107);
- Old Olive ink (item 147090);
- Mossy Meadow ink (item 147111);
- Highland Heather ink refill (item 147167);
- Daffodil Delight ink refill (item 119672);
- Basic Gray ink (item 149165);
- Granny Apple Green ink (item 147095);
- Pecan Pie ink (item 161665);
- Real Red ink (item 147084);
- Calypso Coral ink refill (item 122934);
- Misty Moonlight ink (item 153118); and
- Crumb Cake ink (item 147116).
For several of the watercolour paper ATC bases I used various sizes of flat paint brushes to paint stripes of ink across the paper:
- Lemon Lime Twist ink refill (item 144092);
- Pool Party ink refill (item 122933);
- Daffodil Delight ink refill;
- Calypso Coral ink refill;
- Highland Heather ink refill;
- Basic Gray ink refill (item 149166); and
- Berry Burst ink (item 147143).
Additional inks used for colouring panels by "ink smooshing":
- Real Red ink refill (item 103287);
- Pool Party ink refill;
- Azure Afternoon ink refill (item 161668);
- Pecan Pie ink refill (item 161669);
- Garden Green ink refill (item 102059);
- Mossy Meadow ink; and
- Old Olive ink refill (item 100531).
I used the following stamps and dies:
- Spotlight On Nature stamp set (item 163579) - leaves image;
- Sale-A-Bration Corner In Bloom stamp set (item 164959) - single fussy cut large flower on bunny ATC;

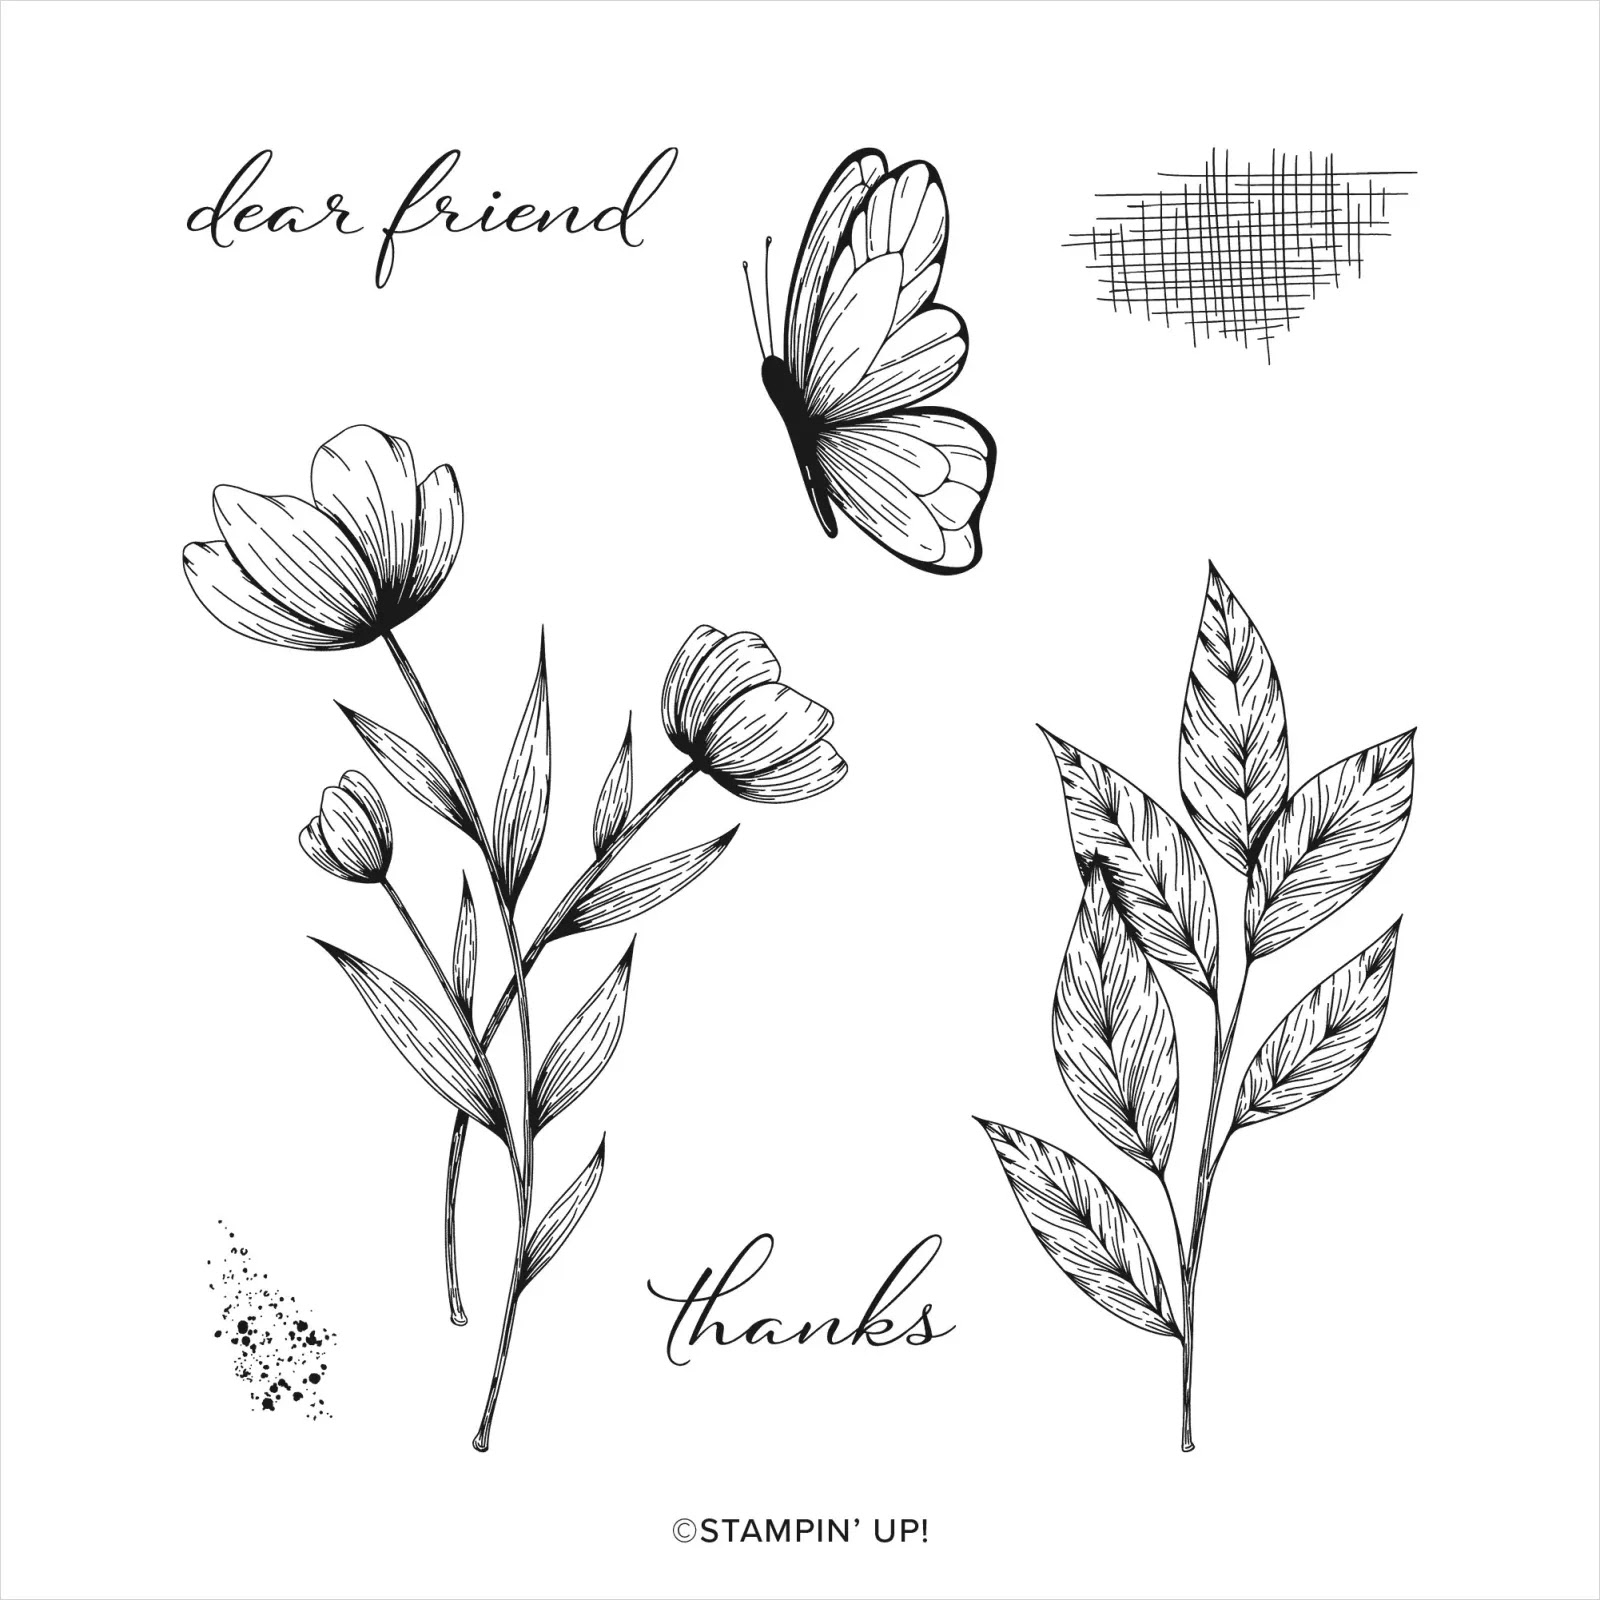
- Thoughtful Wishes stamp set (item 163305) - grouping of small tulips image;

- retiring Changing Leaves stamp set (item 164351), and the co-ordinating and also retiring Changing Leaves dies (item 164138) - large skeleton leaves image die cut using the co-ordinating dies;


- Grassy Grove stamp set (item 157836) - double fir tree image;

- Mixed Florals stamp set (item 164639) - tulips image;

- Elements of Text stamp set (item 164774);

- retiring Queen Bee stamp set (item 160476) - large bee image;
.webp)
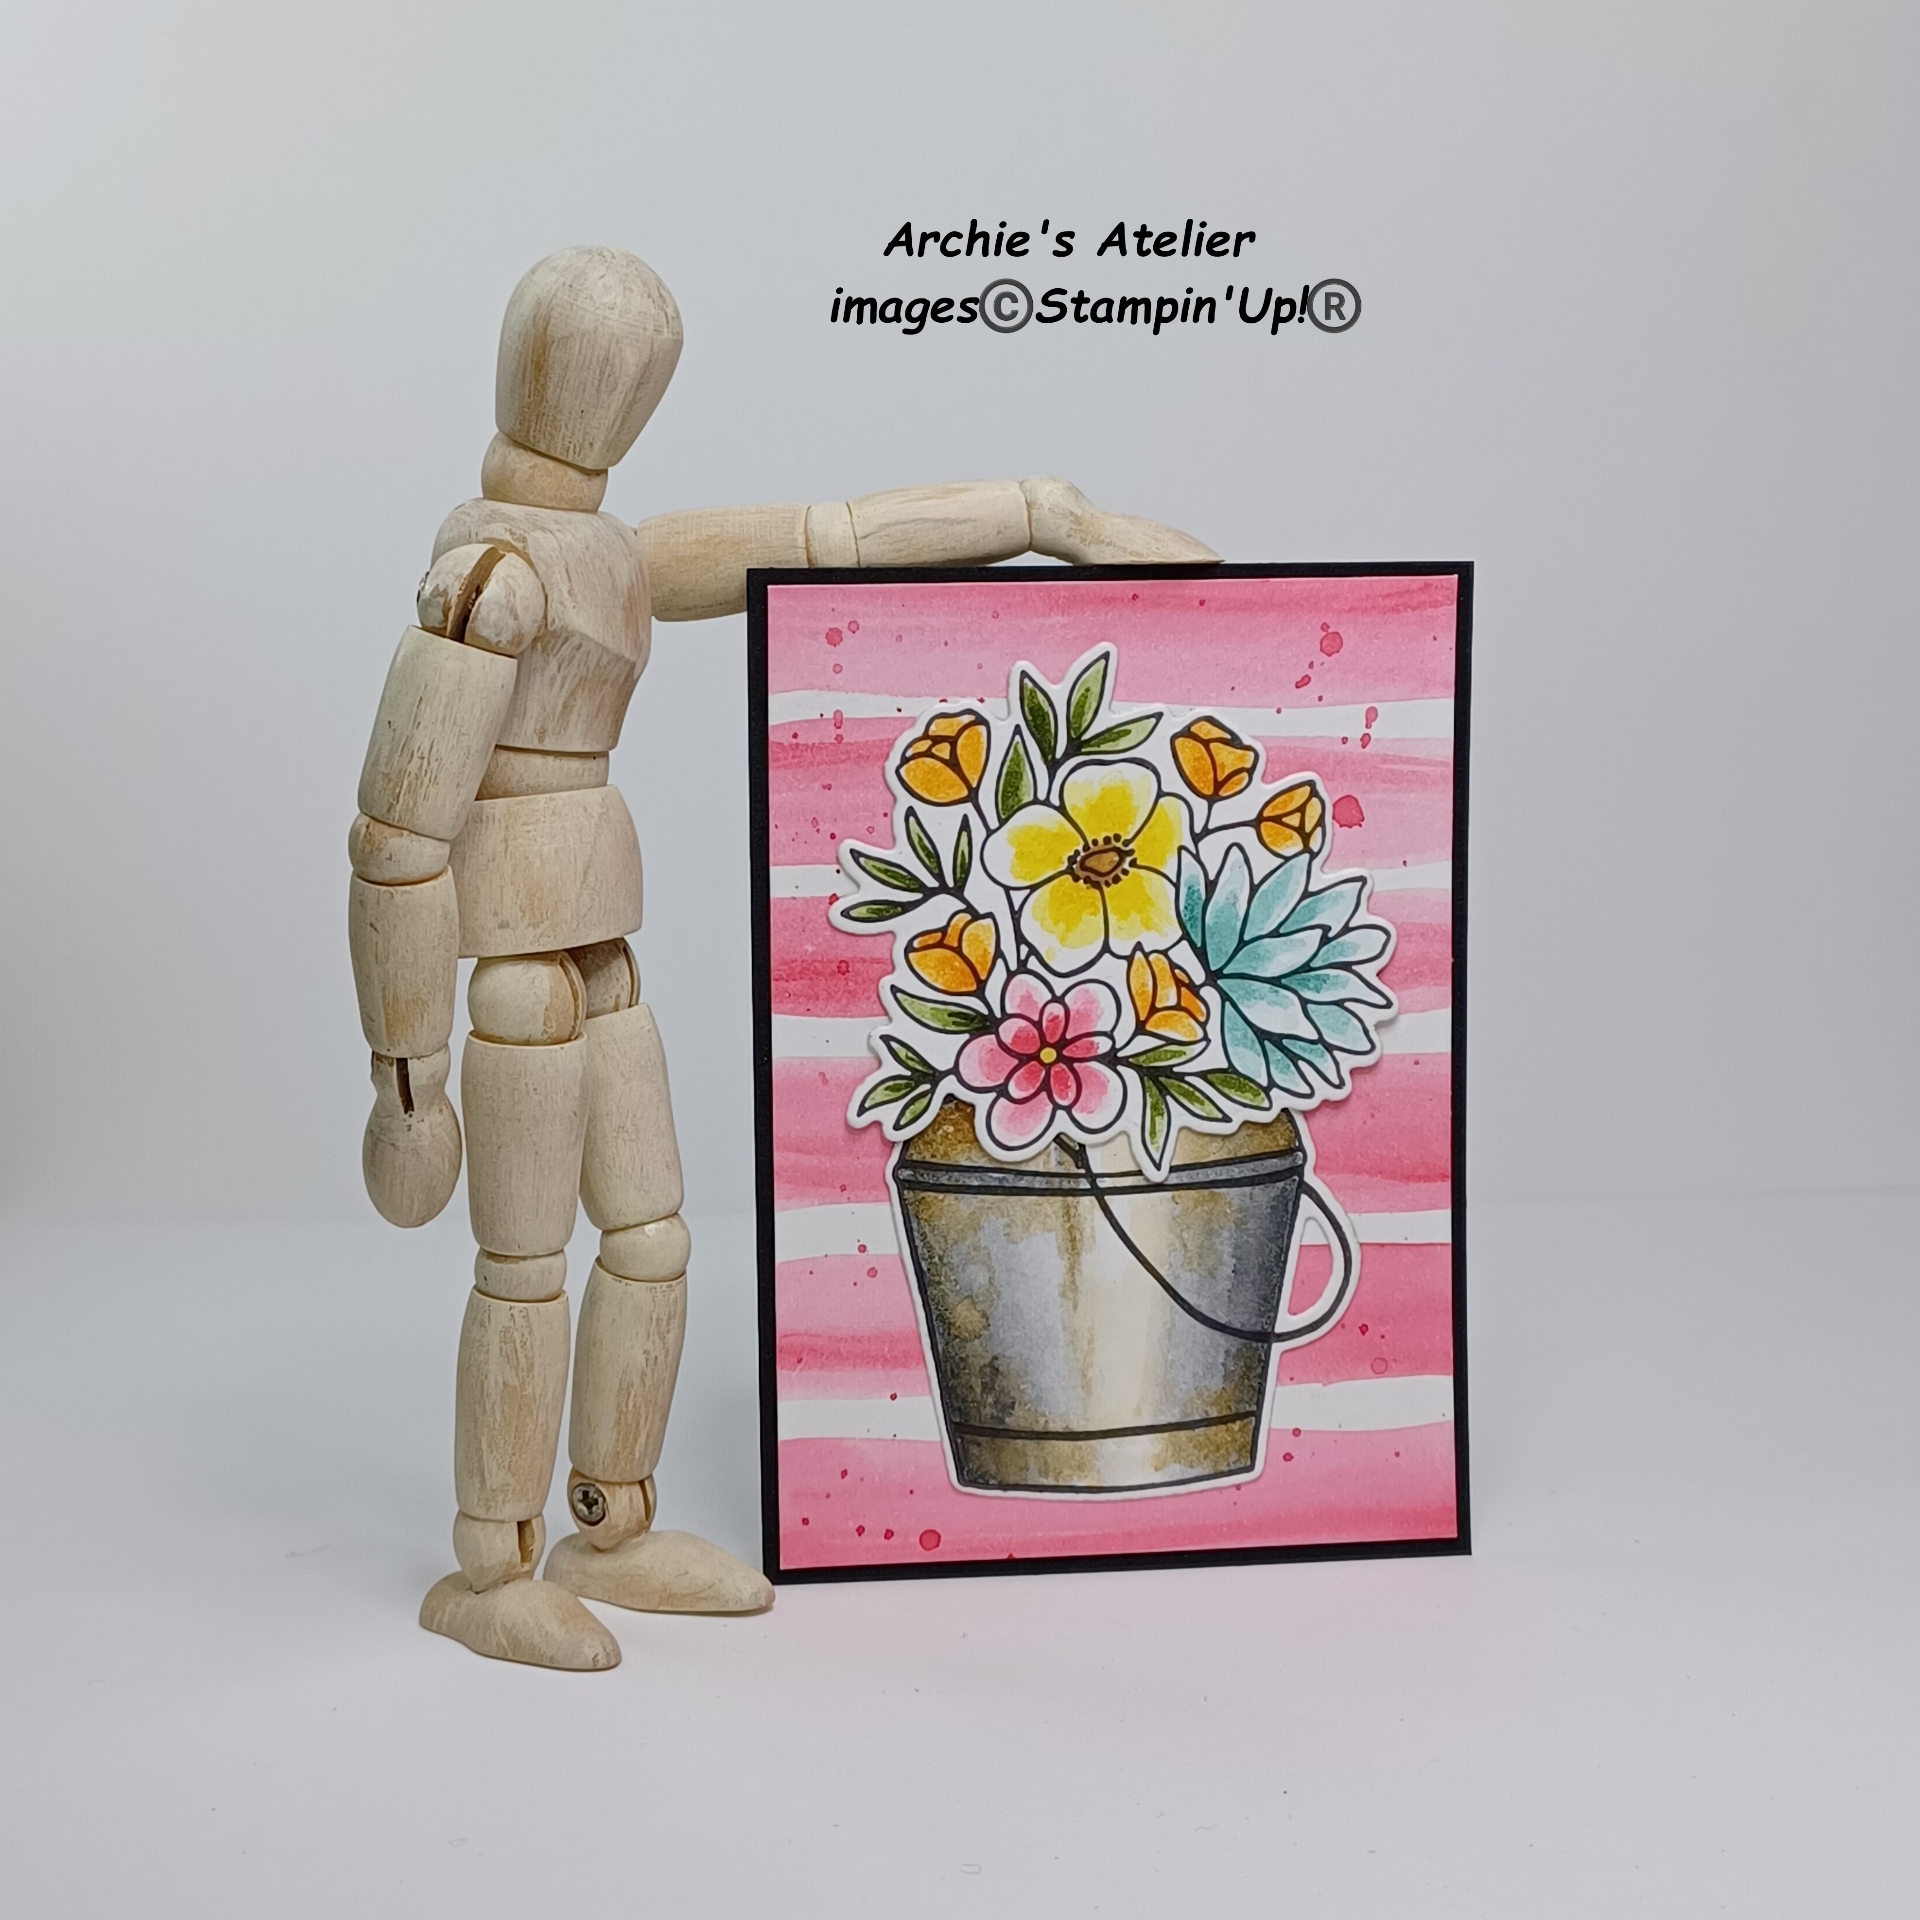
- Country Flowers stamp set (item 163405), and the co-ordinating Country Flowers dies (item 163410) - available together in the Country Flowers Bundle (item 163411) - large floral bouquet and bucket images die cut using the co-ordinating dies;


- Umbrella Days stamp set (item 164891), and the co-ordinating Umbrella Days dies (item 164894) - available together in the Umbrella Days Bundle (item 164895) - lady with umbrella and little girl with umbrella images die cut using the co-ordinating dies;


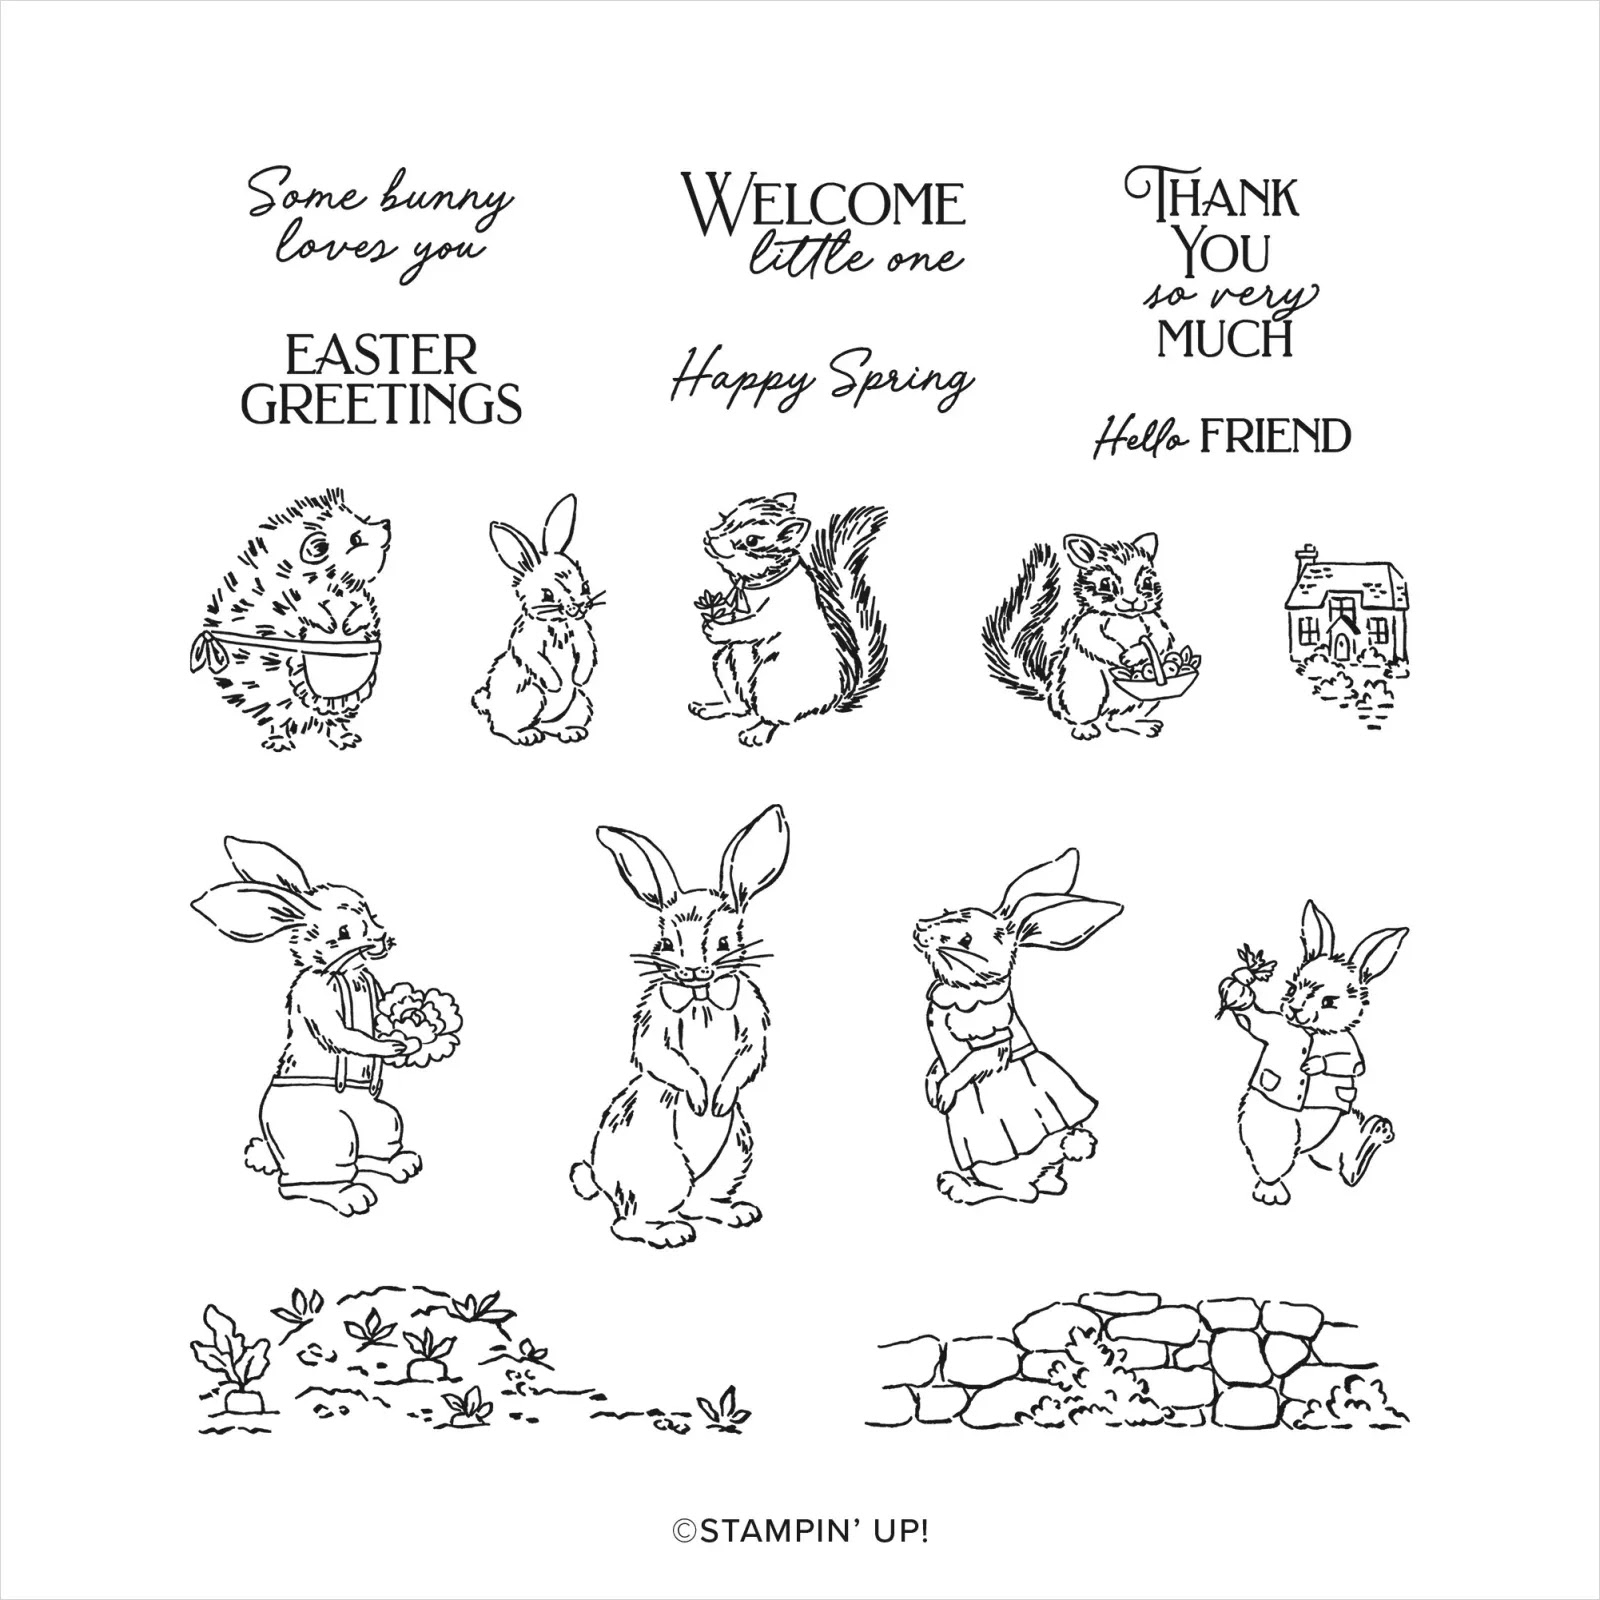
- Storybook Friends stamp set (item 164668), and the co-ordinating Storybook Friends dies (item 164674) - available together in the Storybook Friends Bundle (item 164675) - bunny images die cut using the co-ordinating dies;

- Around It All dies (item 164725) - wonky circles, and circle frames and openings;

- Everyday Arches dies (item 164629) - solid and frame arch die cuts;

- retiring Potions & Spells dies (item 164141) - small bottle die cut;
.webp)
- Country Birdhouse dies (item 163400) - small flower die cut on Potions & Spells bottle ATC, and small Basic White Thick cardstock (item 159229) flower on Daffodil Delight striped wonky circle ATC;

- Country Flowers dies - leafy clump die cuts;
- Perennial Postage dies (item 162607) - die cut on Potions & Spells bottle ATC;

- retiring Greetings Of The Season dies (item 1641120) - hexagon tag die cut with both ends torn on Grassy Grove tree ATC, and on the Spotlight On Nature leaf ATC added to cover of larger album;
- Changing Leaves dies - large leafy and three-leafed die cuts;
- Stylish Shapes dies (item 159183) - 2 1/8" diameter Basic White Thick cardstock matting circle die cut used on belly band;

- retiring Simply Zinnia dies (item 163479) - large flower, flower centers, blossom, and blossom stem die cuts;

- retired Sophisticated Sled dies (item 164133) - two leafy sprig die cuts on bunny ATC; and
- retired Stitched Rectangles dies (item 151820) for the 4 3/8" x 3" Basic White Thick cardstock ATC matting panels in larger album.
I used the following embossing folders:
- retiring Changing Leaves Hybrid Embossing Folder (included with the Changing Leaves dies) - I used Pecan Pie ink and Early Espresso ink (item 147114) to colour the embossed watercolour paper panel;

- Sale-A-Bration Starstruck Embossing Folder (item 164972) - I added an embossed piece of Petal Pink cardstock (item 146985) behind the Everyday Arches Basic White Thick cardstock frame on the bunny ATC;

- Plaster Painting 3D Embossing Folder (item 164656) - to emboss the Calypso Coral/Real Red coloured watercolour paper wonky circles on the Daffodil Delight striped ATC;

- Mini Corrugated 3D Embossing Folder (item 165559) - for the Grassy Grove trees ATC I embossed a piece of Crumb Cake cardstock (item 120953) using this embossing folder that will be part of the March 4, 2025, Online Exclusives new product release. I sponged the edges of the trimmed embossed panel with Crumb Cake ink (item 147116), and used my finger to apply a little of the Craft Stampin' White Ink Refill (item 101780) over the embossed panel.

Just a quick summary of the basic tools and supplies I used to complete my projects this week:
- Paper Trimmer (item 152392) - for trimming cardstock and Designer Series Paper - can also be used for scoring;
- stylus and scoreboard (Simply Scored Scoring Tool - item 122334) for scoring fold lines and decorative lines on cardstock;
- Bone Folder (item 102300) for burnishing scored fold lines;
- Stampin' Cut & Emboss Machine (item 149653) - for all die cutting and embossing;
- Paper Snips Scissors (item 103579) - sharp little scissors that make fussy cutting the flower image from the Corner In Bloom stamp set a lot easier - also great for trimming die cuts;
- Take Your Pick Tool (item 144107) - the paper piercer, mini spatula, and tacky putty tips are definitely a great help for picking up and placing small die cuts and embellishments;
- for the main adhesive, Multipurpose Liquid Glue (item 110755);
- Blending Brushes (item 153611) and Small Blending Brushes (item 160518) to apply Classic Stampin' inks to colour and shade cardstock and watercolour paper die cuts and panels; and
- Stampin' Spritzers (item 126185) - to add a little visual texture to coloured die cuts and panels I sometimes lightly spritz the coloured die cut/panel with water and blot dry with paper towel to achieve a mottled effect - the longer the water droplets are allowed to sit on the coloured watercolour paper or cardstock the lighter the splotches will be.
On with the projects!


- for the base of the album a 9 11/16" x 4" piece of Berry Burst cardstock (item 144243), scored on the 9 11/16" side at 3 1/4" and 6 1/2" (the 3 3/16" wide panel will be the right side panel and is slightly smaller than the other two panels in order to eliminate extra bulk when the album is folded closed);
- for the pockets: for the left and center panels - two 1 1/4" x 3 11/16" pieces of Berry Burst cardstock, scored at 1/4" on three sides; and for the right panel - one 1 1/4" x 3 5/8" piece of Berry Burst cardstock, also scored at 1/4" on three sides. On the bottom corners of each of the pocket pieces I used my scissors to make diagonal cuts to eliminate bulk when the 1/4" flaps were folded back - I glued the pockets to the bottom of each of the panels, aligning the bottom folded edge of the pockets with the bottom edges of the panels, and centering the pockets on the panels. From one of the Berry Burst patterns from the 6" x 6" Designer Series Paper Assortments-Brights (item 163775) I cut strips to cover the front of each of the three pockets - trimming the strips to be 1/8" smaller than the corresponding cardstock panels;

- Basic White Thick cardstock (item 159229) for the matting panels for the back sides of the panels - these matting panels trimmed to be 1/8" smaller than the corresponding Berry Burst cardstock panels;
- three patterns from the Full Of Life 6" x 6" Designer Series Paper (item 163357) for the DSP panels for the back panels of the album - each DSP panel trimmed to be 1/8" smaller than the corresponding Basic White Thick cardstock matting panel;

- for the belly band a 1 1/4" x 8 1/4" strip of Berry Burst cardstock, scored nine times down the 8 1/4" length at 1/8" intervals. After scoring I used my Bone Folder to curl the belly band strip in order to prevent excessive creasing when it was wrapped around the album - there is just under a 1 1/4" overlap on the band when it is wrapped around the closed album;
- on the Basic White Thick cardstock circle die cut glued over the overlap join on the belly band I glued a wonky circle die cut from one of the patterns of Full Of Life DSP, a watercolour paper wonky circle die cut frame coloured with Pumpkin Pie ink, and an "almost Pumpkin Pie" button from my stash.


To complete this 5 1/2" x 4 1/2" album with two signatures, and mats for four ATCs, I used the following additional supplies:
- for the cover: a 5 1/2" x 11" piece of Basic Black cardstock (item 121045), scored on the 11" side at 1" from each end (to create little pockets on the inside and back covers - I applied a thin line of glue only to the bottom and top edges of the pocket flaps), and at 5 1/2";
- for the two signatures: two 5 1/2" x 8 1/4" pieces of Basic Black cardstock, each scored on the 8 1/4" side at 4 1/8". Using waxed black cord and the three-hole pamphlet stitch (https://archiesatelier.blogspot.com/2022/02/a-few-projects-using-ranunculus-romance.html) I secured the two signatures to the cover;
- for the DSP panels (including pocket flap strips) I used various patterns from the Full Of Life 6" x 6" Designer Series Paper (item 163357); a Granny Apple Green pattern and an Azure Afternoon pattern from the 6" x 6" Designer Series Paper Assortments-Brights (item 163775); a Pretty Peacock pattern from the 6" x 6" Designer Series Paper Assortments-Regals (item 163774); and a Blackberry Bliss pattern from the Thoughtful Journey 6" x 6" Designer Series Paper (item 163303);


- for the matting panels for the Basic White Thick Stitched Rectangles panels I trimmed pieces of Basic Black cardstock 1/8" larger than the Basic White Thick cardstock panels; and
- for the front of the album I first glued on the Basic White Thick cardstock panel over which I added the 5/8" black & white gingham ribbon from my Dollar Tree stash - securing the ribbon to the front and back covers with strips of double-sided tape (Tear & Tape Adhesive - item 154031). Over the ribbon I added the Basic Black cardstock matted Full Of Life DSP panel, and one of the ATCs.


To complete this 4 1/4" x 3 1/2" x 1 1/2" lidded box I used the following additional supplies:
- for the box: a 10 1/2" x 5 3/4" piece of Smoky Slate cardstock (item 131202), scored on the 10 1/2" side at 1 1/2", 5", 6 1/2", and 10" (1/2" tab is the glue tab); and scored on the 5 3/4" side at 1 1/2" (bottom flaps);
- for the lid: a 5 9/16" x 3 9/16" piece of Smoky Slate cardstock, scored at 1" on all four sides;
- Basic Gray cardstock (item 121044) for the matting panels for all sides of the box, and all sides and top of the lid - each of the matting panels cut 1/8" smaller than the corresponding box/lid cardstock panel; and
- two Smoky Slate patterns from the Country Lace 12" x 12" Designer Series Paper (item 163415) for the box and lid DSP panels - each of the DSP panels cut 1/8" smaller than the corresponding Basic Gray cardstock matting panel.

Around the lid of the box I tied a bow using 3/8" satin "almost Smoky Slate" ribbon from my stash.
A few ATCs . . .

For this Thoughtful Wishes poppy ATC I used Pool Party cardstock (item 122924) for the base panel.

To the center of the Highland Heather coloured three-circle flower on this Around It All/Country Flowers/Changing Leaves ATC I added a white button from my stash.

To this Queen Bee ATC I added three Basic Gray dots from the retired Classic Matte Dots (item 158146).

For this Daffodil Delight striped ATC I added Basic Black cardstock circles die cut using the Grow With Love dies (item 164803) - including the small circle added to the center of the flower.


For the DSP panel on this Spotlight On Nature/Everyday Arches ATC I used an Old Olive pattern from the Floral Delight 12" x 12" Designer Series Paper (item 164700), and added three Pool Party dots from Party Dots (item 164602).


For this Storybook Friends bunny ATC I used Linen Thread (item 104199) for the bow - securing the knotted ends with tiny dabs of Multipurpose Liquid Glue.

To the center of the flower on this Potions & Spells bottle ATC I added a small Pool Party dot from Party Dots (item 164602), and knotted Linen Thread (item 104199) around the bottle before it was glued to the ATC.


On this Umbrella Days ATC I used strips of various widths trimmed from several patterns of the Sale-A-Bration Bloom Impressions 12" x 12" Designer Series Paper (item 164944) for the paper "quilted" background panel.


For the background panel on this Changing Leaves ATC I used one of the patterns from the Season Of Green & Gold 12" x 12" Specialty Designer Series Paper (item 164324).


To the center of the flower on this Simply Zinnia/Changing Leaves ATC I added an "almost Calypso Coral" button from my stash.
Thank you for visiting my blog! I certainly had a lot of fun working on my ATC projects this week!
Unfortunately Stampin' Up! advises that the following products I used this week are not currently available, but I have indicated below the date that Stampin' Up! expects the products to again be available for ordering:
- Everyday Arches dies (item 164629) - week of March 3, 2025; and
- Storybook Friends dies (item 164674), and consequently the Storybook Friends Bundle (item 164675) - also the week of March 3, 2025.
The following retiring products that I used this week are discounted Last Chance Products - available only while supplies last:
- Changing Leaves stamp set (item 164351) - $14.00;
- Changing Leaves dies and Hybrid Embossing Folder (item 164138) - $33.00;
- Greetings Of The Season dies (item 164112) - $30.80;
- Potions & Spells dies (item 164141) - $26.40;
- Simply Zinnia dies (item 163479) - $22.50; and
- Queen Bee stamp set (item 160476) - $12.80.
Just a reminder that today - Friday February 28, 2025 - is the final day of the Stampin' Up! annual 2025 Sale-A-Bration Promotion!
If you are interested in purchasing any of the available Stampin’ Up!® products I have used in my projects, and you live in Canada and do not have a Stampin' Up! demonstrator, please do not hesitate to visit my online store found on my website https://archiesatelier.stampinup.net/ at your convenience, or simply click under the "Shop With Me" tab on the right sidebar of my blog, which will take you directly to my website and online store. I very much appreciate your business and would be very pleased to be your demonstrator! If you need any assistance please do not hesitate to contact me (lmccoyarchie@gmail.com) and I will try my best to help! The digital versions of the May 2024-April 2025 Annual Catalogue, January-April 2025 Mini Catalogue, and the companion (and digital-only) January 2025 Scrapbooking Brochure, are all available for you to access at your convenience on my website (https://archiesatelier.stampinup.net/). Don't forget to check out all the retiring Last Chance Products in my online store - there are certainly some great bargains to be had!
Have fun creating!
Laurel
*It has come to my attention that quite often email correspondence from me is delivered to the recipient's spam or junk mail folder - if you have corresponded with me I have replied so be sure to check your spam or junk mail folder! Thank you!!

A sweetheart deserves sweet dreams!
Comments
Post a Comment