A Few Festive Window Projects!
Hello! Today I am sharing two festive decor "window" projects I worked on this week using a variety of Stampin' Up! die sets, cardstock, and Designer Series Paper.Just a brief note regarding the basic tools and supplies I used to complete my projects this week:
- Paper Trimmer (item 152392) - for trimming cardstock and Designer Series Paper;
- Stampin' Cut & Emboss Machine (item 149653) - for all die cutting and embossing;
- Paper Snips Scissors (item 103579) - these sharp little scissors are great for doing any necessary trimming of die cuts - i.e. separating a large foliage die cut into two or more smaller pieces - and of course for fussy cutting too!;
- Take Your Pick Tool (item 144107) - the paper piercer, mini spatula, and tacky putty tips are a great help for picking up and placing small embellishments; and
- for the main adhesive, Multipurpose Liquid Glue (item 110755).
To add shading to cardstock die cuts I used Small Blending Brushes (item 160518) to apply Classic Stampin' Inks to the die cuts. To add a little additional visual texture I quite often lightly spritzed the inked cardstock with water (Stampin' Spritzers - item 126185), allowing to air dry.
For both projects I also used a fine weave very pale gray decorative mesh embedded with white "knobbies" - perfect snow - picked up at Dollar Tree. There is plenty on the 6" wide roll for lots of projects!
On with the projects!
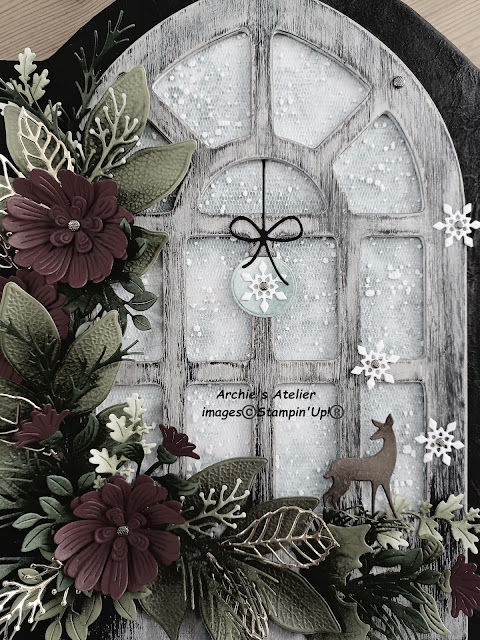
For my first project I began with a tole-painted wooden plaque picked up at my local thrift store. The plaque, with a pre-drilled hole on the back for easy wall hanging, measures 11 1/4" tall x 8 1/2" wide x 3/4" thick, and I glued on several layers of torn tissue paper to add a little texture, followed by several coats of black acrylic paint. I used the plaque for the base of my "window frame" - a wood sign with several metal embellishments that I picked up at Dollar Tree. After removing the metal decorations I painted the frame with coats of both white and black acrylic paint - using a medium-grit sandpaper to distress the painted frame. To the back of the window frame I first glued the trimmed decorative mesh, and then a panel trimmed from a sheet of Lost Lagoon patterned paper from the Winter Meadow 12" x 12" Designer Series Paper (item 162133). I then glued the window frame to the plaque base and began to add the festive decorations, made using the following supplies:
- Changing Leaves dies (item 164138) - and Hybrid Embossing Folder - for the three large five-leaved stems: two cut from Old Olive cardstock (item 100702), and one from Mossy Meadow cardstock (item 133676), and all shaded with Mossy Meadow ink (item 147111);
- Changing Leaves dies for the skeleton leaves and berry sprigs - all skeleton leaves and two of the berry sprigs cut from gold metallic paper from the Textured Metallic 12" x 12" Specialty Paper (item 163772); and two berry sprigs cut from Soft Seafoam cardstock (item 146988) and shaded with Mossy Meadow ink;
Changing Leaves dies (and Hybrid Embossing Folder) - 164138
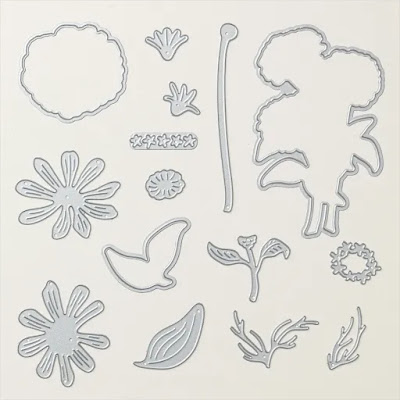
- Simply Zinnia dies (item 163479) for the petal layers for the three large flowers cut from Cherry Cobbler cardstock (item 119685), and shaded with Blackberry Bliss ink (item 147092); the blossoms - also cut from Cherry Cobbler cardstock, and shaded with Blackberry Bliss ink; and the three stems (with leaves) for the blossoms - two cut from Old Olive cardstock, and one from Garden Green cardstock (item 102584), and all shaded with Mossy Meadow ink;
Simply Zinnia dies - 163479
- Country Birdhouse dies (item 163400) for the small flowers added to the centers of the large flowers cut using the Simply Zinnia dies - cut from Cherry Cobbler cardstock, and shaded with Blackberry Bliss ink; and the hanging bow for the bauble decoration, cut from Basic Black cardstock (item 121045);
Country Birdhouse dies - 163400
- Country Flowers dies (item 163410) for the four leafy clumps - three cut from Garden Green cardstock and one from Old Olive cardstock, and all shaded with Mossy Meadow ink;
Country Flowers dies - 163410
- Encircled In Nature dies (item 163628) for the three oak leaf stems - cut from Soft Seafoam cardstock, and shaded with Mossy Meadow ink; and the four thin pine branches, cut from Garden Green cardstock, and shaded with Mossy Meadow ink;
Encircled In Nature dies - 163628
- retired Joy Of Noel dies (item 161965), which were featured in the September-December 2023 Mini Catalogue, for the five fuller pine branches - three cut from Garden Green cardstock and two from Old Olive cardstock, and all shaded with Mossy Meadow ink;
- Snowy Wonder dies (item 164124) for the four snowflakes cut from Basic White Thick cardstock (item 159229);
Snowy Wonder dies - 164124
- Gone Fishing dies (item 161541) for the bauble decoration - one full bauble cut from watercolour paper, and shaded with Lost Lagoon ink (item 161678); and one partial (top portion) bauble cut from Smoky Slate cardstock (item 131202), and shaded with Basic Gray ink (item 149165). To add a little holiday sparkle I painted the completed die cut bauble decoration with my Wink of Stella Glitter Brush (item 141897).
Gone Fishing dies - 161541
- Grove dies (item 157844) for the deer - cut from Pecan Pie cardstock (item 161717), and shaded with Pecan Pie ink (item 161665) and Early Espresso ink (item 147114); and
Grove dies - 157844
- Adhesive-Backed Textured Dots (item 163338) - I added a large dot to the center of each of the three large flowers, and to cover the two holes in the top of the window frame; and I added a small dot to the center of each snowflake.
Adhesive-Backed Textured Dots - 163338
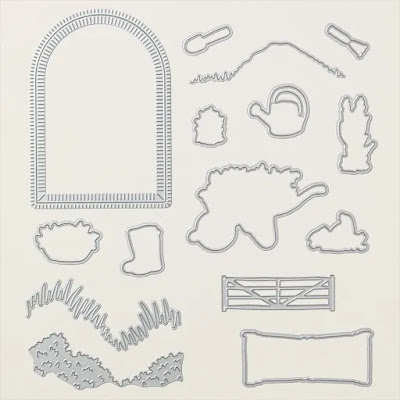
For the second project I began with a wood grain easel frame from Dollar Tree (although it also has a hanger on the back panel) with outside dimensions of 7 1/4" x 5 1/4", and a 5 3/8" x 3 3/8" front opening. Using the large arch die from the Garden Meadow dies (item 162740) I cut a window opening in two 6" x 4" (sized to fit the frame's back opening) pieces of Basic Black cardstock (item 121045).
I glued the two window panels together and placed them facedown on some graph paper. For the window's muntin bars I cut 1/8" wide strips of Basic Black cardstock (for cutting such narrow strips of cardstock the Paper Trimmer works great!) and used the lines on the graph paper as guides for the placement of the strips - gluing the ends of the strips to the edges of the window opening. I started by placing the center vertical strip, adding the two horizontal strips, and finally the two top diagonal strips. I then glued the trimmed decorative mesh panel followed by a trimmed panel cut from the Winter Meadow 12" x 12" Designer Series Paper (item 162133) to the back of the window panel before securing the whole assemblage into the back of the frame. I then began to add the decorative elements using the following supplies:
- Encircled In Nature dies (item 163628) for the seven thin pine branches cut from Garden Green cardstock (item 102584), and shaded with Mossy Meadow ink (item 147111);
- Sophisticated Sled dies (item 164133) for the trimmed curved leavy boughs cut from Old Olive cardstock (item 100702) and Soft Seafoam cardstock (item 146988), and shaded with Mossy Meadow ink;
Sophisticated Sled dies - 164133
- Snowy Wonder dies (item 164124) for the four snowflakes cut from Basic White Thick cardstock (item 159229);
- Changing Leaves dies (item 164138) to cut two berry sprigs from gold metallic paper from the Textured Metallic 12" x 12" Specialty Paper (item 163772);
- Country Flowers dies (item 163410) to cut leafy clump from Old Olive cardstock - shaded with Mossy Meadow ink;
- Country Birdhouse dies (item 163400) to cut the two flowers from Cherry Cobbler cardstock (item 119685) - shaded with Blackberry Bliss ink (item 147092); and the hanging bow from gold metallic paper from the Textured Metallic 12" x 12" Specialty Paper;
- retired Joy Of Noel dies (item 161965), which were featured in the September-December 2023 Mini Catalogue, for the two fuller pine branches cut from Garden Green cardstock, and shaded with Mossy Meadow ink;
- retired Poinsettia dies (item 153522), which were featured in the August-December 2020 Mini Catalogue, for the two poinsettia leaves turned holly leaves cut from Old Olive cardstock, and shaded with Mossy Meadow ink; and
- Adhesive-Backed Textured Dots (item 163338) - one large dot added to the flower center, and one small dot added to the center of each snowflake.
Thank you for visiting my blog! I had a lot of fun working on these window projects! Festive decor projects also make great pre-Christmas presents!
Today - Friday November 15, 2024 - is the final day of the annual Stampin' Up! Seasonal Sale, and I hope you have been able to take advantage of a great opportunity to stock up on art and crafting supplies from the May 2024-April 2025 Annual Catalogue - and maybe do a little gift shopping for your favourite avid crafter!
If you are interested in purchasing any of the available Stampin' Up! products I have used in my projects, and you live in Canada and do not have a Stampin' Up! demonstrator, please do not hesitate to visit my online store found on my website https://archiesatelier.stampinup.net/ at your convenience, or simply click under the "Shop With Me" tab on the right sidebar of my blog, which will take you directly to my website and online store. I very much appreciate your business, and if you need any assistance please do not hesitate to contact me (lmccoyarchie@gmail.com) - I would be very pleased to be your demonstrator! The digital version of the May 2024-April 2025 Annual Catalogue is available for you to access at your convenience on my website (https://archiesatelier.stampinup.net/) - as is the digital version of the September-December 2024 Mini Catalogue, and the digital only September 2024 Scrapbooking Brochure - the companion brochure to the Mini Catalogue. When visiting my online store - and checking out the full range of Online Exclusives (including all products in the November 5, 2024, release) and the full selection of all-inclusive card and crafting kits available in the Kits Collection (kits make great gifts for fellow crafters too!) - don't forget to also check out the great deals on the Clearance Rack including:
- Les Shoppes 12" x 12" Designer Series Paper (item 161322) - $6.80;
- Envelope Treat Boxes (item 159788) - $4.40;
- Vintage Bottle Punch (item 158689) - $18.00; and
- White 3/4" Frayed Ribbon (item 158138) - $4.10 - great for bows on festive packages!
All Clearance Rack products are only available while supplies last!


Comments
Post a Comment