Playing With Leaves
Hello! This week's projects are all about the leaves - the large skeleton leaf stamp from the Stampin' Up! Changing Leaves stamp set (item 164351), and real leaves gathered from my yard - and during a walk around my neighbourhood on Monday to work off the Thanksgiving dinner enjoyed on Sunday! The Changing Leaves stamp set is one of the Online Exclusives, and is also available in the Changing Leaves Bundle (item 164139) together with the co-ordinating Changing Leaves dies and Hybrid Embossing Folder (item 164138).
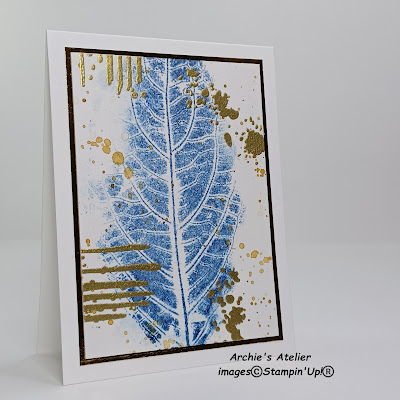
For several of the note cards I used a very fun technique I haven't used for years (maybe not since elementary school art classes!) - using real leaves as my stamps. I pressed the back side of the leaf (the side of the leaf where the veins are most defined) directly into my Classic Stampin' Ink Pad and used my fingers to gently press the inked leaf onto trimmed watercolour paper panels (I started with Artist Trading Card-sized panels - 2 1/2" x 3 1/2" - but in completing several of the cards I ended up trimming the panels down a little). To get a little more of a watercolour effect I lightly spritzed the stamped images with water (Stampin' Spritzers - item 126185) to let some of the ink "bleed", using a heat gun (Heat Tool - item 129053) to dry the ink. I added some ink splatters - by flicking the paint brush loaded with the mixture of ink and water over the panels. For several of the cards I added some heat embossing to the inked panels - stamping images from the Of Art & Texture stamp set (item 162687) in VersaMark Ink (item 102283), and embossing with gold embossing powder (WOW! Embossing Powder-Metallics - item 165678). To activate or melt the embossing powder I used the heat gun (Heat Tool).
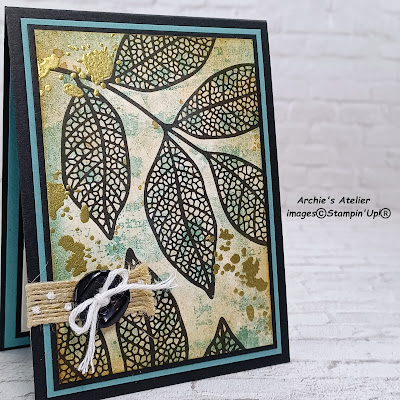
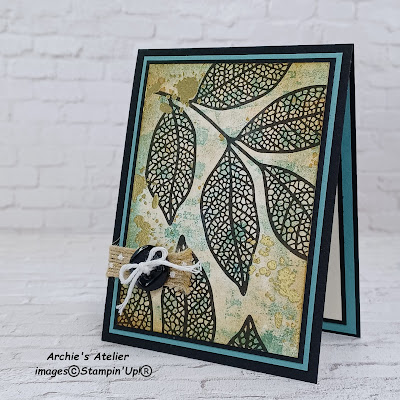
For the two cards using the skeleton leaf stamp I first applied background colour to the watercolour paper panels by applying Crumb Cake ink (item 147116) with my Stampin' Brayer (item 162936), adding some splatters, stamping images from the Of Art & Texture stamp set and the fractured text image from the Queen Bee stamp set (item 160476) on the button card using Lost Lagoon ink (item 161678), and, after then stamping the leaf images using Stazon Jet Black Ink (item 101406), adding heat embossing using more images from the Of Art & Texture stamp set and gold embossing powder.
With the exception of the two skeleton leaf stamp cards, for which I used Basic Black cardstock (item 121045) for the card bases, I used Basic White Thick cardstock (item 159229) for the card bases.
Just a quick summary of the additional basic tools and supplies I used to complete my note card projects:
- Paper Trimmer (item 152392) - for trimming cardstock (can also be used for scoring fold lines);
- stylus and scoreboard (Simply Scored Scoring Tool - item 122334) - for scoring card fold lines and decorative lines - to ensure crisp folds I also burnish all folded scored lines using my Bone Folder (item 102300); and
- for the main adhesive, Multipurpose Liquid Glue (item 110755).
Amazingly I was able to complete this week's projects without using any dies!!
On with the projects!
Additional supplies used to complete this 5 1/2" x 3 3/4" top-fold card:
- Crumb Cake cardstock (item 120953) for the image panel's 4 1/4" x 3 1/8" matting panel (scored at 1/8" around all edges), and 5 3/8" x 3 5/8" inside panel;
- Basic Black cardstock for the image panel's 3 5/8" x 2 5/8" matting panel, and 5 1/8" x 3 3/8" inside matting panel;
- Very Vanilla cardstock (item 101650) for the 5" x 3 1/4" inside panel;
- Basic Beige/Crumb Cake wood grain patterned paper from Country Woods 12" x 12" Designer Series Paper (item 163393) for the card front's 1/2" x 3 1/2" strip, and inside panel's 1/2" x 3 1/8" strip - all edges of both strips sponged with Crumb Cake ink (item 147116); and
- Crumb Cake baker's twine (Baker's Twine Essentials Pack - item 155475) for bow tied around DSP strip on card front - knot and ends secured with tiny dabs of Multipurpose Liquid Glue.
- Lost Lagoon cardstock (item 133679) for the image panel's 3 3/4" x 2 3/4" matting panel, and 3 7/8" x 2 7/8" inside matting panel;
- Basic Black cardstock for the image panel's 3 5/8" x 2 5/8" matting panel, and 3 5/8" x 2 5/8" inside matting panel;
- Very Vanilla cardstock (item 101650) for 3 1/2" x 2 1/2" inside panel;
- small length of Natural 3/8" Polka Dot Trim (item 163465) wrapped around side near bottom edge of card front - secured with Multipurpose Liquid Glue; and
- white baker's twine (Baker's Twine Essentials Pack - item 155475) for bow tied through black button from my stash.
Additional supplies used to complete this 4 1/2" x 3 1/2" top-fold card:
- Shaded Spruce ink (item 147088) for leaf and splatters;
- Shaded Spruce cardstock (item 146981) for 4 3/8" x 3 3/8" and 3 5/8" x 2 5/8" matting panels; and
- white and gold checked patterned paper from Nature's Sweetness 12" x 12" Specialty Designer Series Paper (item 162616) for 4 1/4" x 3 1/4" panel.
Additional supplies used to complete this 5 1/2" x 4 1/2" top-fold card:
- Real Red ink (item 147084) for leaf and splatters;
- Pumpkin Pie ink (item 147086) - applied with one of the Small Blending Brushes (item 160518) for additional colouring on leaf panel;
- Basic Black cardstock (item 121045) for 4" x 3" and 3 9/16" x 2 9/16" matting panels;
- Poppy Parade cardstock (item 119793) for the 3 3/4" x 2 3/4" matting panel; and
- Stampin' Dimensionals (item 104430) to attach the triple-matted image panel to card front - I made good use of the edge strips on the Dimensionals sheet!
Additional supplies used to complete this 5" x 4" top-fold card:
- Blackberry Bliss ink (item 147092) for the leaf; and
- Stampin' Dimensionals (item 104430) to attach the image panel.
The last four top-fold cards all measure 4" x 3".
For this card I used Berry Burst ink (item 147143) for the leaf and splatters; Berry Burst cardstock (item 144243) for the 3 3/4" x 2 3/4" matting panel; and Basic Black cardstock (item 121045) for the 3 9/16" x 2 9/16" and 3 13/16" x 2 7/8" matting panels.
Additional supplies used to complete this card:
- Real Red ink (item 147084) for the leaf;
- Crumb Cake ink (item 147116) for the splatters; and
- gold paper from Textured Metallic 12" x 12" Specialty Paper (item 163772) for the 3 1/2" x 2 3/8" matting panel.
Additional supplies used to complete this card:
- Misty Moonlight ink (item 153118) for the leaf;
- Pecan Pie ink (item 161665) for the splatters; and
- gold paper from Textured Metallic 12" x 12" Specialty Paper (item 163772) for the 3 5/8" x 2 5/8" matting panel.
And finally . . .
For this last card I used Lost Lagoon ink (item 161678) for the leaf and splatters; and gold paper from Textured Metallic 12" x 12" Specialty Paper (item 163772) for the 3 5/8" x 2 5/8" matting panel.
Thank you for visiting my blog! I had so much fun with my leaf stamping that I have lots of panels for future projects! Stamping with the leaves is so much better than raking them!
Just a reminder of the two specials Stampin' Up! has for the month of October:
- Kits Collection Sale: all kits in the Kits Collection are up to 30% off - these all-inclusive kits, which include a range of Christmas projects, include easy to follow step-by-step instructions and all supplies required to complete pre-designed projects. These kits also make great gifts for fellow crafters!; and
- Starter Kit Special: for anyone interested in joining Stampin' Up! as an Independent Demonstrator you will receive $206.00 CDN worth of your choice of Stampin' Up! products for the Starter Kit price of $135.00 CDN! There is free shipping on all Starter Kits, and each Starter Kit also includes free business supplies. Whether you are an avid crafter who would like to receive a nice discount on personal art and crafting supplies or someone who would like to establish a home-based business, I would be very pleased to have you join my team as one of "Archie's Arties"!
If you are interested in purchasing any of the available Stampin' Up! products I have used in my projects, and you live in Canada and do not have a Stampin' Up! demonstrator, please do not hesitate to visit my online store found on my website https://archiesatelier.stampinup.net/ at your convenience, or simply click under the "Shop With Me" tab on the right sidebar of my blog, which will take you directly to my website and online store. I very much appreciate your business, and if you need any assistance please do not hesitate to contact me (lmccoyarchie@gmail.com) - I would be very pleased to be your demonstrator! The digital version of the May 2024-April 2025 Annual Catalogue is available for you to access at your convenience on my website (https://archiesatelier.stampinup.net/) - as is the digital version of the September-December 2024 Mini Catalogue, and the digital only September 2024 Scrapbooking Brochure - the companion brochure to the Mini Catalogue. When visiting my online store don't forget to check out all the products now available as Online Exclusives - including the Changing Leaves stamp set and the Of Art & Texture stamp set - and the great deals on the Clearance Rack!
Have fun creating!
Laurel
*It has come to my attention that quite often email correspondence from me is delivered to the recipient's spam or junk mail folder - if you have corresponded with me I have replied so be sure to check your spam or junk mail folder! Thank you!!


.jpg)
.jpg)

Comments
Post a Comment