Potions & Spells!
(starting to play with the Potions & Spells Bundle)

Hello! Today I am sharing three projects I worked on this week using the Stampin' Up! Potions & Spells Bundle (item 164357), which includes the Potions & Spells photopolymer stamp set (item 164355) and the co-ordinating Potions & Spells dies (item 164141). The stamp set and co-ordinating dies were included in the July 2024 Online Exclusives new product launch. The stamp set and dies can of course be purchased separately from the Bundle, but when purchased together using the Bundle item number you will receive the 10% Bundled Savings!

.jpg)
Potions & Spells dies - 164141
(Bundle - 164357)
I figured if there can be Christmas in July why not some Halloween projects in August - time does fly and it is never too early to start seasonal crafting projects! For an embossed skeleton and partial skeleton included in two of my projects this week I did make use of two retired products: the Bag Of Bones photopolymer stamp set (item 162216) and the co-ordinating Bag Of Bones dies (item 162218), both of which were featured in the September-December 2023 Mini Catalogue.

.jpg)
Bag Of Bones dies - 162218
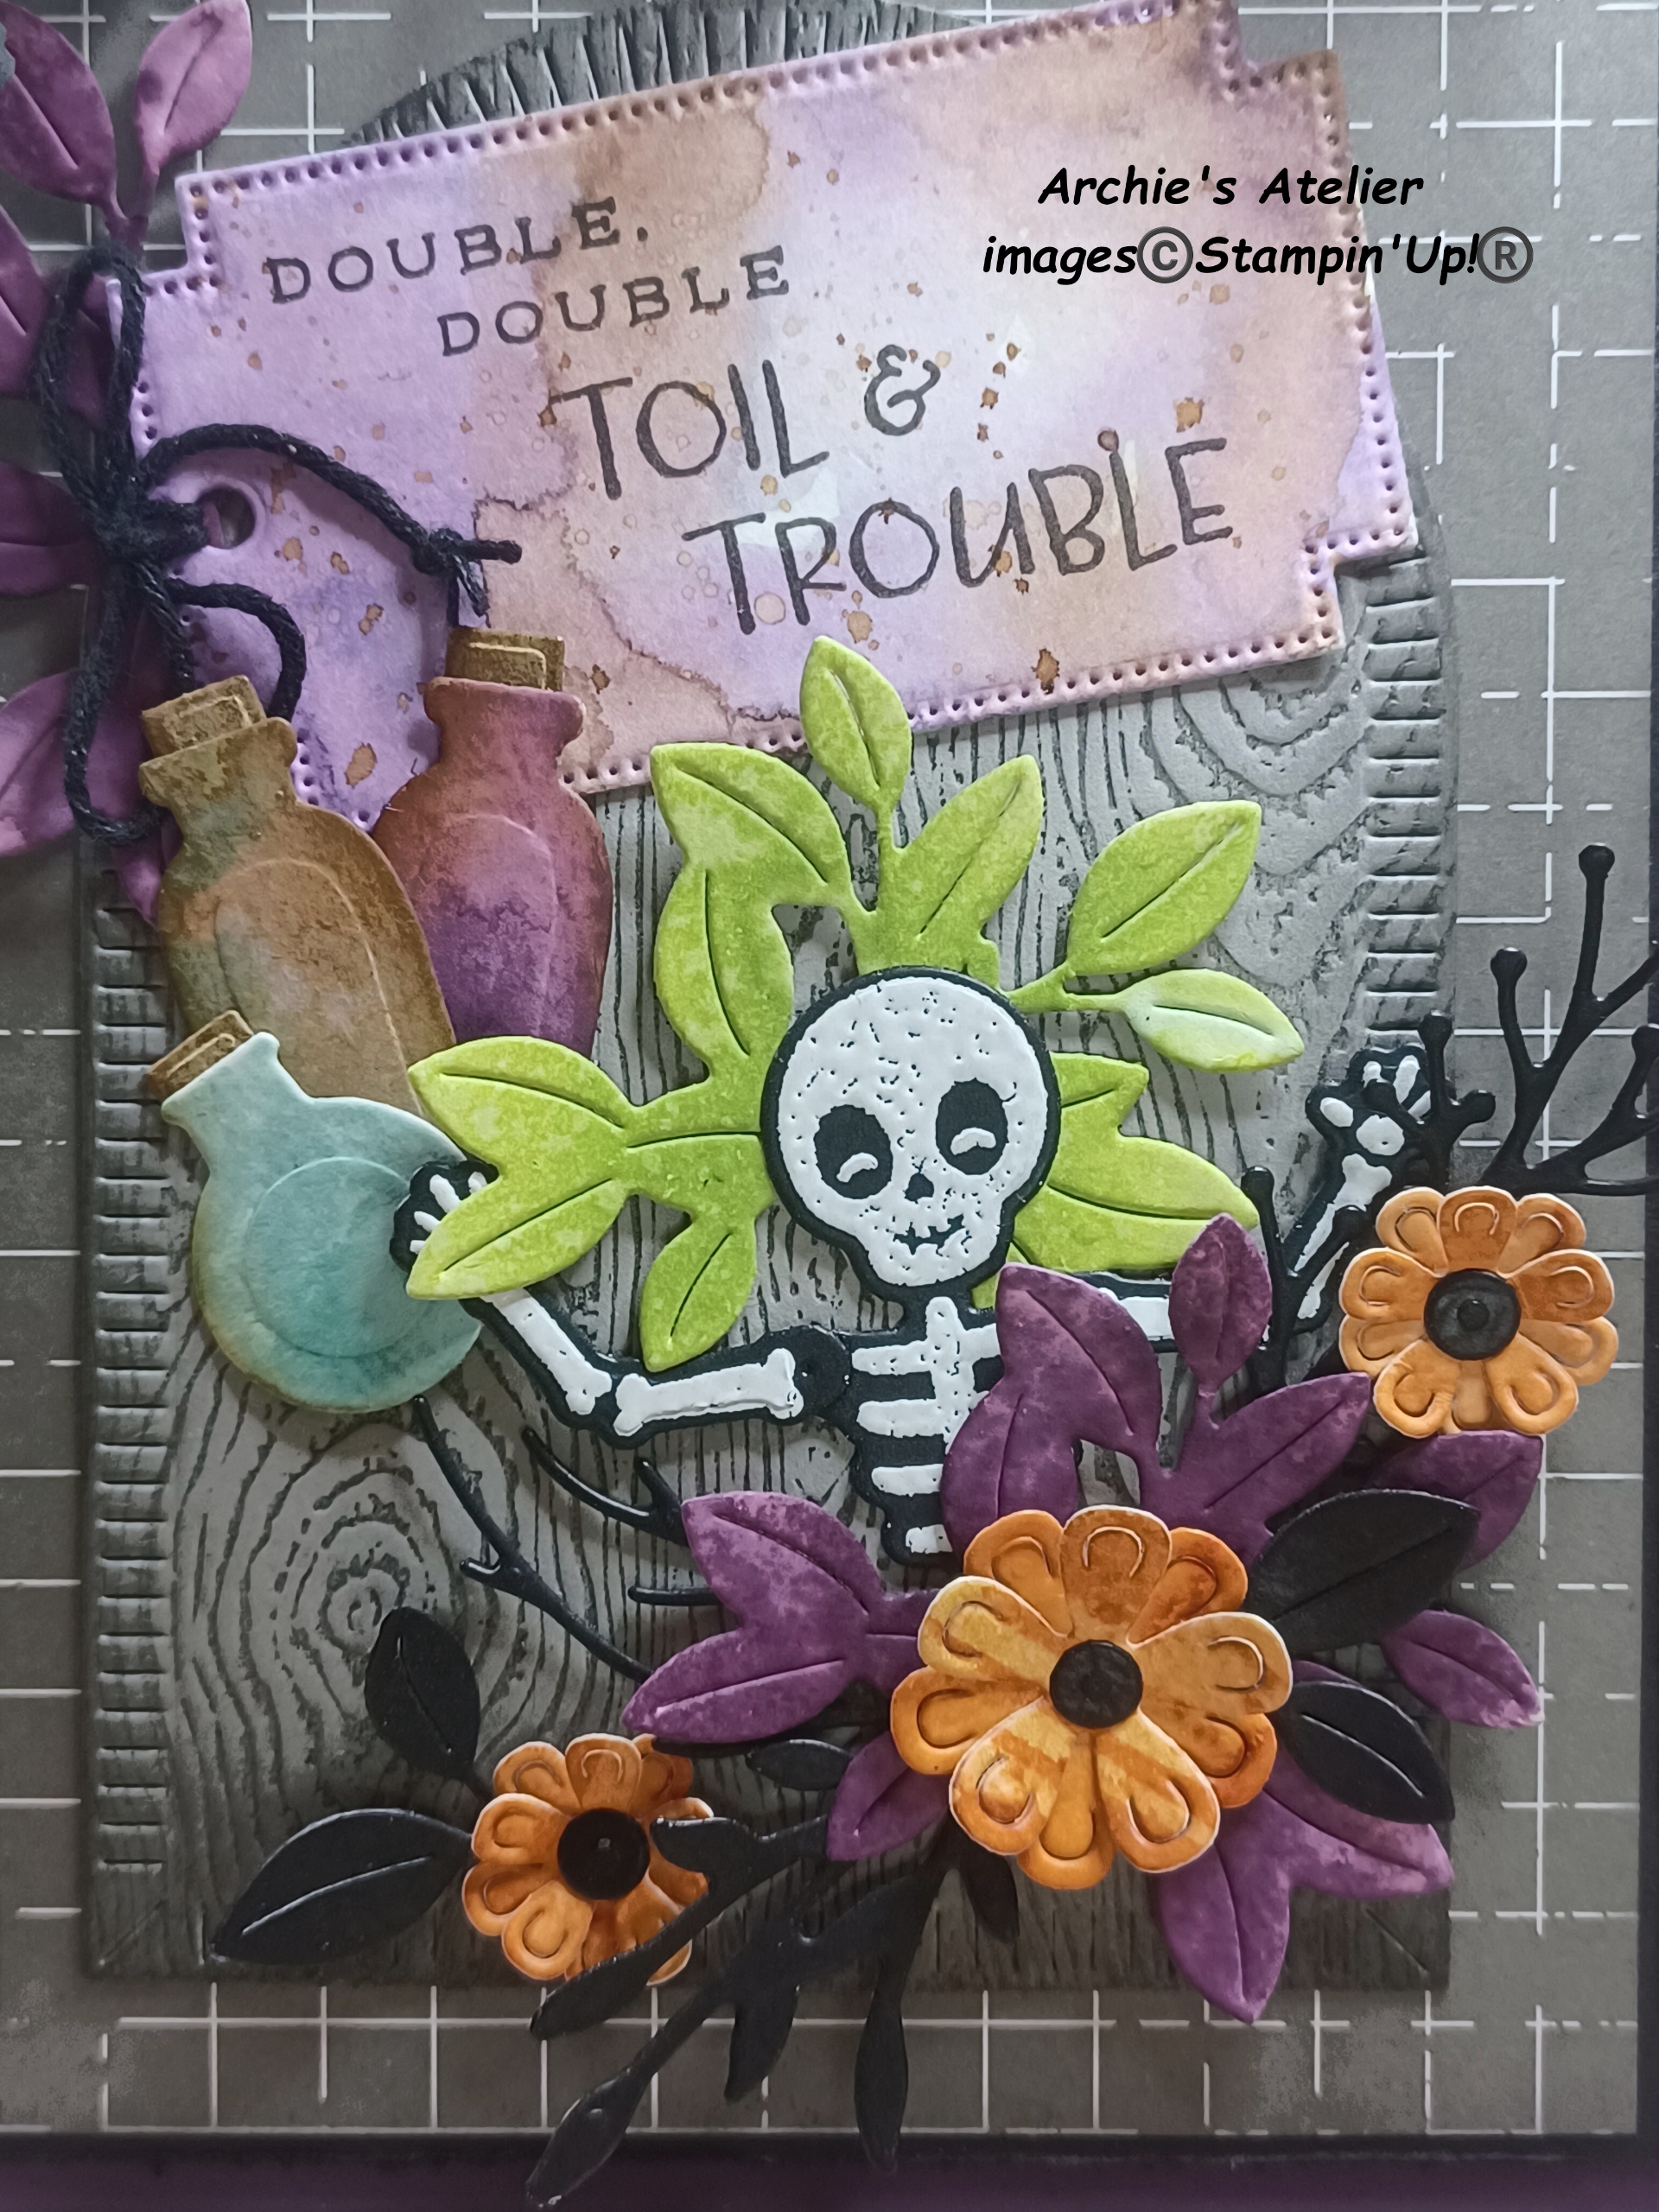
The complete skeleton from the "Happy Halloween" wood panel project (the lower portion of the skeleton is hidden behind the cauldron) and the partial skeleton (body and two arms) from the "Double, Double Toil & Trouble" treat holder were both stamped using VersaMark Ink (item 102283) on Basic Black cardstock (item 121045) and heat embossed using white embossing powder (Wow! Embossing Powder-Basics - item 165679) and then die cut using the co-ordinating dies. The pebbly surface of the white heat embossed surface reminds me of pitted bones - appropriately macabre for skeletons!
On all three projects I used the arched die from the Garden Meadow dies (item 162740) - die cutting the "window" opening on the wood panel project, and the two arch-shaped bases for the treat holders from Gray Granite cardstock (item 146983) that I had embossed using the Timber 3D Embossing Folder (item 156406), over the inside panel of which I had dragged my Basic Gray ink pad (item 149165). After die cutting I sponged additional Basic Gray ink around the inside of the window opening and the edges of the window panel, and around both arch-shaped bases.
.jpg)
Garden Meadow dies - 162740
The orange flowers used on all three projects were die cut using the Country Birdhouse dies (item 163400) from watercolour paper that had first been coloured with Pumpkin Pie ink (item 147086) applied with one of the Blending Brushes (item 153611); lightly spritzed with water (Stampin' Spritzers - item 126185); and then, after the watercolour paper was thoroughly dry, over stamped using images from the Of Art & Texture stamp set (item 162687) and Pumpkin Pie ink. The small circles used for the flower centers were cut from Basic Black cardstock and are the center circles from the large circle die from the Country Birdhouse dies.
.jpg)
Country Birdhouse dies - 163400

Additional foliage was cut using the following dies:
- Country Flowers (item 163410) - leaf clumps - cut from watercolour paper and coloured with either Granny Apple Green ink (item 147095) or Blackberry Bliss ink (item 147092) applied with one of the Small Blending Brushes (item 160518), and lightly spritzed with water (Stampin' Spritzers). I shaded the Granny Apple Green leaf clump used on the "A Little Hocus Pocus" treat holder with a little Mossy Meadow ink (item 147111) applied with one of the Small Blending Brushes;
.jpg)
Country Flowers dies - 163410
- Changing Leaves (includes Hybrid Embossing Folder) - item 164138 - for skeleton leaves, three-leaved stem, and berry sprig - all cut from Basic Black cardstock - essential to have black leaves in a Halloween floral arrangement!;
.jpg)
Changing Leaves dies (also includes Hybrid Embossing Folder) - 164138
- Country Birdhouse - two-leaved sprigs, cut from Basic Black cardstock;
- Delicate Forest (item 162679) - multi-leaved sprigs, cut from Basic Black cardstock;
.jpg)
Delicate Forest dies - 162679
- Grove (item 157844) - small three- and five-leaved stems, cut from Basic Black cardstock;
.jpg)
Grove dies - 157844
- Simply Zinnia (item 163479) - spiky foliage, cut from Basic Black cardstock; and
.jpg)
Simply Zinnia dies - 163479
- Encircled In Nature (item 163628) - two curvy leafy sprigs used on wood panel project - cut from watercolour paper, and shaded with Basic Gray ink (item 149165).
.jpg)
Encircled In Nature dies - 163628
The raven and book images were stamped on watercolour paper using Stazon Jet Black Ink (item 101406), and coloured using Classic Stampin' inks mixed with a little water and applied with fine-tipped paint brushes. I also used Stazon Jet Black Ink to stamp the sentiments - the sentiments were stamped on watercolour paper tags die cut using the Greetings Of The Season dies (item 164112), another recent addition to Online Exclusives. Before stamping the sentiments the tags were coloured with washes of Classic Stampin' inks and Classic Stampin' ink refills (colours will be included in project descriptions).
.jpg)
For all three projects I also used the same Pebbled Path check patterned paper from Nature's Sweetness 12" x 12" Specialty Designer Series Paper (item 162616) - a 4 7/8" x 3 7/8" panel for each treat holder (all edges sponged with Basic Gray ink); and a just shy of 8" square piece to cover the front of the wood panel.
Just a quick note about the basic tools and supplies I used to complete my projects this week:
- Paper Trimmer (item 152392) - for trimming paper and cardstock - can also be used for scoring;
- stylus and scoreboard (Simply Scored Scoring Tool - item 122334) - for scoring fold lines and decorative lines - to ensure crisp folds I also burnish all folded scored lines using my Bone Folder (item 102300);
- Stampin' Cut & Emboss Machine (item 149653) - for all die cutting and embossing;
- Paper Snips Scissors (item 103579) - these sharp little scissors are great for trimming die cuts;
- Take Your Pick Tool (item 144107) - the paper piercer, mini spatula, and tacky putty tips are a great help for picking up and placing small die cuts (i.e. tiny circles used for flower centers!) and
- for the main adhesive, Multipurpose Liquid Glue (item 110755).
In addition to VersaMark Ink and white embossing powder, for the heat embossing I also used:
- Embossing Buddy (small powder-filled bag used to rub over the cardstock before stamping image. The anti-static powder helps prevent the embossing powder from sticking to any areas of the cardstock other than the stamped design.) An Embossing Buddy is included in the Embossing Additions Tool Kit (item 159971); and
- heat gun (Heat Tool - item 129053) to activate/melt the embossing powder.
On with the projects!


The base for the first project is an (almost) 8" square x 1" deep wood panel from Dollarama, and I used the following additional supplies to complete the project:
- woodgrain patterned paper from Country Woods 12" x 12" Designer Series Paper (item 163393) to cover the sides of the panel - from leftover strips I trimmed four strips (cutting one end of each of the four strips at a 45 degree angle) to make the two partial frame sections added to the top left and bottom right of the panel front. I sponged all edges of the strips used for the frame sections with Early Espresso ink (item 147114). I used a very fine grit sandpaper to lightly sand the edges of the Designer Series Paper used to cover the front and sides of the panel;
- Basic Black cardstock for the 5 7/8" x 4 7/8" matting panel for the Pebbled Path cardstock embossed panel with window opening (this panel was trimmed to 5 3/4" x 4 3/4");
- Basic Black cardstock for the die cut cauldron. Before die cutting the cauldron I embossed the cardstock using the Painted Texture 3D Embossing Folder (item 154317), and sponged around the edges of the embossed die cut cauldron with Craft Stampin' White Ink (item 147277);
- Pebbled Path cardstock for the die cut cauldron handles - sponged with Early Espresso ink and Basic Gray ink (item 149165);
- Pecan Pie cardstock (item 161717) embossed using the Timber 3D Embossing Folder inked with Early Espresso ink for the die cut broom handle - sponged with additional Early Espresso ink;
- Basic Beige cardstock (item 164511) for the die cut broom bristles - shaded with Crumb Cake ink (item 147116) and Early Espresso ink;
- watercolour paper coloured by "ink smooshing" Granny Apple Green ink refill (item 147163) and Garden Green ink refill (item 102059) for the die cut bubbles and slime edge - die cuts shaded with Mossy Meadow ink (item 147111) and, for a little sparkle, painted with Wink of Stella Clear Glitter Brush (item 141897);
- watercolour paper coloured with a wash of Granny Apple Green ink (item 147095) for the sentiment tag - one end torn;
- watercolour paper for the die cut bottles - coloured using washes of Pool Party ink (item 147107), Garden Green ink refill, Pecan Pie ink (item 161665), and Blackberry Bliss ink (item 147092) - bottles also shaded with Pool Party ink, Mossy Meadow ink, Pecan Pie ink, and Blackberry Bliss ink;
- Crumb Cake cardstock (item 120953) pounced with Crumb Cake ink applied using a small faux sea sponge (packages picked up at Dollar Tree) for the corks for the bottles. I used the top end of the die for the bow's tie from the Mini Pocket Envelope dies (item 159167) to cut the corks - trimming to fit in the bottles' necks. I sponged edges of the corks with Pecan Pie ink and a little Early Espresso ink;
.jpg)
Mini Pocket Envelope dies - 159167
- watercolour paper for the "spells" tag, die cut using the small tag die from Mini Pocket Envelope dies. Tag coloured with Crumb Cake and Basic Gray inks. From one incompletely stamped set of books I trimmed "spells" and glued it to the small tag - curling the tag with my fingers while the glue dried. I tied the tag to the bottle with a single strand of Linen Thread (item 104199) - securing the tag to the bottle with a dab of Multipurpose Liquid Glue;
- Basic Gray ink and Pecan Pie ink to colour the raven;
- Mossy Meadow ink, Blackberry Bliss ink, Basic Gray ink, Basic Beige ink (item 163806), and Pecan Pie ink to colour the books;
- Wink of Stella Clear Glitter Brush to add splatters to background by whacking the Brush against my Bone Folder;
- Stampin' Dimensionals (item 104430) used to attach the raven; and
- Mini Stampin' Dimensionals (item 144108) used behind the two tall bottles perched atop the stack of books.
Even though I am not shopping yet for Halloween candy (it would never last!) I have started on the treat holders:

The box portions of each of these two treat holders measure 5 1/4" tall x 4 1/4" wide x 1" deep, and I used an 11" x 6 1/4" piece of cardstock, scored on the 11" side at 1", 5 1/4", 6 1/4", and 10 1/2" (1/2" tab is the glue tab); and scored on the 6 1/4" side at 1" (bottom flaps). For the handles I used a 3/4" x 11" strip of cardstock for the base piece, and a 1/2" x 11" strip for the center piece. The center pieces I scored three times at 1/8" intervals on the 1/2" side (placing the strips so the raised side of the scored lines faced up). For one holder I used a pencil to draw a line 1/2" from each end of the handle strip to use as guidelines for gluing the handle to the inside of the sides of the box portion; and for the other box I drew the lines at 3/4" from each end. To embellish each side of each treat holder I layered a cardstock circle die cut using the smallest circle die from the Stylish Shapes dies (item 159183) with a cardstock circle die cut using the largest circle die from the Country Birdhouse dies (this die cuts a small circle from the center of the circle).


Additional supplies used to complete the first treat holder:
- Blackberry Bliss cardstock (item 133675) for the box, center handle strip, and top circle die cuts for side panel embellishments;
- Basic Black cardstock (item 121045) for the 5" x 4" matting panel for the DSP panel (the edges of the matting panel scraped with the blade of my craft knife), the base handle piece, and the two base circle die cuts for the side panel embellishments;
- Highland Heather ink refill (item 147167) and Pecan Pie ink (item 161665) for the colour washes on the sentiment tag - Pecan Pie ink splatters added by flicking the paint brush used to mix the ink with a little water. After the tag was thoroughly dry I stamped the sentiment;
- Pool Party ink (item 147107), Pecan Pie ink, and Blackberry Bliss ink used to colour the bottles ("corks" made as detailed for wood panel project); and
- Basic Black baker's twine (Baker's Twine Essentials Pack - item 155475) for bow tied onto sentiment tag - ends secured with tiny dabs of Multipurpose Liquid Glue.


- Pebbled Path cardstock (item 161722) for the box, base handle piece, and top circle die cuts for side panel embellishments;
- Basic Black cardstock (item 121045) for the 5" x 4" matting panel for the DSP panel, center handle piece, and base circle die cuts for the side panel embellishments;
- watercolour paper for two large tags cut using the largest tag from the Greetings Of The Season dies - I cut a window in one of the tags by using low-tack tape to hold the rectangular tag die (same die used for the sentiment tag on the first treat holder) and the large tag together when passing through the Stampin' Cut & Emboss Machine - this way the frame was cut with one pass through the Stampin' Cut & Emboss Machine. The base tag I coloured with a wash of Pecan Pie ink (item 161665), lightly spritzing with water (Stampin' Spritzers - item 126185) and blotting dry with paper towel, and then over stamping using images from the Of Art & Texture stamp set (item 162687) and Pecan Pie ink. The frame tag was coloured with Pecan Pie ink applied with one of the Blending Brushes, lightly spritzed with water, and then all edges sponged with Early Espresso ink (item 147114). The frame and base tags were glued together, and the holes of these tags were matched up with the hole of the sentiment tag (through which the Basic Black baker's twine [Baker's Twine Essentials Pack - item 155475] bow was tied). Before stamping the sentiment I coloured the sentiment tag with Pecan Pie ink applied using one of the Blending Brushes, lightly spritzed with water, and then sponged the edges with Early Espresso ink;
- Basic Gray ink (item 149165) and Pecan Pie ink to colour the raven - I sponged additional Pecan Pie ink around the edges of the die cut;
- Pecan Pie ink, Mossy Meadow ink (item 147111), Basic Beige ink (item 163806), Misty Moonlight ink (item 153118), and Basic Gray ink to colour the books - I sponged additional Pecan Pie ink around the edges of the two die cuts before "stacking" the books; and
- Black & Very Vanilla 3/8" Large Check Ribbon (item 161982) for the bow tied around the handle.
Unfortunately Stampin' Up! advises that the following supplies I used in my projects this week are not currently available but I have included the date Stampin' Up! expects each to again be available for ordering - hopefully some dates will be earlier than expected:
- Stampin' Cut & Emboss Machine (item 149653) - yikes! - week of September 2, 2024;
- Changing Leaves dies and Hybrid Embossing Folder (item 164138) - week of September 2, 2024;
- VersaMark Ink (item 102283) - week of August 19, 2024; and
- Mossy Meadow ink pad (item 147111) - week of August 5, 2024.
Now for the good news:

From August 6 through to August 31, 2024, select Designer Series Papers from the May 2024-April 2025 Annual Catalogue will be 15% off! Although the sale will not apply to the 6" x 6" Designer Series Paper Assortments or to Specialty Papers it will include the following Designer Series Papers:
- Bright & Beautiful 6" x 6" (item 161449);
- Countryside Inn 12" x 12" (item 161467);
- Country Lace 12" x 12" (item 163415);
- Country Woods 12" x 12" (item 163393);
- Full Of Life 6" x 6" (item 163357);
- Lily Pond Lane 6" x 6" (item 163342);
- Mediterranean Blooms 12" x 12" (item 163284);
- Perennial Lavender 12" x 12" (item 162593);
- Take To The Sky 12" x 12" (item 163436);
- Thoughtful Journey 6" x 6" (item 163303);
- To Market 12" x 12" (item 163421);
- Unbounded Beauty 12" x 12" (item 163372);
- Wildly Flowering 12" x 12" (item 163323); and
- Winter Meadow 12" x 12" (item 162133).

The Redemption Period for the Stampin' Up! annual Bonus Days began on August 1, 2024, and runs until August 31, 2024. Coupons earned on orders placed during July are redeemable on orders placed during August - a great opportunity to stock up on some of your favourite Designer Series Papers from the Annual Catalogue!
Thank you for visiting my blog! I had a lot of fun working on my projects this week - cooling thoughts of Halloween weather during another stifling heat wave!
If you are interested in purchasing any of the available Stampin' Up! products I have used in my projects, and you live in Canada and do not have a Stampin' Up! demonstrator, please do not hesitate to visit my online store found on my website https://archiesatelier.stampinup.net/ at your convenience, or simply click under the "Shop With Me" tab on the right sidebar of my blog, which will take you directly to my website and online store. I very much appreciate your business, and if you need any assistance please do not hesitate to contact me (lmccoyarchie@gmail.com) - I would be very pleased to be your demonstrator! The digital version of the May 2024-April 2025 Annual Catalogue is available for you to access at your convenience on my website (https://archiesatelier.stampinup.net/). When visiting my online store don't forget to check out all the products now available as Online Exclusives!
Have fun creating!
Laurel
*It has come to my attention that quite often email correspondence from me is delivered to the recipient's spam or junk mail folder - if you have corresponded with me I have replied so be sure to check your spam or junk mail folder! Thank you!!
.jpg)
Definitely not guilty!
Comments
Post a Comment