Flowers & Trees
(and a few leaves too!)

- Simply Zinnia (item 163479) - petals, buds, stems, and spiky foliage dies;
.jpg)
Simply Zinnia dies - 163479
- Country Birdhouse (item 163400) - flowers and two-leaved sprig dies;
.jpg)
Country Birdhouse dies - 163400
- Country Flowers (item 163410) - leafy clump die;
.jpg)
Country Flowers dies - 163410
- Changing Leaves (item 164138) - three-leaved sprig die;
.jpg)
Changing Leaves dies (also includes Hybrid Embossing Folder) - 164138
- Frosted Forest (item 164136) - three bare branched trees, large branched tree, and tree foliage dies; and
.jpg)
Frosted Forest dies - 164136
- Encircled In Nature (item 163628) - five-tree die (embroidery hoop project).
.jpg)
Encircled In Nature dies - 163628
For the "You are amazing in every way" sentiment used on two cards I used the Changing Leaves stamp set (item 164351) and Stazon Jet Black Ink (item 101406) to stamp the sentiments on watercolour paper.

I also used the large skeleton leaf stamp from the Changing Leaves stamp set to stamp and clear heat emboss a kraft envelope for the 6 1/2" x 5" side-fold card. For the heat embossing I used an Embossing Buddy (small anti-static powder-filled bag used to rub over the surface of the paper/cardstock before stamping image. The anti-static powder helps prevent the embossing powder from sticking to any areas of the paper/cardstock other than the stamped design.) - an Embossing Buddy is included in the Embossing Additions Tool Kit (item 159971); VersaMark Ink (item 102283) to stamp the images; clear embossing powder (Wow! Embossing Powder-Basics - item 165679) for embossing the images; and a heat gun (Heat Tool - item 129053) to heat (activate) the embossing powder.
For "shading" the die cuts I applied Classic Stampin' inks with Blending Brushes (item 153611) and Small Blending Brushes (item 160518).
Just a brief summary of the basic tools and supplies I used to complete my projects this week:
- Paper Trimmer (item 152392) - for trimming paper and cardstock - can also be used for scoring;
- stylus and scoreboard (Simply Scored Scoring Tool - item 122334) - for scoring card fold lines - to ensure crisp folds I also burnish all folded scored lines using my Bone Folder (item 102300);
- Stampin' Cut & Emboss Machine (item 149653) - for all die cutting;
- Paper Snips Scissors (item 103579) - these sharp little scissors are great for trimming die cuts;
- Take Your Pick Tool (item 144107) - the paper piercer, mini spatula, and tacky putty tips are a great help for picking up and placing small die cuts and embellishments; and
- for the main adhesive, Multipurpose Liquid Glue (item 110755).
On with the projects!


- Daffodil Delight cardstock (item 119683) shaded with Daffodil Delight ink (item 147094) for flowers (including buds);
- Berry Burst cardstock (item 144243) shaded with Blackberry Bliss ink (item 147092) for flowers (including the two layered small flowers cut using the Country Birdhouse dies;
- Cajun Craze cardstock (item 119684) shaded with Pecan Pie ink (item 161665) for flowers (including buds);
- Crushed Curry cardstock (item 131199) shaded with Pumpkin Pie ink (item 147086) for the flower centers' starry rings - I layered three rings for each of the large flowers;
- Early Espresso cardstock (item 119686) for the oval flower centers;
- Mossy Meadow cardstock (item 133676), Old Olive cardstock (item 100702), and Granny Apple Green cardstock (item 146990) shaded with Mossy Meadow ink (item 147111) for the stems and foliage;
- Stampin' Dimensionals (item 104430) - trimmed in half - to attach the petal layers together for the large flowers (I used between two and four petal layers). I also used one of the Stampin' Dimensionals to attach the oval flower centers after gluing the layered starry rings to the Early Espresso cardstock centers. I used my Bone Folder to curl the petals;
- two small Pebbled Path dots from the retired 2023-2025 In Colour Dots (item 161620) for the centers of the two small flowers; and
- one of the Paper Butterfly Accents (item 162612) shaded with Daffodil Delight ink, Pumpkin Pie ink, and Basic Gray ink (item 149165), and lightly spritzed with water (Stampin' Spritzers - item 126185).

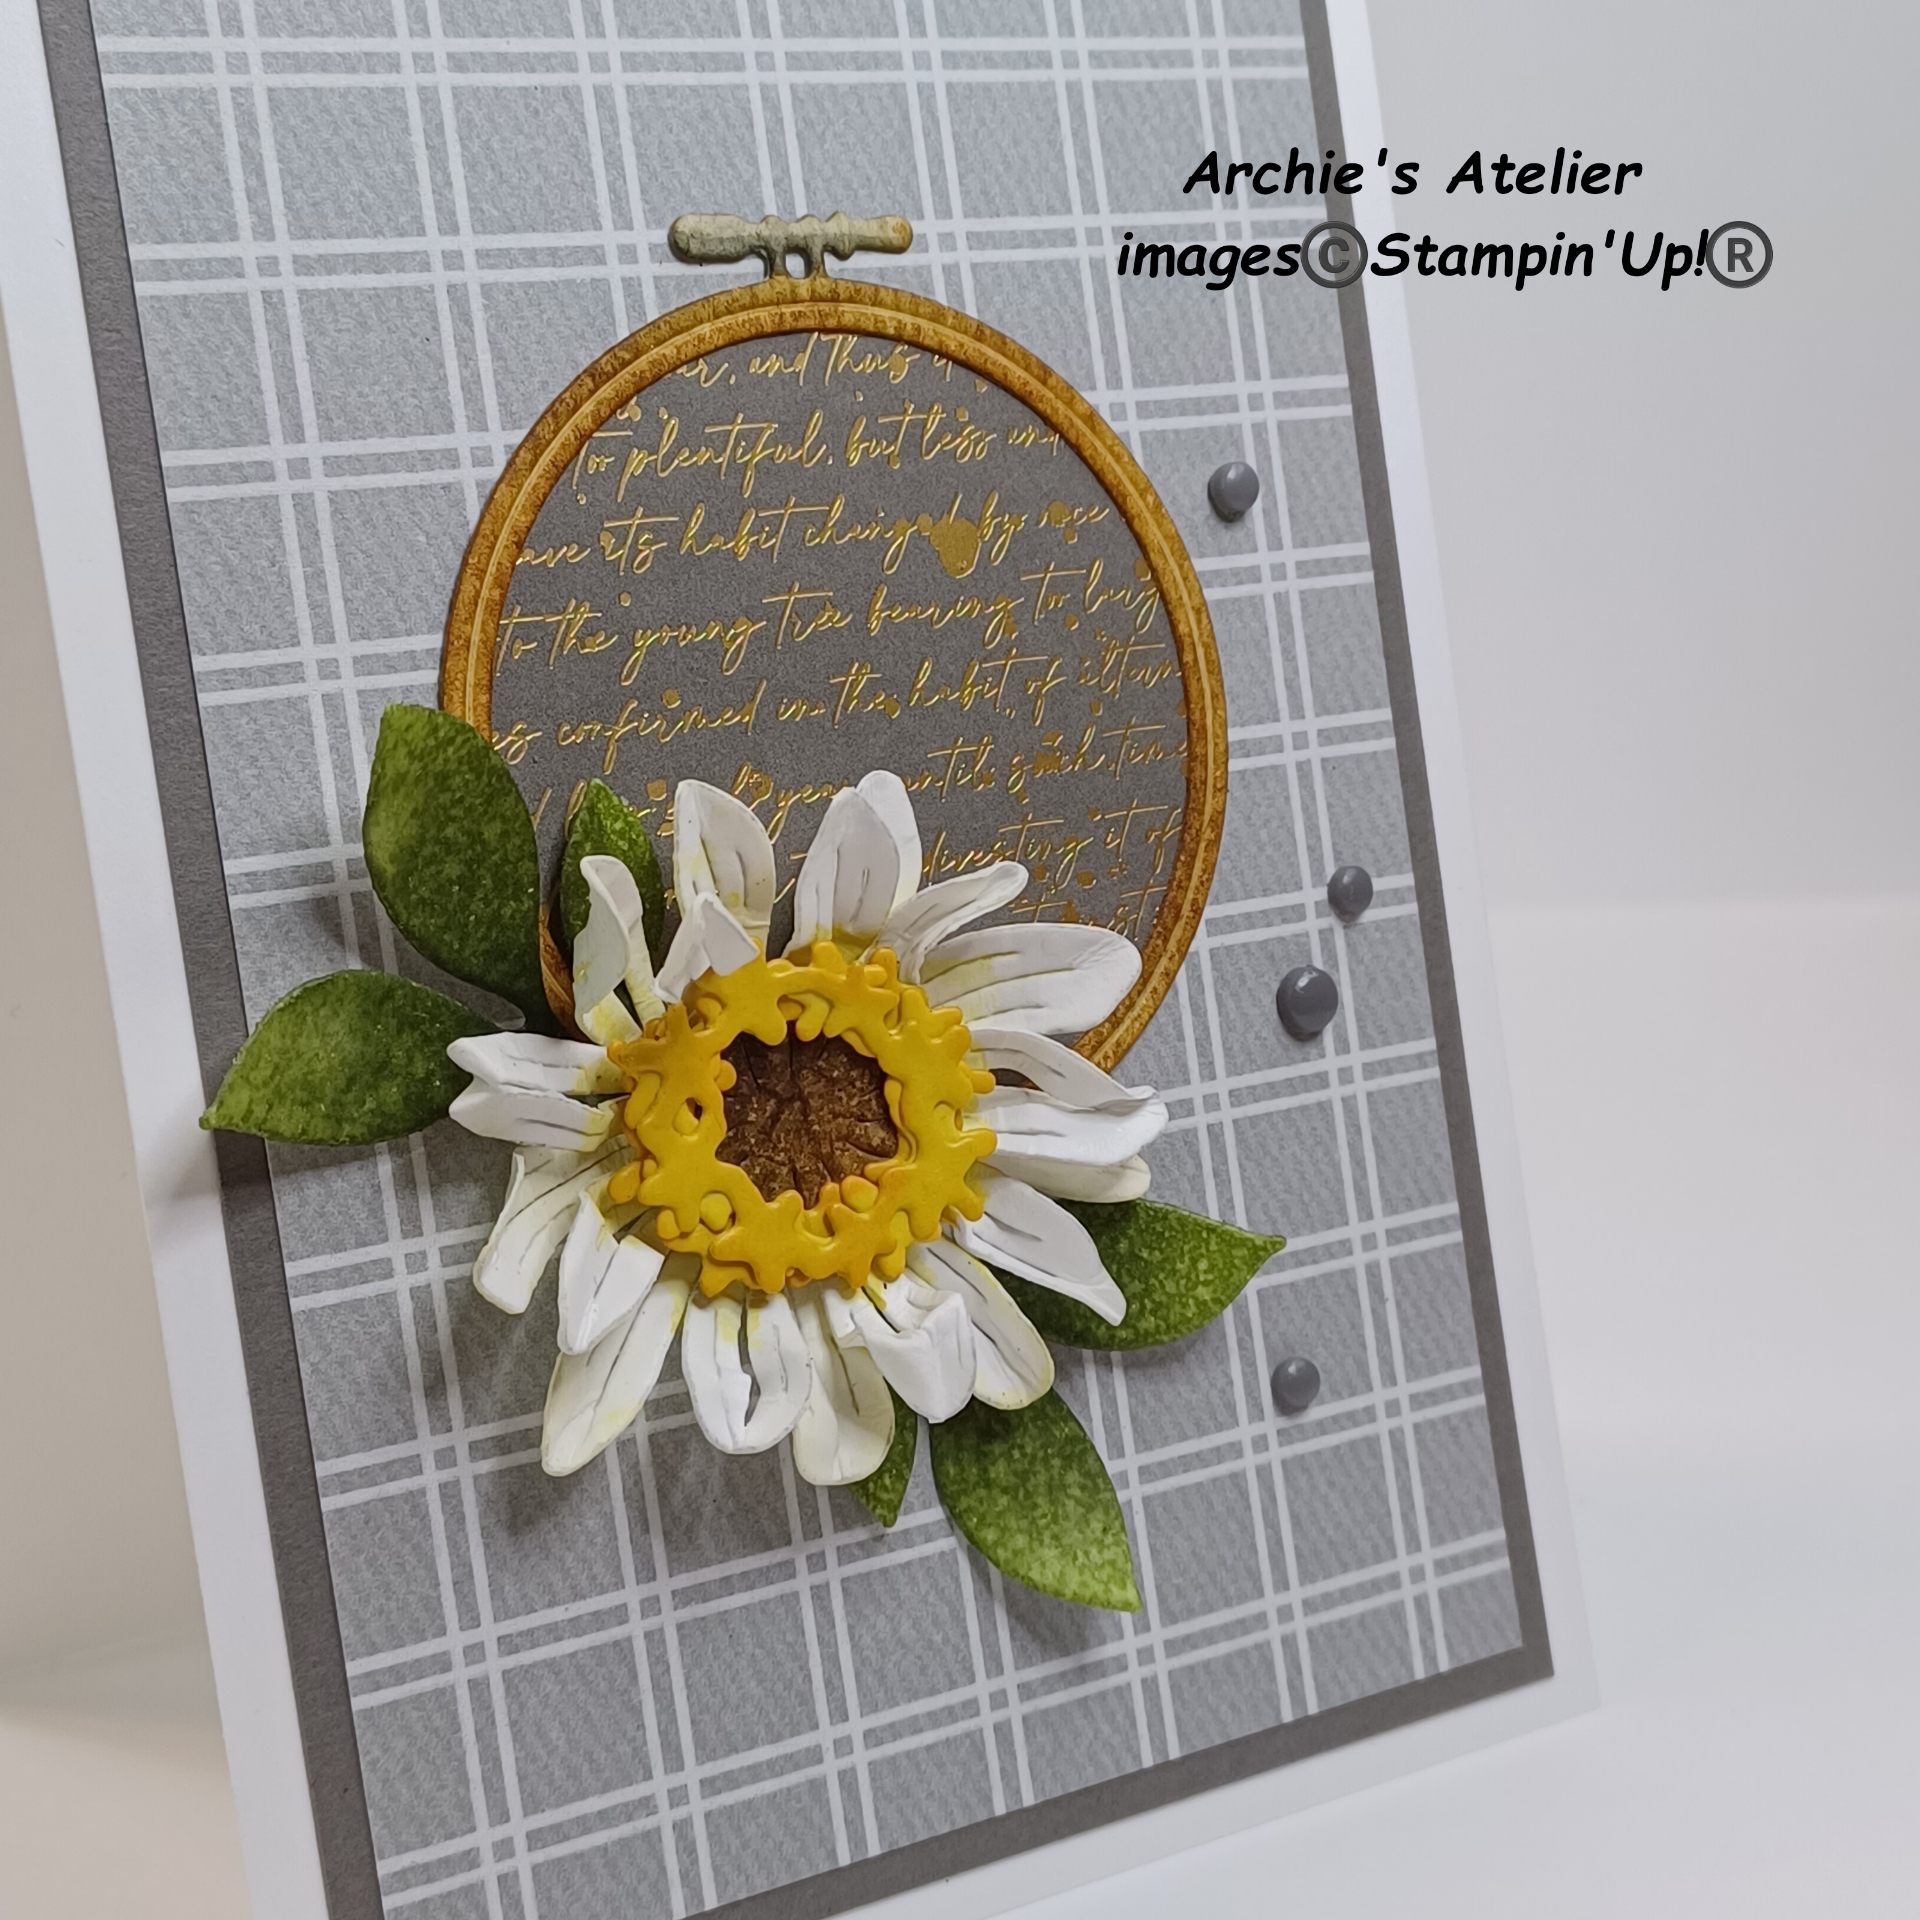


For the "daisy" I cut two petal layers from watercolour paper using the Simply Zinnia dies - adding a light wash of Daffodil Delight ink (item 147094) to the centers, allowing the ink to bleed slightly into the petals - and then pinching and scrunching the petals. To attach the petal layers together I used a little bit of glue, applied just to the center of the bottom petal layer. After gluing the starry rings (cut from Crushed Curry cardstock - item 131199 - and shaded with Pumpkin Pie ink - item 147086) to the oval center that had been cut from watercolour paper, shaded with Early Espresso ink (item 147114) and lightly spritzed with water (Stampin' Spritzers - item 126185), I used one of the Stampin' Dimensionals (item 104430) to attach the completed center to the center of the top petal layer. To complete this 4 3/4" x 3 5/8" top-fold card I used the following additional supplies:
- Basic White Thick cardstock (item 159229) for the card base;
- Pebbled Path cardstock (item 161722) for the 4 1/2" x 3 3/8" matting panel;
- Smoky Slate patterned paper from the Take To The Sky 12" x 12" Designer Series Paper (item 163436) for the 4 4/16" x 3 1/8" panel;
- watercolour paper for the two three-leaved sprigs die cut using the Changing Leaves dies - shaded with Mossy Meadow ink (item 147111) and lightly spritzed with water (Stampin' Spritzers);
- watercolour paper for the embroidery hoop die cut using the Crafting With You dies (item 161225) - coloured using Pecan Pie ink (item 161665) and Basic Gray ink (item 149165);
.jpg)
Crafting With You dies - 161225
- Pebbled Path/gold script patterned paper from the Nature's Sweetness 12" x 12" Specialty Designer Series Paper (item 162616) trimmed to fit behind the embroidery hoop - I used a very fine bead of glue on the back of the embroidery hoop to glue the trimmed DSP to the hoop; and
- three small and one large of the Basic Gray dots from the retired Classic Matte Dots (item 158146) added to the DSP panel.


- Basic White Thick cardstock (item 159229) for the card base;
- watercolour paper for the two flowers die cut using the Country Birdhouse dies and coloured with a wash of Daffodil Delight ink (item 147094); the stem trimmed from the die cut made using the bow die from the Country Birdhouse dies, and shaded with Mossy Meadow ink (item 147111); the bottle die cut using the Potions & Spells dies (item 164141) and shaded with Pool Party ink (item 147107) and a little Mossy Meadow ink and lightly spritzed with water (Stampin' Spritzers - item 126185); and sentiment banner - before stamping the sentiment I cut the banner using the long narrow banner die from the Stylish Shapes dies (item 159183), and after stamping the sentiment shaded using Pecan Pie ink (item 161665). The ends of the sentiment banner were trimmed so that the banner would fit across the card;
.jpg)
Potions & Spells dies - 164141

Stylish Shapes dies - 159183
- small torn scrap of Pecan Pie cardstock (item 161717) glued to bottom edge of sentiment banner;
- Daffodil Delight ink and the splatter stamp from the Of Art & Texture stamp set (item 162687) for background stamping on card front;

- single strand of Linen Thread (item 104199) for the bow tied around the neck of the bottle (I secured the center knot with a tiny dab of Multipurpose Liquid Glue);
- a 3 1/4" x 1 1/4" piece of Summer Splash patterned paper from the 2024-2026 In Colour 6" x 6" Designer Series Paper Assortments (item 163777); and
- one small white dot from the retired Classic Matte Dots (item 158146) for the flower center.


For the base of this project I used a 3" diameter embroidery hoop from my stash. Using the Encircled In Nature dies I cut two of the five-tree strips from Basic White Thick cardstock (item 159229), gluing them, slightly overlapping and trimmed as required, to the back bottom of the embroidery hoop. From watercolour paper that had been coloured by ink smooshing with Garden Green Ink Refill (item 102059) mixed with water, with additional splatters of water blotted dry with paper towel, I trimmed the background panel to fit behind the embroidery hoop, and die cut the two three-leaved sprigs (cut using the Changing Leaves dies). To complete this small project I added a bow tied using the Black & Very Vanilla 3/8" Large Check Ribbon (item 161982), secured to the top of the hoop (and over the stems of the two leafy sprigs) with a little dab of Multipurpose Liquid Glue - I used a small plastic clamp to hold the bow in place while the glue dried.


Using the Frosted Forest dies I die cut the strip of three bare branched trees from Basic White Thick cardstock (item 159229), and heat embossed them (imperfectly in keeping with the distressed nature of the DSP framing panel - that's my story and I am sticking to it!😏) with gold embossing powder (Wow! Embossing Powder-Metallics - item 165678) - I pressed the die cut strip directly into the VersaMark Ink pad. To complete this 5 1/2" x 4 3/4" top-fold card I used the following additional supplies:
- Basic White Thick cardstock for the card base, and for the 5 1/8" x 4 3/8" panel with square window opening - I used the 2 3/8" x 2 3/8" square die from the Stylish Shapes dies (item 159183) to cut this window;
- Basic Black cardstock (item 121045) for the 5 1/4" x 4 1/2" matting panel;
- wood grain patterned paper from the Country Woods 12" x 12" Designer Series Paper (item 163393) for the 5 1/8" x 4 3/8" panel with square window opening - I used the 2 3/4" x 2 3/4" square die from the Stylish Shapes dies to cut this window;
- gold splattered and text patterned paper from the Nature's Sweetness 12" x 12" Designer Series Paper (item 162616) for the 5 1/8" x 4 3/8" background panel; and
- Black & Very Vanilla 3/8" Large Check Ribbon (item 161982) for the bow tied around the front panel of the card - I used one of the Mini Glue Dots (item 103683) to secure the center back of the bow to the card front.
And finally . . .


To complete this 6 1/2" x 5" side-fold card I used the following additional supplies:
- Very Vanilla cardstock (item 144239) for the card base;
- Early Espresso cardstock (item 119686) for the 6 3/8" x 4 7/8" matting panel, "soil" cut using the Grove dies (item 157844), and the 2 1/2" x 3/8" torn strip on the inside panel;
.jpg)
Grove dies - 157844
- Night Of Navy patterned paper from the Take To The Sky 12" x 12" Designer Series Paper (item 163436) for the 6 1/4" x 4 3/4" background panel, and the torn strips used on the inside panel;
- Crumb Cake cardstock (item 120953) for the bare branched tree die cut using the Frosted Forest dies - shaded with Early Espresso ink (item 147114);
- Granny Apple Green cardstock (item 146990) for the die cut tree foliage (cut using the Frosted Forest dies) and the leafy clump (cut using the Country Flowers dies), both shaded with Mossy Meadow ink (item 147111);
- Old Olive cardstock (item 100702) for the three-leaved sprig that was used on the inside panel and die cut using the Changing Leaves dies and shaded with Mossy Meadow ink;
- watercolour paper for the sentiment banner - cut using the Delicate Forest dies (item 162679) prior to the sentiment being stamped. After stamping the torn banner was shaded with Pecan Pie ink (item 161665) and lightly spritzed with water (Stampin' Spritzers - item 126185);
.jpg)
Delicate Forest dies - 162679
- watercolour paper for the large flower pot die cut using the cauldron die from the Potions & Spells dies (item 164141) - trimmed across the bottom to remove the "feet" - shaded with Misty Moonlight ink (item 153118) and Pecan Pie ink, and lightly spritzed with water (Stampin' Spritzers) - I was trying to replicate the large glazed ceramic flower pots I so admire!; and
- two large and one small of the Very Vanilla dots from the retired Classic Matte Dots (item 158146) added to the DSP panel.
I added splatters to the heat embossed envelope (a 7 1/4" x 5 1/4" kraft envelope) with my Basic Black Stampin' Write Marker (item 162481) by flicking the brush tip against the marker lid. For the bow tied around the envelope I used 3/8" ecru crocheted trim from my dollar store stash.
Thank you for visiting my blog! I had a lot of fun working on my projects!
Unfortunately Stampin' Up! advises that the following supplies I used in my projects this week are not currently available but I have included the date Stampin' Up! expects each to again be available for ordering - hopefully some dates will be earlier than expected:
- Stampin' Cut & Emboss Machine (item 149653) - yikes! - week of September 9, 2024;
- Changing Leaves dies and Hybrid Embossing Folder (item 164138) - week of September 2, 2024;
- Simply Zinnia dies (item 163479) - week of September 2, 2024;
- Basic Black Stampin' Write Marker (item 162481) - week of September 2, 2024; and
- VersaMark Ink Pad (item 102283) - week of August 19, 2024.
Just a reminder that the Redemption Period for the annual Bonus Days is on now until August 31 - coupons earned on orders placed during July are redeemable on orders placed during August - so why not combine a coupon (or two or more!) with the Designer Series Paper Sale that is also on now until August 31, 2024! For the month of August select Designer Series Papers from the May 2024-April 2025 Annual Catalogue - including the Country Woods and Take To The Sky Designer Series Papers - are on sale at 15% off!

.jpg)
If you are interested in purchasing any of the available Stampin' Up! products I have used in my projects, and you live in Canada and do not have a Stampin' Up! demonstrator, please do not hesitate to visit my online store found on my website https://archiesatelier.stampinup.net/ at your convenience, or simply click under the "Shop With Me" tab on the right sidebar of my blog, which will take you directly to my website and online store. I very much appreciate your business, and if you need any assistance please do not hesitate to contact me (lmccoyarchie@gmail.com) - I would be very pleased to be your demonstrator! The digital version of the May 2024-April 2025 Annual Catalogue is available for you to access at your convenience on my website (https://archiesatelier.stampinup.net/). When visiting my online store don't forget to check out all the products now available as Online Exclusives!
Have fun creating!
Laurel
*It has come to my attention that quite often email correspondence from me is delivered to the recipient's spam or junk mail folder - if you have corresponded with me I have replied so be sure to check your spam or junk mail folder! Thank you!!

Fuzzy pink ball - be you friend or foe?
Comments
Post a Comment