Back To The Beach!
Hello! Today I am sharing a few projects I worked on this week using the Stampin' Up! Beach Day stamp set (item 162797) and the co-ordinating Beach Day dies (item 162799) - with high temperatures (and heat warnings) this week the timing seemed right to go back to the beach!
Beach Day dies - 162799
Just a reminder that although the Beach Day stamp set and co-ordinating Beach Day dies are no longer offered as a Bundle, until June 30, 2024, Stampin' Up! is offering an additional 10% off all current stamp and co-ordinating die Bundles, as well as 10% off the Stampin' Cut & Emboss Machine (item 149653), the Mini Stampin' Cut & Emboss Machine (item 150673), and the Boho Blue Limited Edition Mini Stampin' Cut & Emboss Machine (item 161104)!
Both the Country Birdhouse dies (item 163400) and the Simply Zinnia dies (item 163479) are currently out of stock but Stampin' Up! advises that both are expected to be back in stock the week of June 24, 2024 - and hopefully sooner since both the Country Birdhouse Bundle (item 163401) and the Simply Zinnia Bundle (item 163480) will only be available for ordering once the dies are back in stock!
This week Stampin' Up! has also added two new all-inclusive kits to the Kits Collection.
The Scenic Route Travel Journal Kit (item 163904) includes the following to complete one 5 3/4" x 9 1/4" x 7/8" travel journal:
- step-by-step instructions;
- pre-cut pieces;
- two fold-out pages with pockets;
- two tri-fold pages;
- printed adhesive-backed die cut alphabets, sentiments, and images;
- die cut journaling pieces; and
- adhesive to complete the project.
The Expressions Of Kindness Kit (item 163905) includes the following to complete eight 5 1/2" x 4 1/4" cards (four each of two designs):
- step-by-step instructions;
- Expressions Of Kindness photopolymer stamp set;
- Blackberry Bliss Stampin' Spot;
- pre-cut pieces;
- eight printed card bases;
- eight printed envelopes;
- printed die cut images and gold foil labels;
- adhesive-backed gold sparkle gems; and
- adhesive to complete the projects.
Just a quick note regarding the basic tools and supplies I used to complete my projects this week:
- Paper Trimmer (item 152392) - for trimming paper and cardstock - can also be used for scoring;
- stylus and scoreboard (Simply Scored Scoring Tool - item 122334) - for scoring card fold lines and decorative lines. To ensure crisp folds I also burnish all folded scored lines using my Bone Folder (item 102300);
- Stampin' Cut & Emboss Machine (item 149653) - for all die cutting;
- Paper Snips Scissors (item 103579) - these small sharp scissors are very handy for trimming die cuts (i.e. snipping off a few leaves etc.), and certainly help make fussy cutting (truck image) a little easier!;
- Take Your Pick Tool (item 144107) - the paper piercer, mini spatula, and tacky putty tips are a great help for picking up and placing small die cuts; and
- for the main adhesive, Multipurpose Liquid Glue (item 110755).
To apply ink to add shading to die cuts, I used Small Blending Brushes (item 160518). I used Stazon Jet Black Ink (item 101406) to stamp all images and sentiments.
For several of the projects I used a blended ink background panel - I used a combination of Blending Brushes (item 153611) and Small Blending Brushes to apply Classic Stampin' Inks to Basic White Thick cardstock (item 159229) panels. In each section I began with the lightest ink colour, working up to the darkest, blending in more of a previous ink colour in order to get a smoother colour gradation. For this blended ink technique it is recommended that after applying ink to the Blending Brush that you remove some of the ink on a piece of scrap paper (a few little circular motions), and that you place your cardstock panel over some more scrap paper so that you can start the circular blending motions with the Blending Brush off the edge of the cardstock panel rather than putting the Blending Brush immediately down onto the cardstock in order to avoid getting harsh "blobs" of ink on the cardstock panel as these can be very hard to blend out. I find that a light (gentle) application of ink works best - it takes a little effort to build up the colour but it can certainly be well worth it! I used pieces of scrap paper as masks for different sections - i.e. sky, water, beach.
For a couple of projects I used a watercoloured background panel - colour washes of Classic Stampin' inks applied to a watercolour paper panel. I first applied some clean water with a wide clean brush to the watercolour paper, and then while the paper was still damp, and again using a paint brush, I stroked on the ink diluted with some water. I worked in horizontal sections - sky, water, beach, allowing the colour to dry on each section before proceeding with the next to prevent the colours from mixing together - although this can certainly be a desired effect in some circumstances . . .
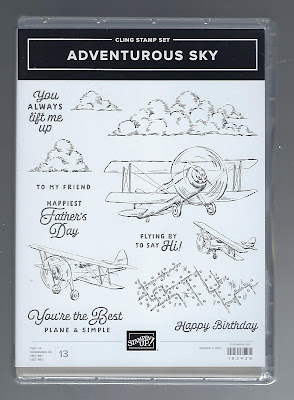
I really like the high cumulus cloud dies from the Adventurous Sky dies (item 163446) - and cut from watercolour paper (using the more defined textured side of the watercolour paper as the "up" side for the die cuts), and shaded with Basic Gray ink (item 149165) in varying degrees these clouds make a few appearances in this week's projects!
Now on with the projects!
Additional supplies used to complete this 6 1/8" x 5 1/8" side-fold card:
- Basic Black cardstock (item 121045) for the card base, and 5 1/2" x 4 1/2" matting panel (edges scraped with the blade of my craft knife);
- Basic White Thick cardstock (item 159229) for the 5 1/4" x 4 1/4" blended ink panel, 5 5/8" x 4 5/8" matting panel, and 5 3/4" x 4 3/4" inside panel;
- Pool Party ink (item 147107), Misty Moonlight ink (item 153118), and Crumb Cake ink (item 147116) for the blended ink panel - sky, water, and sand;
- watercolour paper for the stamped and die cut umbrella, chair, ball, and birds;
- Pumpkin Pie ink (item 147086), Pool Party ink, Real Red ink (item 147084), Daffodil Delight ink (item 147094), Crumb Cake ink, and Basic Gray ink (item 149165) to colour umbrella, chair, ball, and birds;
- Crumb Cake cardstock (item 120953) for stamped and die cut sand castle - shaded with Crumb Cake ink;
- Basic Black Stampin' Write Marker (item 162481) to add splatters to front panel by flicking the marker's brush tip against the marker lid. The splatters were added after the sentiment was stamped but before all die cuts were added; and
- Mini Stampin' Dimensionals (item 144108) to attach the umbrella and chair to the card front.
I used a 0.7 mm tip Posca White Marker to add the dotty wave line along the edge of the sand.
Additional supplies used to complete this 7 1/8" x 5 1/2" side-fold card:
- Basic Black cardstock (item 121045) for the card base, 6 3/8" x 4 3/4" arched window panel, and palm tree, grass, and leafy sprig die cuts;
- Basic White Thick cardstock (item 159229) for the 5 1/2" x 4" blended ink panel, die cut "waves" (these are the inset or punch out pieces from the wave die from the Beach Day dies), and 6 5/8" x 5" inside panel;
- Garden Meadow dies (item 162740) to cut arched window opening, and grass;
Garden Meadow dies - 162740
- Delicate Forest dies (item 162679) to cut leafy sprig;
Delicate Forest dies - 162679
- Daffodil Delight ink (item 147094), Pumpkin Pie ink (item 147086), Berry Burst ink (item 147143), and Blackberry Bliss ink (item 147092) for the sky portion of the blended ink panel;
- Misty Moonlight ink (item 153118) and Blackberry Bliss ink for the water portion of the blended ink panel;
- Crumb Cake ink (item 147116) for the sand portion of the blended ink panel;
- woodgrain patterned paper from Country Woods 12" x 12" Designer Series Paper (item 163393) for 1/2" wide frame strips, lengths trimmed to fit around the Basic Black cardstock window panel. I cut the strip ends at 45 degree angles, and sponged all edges with Crumb Cake ink. I spot glued the window panel to the blended ink panel so that I could tuck in the palm tree and leafy sprig die cuts before adding more glue to secure the panels together, then adding the frame strips, and finally gluing the completed and framed panel to the card front; and
- woodgrain patterned paper from Country Woods DSP for the 1 1/4" x 5" strip added to inside panel (I also sponged all edges of this strip with Crumb Cake ink).
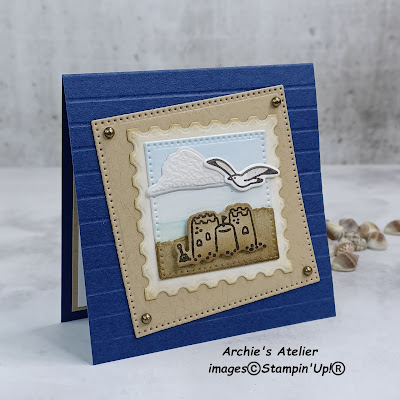
Additional supplies used to complete this 3" square top-fold gift card:
- Night Of Navy cardstock (item 100867) for card base - for the horizontal decorative score lines on the front panel I scored the panel every 1/4";
- Crumb Cake cardstock (item 120953) for the 2 3/8" die cut square (cut using the Stylish Shapes dies - item 159183), torn "sand" strip cut using the 1 1/2" square die from Stylish Shapes dies, stamped and die cut sand castle, and 2 3/4" square inside matting panel;
- Basic White Thick cardstock (item 159229) for the 2 5/8" square inside panel;
- watercolour paper for the watercoloured square (cut using the 1 1/2" square die from Stylish Shapes dies), stamped and die cut bird, and 1 7/8" square "postage stamp" matting panel that was cut using the Perennial Postage dies (item 162607);
Perennial Postage dies - 162607
- Balmy Blue Ink Refill (item 147168) and Pool Party ink (item 147107) for the sky and water colour washes on the die cut watercolour paper square;
- Basic Gray ink (item 149165) to colour the bird;
- Crumb Cake ink (item 147116) to shade the edges of the torn "sand" strip, the sand castle, the edges of the die cut watercolour paper "postage stamp" matting panel, and to stamp the shells on the Basic White Thick cardstock inside panel;
- Mini Stampin' Dimensionals (item 144108) to attach the sand castle; and
- for each of the four corners of the Crumb Cake cardstock 2 3/8" square one small dot from the recently retired Rustic Metallic Adhesive-Backed Dots (item 159082).
For the each of the next two projects I used a 5" x 7" x 3/4" deep wood panel from Dollarama - and I covered the front, and top, back, and side edges of both panels with woodgrain patterned paper from the Country Woods 12" x 12" Designer Series Paper (item 163393), using a fine grit sandpaper to distress all edges of the paper.
Some days there is a lot going on at the beach! Additional supplies used to complete this panel:
- watercolour paper for the 4 3/8" x 3 1/4" sky/water/sand background panel; stamped and fussy cut/die cut images - truck (Trucking Along stamp set - item 162299), lifeguard tower, birds, ball, plane (Adventurous Sky Bundle - item 163447), and anchor (Beauty Of The Deep stamp set - item 161233, and co-ordinating Beauty Of The Deep dies - item 161236); die cut "postage stamp" matting panel (Perennial Postage dies - item 162607), and grass and palm tree;
- Crumb Cake ink (item 147116), Pool Party ink (item 147107), and the recently retired Starry Sky ink (item 159212) for the sand, water, and sky colour washes;
- Pool Party ink, Granny Apple Green ink (item 147095), Old Olive ink (item 147090), Pumpkin Pie ink (item 147086), Daffodil Delight ink (item 147094), Crumb Cake ink (item 147116), Real Red ink (item 147084), Misty Moonlight ink (item 153118), Early Espresso ink (item 147114), and Basic Gray ink (item 149165) to colour truck (and contents), life guard tower, birds, ball, plane, and anchor;
- Granny Apple Green ink, Old Olive ink, Mossy Meadow ink (item 147111), Crumb Cake ink, Pecan Pie ink (item 161665), and Early Espresso ink to colour palm tree - Old Olive ink and Mossy Meadow ink for the grass;
- Crumb Cake ink to shade edges of "postage stamp" matting panel;
- Beauty Of The Deep dies to cut coral from Pool Party cardstock (item 122924) - shaded with Lost Lagoon ink (item 161678);
- Delicate Forest dies (item 162679) to cut tall and small leafy sprigs from Lost Lagoon cardstock (item 133679) - shaded with Lost Lagoon ink;
- Country Flowers dies (item 163410) to cut two leafy "clumps" - one each from Lost Lagoon cardstock and Pool Party cardstock, and both shaded with Lost Lagoon ink;
- Basic Black cardstock (item 121045) for the 4 1/2" x 3 3/8" matting panel - edges scraped with the blade of my craft knife; and
- Stampin' Dimensionals (item 104430) to attach matted image panel to wood panel, and for additional support under the far right side of the anchor cluster.
Some days the beach is a little quieter, and with storm clouds on the horizon and the red flag raised on the lifeguard tower the only visitors are birds . . .

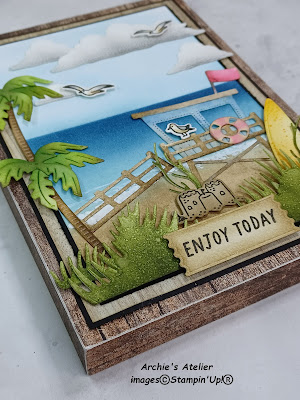
Additional supplies used to complete this panel:
- Basic White Thick cardstock (item 159229) for the 6" x 4" blended ink panel - Pool Party ink (item 147107), Misty Moonlight ink (item 153118), and Crumb Cake ink (item 147116) used for the sky, water, and sand portions of the blended ink panel;
- Basic Black cardstock (item 121045) for the 6 1/8" x 4 1/8" matting panel - edges scraped with the blade of my craft knife; and the 6 5/8" x 4 5/8" matting panel;
- additional woodgrain patterned paper from Country Woods 12" x 12" Designer Series Paper (item 163393) for the 6 1/2" x 4 1/2" panel;
- watercolour paper for the die cut palm trees, grass, lifeguard tower, life preserver, flag, surfboard, stamped and die cut birds, and sentiment panel;
- in addition to the grass "clump" cut using the Beach Day dies, I used the Garden Meadow dies (item 162740) and the Simply Zinnia dies (item 163479) to cut additional grass - the large border grass and the two spiky grasses respectively. All die cut grasses were shaded with Mossy Meadow ink (147111), lightly spritzed with water (Stampin' Spritzers - item 126185) and blotted dry with paper towel;
Simply Zinnia dies - 163479
- Crumb Cake ink, Early Espresso ink (item 147114), Old Olive ink (item 147090), Mossy Meadow ink, Misty Moonlight ink, Real Red ink (item 147084), Daffodil Delight ink (item 147094), Pumpkin Pie ink (item 147086), and Basic Gray ink (item 149165) to colour die cut palm trees, lifeguard tower, flag, life preserver, railing, birds, and surfboard (the dots on the surfboard were stamped using Pumpkin Pie ink);
- Crumb Cake cardstock (item 120953) for the stamped and die cut sand castle - shaded with additional Crumb Cake ink;
- Perennial Postage dies (item 162607) to cut the sentiment label (after sentiment was stamped) - label shaded with Crumb Cake ink;
- Mini Stampin' Dimensionals (item 144108) to attach the sand castle, and the bird perched on the railing; and
- Stampin' Dimensionals (item 104430) to attach the sentiment label.
I again used a 0.7 mm tip Posca White Marker to add wave lines.
And finally . . .
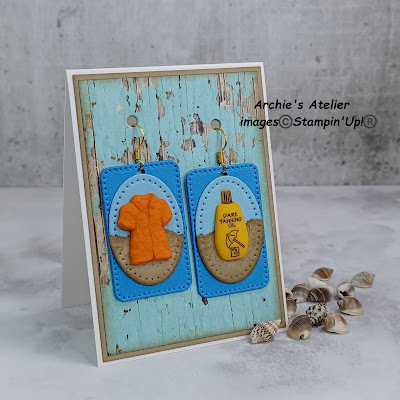
Whether you are dressing for an excursion to the beach, simply visiting the shops to look at beachy stuff - or maybe embarking on the dreaded swimsuit shopping ordeal - you definitely need a pair (or two or more) of beach themed earrings!
I am always on the look out for fun little buttons to use in projects and the pair of bathing beauties, Hawaiian shirt, and sun lotion bottle were perfect for my beach-themed earring project! For each earring base I cut two small rounded corner rectangles from Azure Afternoon cardstock (item 161719) using the Nested Essentials dies (item 161597) - gluing them together with wrong sides together and using a 1/16" hole punch to make the holes to accommodate the earring hooks. Using the oval die included with the Mini Pocket Envelope dies (item 159167) I cut for each earring one complete oval from Balmy Blue cardstock (item 146982) and a partial oval from a torn strip of Crumb Cake cardstock (item 120953) - I found it a lot easier to die cut the ovals from a torn cardstock strip rather than tear a piece off a full die cut oval. Before gluing the Crumb Cake cardstock ovals to the Balmy Blue cardstock ovals I stamped the partial ovals using the seashell image from the Beach Day stamp set and Crumb Cake ink (item 147116) - sponging additional Crumb Cake ink around all edges of the partial ovals. After gluing the completed ovals to the rectangles I glued on the buttons and added the hooks. For the bases of the two 3 3/4" x 2 3/4" top-fold display cards I used Basic White Thick cardstock (item 159229), adding 3 5/8" x 2 5/8" matting panels of either Crumb Cake cardstock or Basic Black cardstock, and 3 1/2" x 2 1/2" panels of woodgrain patterned paper from the Country Woods 12" x 12" Designer Series Paper (item 163393). I sponged the edges of the Crumb Cake cardstock panel and all edges of both DSP panels with Crumb Cake ink. I used a 1/8" hole punch to make the staggered holes in the card fronts to accommodate the earring hooks.
Nested Essentials dies - 161597
Mini Pocket Envelope dies - 159167
Thank you for visiting my blog! I had a lot of fun working on my beach-themed projects this week!
If you are interested in purchasing any of the available Stampin' Up! products I have used in my projects, and you live in Canada and do not have a Stampin' Up! demonstrator, please do not hesitate to visit my online store found on my website https://archiesatelier.stampinup.net/ at your convenience, or simply click under the "Shop With Me" tab on the right sidebar of my blog, which will take you directly to my website and online store. I very much appreciate your business, and if you need any assistance please do not hesitate to contact me (lmccoyarchie@gmail.com) - I would be very pleased to be your demonstrator! The digital version of the May 2024-April 2025 Annual Catalogue is available for you to access at your convenience on my website (https://archiesatelier.stampinup.net/). When visiting my online store don't forget to check out all the products now available as Online Exclusives, as well as some great deals on the Clearance Rack - items on the Clearance Rack are available only while supplies last! There are quite a few exciting new products that will be introduced as Online Exclusives on July 3, 2024 - including the Potions & Spells Bundle and the Changing Leaves Bundle!
Have fun creating!
Laurel
*It has come to my attention that quite often email correspondence from me is delivered to the recipient's spam or junk mail folder - if you have corresponded with me I have replied so be sure to check your spam or junk mail folder! Thank you!!


.jpg)

.jpg)
.jpg)
.jpg)


.jpg)
.jpg)


.jpg)


.jpg)
.jpg)


.jpg)


.jpg)
.jpg)
.jpg)
.jpg)

Comments
Post a Comment