Exploring An Adventurous Sky!

High Flight
(John Gillespie Magee, Jr.)
"Oh! I have slipped the surly bonds of earth
And danced the skies on laughter-silvered wings;
Sunward I've climbed, and joined the tumbling mirth
Of sun-split clouds - and done a hundred things
You have not dreamed of - wheeled and soared and swung
High in the sunlit silence. Hov'ring there,
I've chased the shouting wind along, and flung
My eager craft through footless halls of air . . .
Up, up the long, delirious, burning blue
I've topped the windswept heights with easy grace
Where never lark, or ever eagle flew -
And, while with silent, lifting mind I've trod
The high untrespassed sanctity of space,
Put out my hand, and touched the face of God."
Hello! Today I am sharing a few projects I worked on this week using the Stampin' Up! Adventurous Sky Bundle (item 163447) featured in the May 2024-April 2025 Annual Catalogue. The Bundle includes the Adventurous Sky stamp set (item 163439) and the co-ordinating Adventurous Sky dies (item 163446), and is part of the Take To The Sky Suite Collection (item 163832), which also includes the Take To The Sky 12" x 12" Designer Series Paper (item 163436), and the Industrial Trinkets (item 163450) - both of which I also used in my projects. This is the first time I have ordered an entire Suite Collection!

.jpg)
(Bundle - 163447)
Just a brief summary of the basic tools and supplies I used to complete my projects this week:
- Paper Trimmer (item 152392) - for trimming paper and cardstock - can also be used for scoring;
- stylus and scoreboard (Simply Scored Scoring Tool - item 122334) - for scoring fold lines and decorative lines. To ensure crisp folds I also burnish all folded scored lines using my Bone Folder (item 102300);
- Stampin' Cut & Emboss Machine (item 149653) - for all die cutting;
- Paper Snips Scissors (item 103579) - these small sharp scissors are very handy for trimming die cuts (i.e. trimming the blades from the propeller die cut to make buckle prongs);
- Take Your Pick Tool (item 144107) - the paper piercer, mini spatula, and tacky putty tips are a great help for picking up and placing small die cuts and embellishments; and
- for the main adhesive, Multipurpose Liquid Glue (item 110755).
On with the projects!
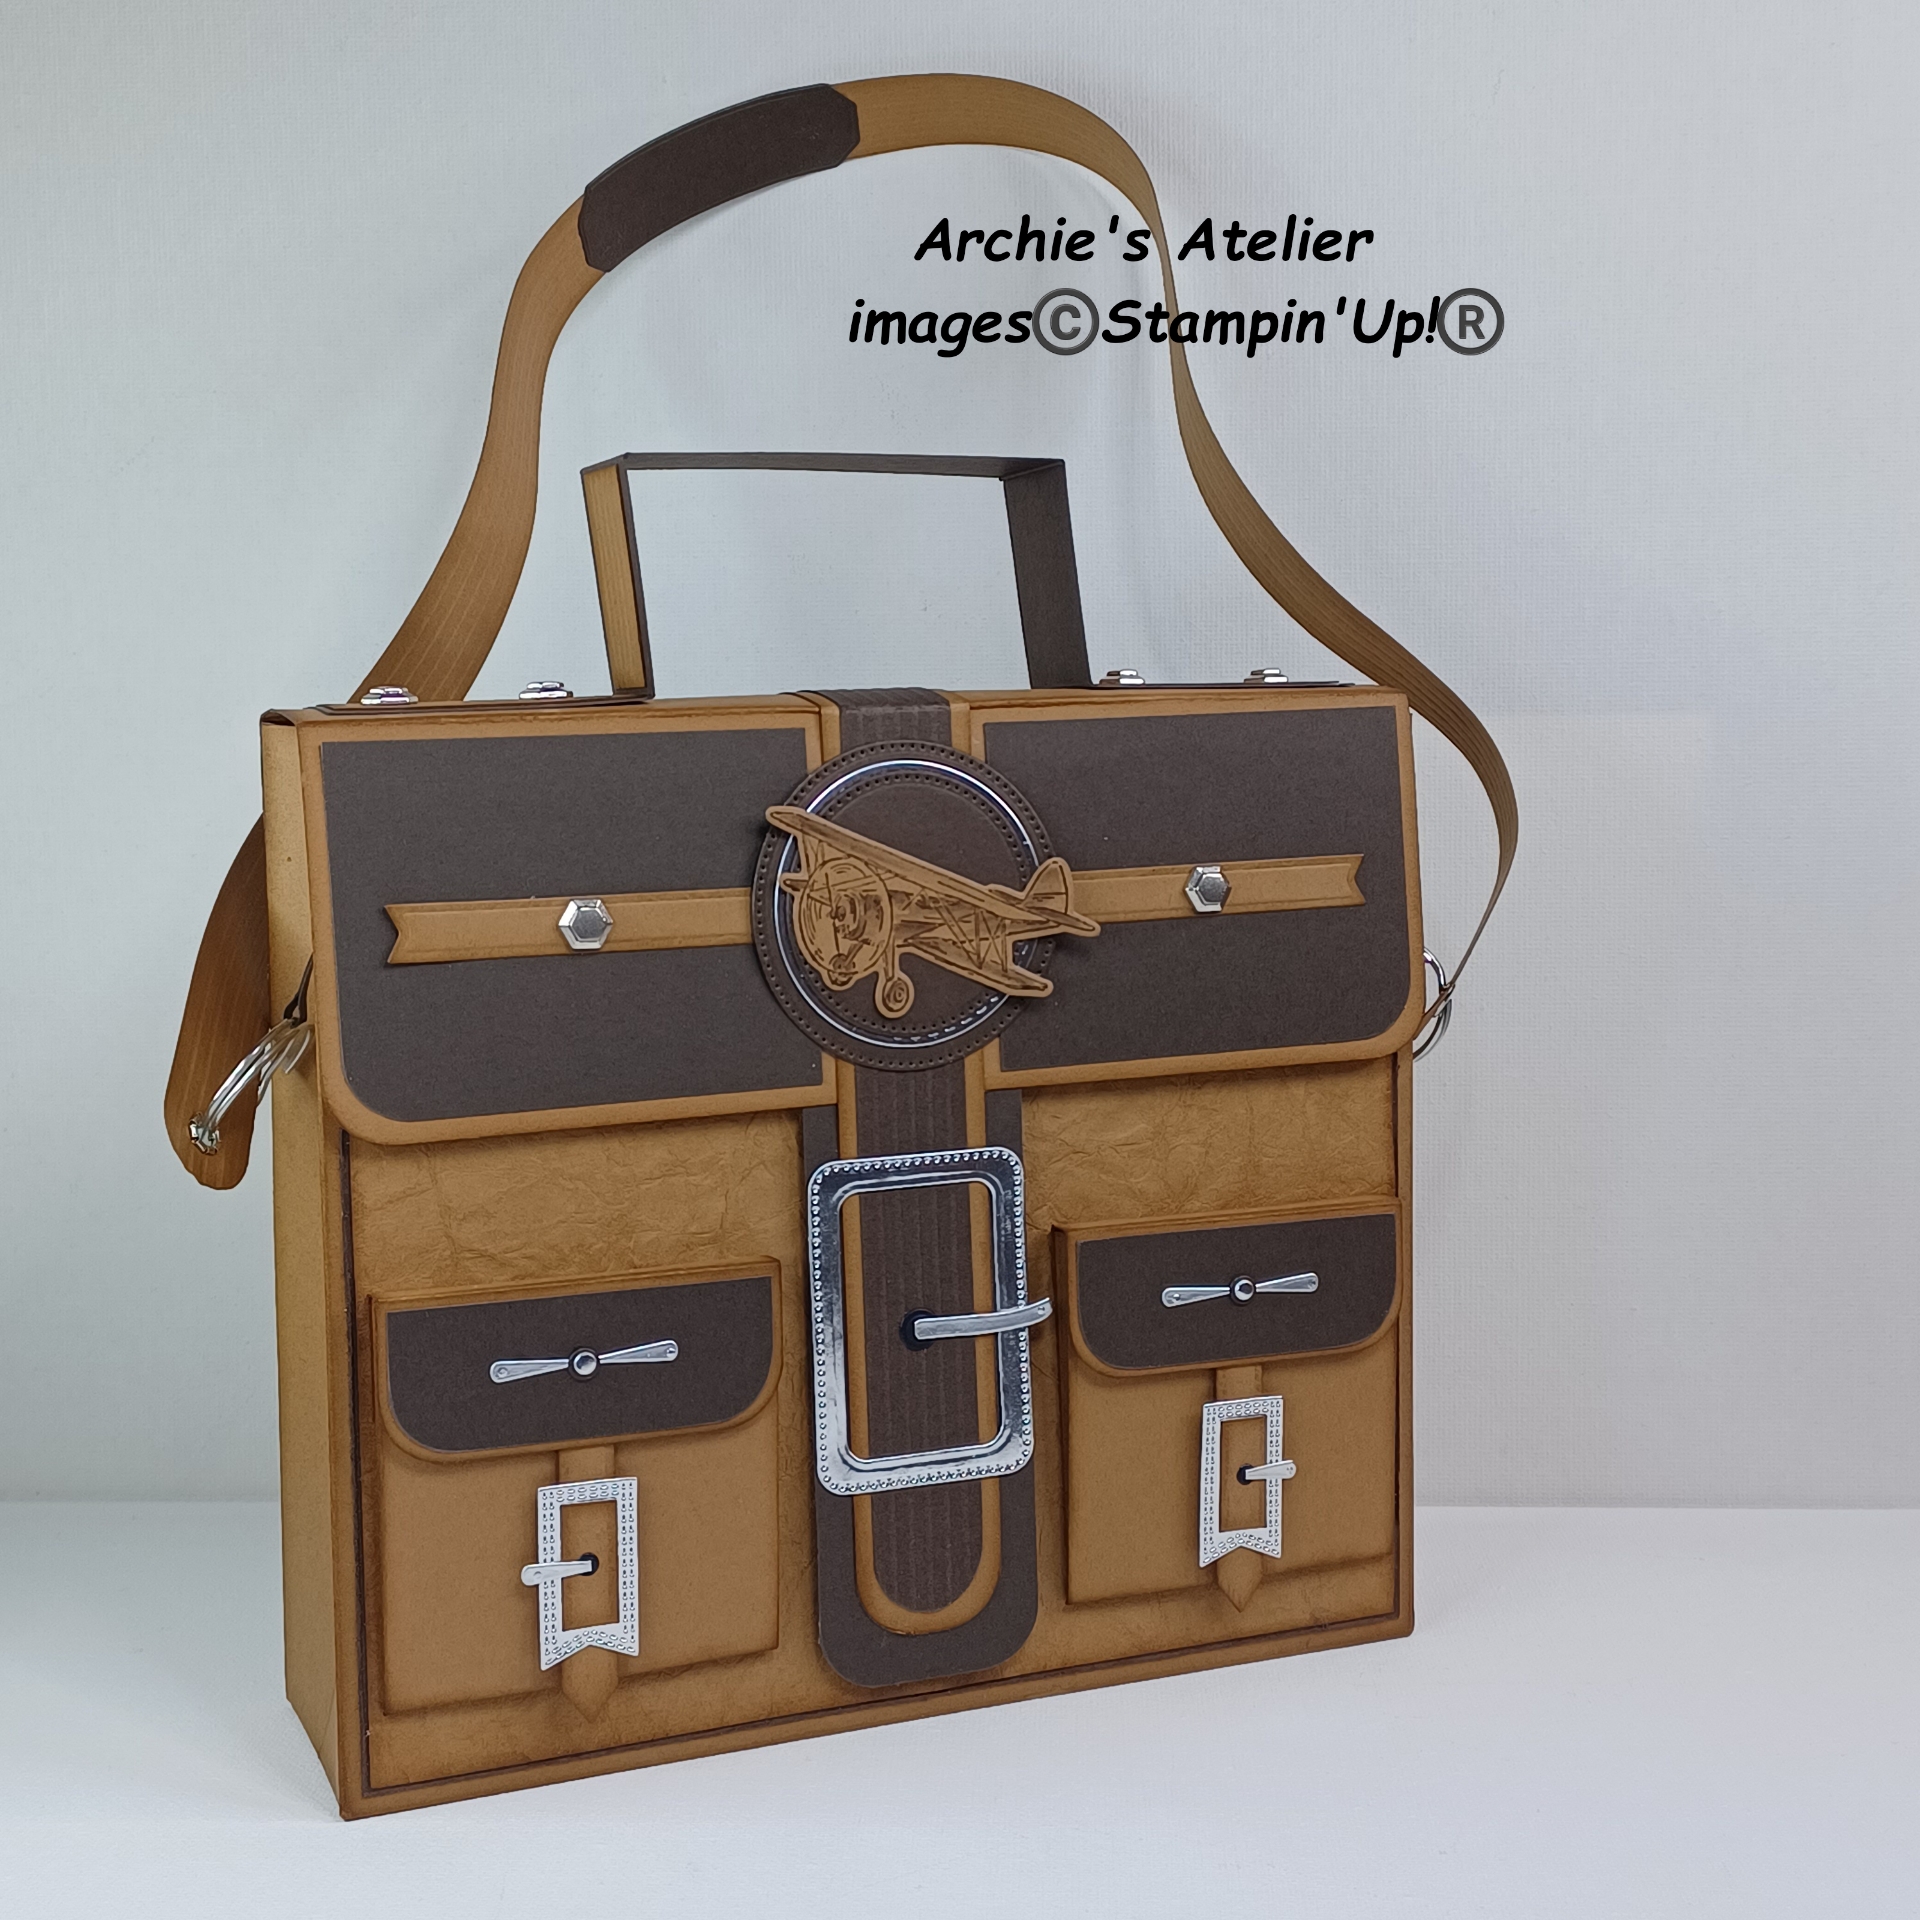
I really like the vintage feel of the Adventurous Sky Bundle, and for the gift bag project I wanted to try to replicate a vintage flight bag (after doing some serious online research!) - and included a handle, strap, flap closure, and two expanding pockets on the front panel. For the bag's flap closure I used four large magnetic discs; and for the flap closures on each of the two expanding pockets I used two small magnetic discs - all purchased at my local scrapbooking shop. Each end of the strap is threaded onto a key ring - I purchased packages of small wood shapes on key rings at Dollarama, so as a bonus I have these wood shapes to use in other projects! I used four small metallic eyelets also purchased at my local scrapbooking shop - one on each end of the strap and one on each side panel of the bag, To punch the holes for the eyelets and to set the eyelets I used my Crop-A-Dile - another very handy tool! Although I used some silver cardstock scraps I had on hand for the metallic die cuts Stampin' Up! offers two options for metallic die cuts: Textured Metallic 12" x 12" Specialty Paper (item 163772), and Silver 12" x 12" Foil Sheets (item 163387) - I will certainly be stocking up on both I think! One of the fun creative challenges of this project was playing with dies and die cuts to get the various components I wanted - buckles, strap fittings etc. I sponged all edges of all Pecan Pie cardstock (item 161717) pieces with Pecan Pie ink (item 161665). I used a small corner rounder punch to round corners - flap closure, front flap and pocket flap decorative panels, and both ends of the strap. For the decorative scoring (handle, flap closure, and strap) I scored at 1/8" intervals, turning the pieces so that the raised side of the scored lines would face out. I added six of the Industrial Trinkets (item 163450) to the bag - four on the handle and two on the decorative strips on the front panel of the top flap.


- for the bag portion two 10" x 8 1/2" pieces of Pecan Pie cardstock each scored on the 10" side at 1", 2", and 9 1/2" (1/2" tab is the glue tab); and scored on the 8 1/2" side at 2" (bottom flaps);

- for the top flap a 5" x 7 1/2" piece of Pecan Pie cardstock scored on the 5" side at 1" and 2 1/2" (when gluing the top flap to the bag I lined up the 1" score line with the top edge of the bag's back panel);

- for the front and back panels: two 6 1/2" x 7 1/2" pieces of Pecan Pie cardstock. To create a faux leather look for these panels I spritzed each panel liberally with water using one of the Stampin' Spritzers (item 126185), crinkled each panel up tightly, spritzing with more water as necessary, ironed each panel dry, and then trimmed each panel to 6 1/8" x 7 1/8";
- for the matting panels for the faux leather panels: two 6 1/4" x 7 1/4" pieces of Early Espresso cardstock (item 119686) - I scraped all edges of these panels with the blade of my craft knife. I glued the two matted faux leather panels to the front and back of the bag after I had glued the top flap to the bag;
- for the handle (which I glued on after I had secured the strap to the bag): a 1" x 10" piece of Early Espresso cardstock, scored on the 10" side at 2", 3 1/2", 6 1/2", and 8"; and from scored Pecan Pie cardstock two 3/4" x 1 7/8" strips. two 3/4" x 1 3/8" strips. and one 3/4" x 2 7/8" strip;
- for the decorative panels for the front of the top flap: two 3" x 2 1/4" pieces of Early Espresso cardstock (outer corners rounded). From Pecan Pie cardstock I cut two of the arrows using the Adventurous Sky dies, and centered one on each of the Early Espresso cardstock panels;
- for the top flap strap: a 1" x 7 1/2" piece of Pecan Pie cardstock, scored on the 7 1/2" side at 1 1/2"; a 3/4" x 7 1/4" piece of scored Early Espresso cardstock glued centered over the Pecan Pie cardstock strip; and a 1 1/2" x 5 5/8" piece of Early Espresso cardstock centered and glued under the Pecan Pie/Early Espresso cardstock matted strip and to the underside of the front of the top flap;
- for the bag's strap: two 3/4" x 11" scored strips of Pecan Pie cardstock - these strips were glued together with a slight overlap, which was covered by the strap fittings. Using my Bone Folder I curled the strap on both sides to create a wavy curve. After setting the eyelets in each end of the strap I attached a key ring to each end of the strap. To attach the key rings to the sides of the bag I used two 1/8" x approximately 3 1/2" long strips of Early Espresso cardstock, folded in half around the key rings and secured together with glue. I threaded the cardstock strips through the eyelets set approximately 1/2" down from the top edge and centered in each side of the bag, gluing the strips to the inside of the bag, and then gluing over the strips a 1/2" x 1 1/2" piece of Early Espresso cardstock;


- for each of the expanding pockets (there is no separate back panel added on these pockets): a 5 1/2" x 3" piece of Pecan Pie cardstock, scored on the 5 1/2" side at 1/2", 1", 1 1/2", 4", 4 1/2", and 5", and scored on the 3" side at 1/2" (bottom). The three 1/2" panels on each side are folded accordion/concertina style so that the outer folds are folded towards the back - mountain/valley/mountain;


- for each pocket flap: a 2" x 2 1/2" piece of Pecan Pie cardstock, scored on the 2" side at 1" (front flap) and 1 1/4". The 3/4" side is glued to the back of the pocket;


- for the decorative panels for each pocket flap: two 7/8" x 2 3/8" pieces of Early Espresso cardstock, bottom corners rounded. To each panel I added a silver cardstock die cut propeller (Adventurous Sky dies) - with additional Early Espresso cardstock and silver cardstock small circles that were cut using, respectively, the small circle die from the Country Birdhouse dies (item 163400), and the double circle die from the Mini Pocket Envelope dies (item 159167);
.jpg)
.jpg)
Mini Pocket Envelope dies - 159167
- Early Espresso ink (item 147114) to stamp airplane image on Pecan Pie cardstock - I used one of the Blender Pens (item 102845) and a little more Early Espresso ink to colour the image. The image was die cut using the Adventurous Sky dies;

- 1 5/8" and 2 1/8" diameter circle dies from Stylish Shapes dies (item 159183) to cut two image matting circles from Early Espresso cardstock;

Stylish Shapes dies - 159183
- embroidery hoop die from Crafting With You dies (item 161225) to cut silver cardstock image matting circle;
.jpg)
Crafting With You dies - 161225
- rounded corner rectangle dies from Nested Essentials dies (item 161597), and stem die from Simply Zinnia dies (item 163479) to cut buckle frame and prong for top flap buckle from silver cardstock - the "hole" was cut from Basic Black cardstock (item 121045) using the large circle die from Country Birdhouse dies;

.jpg)
Nested Essentials dies - 161597
.jpg)
Simply Zinnia dies - 163479
- small flag die from Nested Essentials dies, and propeller die from Adventurous Sky dies to cut buckle and prong for pocket buckles from silver cardstock - I used the arrow die from Adventurous Sky dies to cut the straps from Pecan Pie cardstock. I cut three arrows - trimming 3/4" long strips from the third arrow to glue on top of the silver cardstock "buckle". The "holes" were cut from Basic Black cardstock using the double circle die from Mini Pocket Envelope dies;

- large label die from Delicate Forest dies (item 162679), and small narrow banner die from Stylish Shapes dies to cut strap fittings (one frame cut using the two dies for the top of the strap, and one solid label cut for underside of strap);


.jpg)
Delicate Forest dies - 162679

In keeping with the travel theme I had fun making a few luggage tags - cutting the frames from Pecan Pie cardstock using a combination of the following dies:
- rounded corner rectangle dies from Nested Essentials dies (item 161597);
- oval and small tag dies from Mini Pocket Envelope dies (item 159167);
- tombstone die from the retired - but currently available on the Clearance Rack - Bag of Bones dies (item 162218); and
.jpg)
Bag of Bones dies - 162218
- small rectangular die from Perennial Postage dies (item 162607).
.jpg)

I cut the loops for the luggage tags using the the banner dies from the Stylish Shapes dies (item 159183), curling the die cuts with my Bone Folder. I sponged Pecan Pie ink (item 161665) around all edges of both frames and loops. Behind the tags' window openings I glued trimmed pieces of Transparency Film - a few years ago I lucked out on a full box at a thrift store - certainly comes in handy when your stock of Window Sheets (item 142314) is running low! To decorate the tags I used a combination of stamped/coloured/die cut images, Take To The Sky Designer Series Paper (item 163436), and, for the smallest tag, a partial sentiment from the recently retired Next Destination stamp set (item 161427) - the "Explore" seemed appropriate!

I used Stazon Jet Black Ink (item 101406) to stamp airplane images on watercolour paper, watercolouring the images with Pecan Pie ink, and around the image panel on one small tag using Balmy Blue Ink Refill (item 147168), Pecan Pie ink, and Basic Gray ink (item 149165). I also used Early Espresso ink (item 147114) to stamp an airplane image on Pecan Pie cardstock - colouring with a little additional Early Espresso ink and one of the Blending Pens.
I embellished the tags with die cut silver cardstock circles and propellers, and for one tag, a bow tied using the Black & Very Vanilla 3/8" Large Check Ribbon (item 161982).


I also made one windowed pocket using Pecan Pie cardstock and the Mini Pocket Envelope dies (item 159167). After cutting the window (using the rectangle die included with the Mini Pocket Envelope dies), I stamped the front of the pocket using Early Espresso Ink (item 147114) and the Watercolour World background stamp (item 160708) - gluing a trimmed piece of Transparency Film behind the window prior to completing assembly of the pocket. Inside the pocket I slipped a trimmed panel of Take To The Sky Designer Series Paper; added a stamped and die cut airplane (stamped using Early Espresso ink on Pecan Pie cardstock, and coloured with Early Espresso ink and one of the Blender Pens) to the folded over flap; and a Linen Thread (item 104199) bow to the bulldog clip from my stash.


Thank you for visiting my blog! I had a lot of fun working on my projects this week and am looking forward to more Adventurous Sky exploring!
If you are interested in purchasing any of the available Stampin' Up! products I have used in my projects, and you live in Canada and do not have a Stampin' Up! demonstrator, please do not hesitate to visit my online store found on my website https://archiesatelier.stampinup.net/ at your convenience, or simply click under the "Shop With Me" tab on the right sidebar of my blog, which will take you directly to my website and online store. I very much appreciate your business, and if you need any assistance please do not hesitate to contact me (lmccoyarchie@gmail.com) - I would be very pleased to be your demonstrator! The digital version of the May 2024-April 2025 Annual Catalogue is now available for you to access at your convenience on my website (https://archiesatelier.stampinup.net/). When visiting my online store don't forget to check out all the products now available as Online Exclusives, as well as some great deals on the Clearance Rack, including the Bag of Bones dies - items on the Clearance Rack are available only while supplies last!
Free Shipping - May 21, 2024!

Stampin' Up! has announced FREE SHIPPING for one day only - Tuesday May 21, 2024 - on orders of $100.00 or more CDN (before taxes) - a great opportunity to stock up on some favourite art and crafting supplies - or some soon to be favourites from the May 2024-April 2025 Annual Catalogue - for your summer projects!
Have fun creating!
Laurel
*It has come to my attention that quite often email correspondence from me is delivered to the recipient's spam or junk mail folder - if you have corresponded with me I have replied so be sure to check your spam or junk mail folder! Thank you!!

Comments
Post a Comment