Playing With A Few More Retiring Products!

Hello! Today I am sharing a few projects I worked on this week using a few more of the Stampin' Up! products from the May 2023-April 2024 Annual Catalogue and the January-April 2024 Mini Catalogue that will be retiring at the end of April. During the ongoing Last Chance Promotion (on now until April 30, 2024), the retiring products from both catalogues - several substantially discounted - will be available only while supplies last. Unfortunately quite a few of these products - including several that I have used in my projects this week - have already sold out! The following are the retiring products I used this week that are no longer available - but maybe you have them in your stash or were able to grab them up before they were sold out!
- Lazy Days stamp set (item 161340). Although the Lazy Days Bundle (item 161343), which includes both the stamp set and the co-ordinating and retiring Lazy Days dies (item 161342) is also no longer available the dies are currently available and have been discounted 20%;

.jpg)
Lazy Days dies - 161342
- Lighting The Way stamp set (item 160868);

- Happy Hedgehogs stamp set (item 157983);

- Quiet Meadow stamp set (item 155082);

- Very Vanilla Thick cardstock (item 144237); and
- Calm & Quiet Host stamp set (item 161611).

The following are the additional retiring products I used this week:
- Sweet Sorbet cardstock (item 159268);
- Sweet Sorbet ink (item 159216);
- Parakeet Party cardstock (item 159259);
- Tahitian Tide cardstock (item 159261);
- Starry Sky cardstock (item 159263);
- Starry Sky ink (item 159212);
- Orchid Oasis cardstock (item 159267);
- Zoo Crew 12" x 12" Designer Series Paper (item 161304) - black & white patterned paper;
- Artistic Mix Decorative Masks (item 159178) - discounted 10% - the following mask design that I used is one of the five included designs;

- Classic Matte Dots (item 158146) - discounted 40%;
- Gorgeously Made dies (item 161202) - discounted 20%;
.jpg)
Gorgeously Made dies - 161202
- Dainty Delight dies (item 160674) - discounted 50%;
.jpg)
Dainty Delight dies - 160674
- Meadow dies (item 155852) - discounted 50%;
.jpg)
Meadow dies - 155852
- Paper Florist dies (item 161284) - discounted 50%;
.jpg)
Paper Florist dies - 161284
- Tailor Made Tags dies (item 155563);
.jpg)
Tailor Made Tags dies - 155563
- Notes of Nature dies (item 163203) - discounted 20%; and
.jpg)
Notes of Nature dies - 163203
- Rock & Roll 12" x 12" Designer Series Paper (item 162695) - black & white patterned paper.
Just a quick summary of the basic tools and supplies I used to complete my projects this week:
- Paper Trimmer (item 152392) - for trimming paper and cardstock - can also be used for scoring;
- stylus and scoreboard (Simply Scored Scoring Tool - item 122334) - for scoring card fold lines. To ensure crisp folds I also burnish all folded scored lines using my Bone Folder (item 102300);
- Stampin' Cut & Emboss Machine (item 149653) - for all die cutting and embossing;
- Paper Snips Scissors (item 103579) - these small sharp scissors are very handy for trimming die cuts (i.e. snipping off a few leaves or shortening stems);
- Take Your Pick Tool (item 144107) - the paper piercer, mini spatula, and tacky putty tips are a great help for picking up and placing small die cuts and embellishments; and
- for the main adhesive, Multipurpose Liquid Glue (item 110755).
On with the projects!


To start this card project I watercoloured a piece of watercolour paper with Sweet Sorbet ink and a little Real Red ink (item 147084), and after the ink was dry used Stazon Jet Black Ink (item 101406) to stamp images from the Quiet Meadow stamp set on the paper, and then cut circles from the paper using the 1 11/16", 1 1/4", and 3/4" diameter circle dies from the the Stylish Shapes dies (item 159183).

Additional supplies used to complete this 8" x 4" side-fold card:
- Basic White Thick cardstock (item 159229) for the card base, 7 3/4" x 3 3/4" matting panel, and 7 1/4" x 3 3/8" front panel;
- Basic Black cardstock (item 121045) for the 7 7/8" x 3 7/8", and 7 5/8" x 3 5/8" matting panels, and trimmed sentiment matting banner - cut using the largest banner die from Stylish Shapes dies;
- Stazon Jet Black ink to stamp sentiment from Happy Hedgehogs stamp set on watercolour paper - trimmed sentiment banner also cut using the Stylish Shapes dies; and
- Mini Stampin' Dimensionals (item 144108) to attach the two image circles overlapping the sentiment banner.


To start this second card I used one of the Small Blending Brushes (item 160518) to apply Sweet Sorbet ink through one of the Artistic Mix Decorative Masks to a watercolour paper panel. Before removing the mask I used a paint brush to flick additional splatters of Sweet Sorbet ink over the panel - adding a few more splatters after removing the mask. I trimmed the panel to 5 5/8" x 3". At the bottom of the front panel I added the torn bottom edge of a watercolour paper tag die cut using the Tailor Made Tags dies - the watercolour paper from which the tag had been cut had been used as a sheet over the top of which I had been shading some other die cuts with Sweet Sorbet ink, and after die cutting the tag I had added splatters with my Basic Black Stampin' Write Marker (item 162481) by flicking the marker's brush tip against the marker lid. The main part of the die cut tag was used on the Simply Zinnia card.
Additional supplies used to complete this 6 5/8" x 4" side-fold card:
- Basic White Thick cardstock (item 159229) for the card base, and 5 7/8" x 3 3/8" matting panel;
- Basic Black cardstock (item 121045) for the 6 1/8" x 3 5/8", and 5 5/8" x 3 1/8" matting panels; large silhouette flower cut using the Meadow dies; and the two additional silhouette foliage sprigs cut using the Delicate Forest dies (item 162679);
.jpg)
Delicate Forest dies - 162679
- scraps of black & white patterned paper from the Zoo Crew and Rock & Roll Designer Series Papers for the three strips added to card front; and
- an "almost Parakeet Party" 1/2" diameter button from my dollar store stash.


In addition to the remainder of the watercolour paper die cut tag referred to in the previous card project I used the following supplies to complete this 5" x 4 1/2" top-fold card:
- Basic Black cardstock (item 121045) for the card base, 4" x 3" matting panel, and the tag's hole re-enforcer (also cut using the Tailor Made Tags dies);
- Parakeet Party cardstock for the 4 3/4" x 4 1/4" front matting panel, 4 5/8" x 4 1/8" inside matting panel; two foliage sprigs cut using the Delicate Forest dies (item 162679); and blossom stem and spiky foliage sprig both cut using the Simply Zinnia dies (item 163479). All Parakeet Party cardstock die cuts were shaded with Granny Apple Green ink (item 147095) applied using one of the Small Blending Brushes (item 160518);
.jpg)
- Basic White Thick cardstock (item 159229) for the 4 1/2" x 4" inside panel;
- Simply Zinnia dies to cut two large flower sections and blossom from Sweet Sorbet cardstock (shaded with Sweet Sorbet ink applied using one of the Small Blending Brushes), two circle star center rings from Pecan Pie cardstock (item 161717) - edges sponged with Pecan Pie ink (item 161665), and one flat flower center from Crushed Curry cardstock (item 131199);
- Paper Florist dies to cut two four-stamen flower center sections from Crushed Curry cardstock;
- one large Basic Black dot from Classic Matte Dots for flower center;
- Basic Black Stampin' Write Marker (item 162481) to add additional splatters to flower, blossom and foliage after they had been glued to tag; and
- black baker's twine (Baker's Twine Essentials Pack - item 155475) looped through tag - knotted end secured with tiny dab of Multipurpose Liquid Glue.


Additional supplies used to complete this 6 3/8" x 4 1/2" side-fold card:
- Basic Black cardstock (item 121045) for the card base, and 4 7/8" x 3" matting panel;
- Basic White Thick cardstock (item 159229) for 6 1/8" x 4 1/4", and 5" x 3 1/8" front matting panels; 5 5/8" x 3 3/4" inside panel; silhouette leafy sprig cut using the Gorgeously Made dies; and sentiment tag cut using the Meadow dies;
- 1 3/4" x 1 1/16" rounded corner rectangle die from Nested Essentials dies (item 161597) to cut panels from Orchid Oasis, Sweet Sorbet, Parakeet Party, and Tahitian Tide cardstock;
.jpg)
Nested Essentials dies - 161597
- Tahitian Tide cardstock for inside panel's 5 7/8" x 4" matting panel;
- small flag die from Nested Essentials dies to cut flags from Tahitian Tide, Parakeet Party, and Orchid Oasis cardstock;
- Stazon Jet Black Ink (item 101406) to stamp "Love" sentiment from Quiet Meadow stamp set - the sentiment was stamped before the tag was die cut; and
- black baker's twine (Baker's Twine Essentials Pack - item 155475) for bow tied through the 3/4" diameter "almost Parakeet Party" button from my dollar store stash.


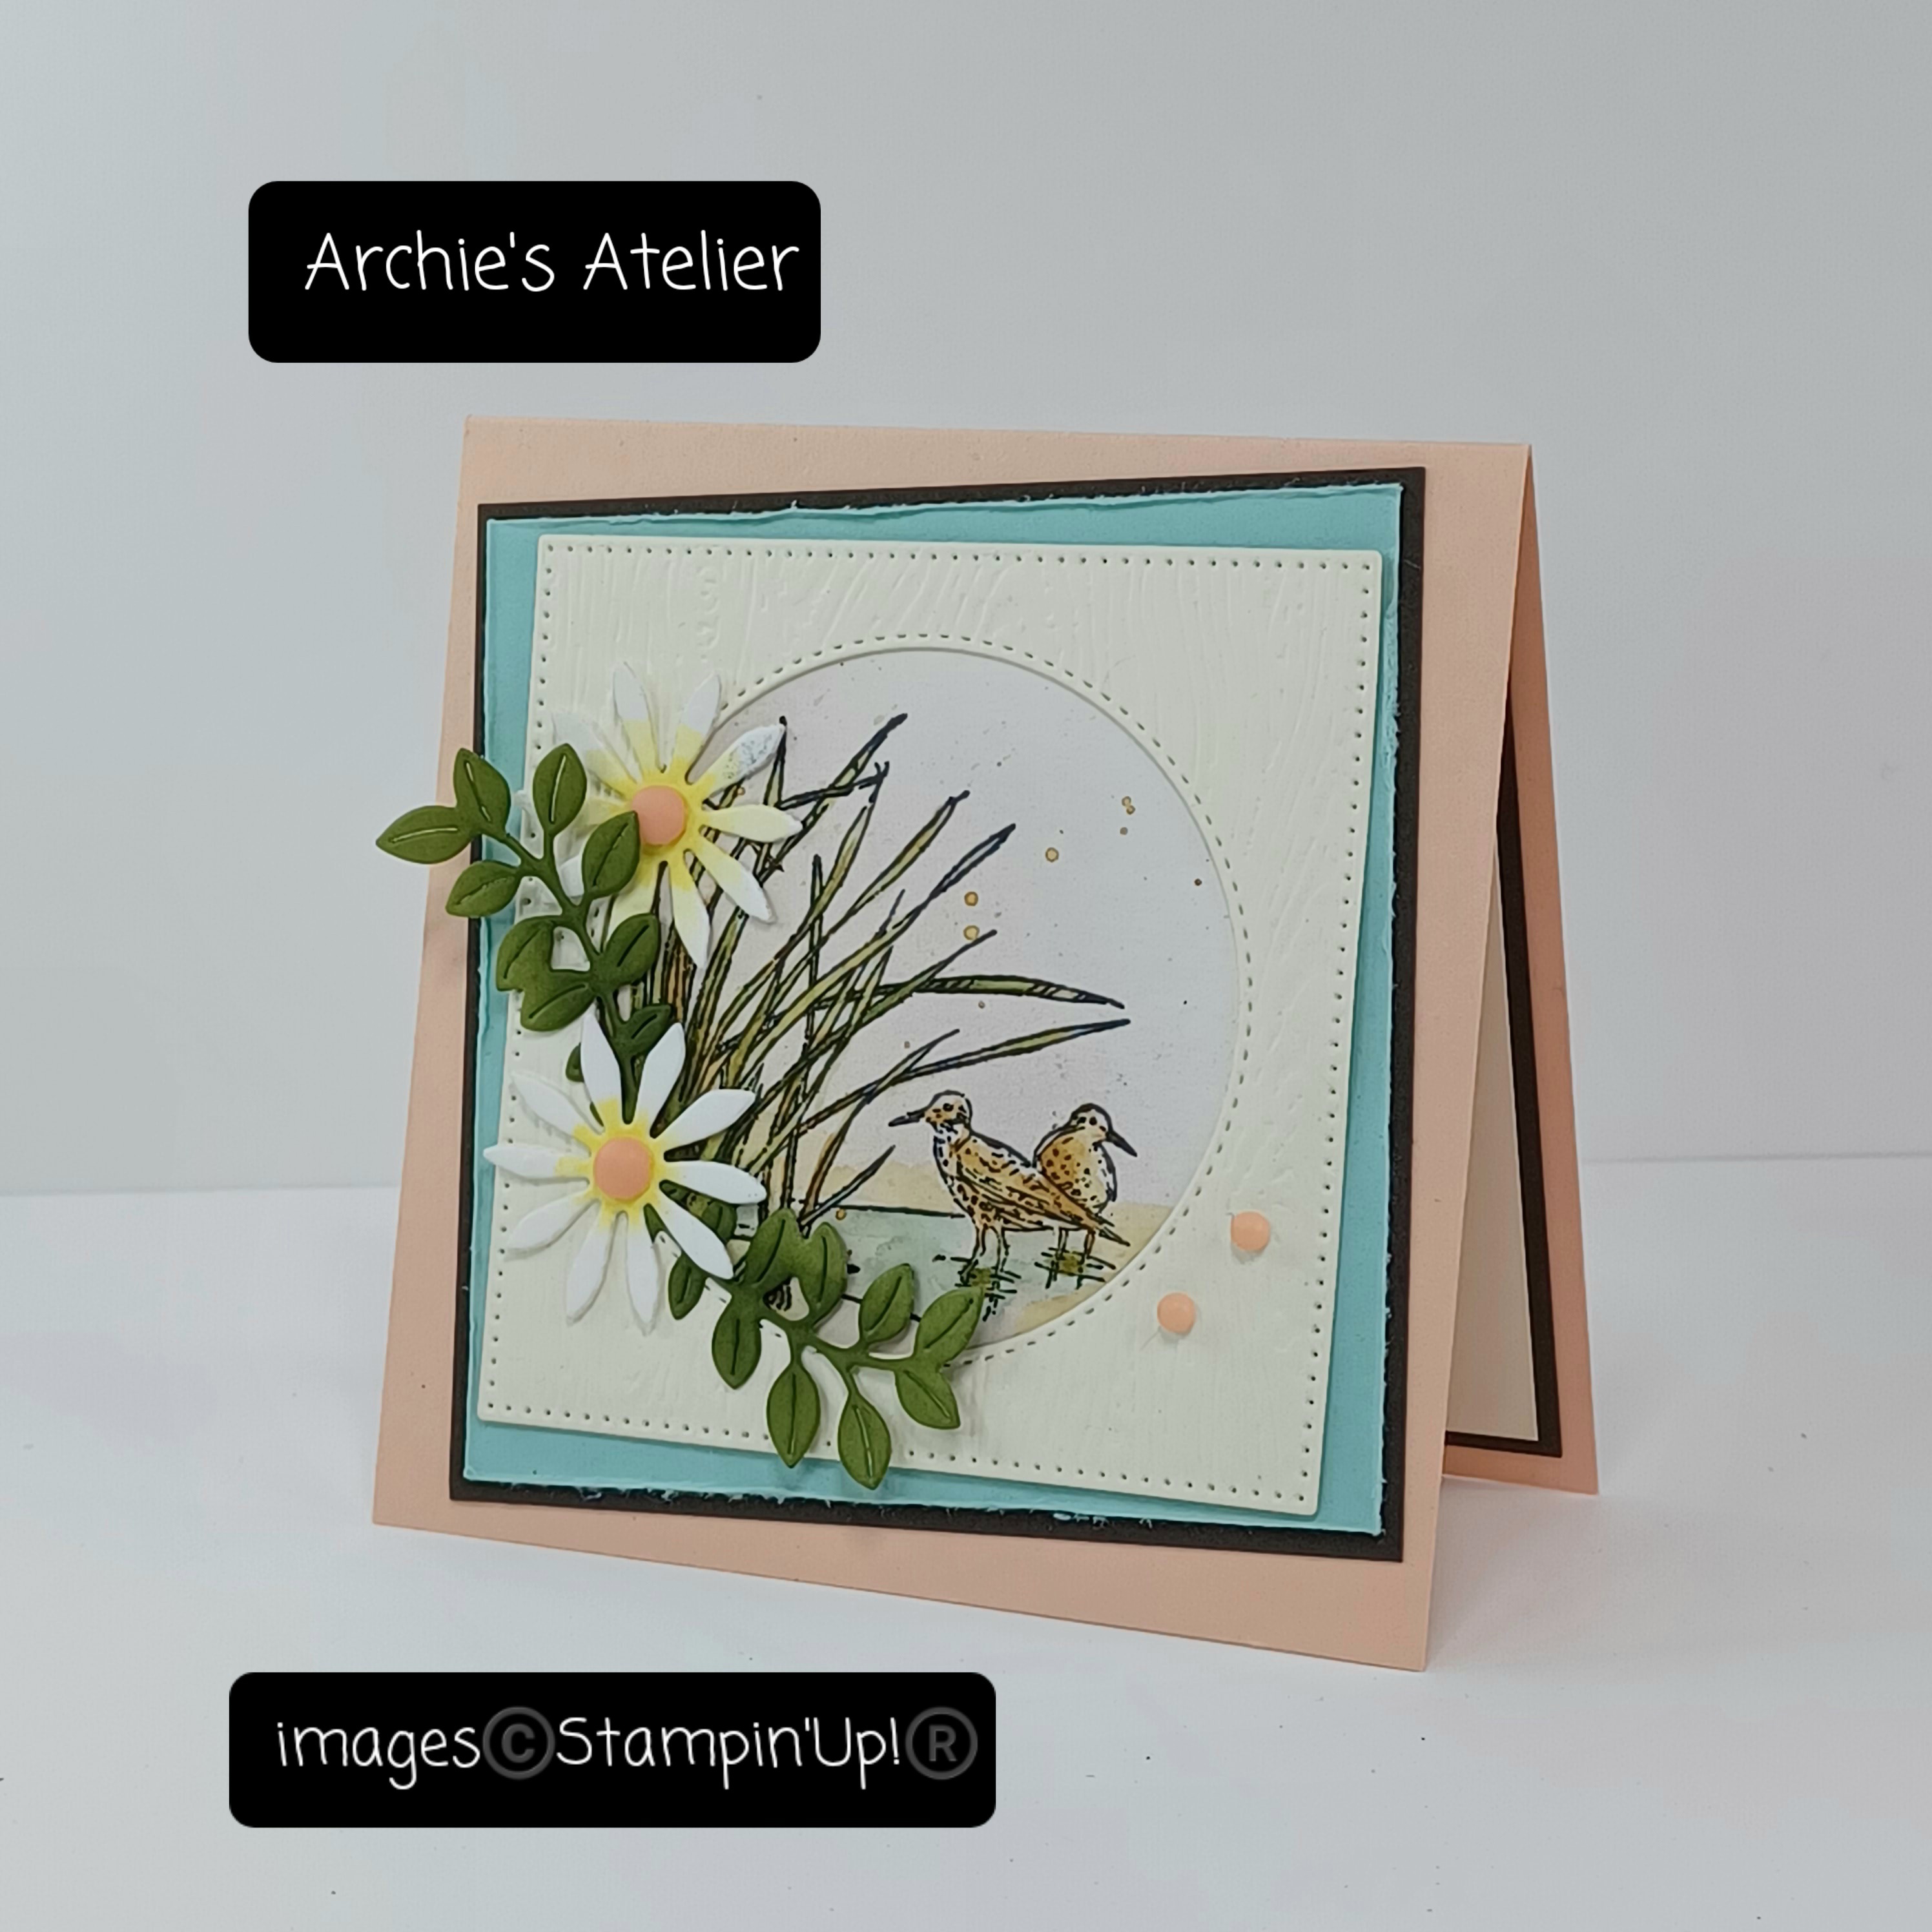
To start this card project I used a small silicone brayer (I didn't have my Stampin' Brayer handy at the time!) to apply Sweet Sorbet ink to a watercolour paper panel - making vertical and horizontal passes over the paper. It is advised that when inking a brayer you roll the brayer in one direction over the ink pad - making as many passes as required to pick up the required amount of ink - i.e. to fully cover the brayer. A slightly drier ink pad will result in a more textured panel - and I actually quite like this effect - texture will also be affected by the surface of the brayer - i.e. if there are scratches or small embedded objects etc. I trimmed the panel to 2 3/4" square. On a section of the original watercolour paper panel that was not fully covered with ink I stamped the image from the Quiet Meadow stamp set using Sweet Sorbet ink - cutting the the image circle using the 1 11/16" diameter circle die from the Stylish Shapes dies (item 159183).
To complete this 3" square top-fold card I used the following additional supplies:
- Basic White Thick cardstock (item 159229) for the card base;
- scraps of black & white patterned paper from the Zoo Crew and Rock & Roll Designer Series Papers for the staggered strips; and
- Mini Stampin' Dimensionals (item 144108) to attach the image circle.


Additional supplies used to complete this 3" square top-fold card:
- Daffodil Delight cardstock (item 119683) for the card base;
- Basic Black cardstock (item 121045) for the front and inside 2 3/4" square matting panels; and the torn half circle for the front panel - die cut using the 2 1/2" diameter circle die from the Stylish Shapes dies (item 159183);
- Basic White Thick cardstock (item 159229) for the front and inside 2 5/8" square panels;
- watercolour paper watercoloured with Daffodil Delight ink (item 147094) and Pumpkin Pie ink (item 147086) - once the inks were dry I stamped the splatter image from the Quiet Meadow stamp set over the panel using Stazon Jet Black Ink (item 101406), and used the 2 1/8" x 1 1/2" rounded corner rectangle die from the Nested Essentials dies (item 161597) to die cut the panel;
- Stazon Jet Black Ink to stamp the flower image from the Quiet Meadow stamp set on watercolour paper - watercoloured using Daffodil Delight ink, Pumpkin Pie ink, and Pecan Pie ink (item 161665) - image circle cut using the 1 11/16" diameter circle die from the Stylish Shapes dies; and
- two large and one small of the Calypso Coral shaded dots from Ombre Matte Decorative Dots (item 161448) added to Basic Black cardstock half circle.


Additional supplies used to complete this 4" x 3" top-fold card:
- Starry Sky cardstock for the card base, and rounded corner rectangle - cut using the 1 3/4" x 1 1/16" die from the Nested Essentials dies (item 161597);
- Basic White Thick cardstock (item 159229) for the front panel's 3 5/8" x 2 1/2" panel (splatters added by flicking paint brush with Starry Sky ink and a little water), and the 3 3/4" x 2 3/4" inside panel;
- 3 1/4" x 7/8" strip cut from watercolour paper panel that had been shaded with Starry Sky ink applied with one of the Blending Brushes (item 153611); lightly spritzed with water (Stampin' Spritzers - item 126185) and blotted dry with paper towel; and stamped using Starry Sky ink and the leafy sprig image from the Lighting The Way stamp set - I used my Wink of Stella Clear Glitter Brush (item 141897) to add a few more splatters;
- Paper Florist dies to cut leafy sprig from Parakeet Party cardstock; and
- white baker's twine (Baker's Twine Essentials Pack - item 155475) for the bow tied through the 1/2" diameter "almost Parakeet Party" button from my dollar store stash - knotted ends secured with tiny dabs of Multipurpose Liquid Glue.

Additional supplies used to complete this 3 1/2" square top-fold card:
- Petal Pink cardstock (item 146985) for the card base;
- Early Espresso cardstock (item 119686) for the front panel's 3 1/8" square matting panel, and inside panel's 3 1/4" square matting panel;
- Pool Party cardstock (item 122924) for the 3" square matting panel - edges scraped with the blade of my craft knife;
- Very Vanilla Thick cardstock for the 3 1/8" square inside panel, and the 2 3/4" square embossed front panel - cardstock embossed using the Timber 3D Embossing Folder (item 156406), and then frame cut using the 2 3/4" square die and the 2 1/8" diameter circle die from the Stylish Shapes dies (item 159183) - I used low tack tape to hold the two dies in place over the embossed cardstock panel while I ran it through the Stampin' Cut & Emboss Machine;
- Dainty Delight dies to cut two small daisies from Basic White cardstock (item 159276) - centers of flowers shaded with Daffodil Delight ink (item 147094);
- Notes of Nature dies to cut two leafy sprigs from Old Olive cardstock (item 100702) - shaded with Mossy Meadow ink (item 147111) applied with one of the Small Blending Brushes (item 160518);
- Stazon Jet Black Ink (item 101406) to stamp image from Calm & Quiet stamp set on watercolour paper - watercoloured using Pecan Pie ink (item 161665), Pool Party ink (item 147107), and Old Olive ink (item 147090); and
- two large and two small of the Calypso Coral shaded dots from Ombre Matte Decorative Dots (item 161448) added to card front - including the two large dots added to flower centers.
And finally . . .

To complete this tag I used the following additional supplies:
- Tailor Made Tags dies to cut two tags - the larger backing tag from Basic Black cardstock (item 121045), and the smaller tag from watercolour paper that had been stamped using Old Olive ink (item 147090) and the foliage image from the Lighting The Way stamp set - before stamping I lightly spritzed the inked stamp with water (Stampin' Spritzers - item 126185);
- large banner die from Stylish Shapes dies to cut trimmed banner from Basic Black cardstock - glued between the two tags;
- Dainty Delight dies to cut one small daisy from Basic White cardstock (item 159276) - center shaded with Daffodil Delight ink (item 147094);
- Notes of Nature dies and Delicate Forest dies (item 162679) to cut leafy sprigs from Old Olive cardstock (item 100702) - both shaded with Mossy Meadow ink (item 147111) applied with one of the Small Blending Brushes (item 160518);
- Stazon Jet Black Ink (item 101406) to stamp watering can image from Garden Meadow stamp set (item 162736), and rocking chair and plant in basket images from Lazy Days stamp set on watercolour paper - images coloured using Pecan Pie ink (item 161665), Basic Gray ink (item 149165), Crumb Cake ink refill (item 121029), Old Olive ink, and Mossy Meadow ink;
.jpg)
- Garden Meadow dies (item 162740) and Lazy Days dies to images stamped using the respective co-ordinating stamp sets [to take advantage of a 10% Bundled Savings the Garden Meadow stamp set and Garden Meadow dies are also available together as the Garden Meadow Bundle (item 162741)];
.jpg)
Garden Meadow dies - 162740
(Bundle - 162741)
- one large Old Olive shaded dot from Ombre Matte Decorative Dots (item 161448) for the center of daisy; and
- for the bow, Black & Very Vanilla 3/8" Large Check Ribbon (item 161982).
Thank you for visiting my blog! I certainly had a lot of fun working on these projects - even though I am quite disappointed about the retirement of so many favourite products!
If you are interested in purchasing any of the available Stampin' Up! products I have used in my project, and you live in Canada and do not have a Stampin' Up! demonstrator, please do not hesitate to visit my online store found on my website https://archiesatelier.stampinup.net/ at your convenience, or simply click under the "Shop With Me" tab on the right sidebar of my blog, which will take you directly to my website and online store. I very much appreciate your business, and if you need any assistance please do not hesitate to contact me (lmccoyarchie@gmail.com) - I would be very pleased to be your demonstrator! The digital versions of both the May 2023-April 2024 Annual Catalogue, and the January-April 2024 Mini Catalogue are available for you to access at your convenience on my website (https://archiesatelier.stampinup.net/). When visiting my online store don't forget to check out all the products now available as Online Exclusives, as well as some great deals on the Clearance Rack! Remember that all retiring products will be available only while supplies last! The new 2024-2025 Annual Catalogue - with lots of fun new products - including five new In Colours - will launch on May 1, 2024!
Have fun creating!
Laurel
*It has come to my attention that quite often email correspondence from me is delivered to the recipient's spam or junk mail folder - if you have corresponded with me I have replied so be sure to check your spam or junk mail folder! Thank you!!

Comments
Post a Comment