Home Is Where Our Story Begins . . .

Hello! Today I am sharing a few projects I worked on this week using a few more retiring Stampin' Up! products. I am always fascinated by mixed media/collage whimsical houses, and for these card projects I used tags cut using the retiring Tailor Made Tags dies (item 155563) for the house bases, and partial (diagonal) squares cut using various of the square dies from the Stylish Shapes dies (item 159183) for the roofs. For the collage stamping and additional elements around the houses I used images - and sentiments - from the following retiring stamp sets: Notes of Nature (item 162630); Quiet Meadow (item 155082) - flowers, splatters, and fractured text stamps; Lighting The Way (item 160868) - large circle and nine-leafed sprig (smallest house); Hey Chuck (item 161549) - "Rise & Shine!" sentiment; and Lazy Days (item 161340) - bird house, plant in basket, birds, wood planks, and "Welcome" and "friends" sentiments.
.jpg)
Tailor Made Tags dies - 155563

Stylish Shapes dies - 159183


I also used the following dies:
- retiring Notes of Nature (item 163203) - to die cut the stamped images from the Notes of Nature stamp set, and to die cut additional foliage;
.jpg)
Notes of Nature dies - 163203
- retiring Lazy Days (item 161342) - to die cut the stamped images from the Lazy Days stamp set, and to die cut additional foliage;
.jpg)
Lazy Days dies - 161342
- Playing In The Rain (item 160550) - to die cut the small cloud stamped using the Playing In The Rain stamp set (item 160542);
.jpg)
Playing In The Rain dies - 160550

- Garden Meadow (item 162740) to die cut two watering cans, and two tall double flowering plants with leaves that were all stamped using the Garden Meadow stamp set (item 162736);
.jpg)
Garden Meadow dies - 162740
.jpg)
- Mini Pocket Envelope (item 159167) - the small oval die used to cut the "Welcome friends" sentiment oval;
.jpg)
Mini Pocket Envelope dies - 159167
- Crafting With You (item 161225) - small heart die used to cut from Sweet Sorbet cardstock (item 159268) the heart added to the center of the circle stamped image from the Notes of Nature stamp set on the last card - I used a 1/2" circle punch to punch this circle out from the larger Field Notes image;
.jpg)
Crafting With You dies - 161225
- retiring Basic Borders (item 155558) to cut the triangular under roof trim on the first card - cut from watercolour paper and coloured with Real Red ink (item 147084) applied with one of the Small Blending Brushes (item 160518); and
.jpg)
Basic Borders dies - 155558
- long narrow banner die from Stylish Shapes to cut the "Rise & Shine!" sentiment banner.
All images (including the collage stamping for the house bases and roofs) and sentiments were stamped on watercolour paper using Stazon Jet Black Ink (item 101406). For the additional die cut foliage I used Garden Green cardstock (item 102584) and Granny Apple Green cardstock (item 146990) - no additional ink shading this time! All cards are top-fold and for all card bases and front panels I used Basic White Thick cardstock (item 159229), and Basic Black cardstock (item 121045) for the matting panels. For the houses and some front card panels I cut strips of black & white patterned paper from the retiring Zoo Crew 12" x 12" Designer Series Paper (item 161304) and the retiring Rock & Roll 12" x 12" Designer Series Paper (item 162695).
To colour stamped and die cut images, and the house bases and roofs, I used the following Classic Stampin' ink pads and refills for watercolouring:
- Pool Party (item 147107);
- Berry Burst (item 147143) - adding a little more water lightens the pink shade - and less water darkens the shade;
- Granny Apple Green (item 147095) and Granny Apple Green ink refill (item 147163);
- Crumb Cake ink refill (item 121029);
- Daffodil Delight (item 147094) and Daffodil Delight ink refill (item 119672);
- Pumpkin Pie (item 147086);
- Garden Green ink refill (item 102059) for the watering can on the "Rise & Shine!" card, and all foliage except for the leaves on the two tall double flowering plants stamped using the Garden Meadow stamp set for which I used Old Olive (item 147090) and Mossy Meadow (item 147111);
- Starry Sky (item 159212);
- Misty Moonlight (item 153118);
- Basic Gray (item 149165);
- Pecan Pie ink refill (item 161669);
- Real Red (item 147084); and
- Highland Heather ink refill (item 147167).
Ink splatters were added to several card front panels by flicking the paint brush used to pick up and mix the ink with water. On other card front panels I used my Basic Black Stampin' Write Marker (item 162481) to add splatters by flicking the marker's brush tip against the marker lid.
After watercolouring the images, and adding the strips of black & white patterned Designer Series Papers to the roof sections, I assembled the houses by gluing the half (diagonal) square over the top of the die cut tag base.
On two cards I added bows tied using black baker's twine from Baker's Twine Essentials Pack (item 155475) - securing the bow and the ends with tiny dabs of Multipurpose Liquid Glue (item 110755).
The following are the additional basic tools and supplies I used to complete my projects this week:
- Paper Trimmer (item 152392) - for trimming paper and cardstock - can also be used for scoring;
- stylus and scoreboard (Simply Scored Scoring Tool - item 122334) - for scoring card fold lines. To ensure crisp folds I also burnish all folded scored lines using my Bone Folder (item 102300);
- Stampin' Cut & Emboss Machine (item 149653) - for all die cutting;
- Paper Snips Scissors (item 103579) - these small sharp scissors are very handy for trimming die cuts (i.e. snipping off a few leaves or shortening stems);
- Take Your Pick Tool (item 144107) - the paper piercer, mini spatula, and tacky putty tips are a great help for picking up and placing small die cuts and embellishments; and
- for the main adhesive, Multipurpose Liquid Glue (item 110755).
On with the projects!
The first card measures 5" x 4 1/2"; the Basic Black cardstock matting panel 4 7/8" x 4 3/8"; and the Basic White Thick cardstock front panel 4 3/4" x 4".


The second card measures 5 1/2" x 5"; the Basic Black cardstock matting panel (the edges of which I scraped with the blade of my craft knife) 4 7/8" x 3 7/8"; and the Basic White Thick cardstock front panel 4 3/4" x 3 3/4". I used Stampin' Dimensionals (item 104430) to attach the sentiment banner (with bird and bird house glued onto the banner), and added two large and one small of the Daffodil Delight dots from Glossy Dots Assortment (item 158827) to the front panel.


The third card measures 5" x 4"; the Basic Black cardstock matting panel 4 7/8" x 3 7/8"; and the Basic White Thick cardstock front panel 4 11/16" x 3 11/16". I used a 1/2" circle punch to punch the center circle image from the larger Field Notes image from the Notes of Nature stamp set.

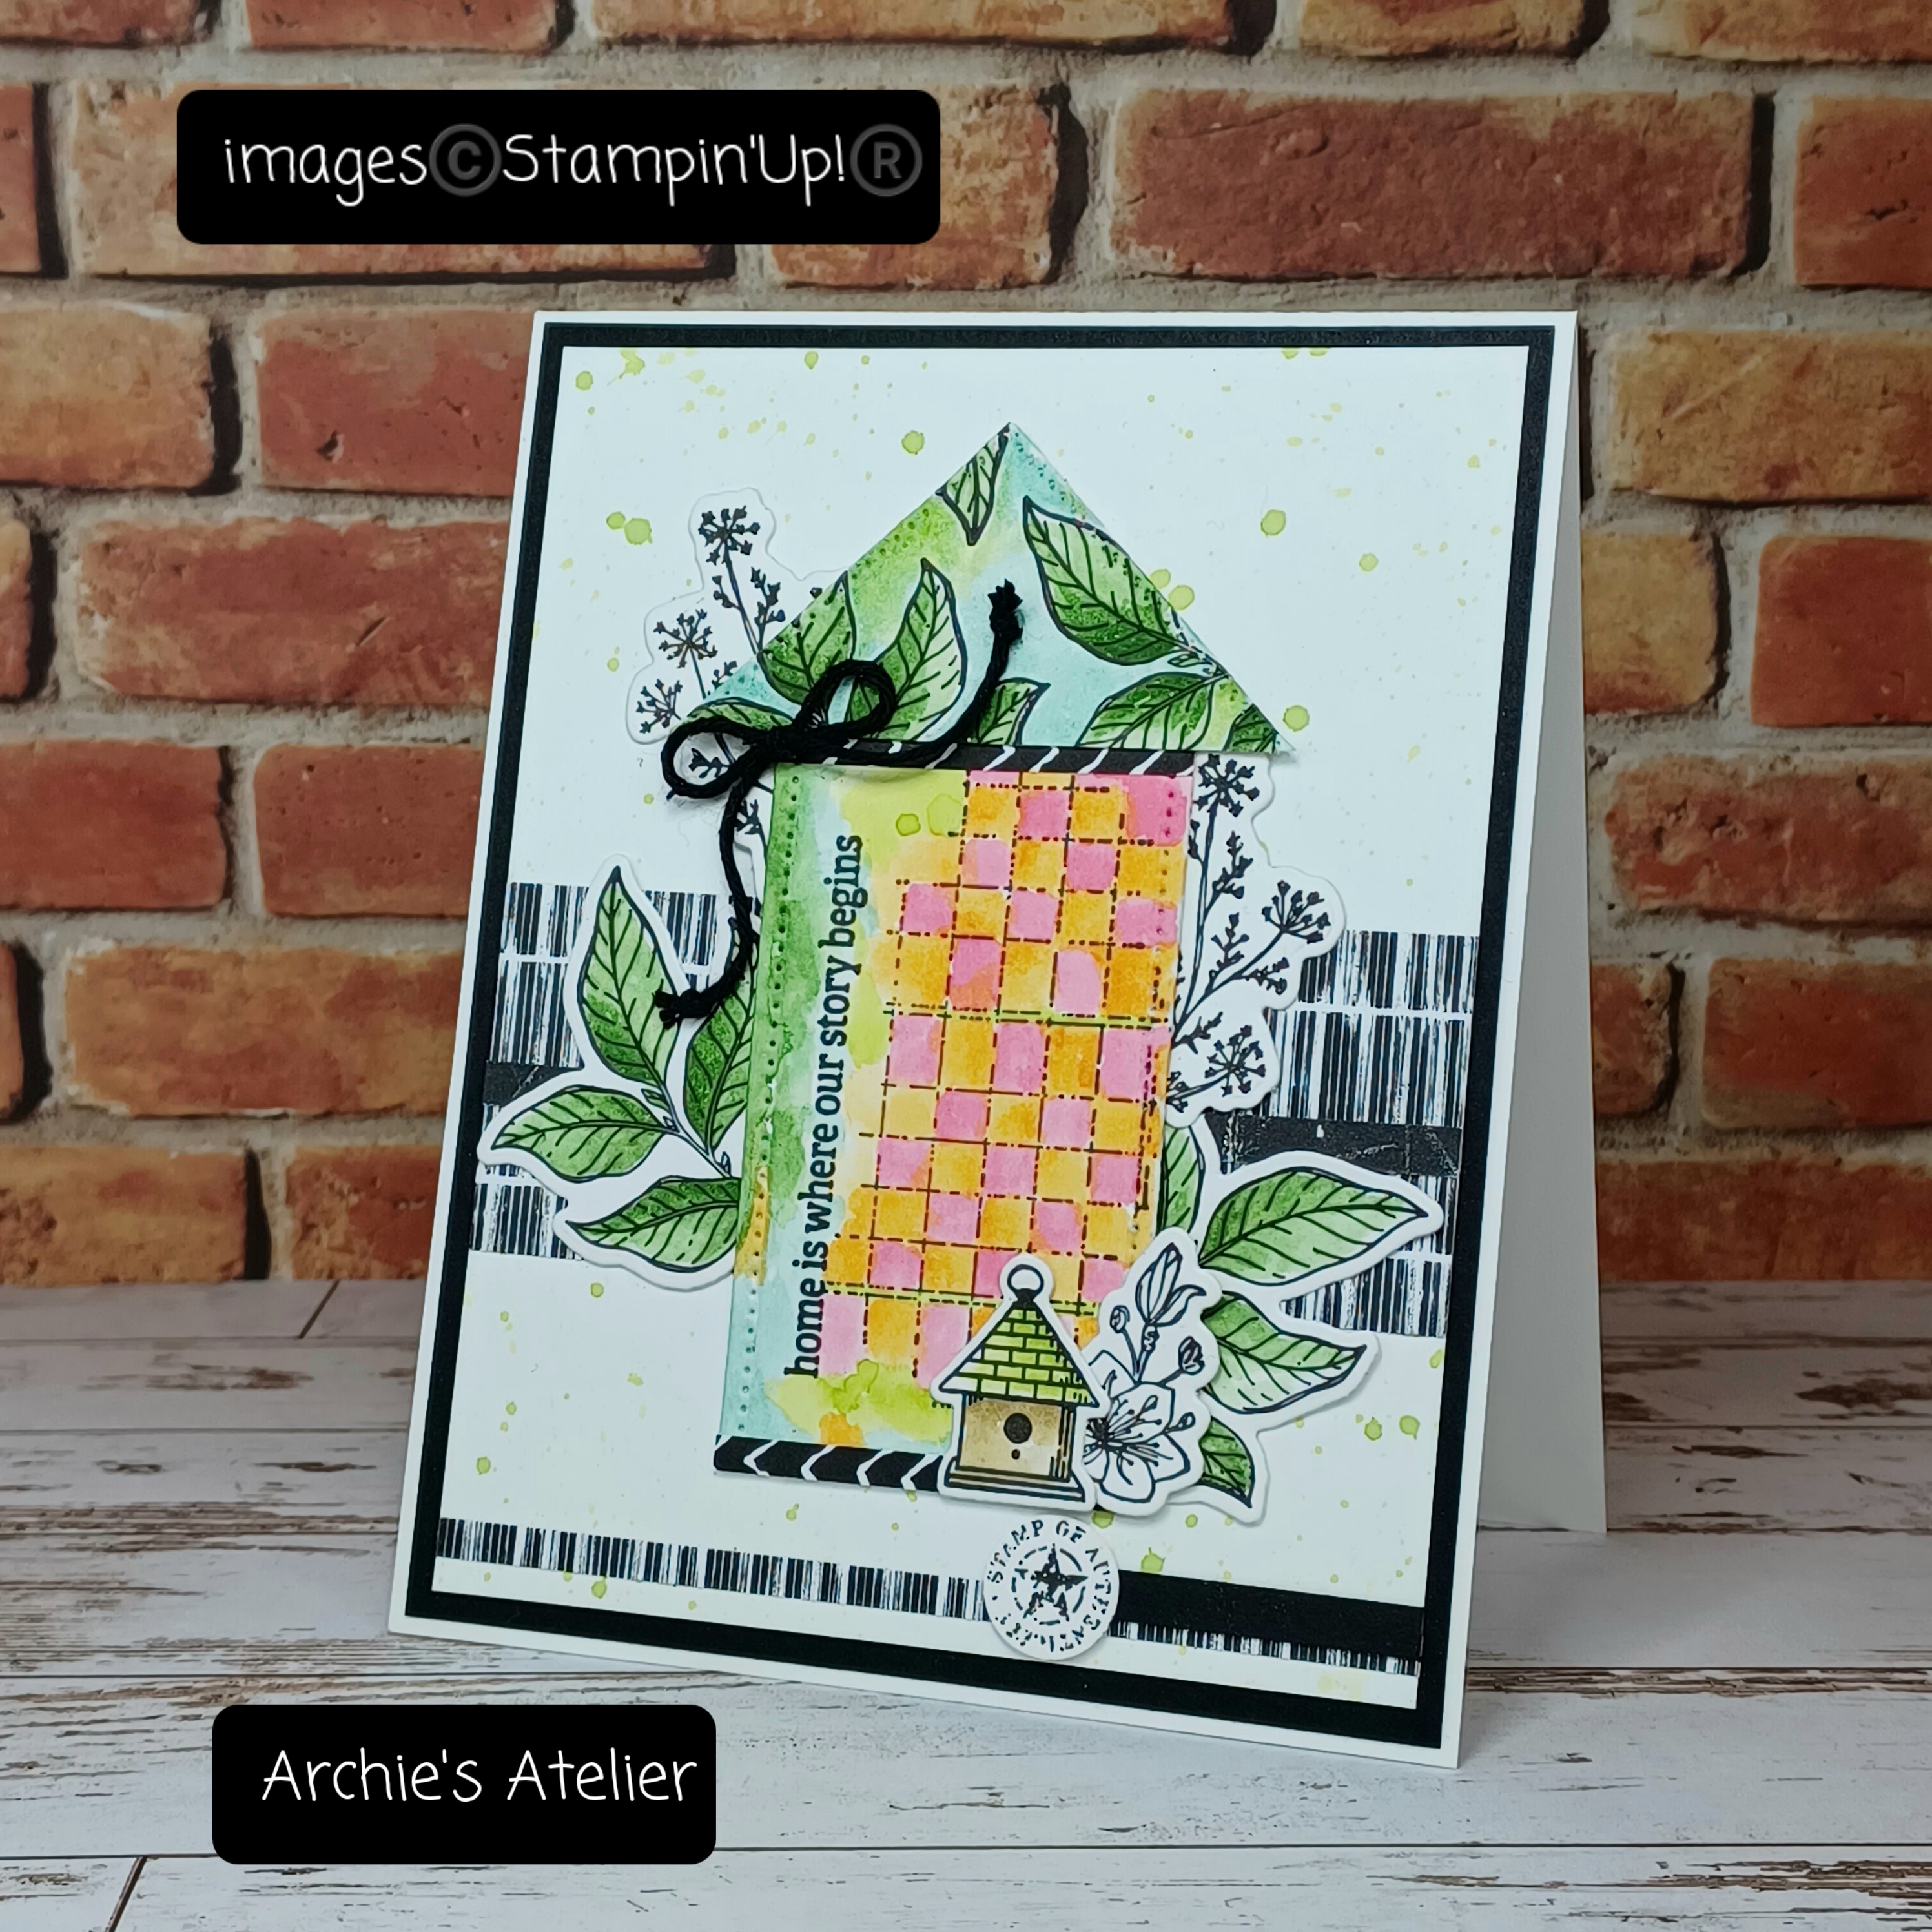
The fourth card measures 5" x 4 1/2"; the Basic Black cardstock matting panel 4 7/8" x 4 3/8"; and the Basic White Thick cardstock front panel 4 3/4" x 4 1/4". I used Stampin' Dimensionals (item 104430) to attach the house (including roof and the stamped/die cut foliage) to the front panel - I was very liberal with the Dimensionals! I added two small and one large of the white dots from Classic Matte Dots (item 158146) to the card front - two on the sentiment oval and one in the center of the small bottom circular image with center star.


The fifth card measures 5" x 3 1/4"; the Basic Black cardstock matting panel 4 7/8" x 3 1/8"; and the Basic White Thick cardstock front panel 4 3/4" x 3".


The sixth card measures 4" x 3 1/2"; the Basic Black cardstock matting panel 3 7/8" x 3 3/8"; and the Basic White Thick cardstock front panel 3 3/4" x 3 1/4". I again used a 1/2" circle punch to punch out the small circular image with center star from the larger Field Notes image (Notes of Nature stamp set) and then added it to the bottom of the house. I used Old Olive ink for second generation stamping of the foliage image from the Lighting The Way stamp set on the house - this stamping was done over the stamped grid and circle images and is so subtle as to be almost invisible! I also added one large and one small of the Basic Gray dots from Classic Matte Dots (item 158146) to the front panel - wanted to accentuate the Basic Gray used on the cloud!


The last card measures 5" x 4"; the Basic Black cardstock matting panel 4 7/8" x 3 7/8"; and the Basic White Thick cardstock front panel 4 3/4" x 3 3/4". I used Stampin' Dimensionals (item 104430) - again quite liberally! - to attach the house (including foliage/bird/bird house) to the front panel.


The Tailor Made Tags dies is another die set that I am very sorry is retiring! Tags are so versatile and so fun to play with - a great way to experiment with new techniques, and can be used on their own (gift tags, little art pieces in junk/art journals etc.) or as key components on cards or larger projects! For readers, tags - even "failed" experiments with a new technique - always come in handy as bookmarks. Like books, you can never have too many bookmarks!
A small piece for a garden journal or maybe destined to be a bookmark, for this watercolour paper tag I used the flower image from the Quiet Meadow stamp set coloured with Crumb Cake ink refill; two flying insect images from the Lighting The Way stamp set stamped using Early Espresso ink (item 147114) and die cut using the co-ordinating Lighting The Way dies; a strip of black & white patterned paper from the Rock & Roll Designer Series Paper; Crumb Cake ink splatters; Basic Black cardstock for the hole re-enforcer; and Crumb Cake baker's twine from Baker's Twine Essentials Pack (item 155475). I sponged additional Crumb Cake ink (item 147116) around the bottom of the tag.

.jpg)

The following retired items that I used in this week's projects will be discounted during the Stampin' Up! Last Chance Promotion that runs from April 9 through April 30, 2024, but all retiring products will only be available while supplies last:
- Lazy Days dies (item 161342) - 20% ($37.60);
- Basic Borders dies (item 155558) - 40% ($24.00);
- Notes of Nature dies (item 163203) - 20% ($31.20);
- Lighting The Way dies (item 160496) - 50% ($21.50); and
- Classic Matte Dots (item 158146) - 40% ($5.85).
- Stampin' Cut & Emboss Machine (item 149653) from $175.00 to $177.00;
- Cutting Plates (item 150815) from $18.00 to $20.00;
- Paper Trimmer (item 152392) from $36.00 to $39.00;
- Cutting Blades Multipack (item 152391) from $16.50 to $20.00;
- Simply Scored Scoring Tool (item 122334) from $49.00 to $51.00;
- Heat Tool (item 129053) from $43.00 to $44.00;
- Paper Snips Scissors (item 103579) from $15.00 to $16.50;
- Bone Folder (item 102300) from $9.75 to $11.00;
- Take Your Pick Tool (item 144107) from $15.00 to $16.50;
- Multipurpose Liquid Glue (item 110755) from $7.50 to $8.25;
- Foam Adhesive Strips (item 141825) from $11.00 to $11.25;
- Foam Adhesive Sheets (item 152815) from $11.00 to $11.25;
- Sponge Daubers (item 133773) from $7.50 to $10.25;
- Stampin' Spritzers (item 126185) from $5.50 to $8.25;
- Blender Pens (item 102845) from $18.00 to $20.00;
- Blending Brushes (item 153611) from $18.00 to $21.00;
- Stazon Jet Black Ink Pad (item 101406) from $13.75 to $14.50;
- Stazon Jet Black Ink Refill (item 102566) from $9.75 to $10.25;
- Watercolour Pencils-Assortment 1 (item 161700) from $22.00 to $25.00;
- Watercolour Pencils-Assortment 2 (item 149014) from $17.00 to $20.00;
- 8 1/2" x 11" cardstock - individual colours (24 sheets) from $13.75 to $15.75;
- 8 1/2" x 11" Basic White Thick cardstock- 24 sheets (item 159229) from $12.25 to $15.50 - currently unavailable but Stampin' Up! advises that it is expected to again be available for ordering the week of April 15, 2024;
- 8 1/2" x 11" Basic White cardstock - 40 sheets (item 159276) from $14.50 to $18.00; and
- 8 1/2" x 11" Very Vanilla cardstock - 40 sheets (item 101650) from $14.50 to $18.00.
Thank you for visiting my blog! I certainly had a lot of fun working on my Tailor Made Tags houses this week - actually I just wanted to keep making more!
If you are interested in purchasing any of the available Stampin' Up! products I have used in my project, and you live in Canada and do not have a Stampin' Up! demonstrator, please do not hesitate to visit my online store found on my website https://archiesatelier.stampinup.net/ at your convenience, or simply click under the "Shop With Me" tab on the right sidebar of my blog, which will take you directly to my website and online store. I very much appreciate your business, and if you need any assistance please do not hesitate to contact me (lmccoyarchie@gmail.com) - I would be very pleased to be your demonstrator! The digital versions of both the May 2023-April 2024 Annual Catalogue, and the January-April 2024 Mini Catalogue are available for you to access at your convenience on my website (https://archiesatelier.stampinup.net/). When visiting my online store don't forget to check out all the products now available as Online Exclusives, as well as some great deals on the Clearance Rack! Remember that all retiring products will be available only while supplies last!
Have fun creating!
Laurel
*It has come to my attention that quite often email correspondence from me is delivered to the recipient's spam or junk mail folder - if you have corresponded with me I have replied so be sure to check your spam or junk mail folder! Thank you!!


The morning ritual of drawing attention to an almost empty food bowl!
Comments
Post a Comment