Simply Zinnia!

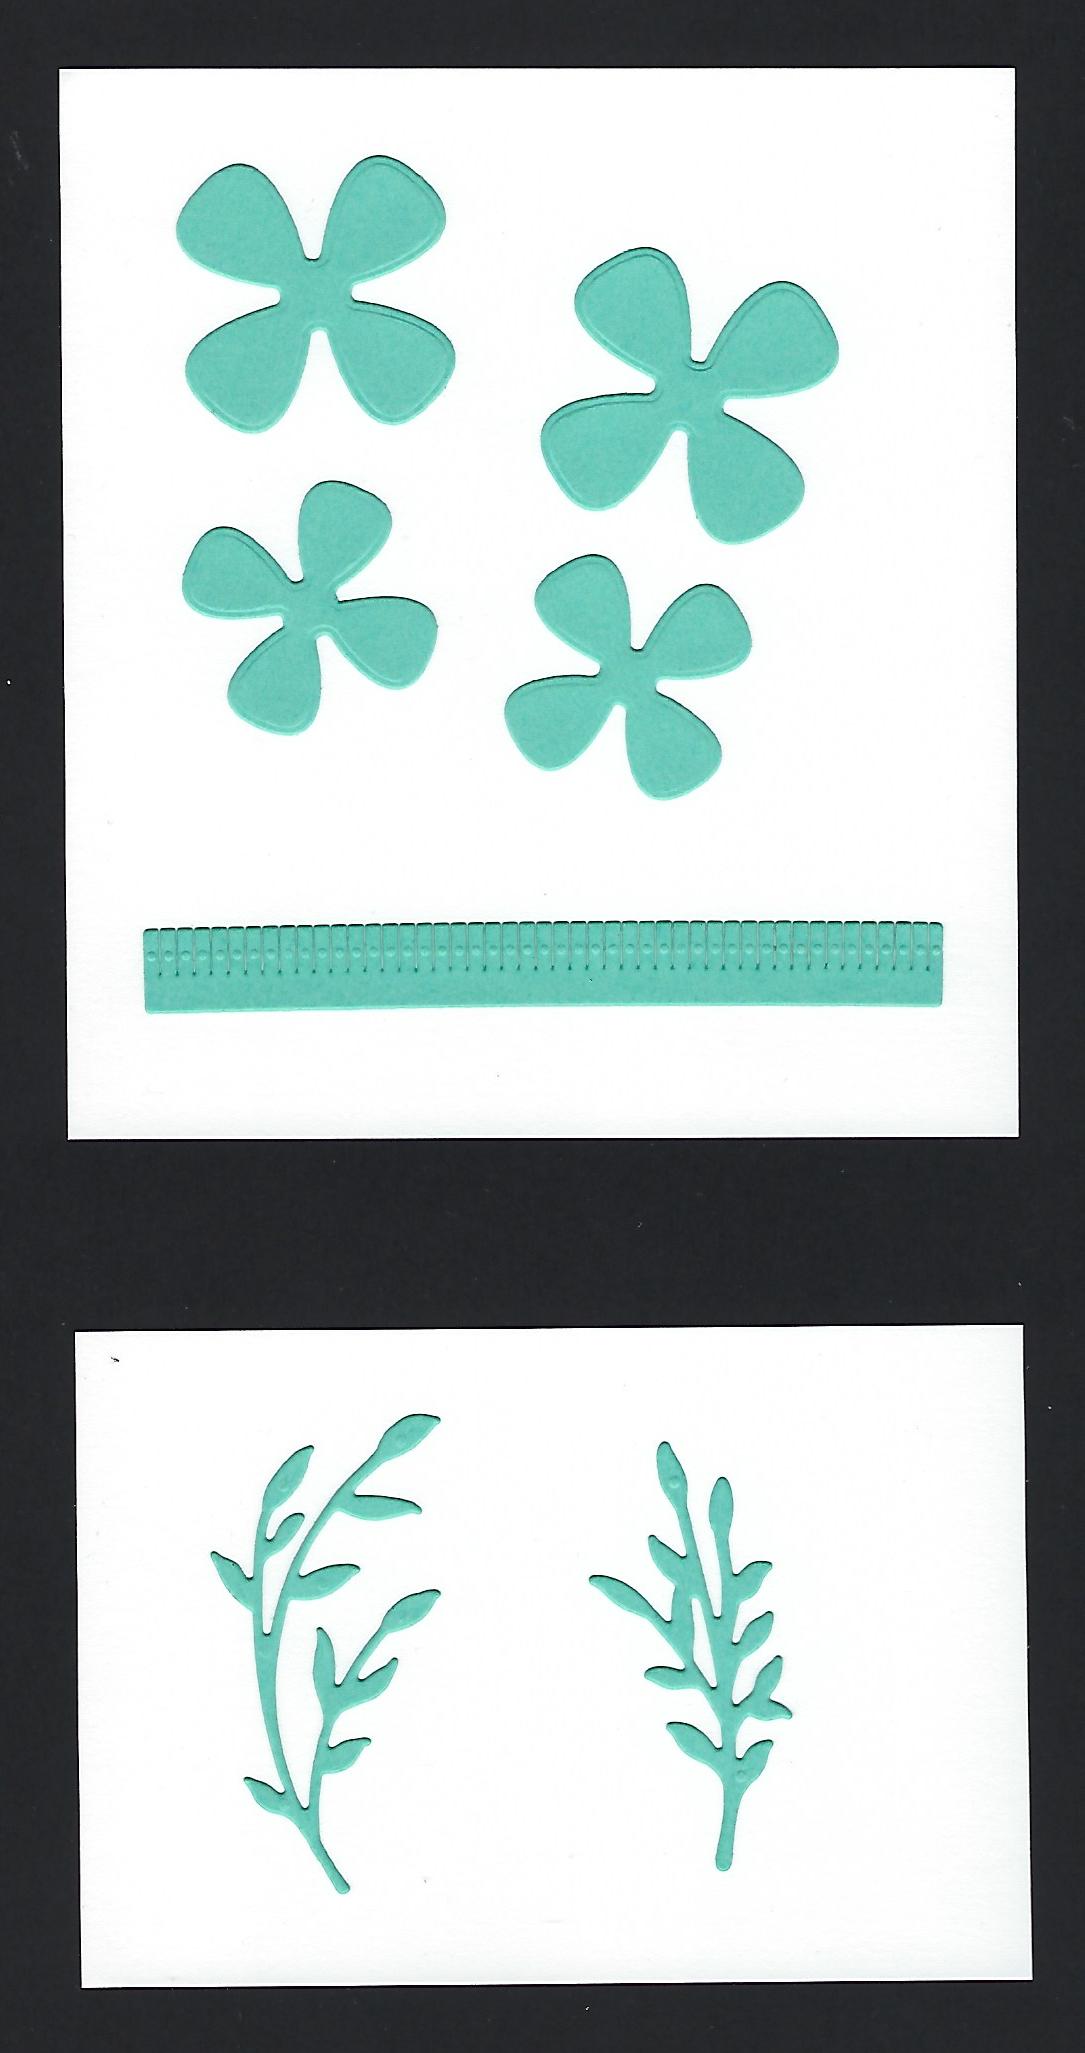
Hello! Today I am sharing a few projects I worked on this week using the new Stampin' Up! Simply Zinnia dies (item 163479) - which were part of the Online Exclusives new product release on March 5, 2024. These dies are also available as part of the Simply Zinnia Bundle (item 163480) together with the co-ordinating Simply Zinnia stamp set (item 163472). Unfortunately, at the time I placed my order for the dies (which I was very anxious to start playing with!) the stamp set was not available but has been placed on my wish list! I think these dies are a great complement to the Cheerful Daisies dies (item 161296) and Paper Florist dies (item 161284) - both of which are featured in the May 2023-April 2024 Annual Catalogue.
.jpg)
.jpg)
Cheerful Daisies dies - 161296
.jpg)
Paper Florist dies - 161284
Just a quick summary of the basic tools and supplies I used to complete my projects this week:
- Paper Trimmer (item 152392) - for trimming paper and cardstock - can also be used for scoring;
- stylus and scoreboard (Simply Scored Scoring Tool - item 122334) - for scoring fold lines. For crisp folds I also burnish all folded scored lines using my Bone Folder (item 102300). I also used the Bone Folder to add some curl to my flowers and leaves, and the handles of my gift bag;
- Stampin' Cut & Emboss Machine (item 149653) - for all die cutting;
- Paper Snips Scissors (item 103579) - these small sharp scissors are very handy for trimming die cuts (i.e. snipping off a few leaves or shortening stems), and for snipping off the small attachment points from the Paper Butterfly Accents (item 162612) that I used on my first project - unfortunately these laser-cut white paper butterflies are not currently available but Stampin' Up! advises that they are expected to again be available for ordering the week of April 8, 2024;
- Stampin' Brayer (item 162936) - although this silicone roller is intended for applying even ink coverage to embossing folders, stamps, and paper, it is also very effective for rolling over paper that has been glued to another surface - i.e. a wood panel. Rolling the Brayer over the paper immediately after gluing the paper to another surface (whether a wood panel or another piece of paper) helps ensure even coverage of the liquid adhesive and helps prevent air bubbles and buckling of the paper - effective adhesion requires a proper adhesive and pressure, and rolling the Brayer over the paper provides good even pressure;
- Take Your Pick Tool (item 144107) - the paper piercer, mini spatula, and tacky putty tips are a great help for picking up and placing small die cuts and embellishments; and
- for the main adhesive, Multipurpose Liquid Glue (item 110755). Although I do transfer glue to a small fine-tipped bottle that works great for applying glue to small items the Multipurpose Liquid Glue bottle has dual tips and the broad chisel tip is great for applying glue to a larger surface - i.e. a wood panel.
The two stamped turtle images (from the Playing In The Rain stamp set - item 160542 - and die cut using the co-ordinating Playing In The Rain dies - item 160550) were stamped on watercolour paper using Stazon Jet Black Ink (item 101406), and watercoloured with Classic Stampin' inks applied with small paint brushes and a little water.

.jpg)
Playing In The Rain dies - 160550
With the exception of the two ten-leafed sprigs (used on the Crumb Cake card) that were cut from watercolour paper using the Encircled In Nature dies (item 163628) - another of the new Online Exclusives - all die cuts were cut from cardstock and shaded with Classic Stampin' inks applied with Blending Brushes (item 153611) and Small Blending Brushes (item 160518). The watercolour paper foliage die cuts were watercoloured using Old Olive ink refill (item 100531) and then finger pressed into my Mossy Meadow ink pad (item 147111).
.jpg)
Encircled In Nature dies - 163628
Using a small selection of Classic Stampin' inks to shade cardstock increases the variety of colours I have to use in my projects - sometimes just giving a darker shade of cardstock, and sometimes the ink/cardstock combinations can result in some unexpected and very pleasant surprises! For my flowers I used the following combinations:
- Flirty Flamingo cardstock (item 141416) and Calypso Coral cardstock (item 122925) shaded with Sweet Sorbet ink (item 159216);
- Poppy Parade cardstock (item 119793) and Real Red cardstock (item 102482) shaded with Real Red ink (item 147084);
- Pumpkin Pie cardstock (item 105117) shaded with Pumpkin Pie ink (item 147086);
- Daffodil Delight cardstock (item 119683) and Crushed Curry cardstock (item 131199) shaded with Daffodil Delight ink (item 147094) - for the small star wreath centers I also used Pumpkin Pie ink for additional shading;
- for the base center pieces Pecan Pie cardstock (item 161717) shaded with Pecan Pie ink (item 161665);
- for the daisies Basic White Thick cardstock (item 159229) shaded with Crumb Cake ink (item 147116) - petals, and for the centers, Daffodil Delight ink and a little Pumpkin Pie ink; and
- even though there are apparently no blue zinnias - Highland Heather cardstock (item 146986) shaded with Starry Sky ink (item 159212) - in my second project I just used two small blooms but I did make a few full flowers to use in a future project.
For the stems, leaves, and additional foliage I used Old Olive cardstock (item 100702) shaded with Old Olive ink (item 147090) and Mossy Meadow ink (item 147111), and Mossy Meadow cardstock (item 133676) shaded with Mossy Meadow ink.
To add the shading to the small centers of the daisies and to add the darker Pumpkin Pie shading to the edges of the star wreath centers I used a small pointed makeup sponge that I picked up at Dollar Tree - a great addition to my collection of Blending and Small Blending Brushes!
On with the projects!
For my first project I began with a thrift store wooden frame with a 12" x 5 1/8" opening that I painted with Early Espresso ink refill (item 119789), applying the ink refill with a sponge. I cut a piece of cardboard (the back covers of watercolour paper pads come in very handy!) to fit the frame opening and covered it with a piece of Crumb Cake checked patterned paper from Perennial Lavender 12" x 12" Designer Series Paper (item 162593) and used it as the base for the flowers - a few of the flowers, leaves, and one of the butterflies are actually glued to the frame edges.
In addition to the Simply Zinnia dies I used the following dies for this project - I have also included photos showing the die cuts:
- Garden Meadow (item 162740) - grass and "shrub" die cuts used for the ground layers;
.jpg)
- Delicate Forest (item 162679) - the edge die with two mini trees used for the ground layers, and leafy sprigs used as additional "fill-in" foliage;
.jpg)
Delicate Forest dies - 162679
- Basic Borders dies (item 155558) - "cloud" edge die cut used for top layer in ground layer - I used a small faux sea sponge from Dollar Tree to dabb on some Old Olive ink refill for a little texture;
.jpg)
- Paper Florist dies (item 161284) for the three Pumpkin Pie poppies - the fringe centers were cut from Basic Black cardstock (item 121045), and rolled around a toothpick, spot glued, and the top fringe ruffled with my fingers. The "petals" were scrunched up with my fingers;
.jpg)
Paper Florist dies - 161284
- Meadow dies (item 155852) - three tall leafed stems and two three-branched leafy stems; and
.jpg)
Meadow dies - 155852
- Cheerful Daisies dies (item 161296) - five small daisies (bases and petal overlays) and stems.
.jpg)


Paper Florist and Delicate Forest die cuts

Meadow and Cheerful Daisies die cuts


For my second project I began with two dollar store items: a sectioned MDF heart shape (5 1/4" x 5 1/2" x 3/8" thick with two back bracing panels) from Dollar Tree, and a 7 3/4" (packaged as 8" square) x 7/8" thick wood panel from Dollarama. I "painted" the heart with a wash of Craft Stampin' Ink White Refill (item 101780) - mixing liberal amounts of water with the ink refill. To cover the front of the panel I used Lemon Lime Twist patterned paper from Masterfully Made 12" x 12" Designer Series Paper (item 161192); and to cover the panel sides and for the 6 1/4" x 2 7/8" front panel horizontal strip I used Lemon Lime Twist patterned paper from Stargazing 12" x 12" Designer Series Paper (item 161175). For the smaller centered panel I used a full 6" square sheet of Lemon Lime Twist patterned paper from Glorious Gingham 6" x 6" Designer Series Paper (item 163170), with a 6 1/4" square piece of Basic White Thick cardstock (item 159229) for the matting panel (edges scraped with the blade of my craft knife.
Using the Around The Bend dies (item 160649) I die cut the ground layer from Lemon Lime Twist cardstock (item 144245), shading with Old Olive and Mossy Meadow inks. The top curving leafy stem was die cut from Lemon Lime Twist cardstock using the Dainty Delight dies (item 160674) and also shaded using Old Olive and Mossy Meadow inks.
.jpg)
Around The Bend dies - 160649
.jpg)
Dainty Delight dies - 160674
To colour the turtle image I used Old Olive ink, Mossy Meadow ink, Pecan Pie ink (item 161665), Daffodil Delight ink (item 147094), and Sweet Sorbet ink (item 159216). I used several Stampin' Dimensionals (item 104430) to attach the die cut turtle. Maybe not exactly the right shades but I think there is still enough green in this project to qualify it as a St. Patrick's Day project!


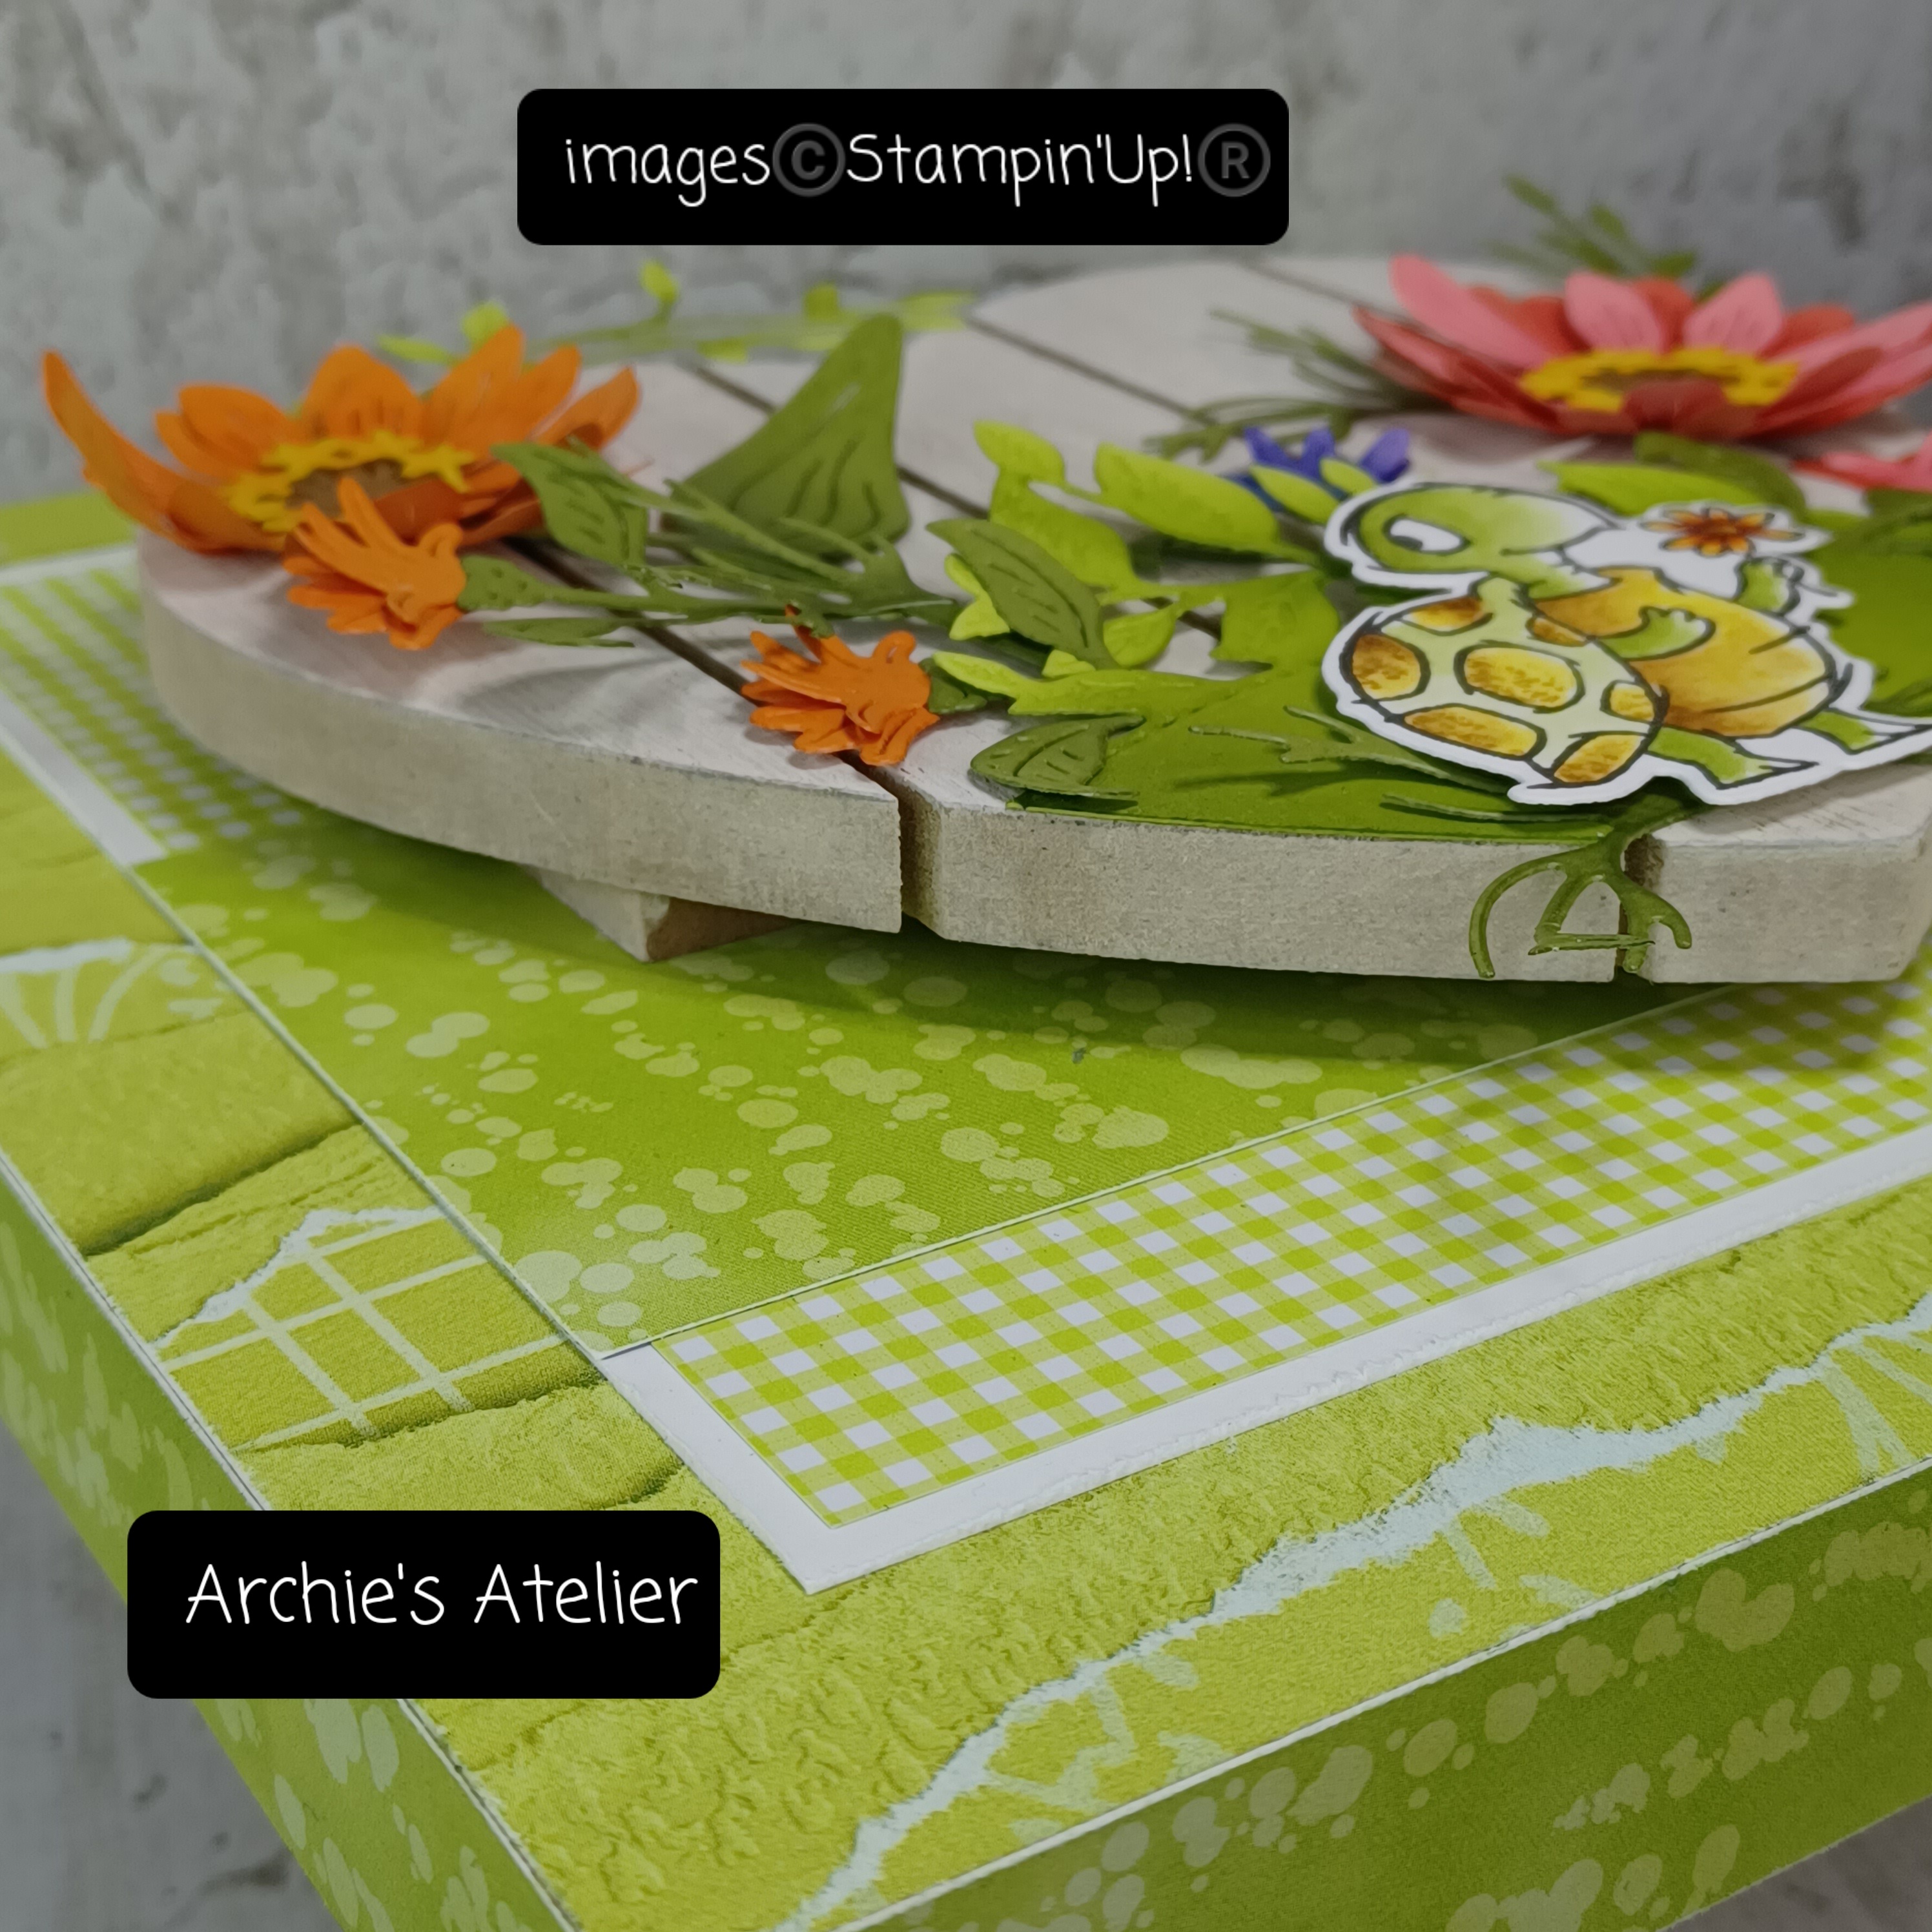
The handled gift bag is constructed in the same manner used for my "soft sided" tool tote shared in my February 23, 2024, blog post (https://archiesatelier.blogspot.com/2024/02/a-few-final-sale-bration-projects-hello.html) but is 5" tall rather than 4", and the pocket is 3" tall rather than 2 1/2". To complete this project - which will hold a small gift for a gardening friend, including a seed packet (or two) in the pocket - I used the following additional supplies:
- for the bag two 7" square pieces of Blueberry Bushel cardstock (item 146968) each scored on one 7" side at 1" down to 4", 2", and 6 1/2" (1/2" tab is the glue tab); and scored on the other 7" side (with the top edge of the first 7" side score lines to the right) at 2" (bottom flaps). Using a ruler and stylus I scored the lines from the bottom of the 1" score line (4" mark) out to bottom corners of each side panel;
- for the top flap a 3" x 3 1/4" piece of Blueberry Bushel cardstock scored on the 3" side at 1" and 2" - I used a small corner rounder punch to round the corners of the front panel of the flap;
- for the pocket a 5" x 3 3/4" piece of Blueberry Bushel cardstock scored on the bottom and both sides at 3/4";
- for the handles two 11" x 1/2" wide strips of Blueberry Bushel cardstock - scored three times at 1/8" intervals down the 11" length (I marked a pencil line at 3/4" from each end of both handles to use as guide lines when gluing the handles to the inside of the front and back of the bag);
- from Basic White Thick cardstock (item 159229) the following matting panels: for the front and back of the bag two 4 7/8" x 4 3/8" pieces; for the pocket a 2 7/8" x 3 3/8" ; and for the top flap three 3 1/8" x 7/8" pieces (I used the corner rounder punch to round the corners of the front panel's matting panel);
- from Blueberry Bushel patterned paper from Glorious Gingham 6" x 6" Designer Series Paper (item 163170) two 4 3/4" x 4 1/4" pieces for the front and back panels of bag, and a 2 3/4" x 3 1/4" piece for the pocket;
- from Real Red patterned paper from 6" x 6" Designer Series Paper Assortments-Regals (item 161642) three 3" x 3/4" pieces for the top flap (I used the corner rounder punch to round the corners of the DSP panel for the front panel); and
- white baker's twine from Baker's Twine Essentials Pack (item 155475) for the bow tied through the center of the 7/8" "almost Real Red" button from my stash.
For the magnetic closure I used two small Basic Grey magnetic discs purchased at my local scrapbooking shop.


- Crumb Cake cardstock (item 120953) for the card base;
- a torn piece of watercolour paper (approximately 3" x 3 3/4") die cut using the notebook edge die from the Gorgeously Made dies (item 161202);
.jpg)
Gorgeously Made dies - 161202
- Old Olive ink refill (item 100531) to add splatters to torn watercolour paper panel - flicking a paint brush with ink refill and water; and
- one large Calypso Coral shaded dot from Ombre Matte Decorative Dots (item 161448) for the flower center.
And finally . . .
Okay, while I didn't use any of the Simply Zinnia dies for this last card I think the turtle may be offering a zinnia to a special someone . . .


Additional supplies used to complete this 4" x 3 1/2" top-fold card:
- Basic White Thick cardstock (item 159229) for the card base;
- Basic Black cardstock (item 121045) for the 3 3/4" x 3 1/4" matting panel;
- Pecan Pie patterned paper from Glorious Gingham 6" x 6" Designer Series Paper (item 163170) for the 3" x 1" strip (one end torn);
- Old Olive polka dot patterned paper from 6" x 6" Designer Series Paper Assortments-Regals (item 161642) for 3 3/4" x 2 1/4" strip;
- Old Olive ink (item 147090), Mossy Meadow ink (item 147111), Pecan Pie ink (item 161665), Daffodil Delight ink (item 147094), and Sweet Sorbet ink (item 159216) to colour turtle image; and
- several Stampin' Dimensionals (item 104430) to attach the die cut turtle to the card front - I am always pretty liberal with the Dimensionals!
Thank you for visiting my blog! I had a lot of fun working on these projects and am certainly looking forward to playing more with the Simply Zinnia dies as there are so many possibilities in building flowers and combining them with other die cuts!
If you are interested in purchasing any of the available Stampin' Up! products I have used in my projects, and you live in Canada and do not have a Stampin' Up! demonstrator, please do not hesitate to visit my online store found on my website https://archiesatelier.stampinup.net/ at your convenience, or simply click under the "Shop With Me" tab on the right sidebar of my blog, which will take you directly to my website and online store. I very much appreciate your business, and if you need any assistance please do not hesitate to contact me (lmccoyarchie@gmail.com) - I would be very pleased to be your demonstrator! The digital versions of the May 2023-April 2024 Annual Catalogue, and the January-April 2024 Mini Catalogue are available for you to access at your convenience on my website (https://archiesatelier.stampinup.net/). When visiting my online store don't forget to check out all the products now available as Online Exclusives, as well as the great deals on the Clearance Rack!
Have fun creating!
Laurel
*It has come to my attention that quite often email correspondence from me is delivered to the recipient's spam or junk mail folder - if you have corresponded with me I have replied so be sure to check your spam or junk mail folder! Thank you!!

Comments
Post a Comment