Starting To Play With The Notes Of Nature Bundle!

Hello and Happy New Year! Today I am sharing a few card projects I worked on this week using the Stampin' Up! Notes of Nature Bundle (item 162640), which is one of the new Bundles featured in the January-April 2024 Mini Catalogue. This Bundle includes the Notes of Nature stamp set (item 162630) and the co-ordinating Notes of Nature dies (item 163203). The stamp set and dies can also of course be purchased separately - but if you would like to purchase both be sure to use the Bundle item number to ensure that you receive the 10% Bundle Savings!

.jpg)
Notes of Nature dies - 163203
(Bundle - 162640)
I had a lot of fun combining images and die cuts made using this Bundle with images and/or die cuts made using the Perched In A Tree stamp set (item 159791) and co-ordinating Aspen Tree dies (item 159798); the Lazy Days stamp set (item 161340) and co-ordinating Lazy Days dies (item 161342); Paper Florist dies (item 161284); Meadow dies (item 155852); and the Vintage Bottle Punch (item 158689).

.jpg)
Aspen Tree dies - 159798

.jpg)
Lazy Days dies - 161342
.jpg)
Paper Florist dies - 161284
.jpg)
Meadow dies - 155852
Just a quick note about the standard tools and supplies I used to complete the cards:
- Paper Trimmer (item 152392) - for trimming paper and cardstock - can also be used for scoring;
- stylus and scoreboard (Simply Scored Scoring Tool - item 122334) - for scoring fold lines. For crisp folds I also burnish all folded scored lines using my Bone Folder (item 102300);
- Stampin' Cut & Emboss Machine (item 149653) - for all die cutting and embossing;
- Paper Snips Scissors (item 103579) - these sharp scissors are great for fussy cutting and trimming die cuts - I had borrowed the Notes of Nature Bundle from my sister and had forgotten to die cut my stamped leafy branches before returning the Bundle so my Paper Snips Scissors definitely came in very handy!;
- Take Your Pick Tool (item 144107) - the paper piercer, mini spatula, and tacky putty tips are a great help for picking up and placing small embellishments and die cuts; and
- for the main adhesive, Multipurpose Liquid Glue (item 110755).
All images and sentiments (unless otherwise noted) were stamped on watercolour paper using Stazon Jet Black Ink (item 101406), and the images were coloured using Classic Stampin' inks, with the colour applied either with paint brushes and water, or Blending Brushes (item 153611) and Small Blending Brushes (item 160518). Die cut foliage was cut from watercolour paper and coloured using Old Olive ink (item 147090) and Mossy Meadow ink (item 147111) applied using Blending Brushes and Small Blending Brushes.
On with the projects!


Additional supplies used to complete this 4 1/4" square top-fold card:
- Crumb Cake cardstock (item 120953) for the card base;
- Basic Black Stampin' Write Marker (item 162481) to add splatters to the card front by flicking the brush tip against the marker lid;
- Very Vanilla Thick cardstock (item 144237) for the 4" square inside panel, and for the sentiment strip - the "Explore Dream Discover" sentiment, from the Next Destination stamp set (item 161427), was stamped using Stazon Jet Black Ink, the strip cut using the Paper Trimmer, and the edges sponged with Crumb Cake ink (item 147116);

- Crumb Cake ink - applied as a wash over the "Filed Notes" 3" x 2 3/4" watercolour paper panel;
- Pecan Pie ink (item 161665), Early Espresso ink (item 147114), Real Red ink (item 147084), and Misty Moonlight ink (item 153118) to colour bird image;
- Old Olive ink and Mossy Meadow ink to colour the two stamped leafy branches; and
- Mini Stampin' Dimensionals (item 144108) - two added to the back of sentiment strip (behind "Discover"), and one under the lowest leaf on the stamped leafy branch under the bird.

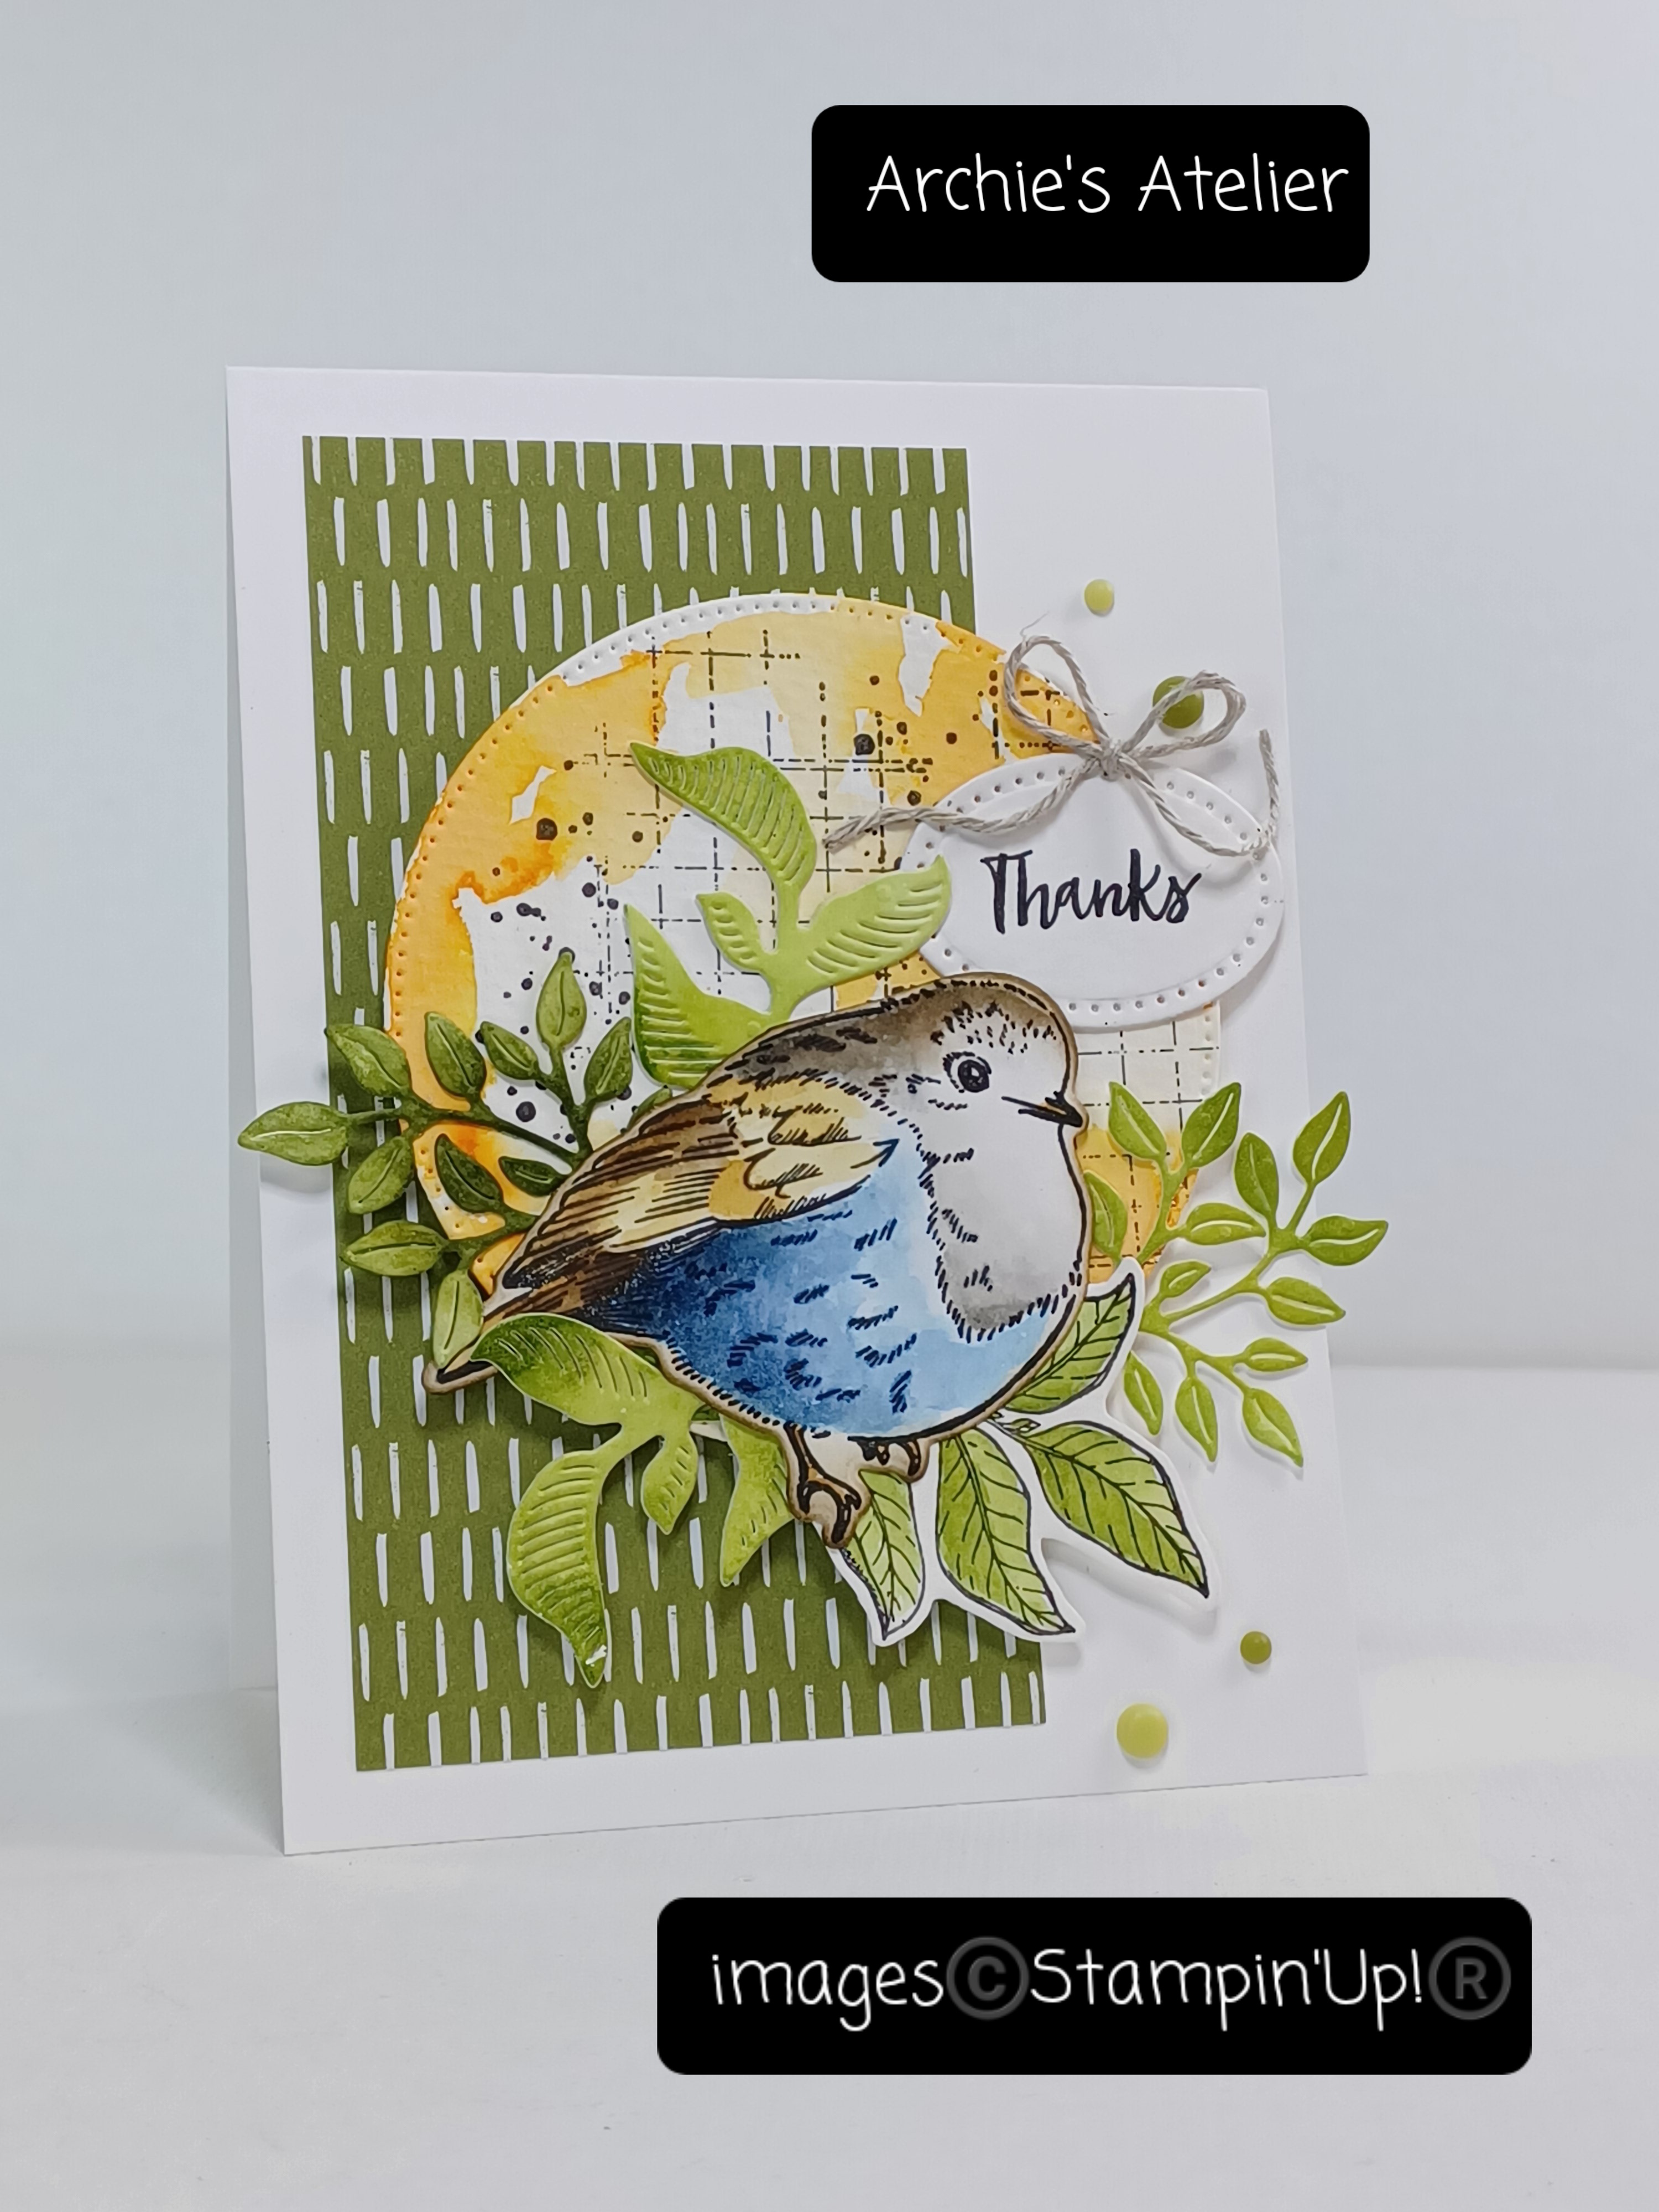

Additional supplies used to complete this 5" x 3 3/4" top-fold card:
- Basic White Thick cardstock (item 159229) for the card base;
- 4 1/2" x 2 3/8" piece of Old Olive patterned paper from 6" x 6" Designer Series Paper Assortments-Regals (item 161642) for front panel - glued to the card front allowing a 1/4" border on top, bottom, and left side;
- Pumpkin Pie ink (item 147086) applied as a wash to stamped watercolour paper circle (circle cut after stamping using the 3" diameter circle die from Stylish Shapes dies - item 159183) - after attaching foliage, bird, and sentiment oval to the circle I attached the completed cluster to the front panel using Stampin' Dimensionals (item 104430) - I am very liberal in my use of Dimensionals!;

Stylish Shapes dies - 159183
- Pecan Pie ink (item 161665), Early Espresso ink (item 147114), Basic Gray ink (item 149165), and Misty Moonlight ink (item 153118) to colour the bird image;
- Old Olive ink and Mossy Meadow ink to colour the stamped leafy branch;
- small oval die from Mini Pocket Envelope dies (item 159167) to cut sentiment oval after I stamped the "Thanks" from the Lazy Days stamp set;
.jpg)
Mini Pocket Envelope dies - 159167
- Linen Thread (item 104199) for the sentiment oval bow - bow and ends secured with tiny dabs of Multipurpose Liquid Glue; and
- four of the Old Olive shaded dots from Ombre Matte Decorative Dots (item 161448) added to card front.


Additional supplies used to complete this 4 1/4" x 5 1/2" top-fold card:
- Crumb Cake cardstock (item 120953) for the card base;
- Basic Black cardstock (item 121045) for 4 1/8" x 5 3/8" front matting panel, and 3 3/4" x 5" inside matting panel;
- Basic White cardstock (item 159276) for 3 1/2" x 4 3/4" inside panel;
- Pretty Peacock patterned paper from Earthen Elegance 12" x 12" Designer Series Paper (item 161503) for 4" x 5 1/4" front panel, and 1/2" x 4" inside strip - all edges sponged with Lost Lagoon ink (item 161678);
- Crumb Cake ink (item 147116) applied to stamped watercolour paper circle (circle cut after stamping using 3" diameter circle die from Stylish Shapes dies - item 159183) using one of the Blending Brushes. Circle spritzed with water (Stampin' Spritzers - item 126185) and blotted dry with paper towel - Early Espresso ink (item 147114) sponged around edges of circle;
- Crumb Cake and Early Espresso inks applied using one of the Blending Brushes and one of the Small Blending Brushes to the watercolour paper die cut rocking chair;
- Crumb Cake ink applied with one of the Blending Brushes to watercolour paper strip cut using the hole-punch edge die - spritzed with water (Stampin' Spritzers) and blotted dry with paper towel - end torn after inking, and Crumb Cake baker's twine (Baker's Twine Essentials Pack - item 155475) wrapped around strip and tied in a bow - ends secured with tiny dabs of Multipurpose Liquid Glue;
- Crumb Cake ink and Pool Party ink (item 147107) to colour bird house and birds;
- Shaded Spruce ink (item 147088) and Crumb Cake ink to colour foliage and pot of hanging plant added to inside panel; and
- long narrow banner die from Stylish Shapes dies to cut sentiment banner (after the sentiment was stamped).


Additional supplies used to complete this 3 3/4" x 4 1/2" top-fold card:
- Basic White Thick cardstock (item 159229) for the card base;
- Nested Essentials dies (item 161597) to cut stamped watercolour paper rounded corner rectangle panel - Pool Party ink (item 147107) and Pecan Pie ink (item 161665) applied as washes to die cut panel;
.jpg)
Nested Essentials dies - 161597
- long broad banner die from Stylish Shapes dies (item 159183) to cut sentiment banner after stamping. Pecan Pie ink applied to die cut banner using one of the Blending Brushes, banner then spritzed with water (Stampin' Spritzers - item 126185) and blotted dry with paper towel;
- Pool Party and Pecan Pie inks to colour foliage and basket of potted plant;
- Pool Party ink to colour stamped foliage;
- Crumb Cake patterned paper from One Horse Open Sleigh 6" x 6" Designer Series Paper (item 162118) for 1 1/2" x 3" strip added behind sentiment banner; and
- four Coastal Cabana shaded dots from Ombre Matte Decorative Dots (item 161448) added to card front.


Additional supplies used to complete this 4" x 4 1/2" top-fold card:
- Pool Party cardstock (item 147107) for the card base, 3 3/4" x 4 1/4" embossed panel (embossed using the Timber 3D Embossing Folder - item 156406), and stamen circle (cut using the Paper Florist dies);
- Crumb Cake cardstock (item 120953) for the 3 7/8" x 4 3/8" front and inside matting panels;
- Very Vanilla cardstock (item 101650) for the 3 5/8" x 4 1/8" inside panel (splatters added by flicking a paint brush on which I had mixed Crumb Cake ink with water);
- Crumb Cake ink and Pool Party ink (item 147107) applied as washes to stamped watercolour paper circle, allowed to dry and then spritzed with additional water (Stampin' Spritzers - item 126185) and blotted dry with paper towel. Additional Crumb Cake ink and a little Early Espresso ink (item 147114) sponged around the edges. The 2 1/2" diameter circle die from Stylish Shapes dies (item 159183) was used to cut the circle;
- using the large and small five-petalled flower dies from Paper Florist dies I cut the two flower sections from watercolour paper that had been coloured with Berry Burst ink (item 147143) applied as a wash (after drying I pressed a damp paper towel against the watercolour paper panel to get a "dotty" effect);
- after cutting the sentiment flag using the Nested Essentials dies (item 161597) - after the sentiment was stamped - I applied Pool Party ink (item 147107) to the flag using one of the Small Blending Brushes - then spritzed with water (Stampin' Spritzers) and blotted dry with paper towel;
- Crumb Cake ink was applied to the watercolour paper strip cut with the hole-punch edge die, lightly spritzed with water (Stampin' Spritzers), blotted dry with paper towel, and more Crumb Cake ink and a little Early Espresso ink applied with one of the Small Blending Brushes;
- Old Olive ink (item 147090) and Mossy Meadow ink (item 147111) used to colour the two stamped leafy branches; and
- using the full butterfly die from the Meadow dies I cut the butterfly used on the inside panel from a piece of stamped watercolour paper - Pool Party ink applied to die cut butterfly using one of the Small Blending Brushes, spritzed with water (Stampin' Spritzers) and blotted dry with paper towel.
The sentiment flag was attached to the circle using a tiny staple, and the "darker shade of Crumb Cake" button used for the flower center was from my stash.


Additional supplies used to complete this 4 1/2" square top-fold card:
- Basic White Thick cardstock (item 159229) for the card base;
- Old Olive cardstock (item 100702) for the 4 1/4" square matting panel;
- Lemon Lime Twist patterned paper from Masterfully Made 12" x 12" Designer Series Paper (item 161192) for the 4 1/8" square front panel, and 1 1/2" x 4 1/8" inside strip;
- long narrow banner die from Stylish Shapes dies (item 159183) to cut both sentiment banners (after sentiments stamped);
- Highland Heather Ink Refill (item 147167) and Mossy Meadow ink (item 147111) to colour the two flowers cut using the Meadow dies;
- Old Olive ink (item 147090) to stamp the leafy branches on the watercolour paper circle (before stamping the circle was cut using the 3" diameter circle die from Stylish Shapes dies) - after stamping I lightly spritzed the circle with water (Stampin' Spritzers - item 126185) to allow some of the ink to bleed, after letting it dry a few minutes I sponged a little more Old Olive ink around the circle and stamped several of the splatter images with Pool Party ink (item 147107);
- Stampin' Dimensionals (item 104430) used to attach the front panel's sentiment banner; and
- three Coastal Cabana shaded dots from Ombre Matte Decorative Dots (item 161448) added to left side of card front.
From a Highland Heather patterned piece of retired Botanical Butterfly Designer Series Paper (item 149622) I made the envelope using an envelope punch board - adding a bow made from 5/8" "almost Highland Heather" gingham ribbon from my stash.


For this simple 4 5/8" x 3 1/2" Basic Black cardstock (item 121045) side-fold card I cut a bottle from watercolour paper using the Vintage Bottle Punch - after punching a full size bottle I placed the punched shape back into the Punch with the neck portion free of the Punch's top mechanism but the body of the bottle positioned so that I could re-punch the bottom portion higher up on the bottle in order to end up with a shorter bottle. The bottle was coloured using Pecan Pie ink (item 161665) and Basic Gray ink (item 149165). After gluing the die cut foliage to the back of the neck I tied the sentiment tag (cut using the small label die included with the Mini Pocket Envelope dies - item 159167 - around the edges of the tag I sponged Crumb Cake ink - item 147118) to the bottle with a Linen Thread (item 104199) bow. Using Mini Stampin' Dimensionals (item 144108) behind the bottle and one behind the sentiment tag, I attached the bottle to a 3 3/4" x 2 1/8" Very Vanilla Thick cardstock (item 144237) panel with torn top edge that I had glued to the front of the card allowing a 5/8" border on both sides and a 1/2" bottom border. The card was completed with the addition of a 4 1/4" x 3 1/8" Very Vanilla Thick cardstock inside panel.
And finally . . . two small gift cards:

Additional supplies used to complete this 2 1/2" top-fold card:
- Basic White Thick cardstock (item 159229) for the card base;
- Pecan Pie patterned paper from Glorious Gingham 6" x 6" Designer Series Paper (item 163170) for the 3/4" x 1 1/4" strip for the front panel (glued to the back of the image circle), and 1/2" x 2" inside strip (these two patterns are the opposite sides of the same sheet of paper);
- watercolour paper circle cut using the 2 1/8" diameter circle die from Stylish Shapes dies (item 159183) to which I first added a wash of Crumb Cake ink - and some splatters - (item 147116) before stamping the leafy branch image; and
- Foam Adhesive Strips (item 141825) - I curved a length from one strip around the back of the circle - adding a piece behind the DSP strip - to attach the circle to the card front.


Additional supplies used to complete this 3" square top-fold card:
- Pool Party cardstock (item 122924) for the card base;
- Basic White Thick cardstock (item 159229) for the 2 3/4" square front matting panel and inside panel, and 2 1/2" front matting panel (edges scraped with the blade of my craft knife);
- Smoky Slate cardstock (item 131202) for the 2 5/8" square front matting panel;
- 2 3/8" square die from Stylish Shapes dies (item 159183) to cut - after stamping - watercolour paper image square - coloured with Daffodil Delight ink (item 147094) and Pool Party ink (item 147107) applied as washes; and
- Pool Party ink to colour the stamped leafy branch.
The bow was made using some 1/4" "almost Daffodil Delight" ribbon from my stash; and from a piece of Pool Party patterned paper from a former Sale-A-Bration product - Sunshine & Rainbows 6" x 6" Designer Series Paper (item 158126) I made the envelope using an envelope punch board.
Speaking of Sale-A-Bration - just a reminder that the annual Sale-A-Bration began on January 4, 2024 (coinciding with the launch of the January-April 2024 Mini Catalogue) and runs until February 29, 2024! During Sale-A-Bration there are lots of fun products available for free with orders of $60.00 or more (CDN) before shipping and taxes, and with orders of $120.00 or more (CDN) before shipping and taxes! The digital versions of both the January-April 2024 Mini Catalogue and the Sale-A-Bration Brochure are now available for you to access at your convenience on my website (https://archiesatelier.stampinup.net/).
.jpg)
Thank you for visiting my blog! I certainly had a lot of fun working on my projects this week and am looking forward to playing more with the Notes of Nature Bundle - lots of collage possibilities!
If you are interested in purchasing any of the available Stampin' Up! products I have used in my projects, and you live in Canada and do not have a Stampin' Up! demonstrator, please do not hesitate to visit my online store found on my website https://archiesatelier.stampinup.net/ at your convenience, or simply click under the "Shop With Me" tab on the right sidebar of my blog, which will take you directly to my website and online store. I very much appreciate your business, and if you need any assistance please do not hesitate to contact me (lmccoyarchie@gmail.com)! The digital version of the May 2023-April 2024 Annual Catalogue can also be accessed at your convenience on my website. When visiting my online store don't forget to check out the great deals on the Clearance Rack, as well as the great selection of products available as Online Exclusives! There are also two new additions to the Kits Collection:


Have fun creating!
Laurel
*It has come to my attention that quite often email correspondence from me is delivered to the recipient's spam or junk mail folder - if you have corresponded with me I have replied so be sure to check your spam or junk mail folder! Thank you!!

Do not underestimate the value of a self-imposed time-out!
Comments
Post a Comment