A Few More Christmas Projects!

Hello! Today I am sharing a few more Christmas projects I worked on this week. I may take a little break from the Christmas projects next week - don't want to deplete my festive spirit too early!
Just a quick note about the standard tools and supplies I used to complete my projects this week:
- Paper Trimmer (item 152392) - for trimming paper and cardstock - can also be used for scoring;
- stylus and scoreboard (Simply Scored Scoring Tool - item 122334) - for scoring card fold lines, and for crisp folds I also burnished all folded scored lines using my Bone Folder (item 102300);
- Stampin' Cut & Emboss Machine (item 149653) - for all die cutting and embossing;
- Paper Snips Scissors (item 103579) - these sharp scissors help make fussy cutting a little easier;
- Take Your Pick Tool (item 144107) - the paper piercer, mini spatula, and tacky putty tips are a great help for picking up and placing small embellishments and die cuts; and
- for the main adhesive, Multipurpose Liquid Glue (item 110755).
Since a couple of my projects involved heat embossing I also used:


.jpg)
.jpg)
.jpg)
.jpg)
.jpg)
.jpg) Tree Rings dies - 159888 (also includes the Hybrid Embossing Folder)
Tree Rings dies - 159888 (also includes the Hybrid Embossing Folder)


%20RETIRED.jpg)
%20RETIRED.jpg)
.jpg)


.jpg)

.jpg)
.jpg)
.jpg)
%20RETIRED.jpg)


.jpg)
.jpg)
.jpg)


.jpg)


.jpg)


- an Embossing Buddy (included with the Embossing Additions Tool Kit - item 159971) to pounce over the cardstock prior to stamping and embossing to help ensure that the embossing powder would not stick to areas outside of the stamped areas;
- VersaMark Ink (item 102283) for stamping all images/sentiments to be embossed - Stampin' Up! advises that the VersaMark Ink is expected to be back in stock the week of January 1, 2024;
- gold embossing powder from Stampin' Emboss Powders-Metallics (item 155555);
- a very fine dry paint brush to carefully brush away excess embossing powder prior to heat setting (a small brush is also included in the Embossing Additions Tool Kit); and
- specialized heat tool (Heat Tool - item 129053) to heat/activate the embossing powder.
For the sentiments I used the Regal Reindeer stamp set (item 159722), and the Brightest Glow stamp set (item 159542).


On with the projects!
For my first project I removed the glass from an 8" x 6" (outside dimensions) black plastic easel frame with a 6 3/4" x 4 3/4" front opening that I picked up at Dollarama. These dollar and thrift store frames come in very handy for projects! For the front mat I cut a piece of watercolour paper just under 7" x 5" (the back inside frame dimensions). Over the watercolour paper panel I glued a just under 7" x 5" piece of Pecan Pie woodgrain patterned paper from the Joy of Christmas 12" x 12" Designer Series Paper (item 161958) and, using the arched window die from the Garden Meadow dies (item 162740), cut the opening, around the edges of which I sponged Early Espresso ink (item 147114). I used watercolour paper for all die cuts.


.jpg)
Garden Meadow dies - 162740
I used the following additional supplies to complete the project:
- Aspen Tree dies (item 159798) to cut the aspen tree frame - coloured using Crumb Cake ink (item 147116) and Basic Gray ink (item 149165), applied as colour washes using a paint brush and water (with the ink pad closed I press the lid into the pad to transfer ink to the inside of the lid which I can then use as a palette - mixing a little water with the ink and picking up the ink with a paint brush - adding additional water as required to soften the intensity of the colour - to increase the intensity of the colour I add a drop or two from the corresponding ink refill);
.jpg)
Aspen Tree dies - 159798
- Reindeer dies (item 159727) to cut the four Christmas trees (coloured using Mossy Meadow ink - item 147111 - applied with one of the Blending Brushes - item 153611), and the six snow hills (shadows added by applying a Basic Gray ink wash with a paint brush);
.jpg)
Reindeer dies - 159727
- Grove dies (item 157844) to cut the two deer - coloured using Pecan Pie ink (item 161665) and Early Espresso ink applied with Blending Brushes;
.jpg)
Grove dies - 157844
- Joy of Noel dies (item 161965) to cut the two evergreen branches - coloured using Mossy Meadow ink applied with one of the Blending Brushes;
.jpg)
Joy of Noel dies - 161965
- Tree Rings dies (item 159888) to cut the leafy branch - coloured using Pecan Pie and Early Espresso inks applied with a paint brush, and the two berry sprigs - coloured using Mossy Meadow ink applied with a paint brush;
.jpg)
- an approximately 5 1/2" x 4" piece of Blueberry Bushel patterned paper from the Winter Meadow 12" x 12" Designer Series Paper (item 162133) for the background panel;
- Wink of Stella Clear Glitter Brush (item 141897) to add a little sparkle to the sides of the aspen trees, Christmas trees, snow hills, leaves on branch, berries, and tips of evergreen branches;
- Foam Adhesive strips (item 141825) applied around the back edges of the arched window opening after the aspen tree frame, snow hills, and Christmas trees glued to back of panel in order to provide a little dimension between the foreground die cuts and the background DSP panel. When gluing the deer I only added dabs of glue to secure the legs; and
- for the bow, Black & Very Vanilla 3/8" Large Check Ribbon (item 161982).
Using the inside portion of the panel left over after cutting the arched window frame from the DSP covered watercolour paper panel I made a tag - didn't want to waste anything!


Wanting to create some rusty looking "ornaments" I cut a reindeer and a bell from Pecan Pie cardstock (item 161717) - after applying both Pecan Pie and Early Espresso inks with Blending Brushes I pressed the die cuts directly into the Early Espresso ink pad with my fingers - can get a little messy but lots of fun! The reindeer was cut using the Reindeer dies, and the bell was cut using the retired Sounds Of The Season dies (item 154043). Using the Joy of Noel dies I cut four evergreen branches from Mossy Meadow cardstock (item 133676) - shading them by applying Mossy Meadow ink with one of the Blending Brushes. Using three of the dies included with the Bouquet of Love Hybrid Embossing Folder (item 1576411 and currently available on the Clearance Rack) I cut one large and one small flower from Real Red cardstock (item 102482), and two double leaves from Garden Green cardstock (item 102584). Using my Basic Black Stampin' Write Marker (item 162481) I "inked" the "Merry" portion of the "Merry Christmas" sentiment from the Regal Reindeer stamp set and stamped on watercolour paper. Using the small tag die from the Mini Pocket Envelope dies (item 159167) I cut the sentiment tag - which I sponged with Pecan Pie ink. For a distressed look I scrunched the tag with my fingers, and caused a little bleeding of the ink by touching the inked sentiment with a damp finger. I used trimmed Stampin' Dimensionals (item 104430) to attach the bell - through the top of which I looped some Linen Thread (item 104199), securing the knotted end with a tiny dab of Multipurpose Liquid Glue. To the center of the flower I added one of the Rustic Metallic Adhesive-Backed Dots (item 159082). I added an eyelet to the top of the tag through which I looped some recycled twine. I tied a bow around the twine using the Black & Very Vanilla 3/8" Large Check Ribbon.
%20RETIRED.jpg)
Sounds Of The Season dies - 154043 (retired)
%20RETIRED.jpg)
dies included with the Bouquet of Love Hybrid Embossing Folder - 157641
.jpg)
Mini Pocket Envelope dies - 159167
Although the Basic Black Stampin' Write Marker is not currently available for ordering Stampin' Up! advises that it is expected to be back in stock the week of December 18, 2023.


To complete this 5 1/4" x 6" top-fold card I used the following additional supplies:
- Basic White Thick cardstock (item 159229) for the card base, door frame (cut using the crypt die from the Bag of Bones dies - item 162218), snowflakes (cut using the Chic dies - item 158815), snow hills (cut using the Reindeer dies - item 159727), and the sentiment panel (sentiment stamped using Stazon Jet Black Ink - item 101406, and rectangle cut using the Deckled Rectangles dies - item 159173);
.jpg)
Bag of Bones dies - 162218

Chic dies - 158815
.jpg)
Deckled Rectangles dies - 159173
- Basic Black cardstock (item 121045) for the door (cut using the tombstone die from the Bag of Bones dies), fence (also cut using the Bag of Bones dies), Christmas tree urn (cut using the lantern die from the Lighting The Way dies - item 160495 - after trimming off the top portion [from just above the top edge of the side handles] and the lamp frame portion and then turning it upside down you have an urn that perfectly fits the Christmas tree cut from watercolour paper using the Reindeer dies - item 159727), the front 5 1/8" x 4 3/8" matting panel, and the 2 7/8" x 1 1/2" sentiment matting panel;
.jpg)
Lighting The Way dies - 160496
- Mossy Meadow ink (item 147111) to colour the watercolour paper Christmas tree, and the two sprigs cut using the Joy of Noel dies (item 161965) - ink applied using one of the Blending Brushes (item 153611)'
- Mossy Meadow cardstock (item 133676) for the two three-leafed stems (cut using the Around The Bend dies - item 160649), and the present (cut using the Reindeer dies);
.jpg)
Around The Bend dies - 160649
- Real Red cardstock (item 102482) for the present's bow (cut using the Reindeer dies), the small heart over the door (cut using the larger heart die from the retired Teacup dies - item 160186), and the stitched heart on the inside panel (cut using the smaller of the two heart dies included with the Bouquet of Love Hybrid Embossing Folder - item 157641);
%20RETIRED.jpg)
Teacup dies - 160186 (retired)
- Smoky Slate cardstock (item 131202) for the 5" x 4 1/4" embossed panel - embossed using the Exposed Brick 3D Embossing Folder (item 161600);
- Basic Gray ink (item 149165) - sponged around edges of embossed panel;
- Foam Adhesive Sheets (item 152815) used to attach completed door panel to card front; and
- small gold dot from Brushed Metallic Dots (item 156506) for the door knob.


Additional supplies used to complete this 4" square top-fold card:
- Very Vanilla Thick cardstock (item 144237) for the card base, 2 7/8" square matting panel, and sentiment flag (flag cut using the Nested Essentials dies - item 161597);
.jpg)
Nested Essentials dies - 161597
- Real Red cardstock (item 102482) for the three sections of the poinsettia - cut using the Cheerful Daisies dies (item 161296) - the edges of the top two sections shaded with Real Red ink (item 147084) applied with one of the Small Blending Brushes (item 160518);
.jpg)
Cheerful Daisies dies - 161296
- Pecan Pie cardstock (item 161717) for the circle stamens (cut using the Paper Florist dies - item 161284), and bell - cut using the retired Sounds Of The Season dies and coloured in the same manner as previously described for rusty ornaments;
.jpg)
Paper Florist dies - 161284
- Wild Wheat cardstock (item 161725) for the flower center - also cut using the Paper Florist dies. Pecan Pie ink (item 161665) was sponged around the edges of both the circle stamens and flower center die cuts;
- Mossy Meadow cardstock (item 133676) for the two evergreen branches - cut using the Joy of Noel dies (item 161965). For shading I applied some Mossy Meadow ink (item 147111) to the die cut branches using one of the Blending Brushes (item 153611);
- watercolour paper for the two deer - cut using the Grove dies (item 157844) and coloured with Pecan Pie ink and Early Espresso ink (item 147114) applied using Blending Brushes;
- Mossy Meadow patterned paper from the Online Exclusive Traditions of St. Nick 12" x 12" Designer Series Paper (item 162355) for the 3 7/8" square panel - edges sponged with Mossy Meadow ink;
- Mossy Meadow/Very Vanilla patterned paper from Let's Go Fishing 12" x 12" Designer Series Paper (item 161534) for 2 3/4" square panel;
- trimmed Stampin' Dimensionals (item 104430) to attach bell;
- two gold dots from Brushed Metallic Dots (item 156506) added to card front; and
- bow tied using gold cord from Simply Elegant Trim (item 155766) secured to upper right corner of Very Vanilla Thick cardstock matting panel using tiny dab of Multipurpose Liquid Glue. Unfortunately Simply Elegant Trim is not currently available - Stampin' Up! advises that it is expected to be back in stock the week of January 1, 2024.


Additional supplies used to complete this 4 3/8" x 3 3/8" top-fold card:
- Crumb Cake cardstock (item 120953) for the card base;
- Very Vanilla Thick cardstock (item 144237) for the 3 7/8" x 2 7/8" front matting panel, and 4 1/4" x 3 1/4" inside panel;
- Basic Black cardstock (item 121045) for the 4" x 3" and 3 3/8" x 2 3/8" matting panels (the edges of the smaller panel scraped with the blade of my craft knife);
- Crumb Cake patterned paper from Online Exclusive One Horse Open Sleigh 6" x 6" Designer Series Paper (item 162118) for the 3 1/4" x 2 1/4" front panel, and 3" x 1/2" inside strip;
- Stazon Jet Black Ink (item 101406) to stamp on watercolour paper the sentiment (from the Regal Reindeer stamp set), and the truck image from the Trucking Along stamp set (item 162299) - including the wheels and hubcaps ("fill in" stamps);

- Real Red ink (item 147084) to stamp truck body ("fill in" stamp);
- Mossy Meadow ink (item 14711) to stamp tree ("fill in" stamp) - additional Mossy Meadow ink applied using paint brush;
- Pecan Pie ink (item 161665), Basic Gray ink (item 149165), and Pool Party ink (item 147107), applied with paint brush, for additional truck image colouring;
- 2 1/8" diameter circle die from Stylish Shapes dies (item 159183) to cut sentiment circle. Through the small check mask from Artistic Mix Decorative Masks (item 159178) Pecan Pie ink was applied over the sentiment circle using one of the Blending Brushes (item 153611) - after removing the mask additional Pecan Pie ink was blended over the circle to soften the stenciled design; and

Stylish Shapes dies - 159183
.jpg)
small check mask from Artistic Mix Decorative Masks - 159178
- Linen Thread (item 104199) for the bow glued to top of sentiment circle - the bow and knotted ends all secured with tiny dabs of Multipurpose Liquid Glue.


Additional supplies used to complete this 4" x 3 3/4" top-fold card:
- Very Vanilla Thick cardstock (item 144237) for the card base, and sentiment tag (cut using the Tailor Made Tags dies - item 155563);
.jpg)
Tailor Made Tags dies - 155563
- Pretty Peacock cardstock (item 150880) for the 3 7/8" x 3 5/8" matting panel; and the two leafy stems and fringed flower center (cut using the Paper Florist dies - item 161284);
- Lost Lagoon cardstock (item 133679) for the nine large petals - cut using the Paper Florist dies;
- Pool Party cardstock (item 122924) for the two small flowers added to the center of the Lost Lagoon cardstock flower - also cut using the Paper Florist dies - before assembling the flowers I scrunched up all the cardstock petal pieces - this is a good stress reliever exercise!;
- watercolour paper for the small aspen leaf - cut using the Aspen Tree dies (item 159798) - I applied Crumb Cake ink (item 147116) to the die cut leaf using one of the Small Blending Brushes (item 160518);
- map patterned paper from Let's Go Fishing 12" x 12" Designer Series Paper (item 161534) for the 3 3/4" x 3 1/2" panel;
- Wink of Stella Clear Glitter Brush (item 141897) - before adding the flower and aspen leaf to the card front I added splatters to the flower by whacking the brush against my Bone Folder, and then using the brush "painted" the aspen leaf (I wanted the look of a frosted winter leaf), and added additional sparkle to the flower center and around the edges and to some of the creases in the flower; and
- three gold dots from Brushed Metallic Dots (item 156506) added to the card front.
And finally . . .


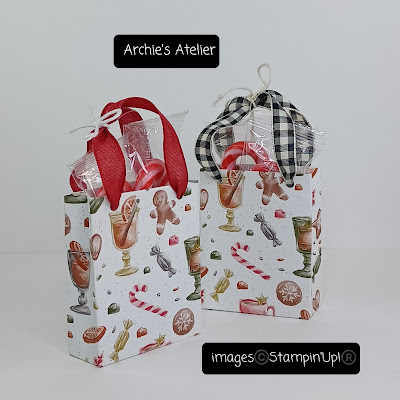
These two little "shopping bags" measure 2 1/2" tall x 2" wide x 3/4" deep and are just the right size to hold two mini candy canes - either as table favours or to hang on the tree!
For each bag I used a 5 7/8" x 3 3/4" piece of Traditions of St. Nick 12" x 12" Designer Series Paper (item 162355) - scored on the 5 7/8" side at 3/8", 3/4", 2 3/4", 3 1/8", 3 1/2", and 5 1/2" (the 3/8" tab is the glue tab but to make a little easier fit into the 3/8" tab on the other side I trimmed a very little bit off the long edge of the glue tab); and scored on the 3 3/4" side at 3/4" (bottom flaps) and 3 1/4" (the 1/2" tab is the the top edge fold-over to cover the ends of the ribbon handles). To ensure accurate placement of the 1/8" holes for the ribbon I made a cardboard template with the holes punched - having a template saves a lot of time and aggravation especially if you might want to make a few bags! For each handle I used an approximately 5" length of ribbon. For these two bags I used Real Red ribbon from the Real Red & Garden Green 3/8" Ribbon Combo Pack (item 159577) with a white baker's twine bow (Baker's Twine Essentials Pack - item 155475), and Black & Very Vanilla 3/8" Large Check Ribbon (item 161982) with a Very Vanilla baker's twine bow (also from Baker's Twine Essentials Pack). I added the ribbon handles and secured the top edge fold-over before completing the assembly of the bag - the ribbon ends can be secured with Multipurpose Liquid Glue or with one of the Mini Glue Dots (item 103683) - and the taper cut top of the glue tab can be tucked under the fold-over on the other side.

Thank you for visiting my blog! I had a lot of fun working on these projects - making progress with my Christmas projects!
If you are interested in purchasing any of the available Stampin' Up! products I have used in my projects, and you live in Canada and do not have a Stampin' Up! demonstrator, please do not hesitate to visit my online store found on my website https://archiesatelier.stampinup.net/ at your convenience, or simply click under the "Shop With Me" tab on the right sidebar of my blog, which will take you directly to my website and online store. I very much appreciate your business, and if you need any assistance please do not hesitate to contact me (lmccoyarchie@gmail.com)! The digital versions of both the May 2023-April 2024 Annual Catalogue and the September-December 2023 Mini Catalogue can be accessed at your convenience on my website! When visiting my online store don't forget to check out the great deals on the Clearance Rack as well as the selection of products now available as Online Exclusives - several new products were introduced on November 7, 2023 - including the Garden Meadow dies (item 162740)!

The Last Chance Promotion featuring the retiring products from the September-December 2023 Mini Catalogue is on now until January 3, 2024. Many of the retiring products are offered at substantial discounts but products will only be available while supplies last - a great opportunity to stock up on some favourites - maybe for some last minute festive projects - and maybe do a little Christmas shopping! A few of the discounts include:
- Stars At Night Hybrid Embossing Folder (item 162006) - 30% off;
- Handcrafted Elements dies (item 162330) - 10% off;
- Sending Cheer stamp set (item 162050) and Sending Cheers dies (item 162052) - each at 40% off;
- Fruitful Blessing dies (item 162209) - 30% off;
- Bag of Bones dies (item 162218) - 10% off
- Cheery Patterns Embossing Folders (item 162287) - 10% off;
- Year To Celebrate stamp set (item 162279) - 40% off;
- Classic Gift Card Envelopes (item 162116) - 30% off;
- Cheers To The Season stamp set (item 162309) - 30% off; and
- Precious Pinecones stamp set (item 162175) - 60% off!

Have fun creating!
Laurel
*It has come to my attention that quite often email correspondence from me is delivered to the recipient's spam or junk mail folder - if you have corresponded with me I have replied so be sure to check your spam or junk mail folder! Thank you!!

Eyes are getting heavy - almost nap time!
Comments
Post a Comment