A Few More Christmas Projects!

Hello! Today I am sharing a few more Christmas projects I worked on this week - almost panic time as November quickly draws to a close and I am starting to feel the hot breath of the approaching festive season on the back of my neck and worried that tempus will fugit before all the projects can be completed (or maybe even started as unfortunately some ideas come a little too late . . .)😼
Just a quick note about the standard tools and supplies I used this week to complete my projects:
- Paper Trimmer (item 152392) - for trimming paper and cardstock - can also be used for scoring;
- stylus and scoreboard (Simply Scored Scoring Tool - item 122334) - for scoring card fold lines, and for crisp folds I also burnished all folded scored lines using my Bone Folder (item 102300) - I also used the Bone Folder to curl the die cut cardstock bows, making them easier to assemble;
- Stampin' Cut & Emboss Machine (item 149653) - for all die cutting and embossing;
- Paper Snips Scissors (item 103579) - theses nice sharp scissors were perfect for fussy cutting the Santa images;
- Take Your Pick Tool (item 144107) - the paper piercer, mini spatula, and tacky putty tips are a great help for picking up and placing small embellishments and die cuts (berries!); and
- for the main adhesive, Multipurpose Liquid Glue (item 110755).
Since a few of my projects involved heat embossing I also used:

.jpg)
.jpg)


.jpg)
.jpg)
.jpg)


.jpg)


.jpg) Fabulous Frames dies - 159163 (retired)
Fabulous Frames dies - 159163 (retired)

.jpg)


.jpg)
.jpg)


.jpg)


.jpg)
.jpg)


- an Embossing Buddy (included with the Embossing Additions Tool Kit - item 159971) to pounce over the cardstock prior to stamping and embossing to help ensure that the embossing powder would not stick to areas outside of the stamped areas;
- VersaMark Ink (item 102283) for stamping all images/sentiments to be embossed - Stampin' Up! advises that the VersaMark Ink is expected to be back in stock the week of January 1, 2024;
- gold embossing powder from Stampin' Emboss Powders-Metallics (item 155555);
- a very fine dry paint brush to carefully brush away excess embossing powder prior to heat setting (a small brush is also included in the Embossing Additions Tool Kit); and
- specialized heat tool (Heat Tool - item 129053) to heat/activate the embossing powder.
The three Santa images were fussy cut from the Online Exclusive Traditions of St. Nick 12" x 12" Designer Series Paper (item 162355), and the edges sponged with Pecan Pie ink (item 161665), The die cut snowflakes were all cut from Basic White Thick cardstock (item 159229) using the snowflake dies from the Chic dies (item 158815) - I also used the smallest snowflake die to cut the center of one of my "poinsettias". The poinsettias were cut using the five-petal flower dies from the Paper Florist dies (item 161284), and I scrunched up the die cut cardstock flowers with my fingers before gluing the flower sections together.

Chic dies - 158815
.jpg)
Paper Florist dies - 161284
All evergreen branches were cut using the Joy of Noel dies (item 161965).
.jpg)
Joy of Noel dies - 161965
The non-embossed sentiments were stamped using Stazon Jet Black Ink (item 101406). For the sentiments I used the following stamp sets:
- "Wishing you abundant joy & peace" - Perched In A Tree (item 159791);

- "'Tis The Season", and "All Is Merry & Bright" - Brightest Glow (item 159542);

- "Christmas is better together" - Beary Cute (item 162016);

- "Merry Christmas", and "Peace On Earth" - Regal Reindeer (item 159722); and

- "To: From:" - Joy of Noel (item 161959).

For the additional die cut foliage I used the Paper Florist dies, the Grove dies (item 157844), and, for the berry sprigs the Tree Rings dies (item 159888) - the "berries" were cut using the small double circle die from the Joy of Noel dies. The deer were also cut using the Grove dies.
.jpg)
Grove dies - 157844
.jpg)
Tree Rings dies (also includes Hybrid Embossing Folder) - 159888
For the two die cut bows I used the Mini Pocket Envelope dies (item 159167) - for both bows I trimmed off the ribbon ends of the second die - using only the upper straight section to wrap around the center of the bows.
.jpg)
Mini Pocket Envelope dies - 159167
On with the projects!


For my first project I began with a thrift store wood frame with a 6 1/2" x 4 1/2" opening - a few scars on the frame added to the vintage look I wanted for this project! To complete the project I used the following additional supplies:
- for the background panel a 5" x 7" (back opening frame dimensions) piece of Mossy Meadow patterned paper from the Traditions of St. Nick Designer Series Paper;
- Mossy Meadow cardstock (item 133676) for the die cut foliage;
- Pecan Pie cardstock (item 161717) for the die cut "berries";
- watercolour paper for the sentiment flag - cut using the Nested Essentials dies (item 161597) after sentiment was stamped. - sponged with Pecan Pie ink (item 161665), spritzed with water (Stampin' Spritzers - item 126185) and blotted dry with paper towel - additional Pecan Pie ink sponged around edges. After gluing the sentiment flag to the Santa image I glued the foliage to the flag before attaching the entire assembly to the backing panel using Stampin' Dimensionals (item 104430) behind the Santa image and sentiment flag; and
.jpg)
Nested Essentials dies - 161597
- Wink of Stella Clear Glitter Brush (item 141897) to add a little sparkle to the foliage and Santa's fur trim.


To cut the Basic Black cardstock (item 121045) frame for this Santa tag I pulled out a set of retired dies - the Fabulous Frames dies (item 159163).
.jpg)
I used the following additional supplies to complete the tag:
- the two smallest circle dies from Stylish Shapes dies (item 159183) to cut the circle frame hanger - I cut one frame, cut it in half and glued together the halves with wrong sides together. The half-circle frame hanger was glued to the back of the frame after the embossed panel was glued to the back of the frame. To finish the back of the frame I cut and glued to the back a 4 7/8" x 3 5/8" piece of Basic Black cardstock - to which I can add a panel for a personalized message to the tag's recipient;

Stylish Shapes dies - 159183
- Craft Stampin' White Ink (item 147277) - sponged around the edges of the frame and half-circle frame hanger;
- for the embossed back panel a just shy of 4 7/8" x 3 5/8" piece of Very Vanilla Thick cardstock (item 144237) embossed using the Distressed Tile 3D Embossing Folder (item 162189). Using one of the Blending Brushes (item 153611) I applied Pecan Pie ink (item 161665) around the edges of the embossed panel, and then added splatters using a Basic Black Stampin' Write Marker (item 162481) by flicking the brush tip against the marker lid;
- watercolour paper for the die cut evergreen branches - coloured using Mossy Meadow ink (item 147111) applied with one of the Blending Brushes;
- watercolour paper for the sentiment tag - cut using the Tailor Made Tags dies (item 155563) after the sentiment was stamped. Pecan Pie ink was applied using one of the Blending Brushes, then tag was spritzed with water (Stampin' Spritzers - item 126185) and blotted dry with paper towel;
.jpg)
Tailor Made Tags dies - 155563
- after gluing tag to Santa image and evergreen branches to tag I attached the completed assembly to the background panel using Stampin' Dimensionals (item 104430) behind Santa and tag; and
- Black & Very Vanilla 3/8" Large Check Ribbon (item 161982) for the bow - secured to the top of the frame with dab of Multipurpose Liquid Glue.
Through the half-circle frame hanger I looped a length of recycled plain jute twine.


To complete this 5" x 3 7/8" top-fold card I used the following additional supplies:
- Pecan Pie cardstock (item 161717) for the card base, and for the 4 5/8" x 3 1/2" embossed panel, embossed using the Timber 3D Embossing Folder (item 156406). Before embossing I dragged my Early Espresso ink pad (item 147114) across the raised design on one inside panel of the embossing folder. After embossing I applied additional Early Espresso ink to the panel using one of the Blending Brushes (item 153611);
- Basic Black cardstock (item 121045) for the 4 3/4" x 3 5/8" front matting panel (edges scraped with the blade of my craft knife), and 4 7/8" x 3 3/4" inside matting panel;
- Very Vanilla Thick cardstock (item 144237) for the 4 3/4" x 3 5/8" inside panel;
- watercolour paper for the tag and sentiment label. Using one of the Blending Brushes and the small check design mask from Artistic Mix Decorative Masks (item 159178) I applied Basic Gray ink (item 149165) to the tag - after stenciling I lightly spritzed the tag with water (Stampin' Spritzers - item 126185) and blotted dry with paper towel. After stamping the sentiment I cut the tag using the tag die from Cheerful Daisies dies (item 161296) - and applied Pecan Pie ink (item 161665) using one of the Blending Brushes, lightly spritzed with water (Stampin' Spritzers) and blotted dry with paper towel;
.jpg)
small check design mask from Artistic Mix Decorative Masks - 159178
(set includes five masks)
.jpg)
Cheerful Daisies dies - 161296
- Mossy Meadow cardstock (item 133676) for the die cut evergreen branch;
- Linen Thread (item 104199) looped through the hole in the tag before completed tag glued to embossed panel; and
- three Basic Black dots from Classic Matte Dots (item 158146) added to card front.
I used two mini staples to embellish the ends of the sentiment label.


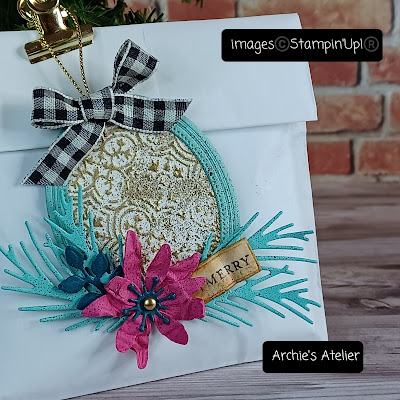
For the oval tag on this glassine bag I used the oval frame die from the retired Fabulous Frames dies (item 159163) to cut the frame from Pool Party cardstock (item 122924), from which I also cut a backing panel for the frame. I sponged the edges of the frame with Pool Party ink (item 147107). For the frame's backing panel I used a trimmed piece from a panel of Very Vanilla Thick cardstock (item 144237) embossed using the Distressed Tile 3D Embossing Folder (item 162189). After embossing I dragged my VersaMark Ink pad across the cardstock panel and then heat embossed using gold embossing powder - was trying for a vintage wallpaper effect! The two evergreen branches were cut from Coastal Cabana cardstock (item 131297), the five-leaf stem and flower center from Pretty Peacock cardstock (item 150880); and the two flower sections for the "poinsettia" from Melon Mambo cardstock (item 115320). For the "Merry" sentiment I used my Basic Black Stampin' Write Marker (item 121045) to "ink" the "Merry" portion on the "Merry Christmas" sentiment stamp and stamped on watercolour paper. The tag was cut using the small tag die included with the Mini Pocket Envelope dies (item 159167) - Pecan Pie ink (item 161665) applied using one of the Small Blending Brushes (item 160518). To distress the tag I tapped the inked tag with a damp finger - causing the marker ink to slightly bleed - and scrunched the tag slightly with my fingers. After assembling the frame I added splatters (covering the tag with a small piece of paper) using my Basic Black Stampin' Write Marker. To the center of the flower I added one large gold dot from Brushed Metallic Dots (item 156506); and to the top of the frame I added a loop of gold trim from Simply Elegant Trim (item 155766), and a Black & Very Vanilla 3/8" Large Check Ribbon (item 161982) bow. The ends of the bow I secured to the frame using rolled up Mini Glue Dots (item 103683). The gold binder clip securing the top of the bag and over which the tag is hung is from my stash.
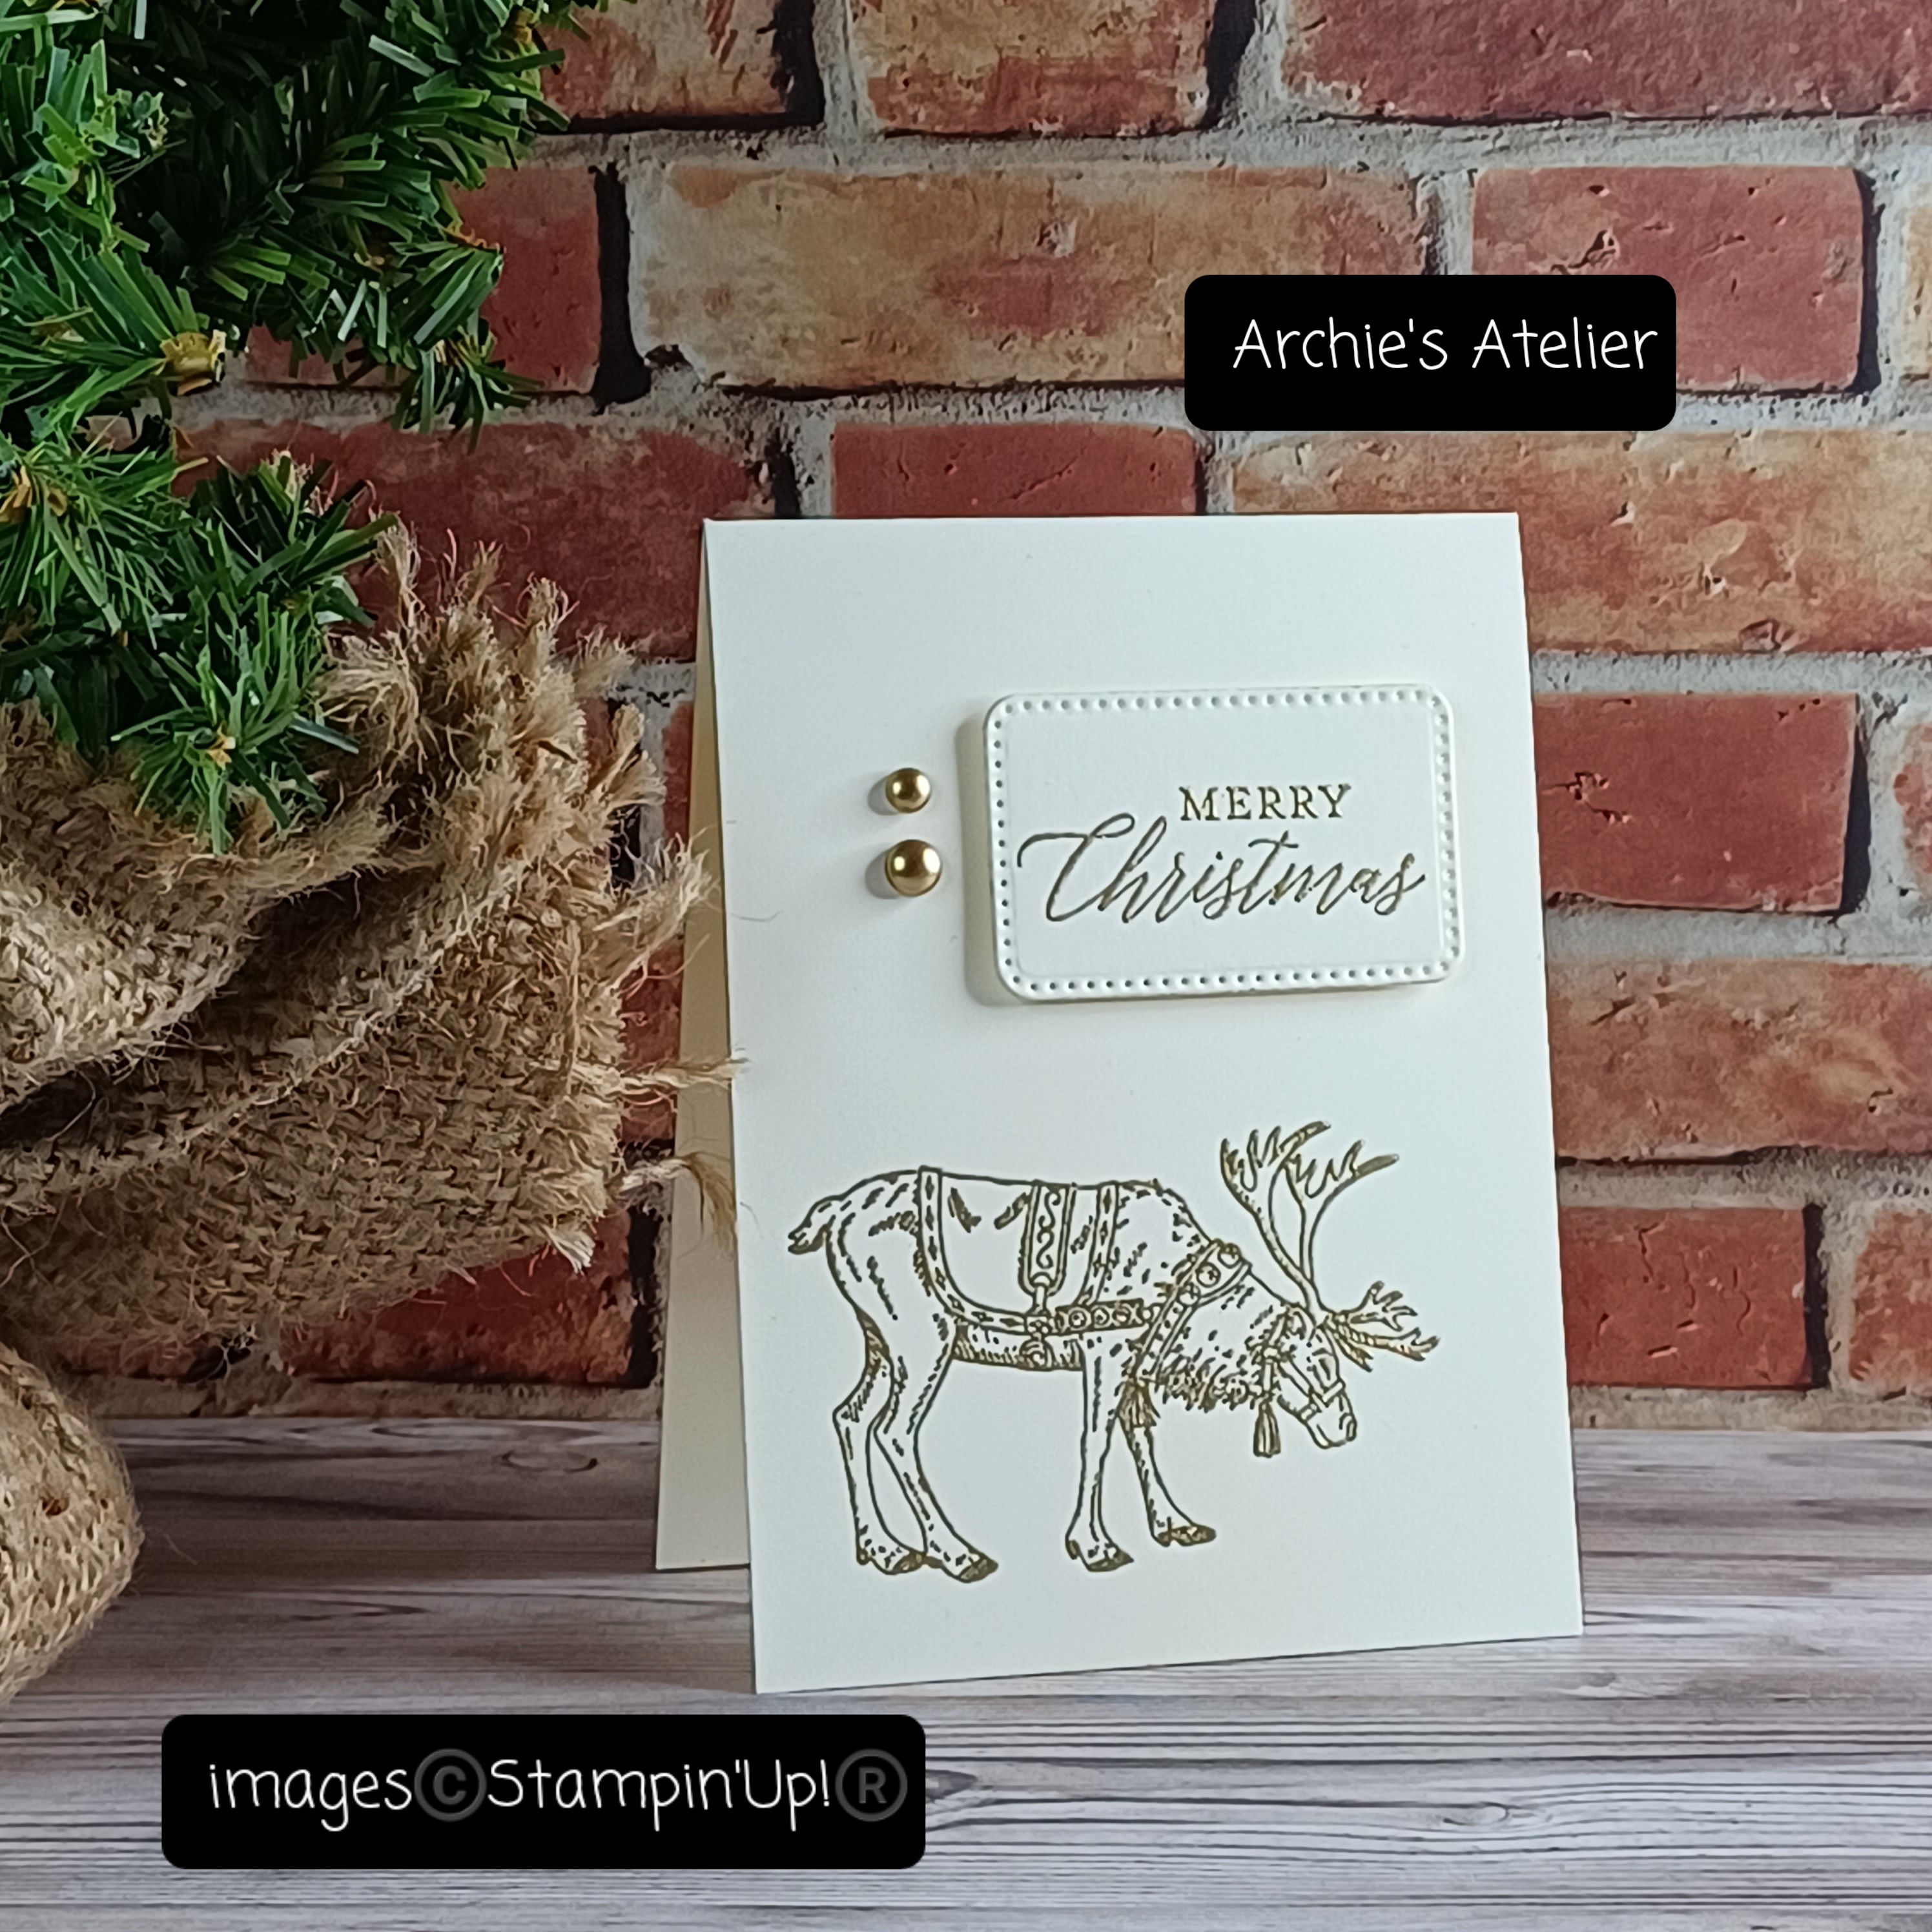
For this 4" x 3" top-fold gift card I used the following additional supplies:
- Very Vanilla Thick cardstock (item 144237) for the card base, and sentiment label;
- Regal Reindeer stamp set for the gold embossed reindeer image and sentiment;
- Nested Essentials dies (item 161597) to cut the sentiment label, which was attached to the card front using Stampin' Dimensionals (item 104430); and
- two gold dots - one of each size - from Brushed Metallic Dots (item 156506) added to card front.


For this very simple small tag I used watercolour paper for the tag (cut using the Tailor Made Tags dies - item 155563) and the stamped, coloured and die cut image. Both the image and the "To: From:" are from the Joy of Noel stamp set, and the image was cut using the co-ordinating Joy of Noel dies. I used Stazon Jet Black Ink to stamp the image as well as the sentiments - to colour the berries I used Real Red ink (item 147084). After gluing the two die cut snowflakes and die cut image to the tag I added sparkle splatters by smacking my Wink of Stella Clear Glitter Brush (item 141897) against my Bone Folder - I also "painted" the tips of the snowflakes with the Wink of Stella Clear Glitter Brush. For the bow tied to the top of the tag I used Black & Very Vanilla 3/8" Large Check Ribbon (item 161982).


.jpg)
Snow Globe Scenes dies - 150655 (retired)
For the base of this snow globe tag I used another retired die set - the Snow Globe Scenes dies (item 150655). Both the snow globe base and the deer were cut from Pecan Pie cardstock (item 161717) that had been embossed using the Timber 3D Embossing Folder (item 156406) inked with Early Espresso ink (item 147114). The globe was cut from watercolour paper using the 2 1/2" diameter circle die from Stylish Shapes dies (item 159183). Over the top three-quarters or so of the circle I applied Misty Moonlight ink (item 153118) using one of the Blending Brushes (item 153611). The two large leaves were cut from Garden Green cardstock (item 102584); the five-leaf and three-leaf stems from Granny Apple Green cardstock (item 146990); and the three "berries" - cut using the plain circle die from Paper Florist dies (item 161284) - from Real Red cardstock (item 102482). Around the base of the globe I wrapped Linen Thread (item 104199), and secured the wrapped strands and the ends of the bow with tiny dabs of Multipurpose Liquid Glue. The sentiment tag was cut from watercolour paper using the Tailor Made Tags dies (item 155563).
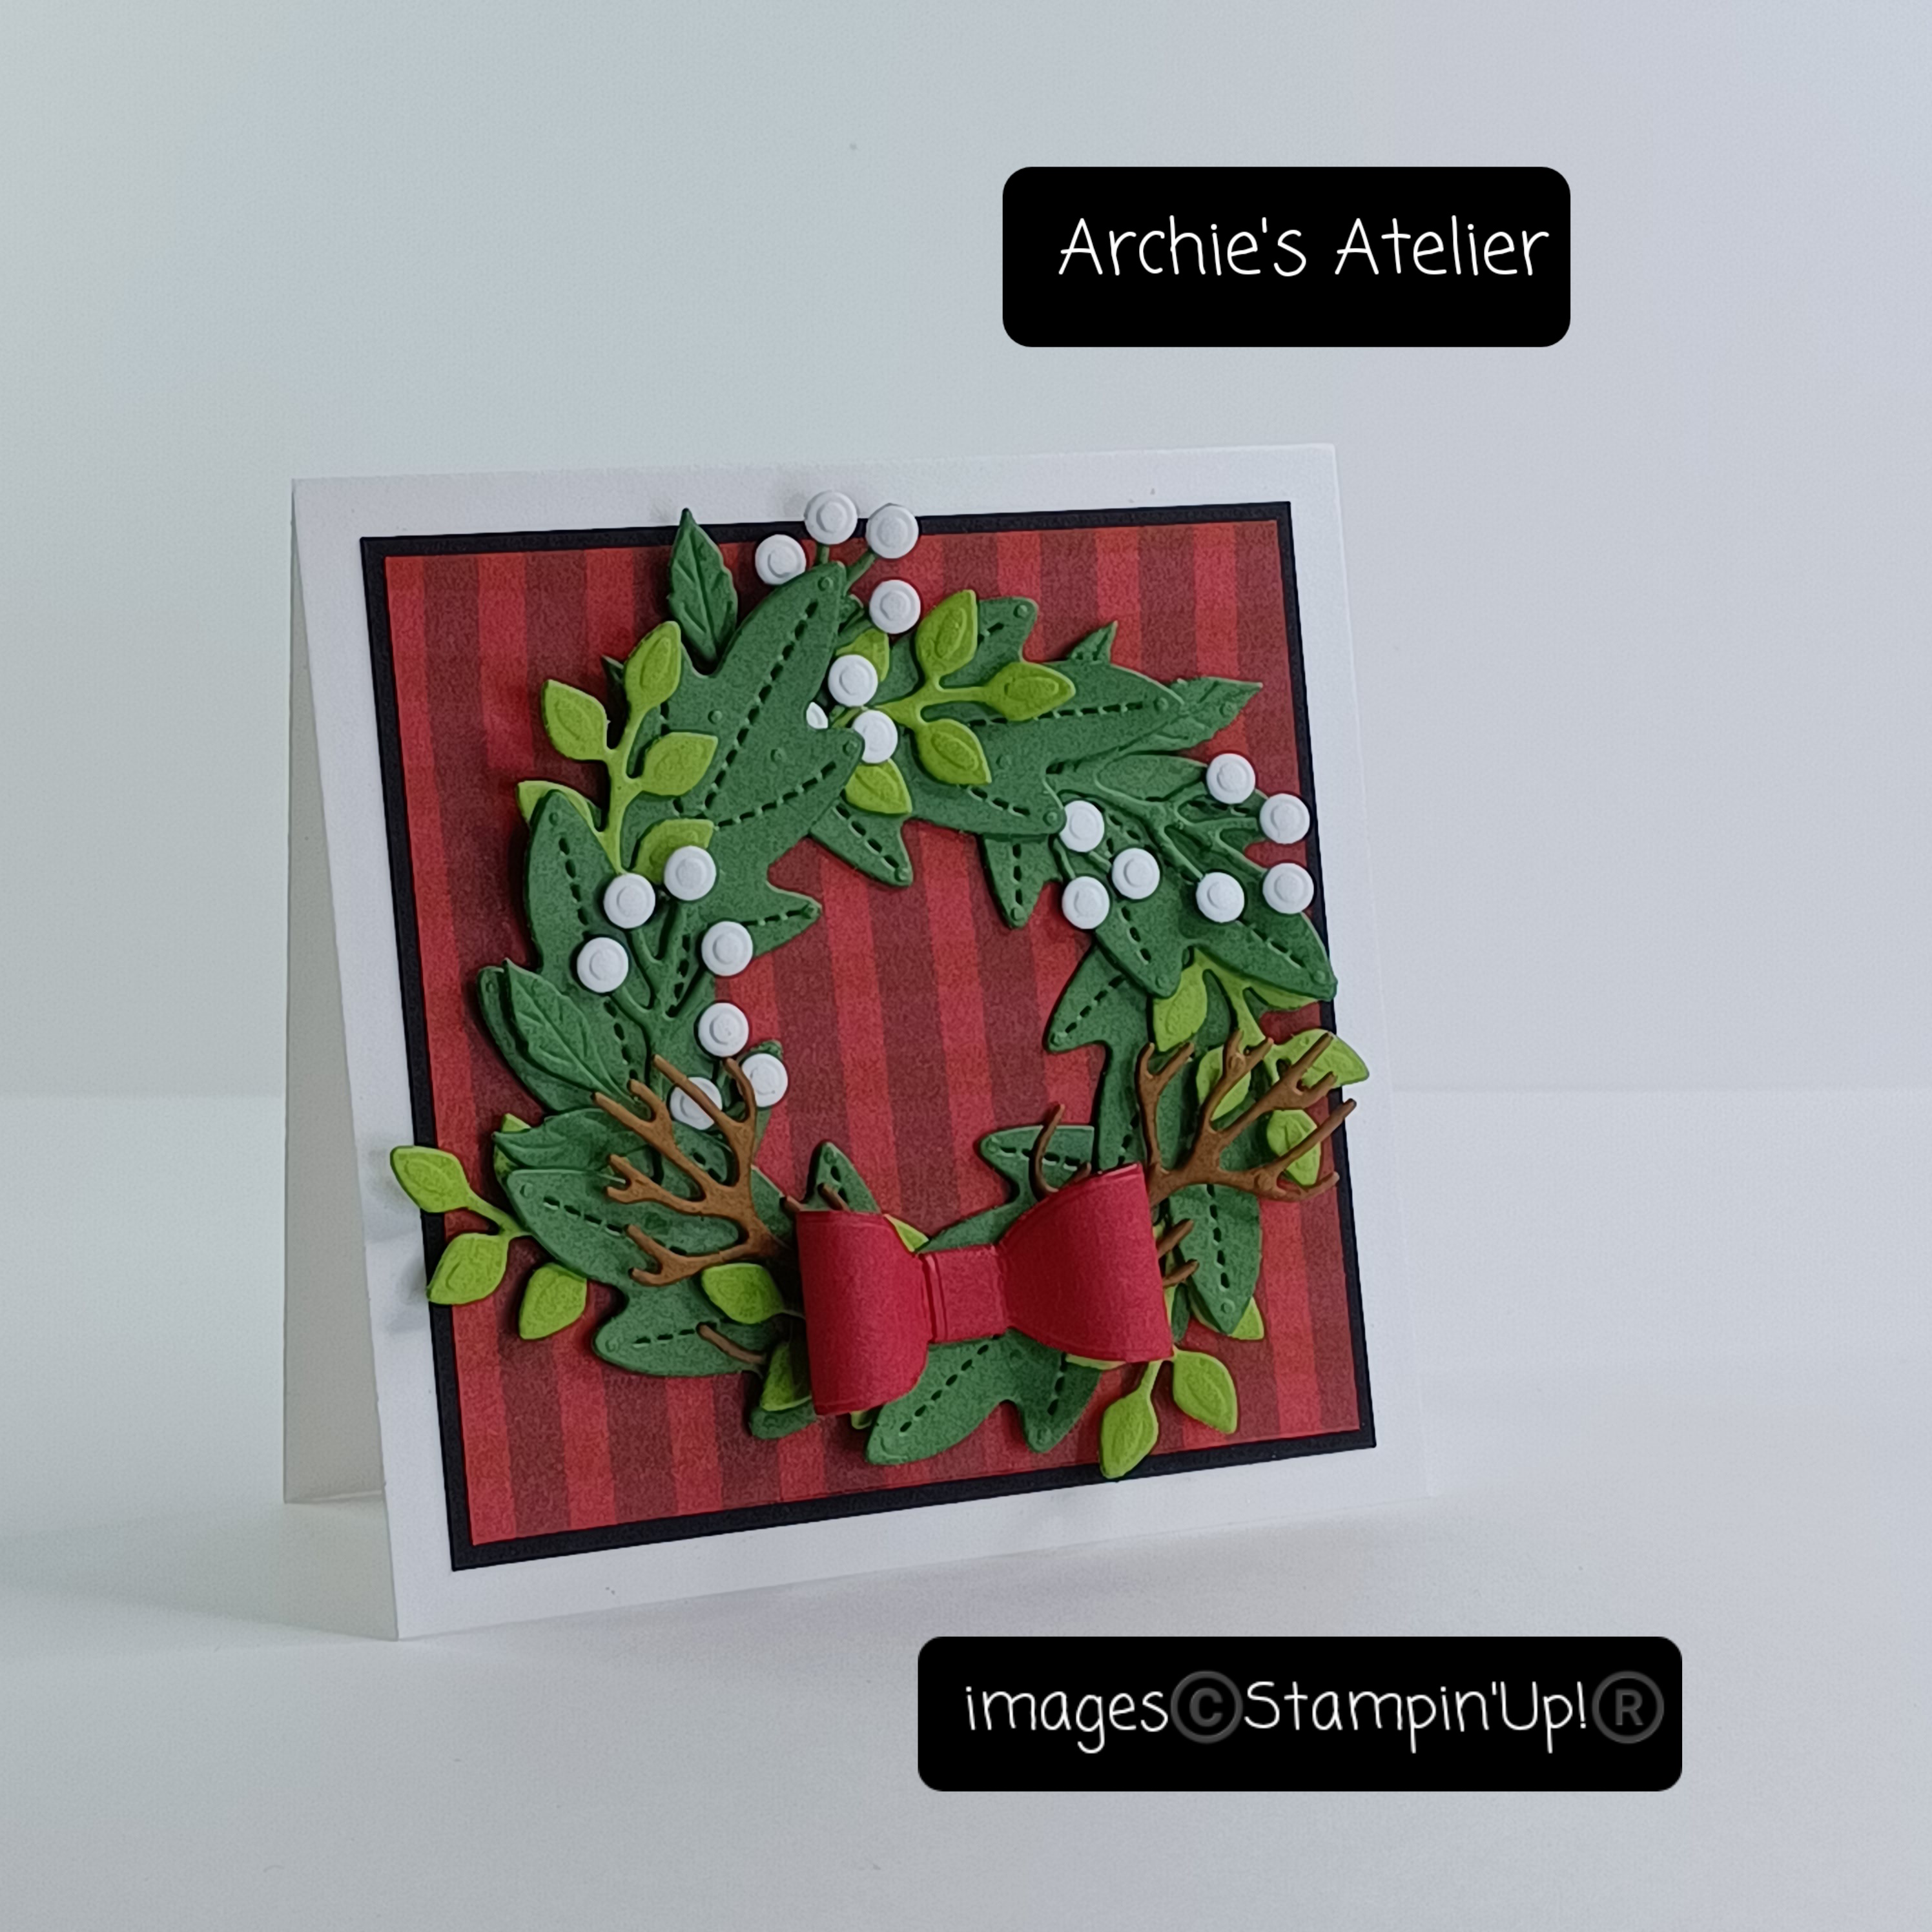

For this 3 1/2" square top-fold card I used the following additional supplies:
- Basic White Thick cardstock (item 159229) for the card base, and the "berries";
- Basic Black cardstock (item 121045) for the 3 1/8" square matting panel;
- Garden Green cardstock (item 102584) for the seven large leaves, and the three berry sprigs;
- Granny Apple Green cardstock (item 146990) for the six five-leaf sprigs;
- Real Red cardstock (item 102482) for the bow;
- Pecan Pie cardstock (item 161717) for the narrow circle frame on which the leaves were arranged - cut using the second and third smallest of the circle dies from Stylish Shapes dies (item 159183) - and the two branches, which were cut using the Beauty Of The Deep dies (item 161236) - branches sponged with Pecan Pie ink (item 161717); and
.jpg)
Beauty Of The Deep dies - 161236
- Real Red patterned paper from Joy of Christmas 12" x 12" Designer Series Paper (item 161958) for the 3" square panel.
And finally . . .
For my last two cards I used the Lighting The Way dies (item 160496) to cut the lanterns - on the first card from watercolour paper (coloured using Basic Gray ink - item 149165 - and Pecan Pie ink - item 161665 - applied using paint brush and water); and on the second card from Basic Black cardstock (item 121045) with Craft Stampin' White Ink (item 147277) sponged around the edges. For both cards the evergreen branches were cut from watercolour paper and coloured using Mossy Meadow ink (item 147111) applied with one of the Blending Brushes (item 153611).
.jpg)
Lighting The Way dies - 160496


Additional supplies used to complete this 5" x 4 1/4" top-fold card:
- Very Vanilla Thick cardstock (item 144237) for the card base, 4 3/4" x 4" embossed panel (embossed using the Distressed Tile 3D Embossing Folder - item 162189), and sentiment circle (cut using the Stylish Shapes dies - item 159183);
- Basic Gray cardstock (item 121044) for the 4 7/8" x 4 1/8" matting panel;
- watercolour paper for the die cut deer - coloured using Pecan Pie ink applied with one of the Blending Brushes;
- sparkle splatters added to the card front before lantern cluster and sentiment circle added by smacking Wink of Stella Clear Glitter Brush (item 141897) against my Bone Folder; and
- Stampin' Dimensionals (item 104430) to attach sentiment circle.


Additional supplies used to complete this 4 1/4" square top-fold card:
- Real Red cardstock (item 102482) for the card base, bow, and poinsettia flower sections;
- Basic Black cardstock (item 121045) for the 3 7/8" square front matting panel, and 4" square inside matting panel;
- Very Vanilla Thick cardstock (item 144237) for the 3 7/8" inside panel;
- Real Red patterned paper from One Horse Open Sleigh 6" x 6" Designer Series Paper (item 162118) for the 3 3/4" square front panel, and 3 3/4" x 1/2" inside strip - all edges sponged with Real Red ink (item 147084); and
- watercolour paper for the sentiment flag and tag - flag cut using the Nested Essentials dies (item 161597), and the tag cut using the Tailor Made Tags dies (item 155563) - using one of the Blending Brushes (item 153611) I applied Pecan Pie ink to both the flag and the tag - for the tag I lightly spritzed with water (Stampin' Spritzers - item 126185) and blotted dry with paper towel.
The black button added to the center of the poinsettia is from my stash.
Thank you for visiting my blog! I had a lot of fun working on these projects - and trying to keep my panic in check!
If you are interested in purchasing any of the available Stampin' Up! products I have used in my projects, and you live in Canada and do not have a Stampin' Up! demonstrator, please do not hesitate to visit my online store found on my website https://archiesatelier.stampinup.net/ at your convenience, or simply click under the "Shop With Me" tab on the right sidebar of my blog, which will take you directly to my website and online store. I very much appreciate your business, and if you need any assistance please do not hesitate to contact me (lmccoyarchie@gmail.com)! The digital versions of both the May 2023-April 2024 Annual Catalogue and the September-December 2023 Mini Catalogue can be accessed at your convenience on my website! When visiting my online store don't forget to check out the great deals on the Clearance Rack as well as the selection of products now available as Online Exclusives - several new products were introduced on November 7, 2023 - including the Garden Meadow Bundle (item 162741), and the very pretty Meandering Meadows 6" x 6" Designer Series Paper (item 162735)!

The Last Chance Promotion featuring the retiring products from the September-December 2023 Mini Catalogue is on now until January 3, 2024. Many of the retiring products are offered at substantial discounts but products will only be available while supplies last - a great opportunity to stock up on some favourites - maybe for some last minute festive projects - and maybe do a little Christmas shopping! A few of the discounts include:
- Stars At Night Hybrid Embossing Folder (item 162006) - 30% off;
- Handcrafted Elements dies (item 162330) - 10% off;
- Sending Cheer stamp set (item 162050) and Sending Cheers dies (item 162052) - each at 40% off;
- Fruitful Blessing dies (item 162209) - 30% off;
- Bag of Bones dies (item 162218) - 10% off
- Cheery Patterns Embossing Folders (item 162287) - 10% off;
- Year To Celebrate stamp set (item 162279) - 40% off;
- Classic Gift Card Envelopes (item 162116) - 30% off;
- Cheers To The Season stamp set (item 162309) - 30% off; and
- Precious Pinecones stamp set (item 162175) - 60% off!

Have fun creating!
Laurel
*It has come to my attention that quite often email correspondence from me is delivered to the recipient's spam or junk mail folder - if you have corresponded with me I have replied so be sure to check your spam or junk mail folder! Thank you!!

Find a quiet spot and try to stay out of trouble!
Comments
Post a Comment