Faux Watercolour With The Inked & Tiled Stamp Set!
Hello! Today I am sharing a few card projects I worked on this week using the Stampin' Up! Inked & Tiled stamp set (item 161158), which is featured in the May 2023-April 2024 Annual Catalogue.
This stamp set is perfect for playing with a faux watercolour technique - a technique that is a lot of fun and a great way to get a watercolour look without a lot of effort! For my projects I inked the stamps using a variety of Classic Stampin' Inks and then lightly spritzed the inked stamp with water using one of the Stampin' Spritzers (item 126185), before stamping on watercolour paper. (Alternate methods are to spritz the paper rather than or in addition to spritzing the inked stamps). The amount of water spritzed onto the inked stamp (and/or paper) will affect how much the ink will pool/bleed/run on the paper - the movement of the ink can be controlled by applying heat from a specialized heat gun/tool (Heat Tool - item 129053) to the stamped image immediately after stamping. When the stamp is inked with multiple colours of ink the water will help blend the colours - adding to the watercolour effect. On a few of the projects I used a fine tipped paint brush to move the wet ink around on the stamped images - filling in petals and flower centers etc. I also applied additional ink, and ink splatters, to and around a few of the stamped images using a paint brush and water.
Just a quick note about the additional standard tools and supplies I used to complete my projects this week:
- Paper Trimmer (item 152392) - for cutting cardstock and paper. Also used to score card fold lines. After folding on the scored lines I burnished the folds using my Bone Folder (item 102300);
- Stampin' Cut & Emboss Machine (item 149653) - for all die cutting and embossing;
- Take Your Pick Tool (item 144107) - the tacky putty tip is very handy for picking up and placing small embellishments; and
- for the main adhesive, Multipurpose Liquid Glue (item 110755).
I used the following die sets:
- Stylish Shapes dies (item 159183) - to cut circles, squares, and banners;
 |
| Stylish Shapes dies - 159183 |
- Nested Essentials dies (item 161597) - to cut large rounded corner image rectangle; and
.jpg) |
| Nested Essentials dies - 161597 |
- Grove dies (item 157844) - to cut the two leafy sprigs from Gold 12" x 12" Foil Sheets (item 132622) for the second card;
Additional supplies to complete this 5 1/8" x 2 3/4" top-fold "lots of love" card (and co-ordinating envelope):
- Pool Party cardstock (item 122924) for the card base, and envelope;
- Basic Black cardstock (item 121045) for the front and inside matting panels;
- Basic White cardstock (item 159276) for the inside panel;
- Sweet Sorbet ink (item 159216), Pecan Pie ink (item 161665), and Mossy Meadow ink (item 147111) to colour the flower image - Pecan Pie and Mossy Meadow inks applied to stamp using Sponge Daubers (item 133773);
- Pool Party ink (item 147107) to apply ink wash around flower image;
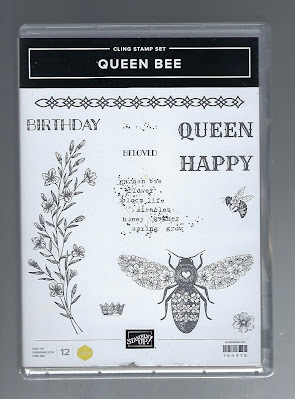
- Pool Party ink and fractured text stamp from Queen Bee stamp set (item 160476 - an Online Exclusive) to second generation stamp over the flower image - I inked the text stamp, stamped once on a piece of scrap paper to remove most of the ink from the stamp, and then stamped over the flower image. The flower image on the inside panel was also second generation stamped using Pool Party ink;
- Basic Black Stampin' Write Marker (item 162481) to add splatters to front image panel and inside panel by flicking the brush tip against the marker lid;
- Stazon Jet Black Ink (item 101406) to stamp the sentiment on watercolour paper - Pool Party ink wash applied over sentiment, dried with heat tool, and then spritzed with water, and blotted dry with paper towel. Banner cut using the Stylish Shapes dies. The larger banner with Mossy Meadow ink was cut (also using the Stylish Shapes dies) from the stem/leaf section of another faux watercolour flower image being consigned to the recycle bin . . . ; and
- white baker's twine from Baker's Twine Essentials Pack (item 155475) tied through the holes of a small black button from my stash.
After trimming the image panel I scraped the edges with the blade of my craft knife.
Using an envelope punch board I made the co-ordinating envelope, and after assembling the envelope I stamped (and added splatters to) the front using Pool Party ink. Around the envelope I tied a bow using White 3/4" Frayed Ribbon (item 158138) - currently available on the Clearance Rack!
For these three notecards I used the single flower image - initially intending the three square images (die cut using the middle square die from Stylish Shapes dies) to be used on a single card . . . all are top-fold cards with Pool Party cardstock (item 122924) used for the card bases; the first card is 4" square, and the other two are 3 3/4" square; I have not used any sentiments (sometimes you just need a blank notecard); and I used Pool Party ink (item 147107) for the colour wash and splatters around the flower images:
Additional supplies to complete the first card:
- Sweet Sorbet ink (item 159216), and Pecan Pie ink (item 161665) for the flower;
- Pool Party cardstock for the embossed square (cut using the second largest square die from Stylish Shapes dies) - prior to die cutting I embossed the cardstock using the Exposed Brick 3D Embossing Folder (item 161600). Although die cutting after embossing slightly flattens the embossed image it does keep the edge detail on the die cut sharp and defined;
- Basic Black cardstock (item 121045) for the matting panels (I scraped the edges of the 2" square image mat with the blade of my craft knife);
- Basic White cardstock (item 159276) for the 3 3/4" square inside panel;
- Real Red patterned paper from the Online Exclusive One Horse Open Sleigh 6" x 6" Designer Series Paper (item 162118) for the 3 7/8" square front panel, and 3 1/4" x 1/2" inside panel strip;
- black & white patterned paper from Zoo Crew 12" x 12" Designer Series Paper (item 161304) for the 2 1/4" x 1 1/4" front strip, and 3" x 3/4" inside panel strip;
- Stampin' Dimensionals (item 104430) to attach the matted image to front panel;
- Gold 12" x 12" Foil Sheets (item 132622) for the two die cut leafy sprigs (cut using the Grove dies); and
- two gold dots from Brushed Metallic Dots (item 156506) added to bottom left corner of front panel.
Additional supplies used to complete the orange flower card:
- Pumpkin Pie ink (item 147086) and Pecan Pie ink (item 161665) for the flower;
- Pool Party ink to stamp the large leaf image on the watercolour paper square (cut using the largest square die from Stylish Shapes dies) - I did not add any water to the leaf stamp prior to stamping;
- Pumpkin Pie patterned paper from Stargazing 12" x 12" Designer Series Paper (item 161175) for the 3 5/8" square front panel, and large banner (one banner cut using the Stylish Shapes dies and cut in half and each end glued so they would show under the image square);
- Basic White cardstock (item 159276) for the 3" square inside panel;
- watercolour paper that had been stamped using the wavy line stamp and Pumpkin Pie ink, then spritzed with water and blotted dry with paper towel, for the inside panel banner - cut using the Stylish Shapes dies;
- Linen Thread (item 104199) - wrapped around the image square before it was adhered to the front panel using Foam Adhesive Strips (item 141825); and
- four Rustic Metallic Adhesive-Backed Dots (item 159082) added to the front panel - one small and one large dot added to each of the upper left and lower right corners.
Additional supplies used to complete the blue flower card:
- Misty Moonlight ink (item 153118) and Pecan Pie ink (item 161665) for the flower;
- Pool Party cardstock for the embossed square (cut using the second largest square die from Stylish Shapes dies) - prior to die cutting I embossed the cardstock using the Exposed Brick 3D Embossing Folder (item 161600);
- Basic Black cardstock (item 121045) for matting square - cut using the largest square die from Stylish Shapes dies;
- Pool Party patterned paper from the Online Exclusive One Horse Open Sleigh 6" x 6" Designer Series Paper (item 162118) for the 3 1/2" x 2 5/16" vertical panel;
- Pecan Pie patterned paper from Glorious Gingham 6" x 6" Designer Series Paper (item 163170) for the 3 3/8" x 1 7/8" horizontal strip;
- Foam Adhesive Strips (item 141825) to attach matted image square to front panel - I coloured the edges of the strips with black Sharpie marker as I had the strips quite close to the edges of the Basic Black cardstock square; and
- Linen Thread (item 104199) for the bow on the upper left corner of image square - ends secured with tiny dabs of Multipurpose Liquid Glue. The small black button glued over the center of the bow was from my stash.
For the last four little cards I used the double flower image again - for the first two cards using Pumpkin Pie ink (item 147086) and Mossy Meadow ink (item 147111) for the flowers and stems (Mossy Meadow ink applied to stamp using one of the Sponge Daubers); and Pecan Pie ink (item 161665) for the flowers on the last two cards. Splatters were added using Pecan Pie ink. All cards are again top-fold cards.
Additional supplies to complete this 4" square "congratulations" card:
- Crumb Cake cardstock (item 120953) for the card base, and sentiment banner;
- Early Espresso cardstock (item 119686) for the 3 7/8" square matting panels (front and inside), and 3 3/8" x 1/8" inside strip;
- Very Vanilla Thick cardstock (item 144237) for the front 3 5/8" square matting panel (edges scraped with the blade of my craft knife), 3 3/4" square inside panel;
- Crumb Cake patterned paper from the Online Exclusive One Horse Open Sleigh 6" x 6" Designer Series Paper (item 162118) for the 3 1/2" square front panel, and 2 3/4" x 1/2" inside panel strip;
- Stazon Jet Black Ink (item 101406) to stamp sentiment - banner then cut using the Stylish Shapes dies;
- Nested Essentials dies to cut image panel;
- Linen Thread (item 104199) - I wrapped a short length twice around the right end of the sentiment banner - adding one of the Mini Glue Dots (item 103683) on the back of the banner to secure the ends of the Linen Thread. I then tied a bow - threading the end of the thread under the double wrap - securing both the center of the bow and the thread ends with tiny dabs of Multipurpose Liquid Glue;
- Stampin' Dimensionals (item 104430) to attach the sentiment banner; and
- three Rustic Metallic Adhesive-Backed Dots (item 159082) added to card front - including one large dot added to left end of sentiment banner.
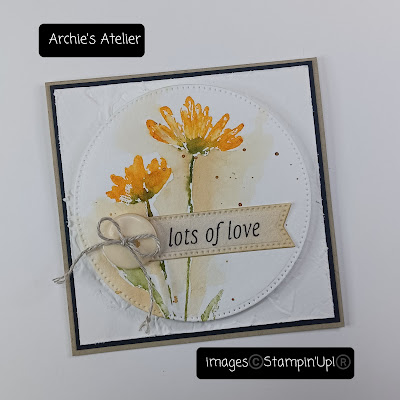
Additional supplies used to complete this 3 1/2" square "lots of love" card:
- Crumb Cake cardstock (item 120953) for the card base;
- Basic Black cardstock (item 121045) for the 3 3/8" square mat;
- Basic White Thick cardstock (item 159229) for the 3 1/4" square embossed panel - embossed using the Painted Texture 3D Embossing Folder (item 154317), and edges scraped with the blade of my craft knife;
- Stazon Jet Black Ink (item 101406) to stamp the sentiment - banner cut using the Stylish Shapes dies, and Pecan Pie ink (item 161665) applied using one of the Small Blending Brushes (item 160518);
- Pecan Pie ink for the colour wash around the flower image;
- Foam Adhesive Strips (item 141825) to attach the image circle - I curved the strips around the back of the circle - adding a few extra strips for support in the center; and
- Linen Thread (item 104199) for the bow tied through the off-white (a very pale Pecan Pie!) button from my stash.
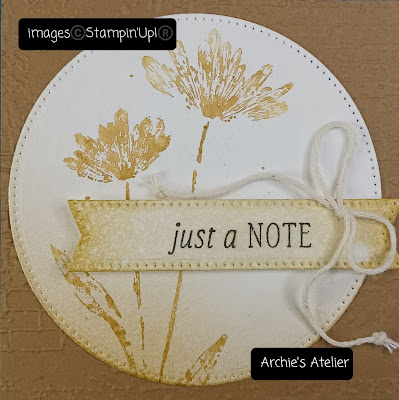
Additional supplies used to complete this 3 1/2" square "just a note" card:
- Pool Party cardstock (item 122924) for the card base;
- Pretty Peacock cardstock (item 150880) for the 3 3/8" square matting panel - edges scraped with the blade of my craft knife;
- Pecan Pie cardstock (item 161717) for the 3 1/4" square embossed panel - embossed using the Exposed Brick 3D Embossing Folder (item 161600);
- Very Vanilla cardstock (item 101650) for the 3 3/8" square inside panel;
- Stazon Jet Black Ink (item 101406) to stamp the sentiment on watercolour paper - banner cut using the Stylish Shapes dies, and Pecan Pie ink applied with one of the Small Blending Brushes (item 160518) - banner lightly spritzed with water and blotted dry with paper towel;
- Stampin' Dimensionals (item 104430) to attach sentiment banner; and
- Very Vanilla baker's twine (Baker's Twine Essentials Pack - item 155475) for bow on sentiment banner - center of bow and ends secured with tiny dabs of Multipurpose Liquid Glue.
And finally . . .
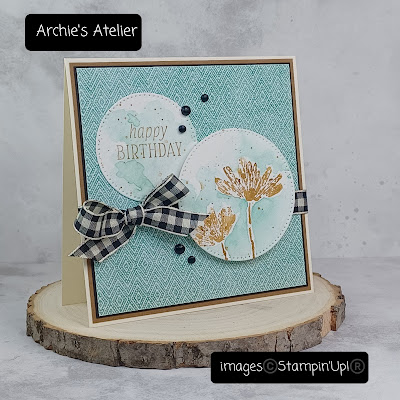
Additional supplies used to complete this 4" square 'happy birthday" card:
- Very Vanilla Thick cardstock (item 144237) for the card base;
- Pecan Pie cardstock (item 161717) for the 3 7/8" square matting panel;
- Basic Black cardstock (item 121045) for the 3 3/4" square matting panel;
- Pool Party patterned paper from the Online Exclusive One Horse Open Sleigh 6" x 6" Designer Series Paper (item 162118) for the 3 11/16" square panel;
- Pecan Pie ink (item 161665) to stamp the sentiment on watercolour paper - sentiment and image circles cut using the Stylish Shapes dies;
- Pool Party ink (item 147107) for the sentiment and image circle colour washes - splatters added using Pecan Pie ink;
- Black & Very Vanilla 3/8" Large Check Ribbon (item 161982) for the bow tied around the front panel of the card; and
- five Basic Black dots from Classic Matte Dots (item 158146) added to card front.
Thank you for visiting my blog! I was having so much fun playing with this stamp set and the faux watercolour technique that I just didn't want to stop!
If you are interested in purchasing any of the available Stampin' Up! products I have used in my projects, and you live in Canada and do not have a Stampin' Up! demonstrator, please do not hesitate to visit my online store found on my website https://archiesatelier.stampinup.net/ at your convenience, or simply click under the "Shop With Me" tab on the right sidebar of my blog, which will take you directly to my website and online store. I very much appreciate your business and if you need any assistance please do not hesitate to contact me (lmccoyarchie@gmail.com)! The digital versions of both the May 2023-April 2024 Annual Catalogue and the September-December 2023 Mini Catalogue can be accessed at your convenience on my website! When visiting my online store don't forget to check out the selection of products available as Online Exclusives as well as the great deals on the Clearance Rack - including the White 3/4" Frayed Ribbon!
If you are interested in joining Stampin' Up! as an Independent Demonstrator consider the great Starter Kit Promotion Stampin' Up! is offering now until October 31, 20231 The 35% Off Or 35% More Promotion celebrating the 35th Anniversary of Stampin' Up! provides two options:
- 35% Off: For $87.75 CDN (35% off the normal cost of the Stampin' Up! Starter Kit) you receive $165.00 CDN worth of Stampin' Up! products - of your choosing - plus free business supplies and free shipping; or
- 35% More: For $135.00 CDN you receive $222.75 CDN worth of Stampin' Up! products - of your choosing - plus free business supplies and free shipping.
Whether you are an avid crafter looking for a nice discount on personal art and crafting supplies or are interested in establishing a home-based business you would be very welcome to join my team as one of "Archie's Arties"!
Have fun creating!
Laurel
*It has come to my attention that quite often email correspondence from me is delivered to the recipient's spam or junk mail folder - if you have corresponded with me I have replied so be sure to check your spam or junk mail folder! Thank you!!


.jpg)


Laurel, I just love your projects! I'm a fellow Demo from South Carolina and you've certainly inspired me!
ReplyDeleteThank you very much!
DeleteVery beautiful!
ReplyDeleteThank you very much!
Delete