Two More Autumn Projects!
Hello! Today I am sharing two more autumn-themed projects I worked on this week combining die cuts made with several current Stampin' Up! dies and one of my favourite retired dies - the Giving Gifts dies (item 156563) which was featured in the July-December 2021 Mini Catalogue - the small leaves make great additions to autumn-themed projects! For the first project I cut the frame openings using another favourite retired die - Stitched Rectangles (item 151820).
Below is a photo showing the die cuts used (with the exception of the Stitched Rectangles) - top row: Grove (item 157844); second row: Tree Rings (item 159888); third row Giving Gifts; and fourth row - left to right: Reindeer (item 159727) for the evergreen tree and small hill; Chic (item 158815) for the solid oak leaf; Around The Bend (item 160649) for the double leaf; and Bag of Bones (item 162218) for the fence:
Grove dies - 157844
Tree Rings dies (also includes Hybrid Embossing Folder) - 159888
Giving Gifts - 156563 (retired)
Reindeer dies - 159727
Chic dies - 158815
Around The Bend dies - 160649
Bag of Bones dies - 162218
Stitched Rectangles dies - 151820 (retired)
Just a quick summary of the standard tools and supplies used to complete this week's projects:
- Paper Trimmer (item 152392) - for cutting cardstock and paper;
- Stampin' Cut & Emboss Machine (item 149653) - for all die cutting;
- Paper Snips Scissors (item 103579) - for fussy cutting the stamped truck image on my second project;
- Take Your Pick Tool (item 144107) - the paper piercer and tacky putty tips are a great help in picking up and placing small die cuts and embellishments; and
- for the main adhesive, Multipurpose Liquid Glue (item 110755).
All my die cuts were cut from watercolour paper - I coloured them with Classic Stampin' Inks - applying the inks using a combination of Blending Brushes (item 153611), Small Blending Brushes (item 160518), and watercolouring (picking up and applying the ink using a paint brush and a little water). To get the white dots on some of the leaves and the hills I lightly spritzed the coloured die cuts with water (Stampin' Spritzers - item 126185) and blotted dry with paper towel. The truck image on my second project was stamped on watercolour paper using Stazon Jet Black Ink (item 101406) - I stamped the "fill in" truck body image using Pecan Pie ink (item 161665) and then added additional colour using a paint brush and a little water.
On with the projects!
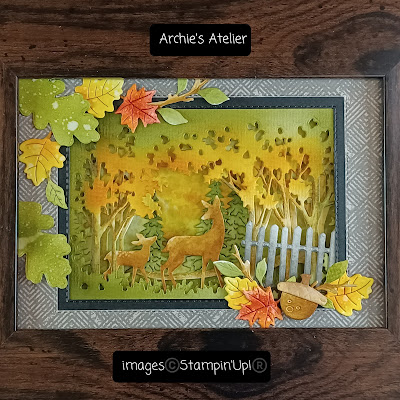
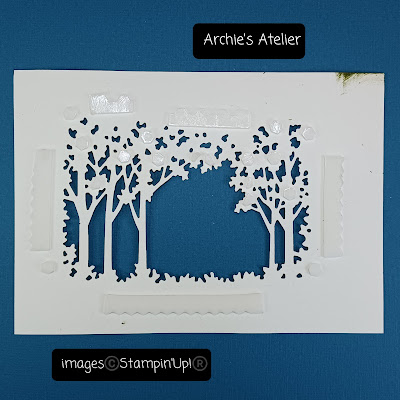
For this decor project I used a frame I picked up at Dollarama - outside dimensions 9 1/2" x 7 1/2" with an 6 1/2" x 4 1/2" front opening. I began by cutting two of the forest frames using the Grove dies - colouring each using Mossy Meadow ink (item 147111), Pecan Pie ink, Daffodil Delight ink (item 147094), and Pumpkin Pie ink (item 147086) - the top frame I made a little darker than the bottom frame. I trimmed the two frames so that they would be slightly offset when placed on top of each other to help create an illusion of depth. I cut two of the hills using the Reindeer dies - colouring one with Pecan Pie ink and one with Mossy Meadow ink. The three evergreen trees cut using the Reindeer dies were coloured using Blending Brushes and Mossy Meadow ink. The two deer were coloured using Pecan Pie ink - for the white spots on the back of the fawn I applied little dabs of clean water with a fine-tipped paint brush and then blotted dry with a paper towel. For the fence I used Basic Gray ink (item 149165); for the top and base of the acorn Pecan Pie ink; for the leafy branches Pecan Pie and Mossy Meadow ink; for the maple leaves Real Red ink (item 147084), Pumpkin Pie ink, and Pecan Pie ink; and for the additional leaves Mossy Meadow, Pecan Pie, Daffodil Delight, and Pumpkin Pie inks.
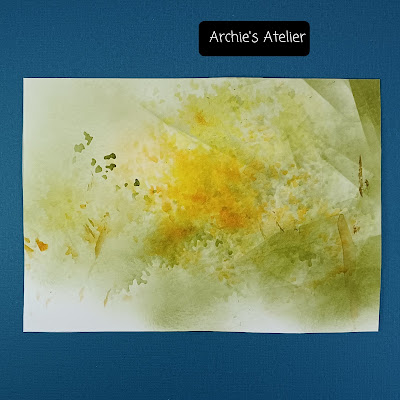
For the background panel I actually used a piece of watercolour paper over which I had unintentionally been inking the die cuts - it was a happy accident that the overlapping and blurred Daffodil Delight, Pumpkin Pie and Mossy Meadow ink "blotches" appeared like distant fall foliage when I placed the Grove frames over the top!
To assemble the main scene I began by adding Stampin' Dimensionals (item 104430) to the back of the bottom frame and attaching it to the backing panel. I then tucked in the two hills and three evergreen trees.
I used foam tape on the back of the top panel - I wanted to save my Stampin' Dimensionals for smaller areas!
The two deer were tucked in between the two frames and secured using Stampin' Dimensionals (trimmed as required to fit). The fence was glued to the bottom side of the top panel.
Autumn Road Trip Scrapbook Page
From my parents' road trip west many years ago this photo was taken from the Terry Fox Monument just outside of Thunder Bay, Ontario overlooking the Trans-Canada Highway and Lake Superior - an iconic autumnal scene!
For this 6 5/8" square scrapbook page I used the following additional supplies:
- Basic Black cardstock (item 121045) for the 6 5/8" square and 5 7/8" square panels (all edges scraped with the blade of my craft knife);
- Very Vanilla Thick cardstock for the 6 3/16" square panel (all edges scraped with the blade of my craft knife);
- watercolour paper for the 5 3/4" square frame - window cut using the largest square die from Stylish Shapes dies (item 159183) - after cutting the window opening I applied a watercolour ink wash using Pecan Pie ink (item 161665). After the wash had dried I applied a little more Pecan Pie ink using one of the Blending Brushes and the small checked design mask from Artistic Mix Decorative Masks (item 159178) - there are five different mask designs included - and the splatter stamp from the Quiet Meadow stamp set (item 155082). I then sponged Basic Gray ink (item 149165) around the edges and lightly spritzed with water (Stampin' Spritzers - item 126185) and blotted dry with paper towel - a little additional Basic Gray ink was then sponged around the edges;
Stylish Shapes dies - 159183
small checked design from Artistic Mix Decorative Masks - 159178
- Trucking Along stamp set (item 162299 - an Online Exclusive) for the truck image - coloured using Pecan Pie ink, Basic Gray ink, and Pool Party ink (item 147107);
- Next Destination stamp set (item 161427) for the sentiment - this was stamped on watercolour paper using Memento Tuxedo Black Ink (item 132708). Before the ink had completely dried I rubbed over it with a piece of paper towel to slightly blur and soften the ink and help add to the distressed look - I also scraped the edges of the trimmed strip with the blade of my craft knife;
- Grove dies to cut from watercolour paper the five-leafed sprig - coloured using Mossy Meadow ink (item 147111);
- two leafy branches, double leaf, maple leaf, additional three leaves, and evergreen tree die cuts - these were "left overs" from my first project;
- Stampin' Dimensionals (item 104430) and Foam Adhesive Strips (item 141825) to attach the truck image and sentiment strip;

- Rustic Metallic Adhesive-Backed Dots (item 159082) - two small dots added to the centers of the truck wheel hubcaps; and
- Black & Very Vanilla 3/8" Large Check Ribbon (item 161982) for the bow tied around the completed page.
Thank you for visiting my blog! As always I had a lot of fun working on these projects!
If you are interested in purchasing any of the available Stampin' Up! products I have used in my projects, and you live in Canada and do not have a Stampin' Up! demonstrator, please do not hesitate to visit my online store found on my website https://archiesatelier.stampinup.net/ at your convenience, or simply click under the "Shop With Me" tab on the right sidebar of my blog, which will take you directly to my website and online store. I very much appreciate your business and if you need any assistance please do not hesitate to contact me (lmccoyarchie@gmail.com)! The digital versions of both the May 2023-April 2024 Annual Catalogue and the September-December 2023 Mini Catalogue can be accessed at your convenience on my website!
On September 6, 2023, Stampin' Up! released five new Designer Series Papers - including Christmas designs - which will be available, while supplies last, as Online Exclusives. These new designs, together with all additional products available as Online Exclusives (including the Trucking Along stamp set/Trucking Along Bundle), can be viewed in my online store under the Online Exclusives category.
Be sure to also check out at your convenience in my online store all the offerings on the Clearance Rack, and details about the Free Virtual Card Making Event Stampin' Up! is offering on October 7, 2023!
Have fun creating!
Laurel
*It has come to my attention that quite often email correspondence from me is delivered to the recipient's spam or junk mail folder - if you have corresponded with me I have replied so be sure to check your spam or junk mail folder! Thank you!!


.jpg)
.jpg)
.jpg)
.jpg)

.jpg)
.jpg)
.jpg)


.jpg)


Comments
Post a Comment