Fall Is In The Air!
Hello! With the autumnal equinox now only a day away I am finely getting into the fall spirit (after jumping ahead to Christmas!), and today I am sharing two fall-themed projects I worked on this week - a small decor project and a little autumnal treat bag (Thanksgiving and the time to enjoy a little caramel candy treat is fast approaching!).
For my projects this week I combined several current Stampin' Up! products with a few retired products. I think it is important not to overlook dies and stamp sets - or Designer Series Paper and embellishments - that we may already have in our collections. When gathering supplies for a project I always enjoy looking through my stash to see what older products will co-ordinate with the new products! This week I made good use of the small leaf dies included with the Giving Gifts dies (item 156563) - featured in the July-December 2021 Mini Catalogue; the Rustic Harvest 12" x 12" Designer Series Paper (item 159638) from the July-December 2022 Mini Catalogue (and one of the items from the Clearance Rack earlier this summer); and Cajun Craze and Old Olive patterned papers from the 6" x 6" Designer Series Paper Assortments-Regals (item 159256) from the May 2022-April 2023 Annual Catalogue, and which was an item added earlier this week to the Clearance Rack (but now unfortunately sold out).
Additional dies and stamp sets used on these projects:
- Chic dies (item 158815) - solid and skeleton oak leaves;
Chic dies - 158815
- Grove dies (item 157844) - three and five leaf sprigs;
Grove dies - 157844

- Mini Pocket Envelope dies (item 159167 - Online Exclusive) - small tag;
- Tree Rings dies (item 159888) leafy branches and acorn (the same die is used to cut the bottom of the acorn and the top of a mushroom);
- Aspen Tree dies (item 159798) - foliage cluster;
- Dainty Delight dies (item 160674) - Queen Anne's Lace;
- Cheerful Daisies dies (item 161296) - daisies (3 pieces); and
- Basic Borders dies (item 155558) - curved "hill" die cut used on pumpkin;
Basic Borders dies - 155558
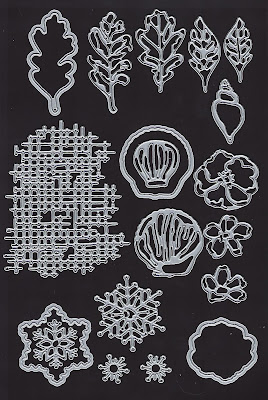
The photo below shows the die cuts used - dies from top left to right: Giving Gifts (three leaves - two rows), Chic, Cheerful Daisies, Grove, Aspen Tree, Dainty Delight, Mini Pocket Envelope, and Tree Rings (bottom row):
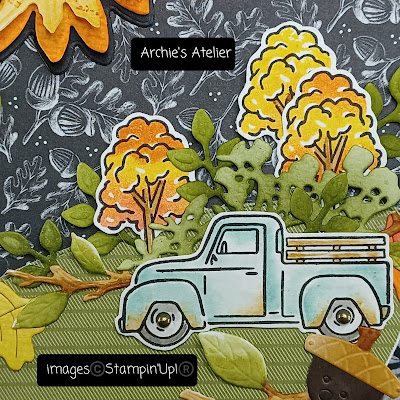
For the truck and tree images, and "Farm Fresh" sentiment I used the Trucking Along stamp set (item 162299 - an Online Exclusive); and for the fractured text image stamped on the watercolour paper sheets used to cut the top two layers for the daisies, the Gorgeously Made stamp set (item 161193).
A quick note about the standard tools and supplies used to complete the projects:
- Paper Trimmer (item 152392) - for cutting cardstock and paper - also used to score cardstock fold lines for treat holder, and to score the lines on the treat holder handles. The treat holder fold lines were burnished using my Bone Folder (item 102300) to ensure crisp folds;
- Stampin' Cut & Emboss Machine (item 149653) - for all die cutting;
- Paper Snips Scissors (item 103579) - for fussy cutting truck and trees; and
- for the main adhesive, Multipurpose Liquid Glue (item 110755).
With the exception of the solid bases for the daisies and the bottom of the acorn, all die cuts were cut from watercolour paper and coloured using Classic Stampin' Ink Pads. The daisy bases and acorn bottom were cut from cardstock.
I coloured two pieces of watercolour paper - applying the ink using Blending Brushes (item 153611) - on one sheet using Pumpkin Pie ink (item 147086), and Daffodil Delight ink (item 147094) on the other. I spritzed both pieces with water (Stampin' Spritzers - item 126185) and blotted dry with paper towel. I stamped over each sheet using Pumpkin Pie ink and the fractured text stamp from the Gorgeously Made stamp set. After die cutting the daisy pieces I applied additional Pumpkin Pie ink to the die cut pieces using one of the Blending Brushes. I coloured the flower centers on the middle layer using Pecan Pie Ink Refill (item 161669) - applying the ink using a paint brush and a little water- I squeezed a small drop of the Ink Refill into the lid of the ink pad.
The truck and tree outline images were stamped on watercolour paper using Stazon Jet Black Ink (item 101406). I used the fill-in stamp for the trees - inking the stamp with Daffodil Delight ink and then adding a little Pumpkin Pie ink to the stamp using one of the Sponge Daubers (item 133773). The trunks of the trees were coloured using Pecan Pie ink (item 161665). To colour the truck I used Pool Party ink (item 147107), Pecan Pie ink, and Basic Gray ink (item 149165).
To colour the additional die cuts I used Pecan Pie ink, Old Olive ink (item 147090), Mossy Meadow ink (item 147111), Daffodil Delight ink, Real Red ink (item 147084), and Pumpkin Pie ink. I used both Blending Brushes and paint brushes and water to apply the inks. The acorn stem was painted with Pecan Pie Ink Refill, which was also used to help darken the trunks of the leafy branches.
Pumpkin Plaque
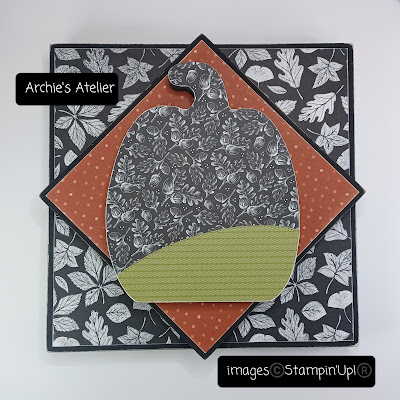
There are three wood pieces in this project: the 8" x 8" x 1" deep base panel and 1/2" deep MDF pumpkin are both from Dollarama; and the 5 7/8" square x 3/8" deep wood panel is from Dollar Tree (the square panel from a hinged "There's No Place Like Home" decor piece). I removed the paper coverings from the pumpkin and smaller panel and painted the edges of all pieces (and a bit of border on the front of the two panels) with black gesso (black paint would be fine too) - lightly sanding the edges.

Using a very fine grit sandpaper I sanded the edges of all the Designer Series Paper used to cover the panels and pumpkin: the two black & white patterned papers used on the larger panel and the pumpkin are from the Rustic Harvest DSP; and the Cajun Craze patterned paper used on the smaller panel and the Old Olive patterned paper for the hill on the pumpkin are from the 6" x 6" Designer Series Paper Assortments-Regal.
I used a strong white glue to secure the smaller panel to the base panel, and the pumpkin to the smaller panel.
The solid bases of the two large flowers were cut from Basic Black cardstock (item 121045); the bottom of the acorn from Early Espresso cardstock (item 119686); and I added two small Rustic Metallic Adheisve-Backed Dots (item 159082) to the centers of the truck's wheels. An older model pickup truck seems to be an iconic autumnal image - especially when you add a little Pecan Pie rust!
Farm Fresh Treat Holder
This treat holder measures 3 1/2" tall (excluding handles) x 2 1/2" wide x 1 1/2" deep and I used the following additional supplies to complete it:
- an 8 1/2" x 5" piece of Basic Black cardstock (item 121045) for the base, scored on the 8 1/2" side at 1 1/2", 4", 5 1/2", and 8" (1/2" tab is the glue tab); scored on the 5" side at 1 1/2" (bottom flaps); scored again on the 8 1/2" side with 1 1/2" tab along the bottom at 3/4" and 4 3/4" down to 2 1/2" from top edge (I placed a ruler over the cardstock lined up at the 2 1/2" mark). Using a ruler and stylus I scored the two lines from the bottom of each of the two vertical score lines out to the bottom corners of the side panels;
- for each handle - a 6 1/2" x 1/2" piece of Basic Black cardstock - scored along the length three times at 1/8" intervals. Using a pencil I marked 1/2" from each end of both handles - this was the glue guide. I slightly curled each handle using my Bone Folder - this helps prevent any unwanted sharp creases in the handles when gluing them to the inside of the front and back panels of the base of the treat holder;
- a 2 3/8" x 3 3/8" piece of Pebbled Path patterned paper from Fresh As A Daisy 12" x 12" Designer Series Paper (item 161289) for the front matting panel;
- a 2 1/4" x 3 1/4" piece of Basic Black cardstock for the front panel;
- Early Espresso cardstock (item 119686) to cut the bases of the two daisies;
- Copper Clay cardstock (item 161721) for the sentiment tag - sentiment stamped using Stazon Jet Black Ink; and
- Copper Clay 3/8" Textured Ribbon (item 161629) for the handle bow.
Looking forward to caramel candy treats for Thanksgiving!
Always good to make a few extras . . .
Thank you for visiting my blog! As always I had a lot of fun working on these projects!
If you are interested in purchasing any of the available Stampin' Up! products I have used in my projects, and you live in Canada and do not have a Stampin' Up! demonstrator, please do not hesitate to visit my online store found on my website https://archiesatelier.stampinup.net/ at your convenience, or simply click under the "Shop With Me" tab on the right sidebar of my blog, which will take you directly to my website and online store. I very much appreciate your business and if you need any assistance please do not hesitate to contact me (lmccoyarchie@gmail.com)! The digital versions of both the May 2023-April 2024 Annual Catalogue and the September-December 2023 Mini Catalogue can be accessed at your convenience on my website!
On September 6, 2023, Stampin' Up! released five new Designer Series Papers - including Christmas designs - which will be available, while supplies last, as Online Exclusives. These new designs, together with all additional products available as Online Exclusives, can be viewed in my online store under the Online Exclusives category.
Be sure to also check out at your convenience in my online store all the offerings on the Clearance Rack. More items were added to the Clearance Rack earlier this week but products are only available while supplies last and while several of the newly added items have already sold out there are still plenty of great deals - including several Christmas die sets!
Have fun creating!
Laurel
*It has come to my attention that quite often email correspondence from me is delivered to the recipient's spam or junk mail folder - if you have corresponded with me I have replied so be sure to check your spam or junk mail folder! Thank you!!

.jpg)

.jpg)
.jpg)
.jpg)
.jpg)
.jpg)
.jpg)
.jpg)


Comments
Post a Comment