A Few Haunting Halloween Treat Holders!

Hello! Last weekend I picked up a box of mini Halloween chocolate bars at a great price so I had to work on a few treat holders this week before I sampled too many of the treats! For these five treat holders - two variations of a rectangular window box with openings at both ends and a back scene panel, and three variations of a basic milk carton - I used the Bag of Bones Bundle (item 162219) - which includes the Bag of Bones photopolymer stamp set (item 162216) and the co-ordinating Bag of Bones dies (item 162218) - and which is featured in the upcoming Stampin' Up! September-December 2023 Mini Catalogue that launches on September 6, 2023. Although the Bag of Bones dies, and consequently the Bundle, will not immediately be available for ordering Stampin' Up! advises that both are expected to be available the week of September 11, 2023 - so not too long to wait! 💀

Bag of Bones stamp set - 162216
(Bundle - 162219)
.jpg)
Bag of Bones dies - 162218
(Bundle - 162219)

The images and dies from the Bundle also co-ordinate nicely with the retired Frightful Tags dies (item 156492) from the July-December 2021 Mini Catalogue. For my projects I used the spiderweb, witch's hat, and circle dies (circle die to cut the "Eat, Shriek, And Be Scary" sentiment circle for the small milk carton treat holder). We shouldn't forget about older stamp and die sets - or Designer Series Papers - in our collections and it is a lot of fun to mix and match the old with the new! I also used in my projects some of the retired Rustic Harvest 12" x 12" Designer Series Paper (item 159633) and Gingham Cottage 12" x 12" Designer Series Paper (item 159651) - both from the July-December 2022 Mini Catalogue and both of which I recently picked up from the Clearance Rack!

Frightful Tags dies - 156492
I also used the following current stamp and die sets in this week's projects:
- Lighting The Way stamp set (item 160868) - leafy sprigs stamped around the edge of the back panel on the "Return of the Sheriff" treat box;

- Quiet Meadow stamp set (item 155082) - I used the splatter stamp on the "Return of the Sheriff" background panel;

- Crafting With You dies (item 161225) - I used the small star die to cut the sheriff's star from a small scrap of Gold Foil (12" x 12" Sheets) - item 132622;
.jpg)
Crafting With You dies - 161225
- Grove dies (item 157844) - to cut all leafy sprigs;
.jpg)
Grove dies - 157844
- Basic Borders dies (item 155558) - to cut the Mossy Meadow patterned Rustic Harvest DSP "hill" on the "Bone-Jour" treat box back panel;
.jpg)
Basic Borders dies - 155558
- Dainty Delight dies (item 160674) - to cut small flowers and flower centers;
.jpg)
- Nested Essentials dies (item 161597) - the smallest hexagon die used to cut the window in the top of the "Return of the Sheriff" box;
.jpg)
Nested Essentials dies - 161597
- Natural Prints dies (item 158800) - label die used to cut the window in the top of the "Bone-Jour" box;
.jpg)
- Mini Pocket Envelope dies (item 159167 - an Online Exclusive) - the small oval die used to cut the "Bone-Jour" and "Boo to you!" sentiment ovals; and
.jpg)
- Stylish Shapes dies (item 159183) - circle dies used to cut the "Eat, Shriek, And Be Scary" white embossed sentiment circle, and DSP matting circle for small Basic Black milk carton treat holder;

For the milk carton treat holders I used black clothespins found at Dollarama/Dollar Tree. The bows, tied with ribbon from my stash, were adhered to the clothespins using Multipurpose Liquid Glue (110755).
Just a quick note about standard tools and supplies used for this week's projects:
- Paper Trimmer (item 152392) - for cutting all paper and cardstock - can also be used for scoring fold lines;
- stylus and scoreboard (Simply Scored Scoring Tool - item 122334) - for scoring cardstock fold lines - to ensure crisp folds I also burnished the folds using a Bone Folder (item 102300); and
- for the main adhesive, Multipurpose Liquid Glue (item 110755).
For the heat embossed skeleton and sentiment on the medium milk carton treat holder I also used the following embossing supplies:
- Embossing Buddy (included in the Embossing Additions Tool Kit - item 159971) to rub over the cardstock before stamping/embossing;
- VersaMark Ink (item 102283);
- white embossing powder from Stampin' Emboss Powders-Basics (item 155554); and
- heat gun (Heat Tool - item 129053).
On with the projects!


For each box I used a 7" x 6 1/2" piece of Basic Black cardstock (item 121045) - scored on the 7" side at 1/2'; 1 1/2", 5 1/2" and 6 1/2"; and scored on the 6 1/2" side at 2", 3", 5", and 6" (1/2" tab is the glue tab). I have included template photos to show scoring and trimming:


I used a small corner rounder punch to round the corners on the top panels end flaps. I glued the DSP panel to the top panel (all DSP panels cut 1/8" smaller than the corresponding cardstock panels) and then die cut the window openings. On the inside of the top panel behind the window openings I glued a piece of acetate (Window Sheets - item 142314) trimmed just shy of 4" x 2". I then glued DSP panels to the front and top side panels; glued the bottom side flaps to the inside of the bottom panel, and completed assembly of the box. Before gluing the back panels (also cut from Basic Black cardstock) to the back of the box I adhered the inked/stamped or DSP panels. For the "Return of the Sheriff" I also glued on the fence sections before gluing the completed back panel to the back of the box.
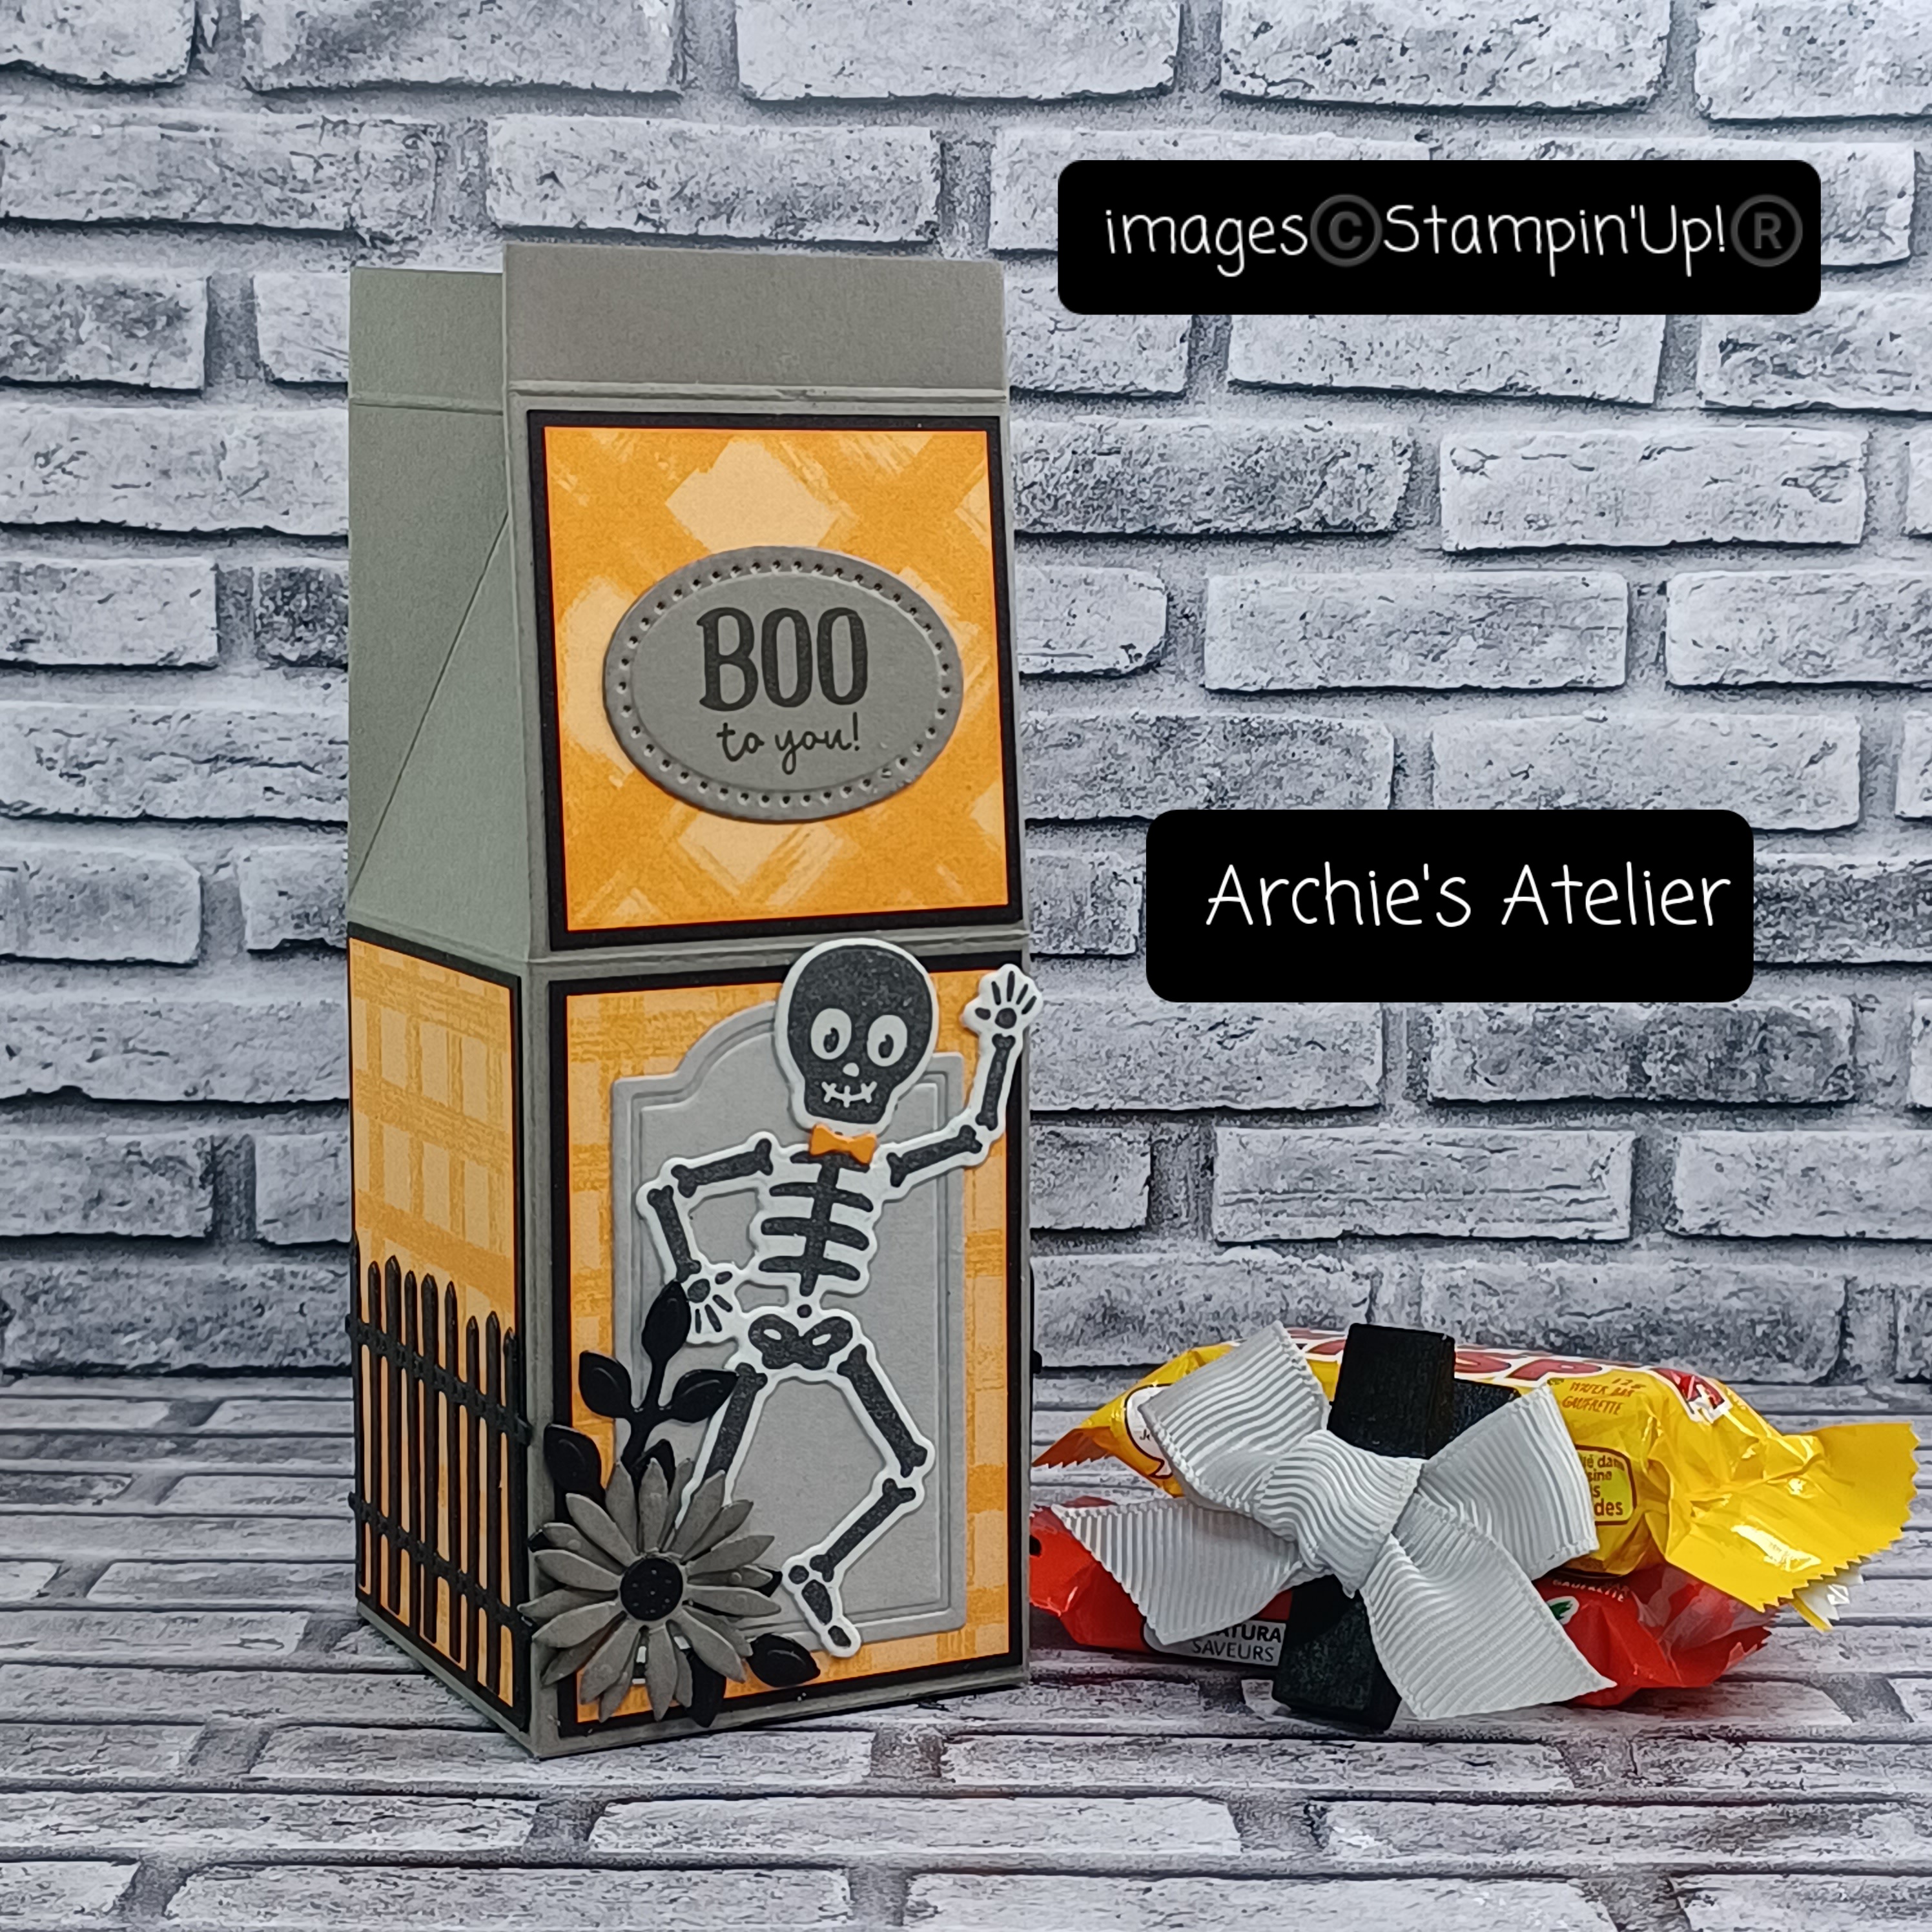
I used Basic White Thick cardstock (item 159229) for the die cut tombstones, tomb "door", and fences; for "Bone-Jour", the stamped and die cut skeletons, and die cut foliage; and, for "Return of the Sheriff", the inked/stamped background panel, and die cut hat and boots. The large tombstones and fences were coloured with Basic Gray ink (item 149165) and Pecan Pie ink (item 161665) - the ink applied using Blending Brushes (item 153611). For "Return of the Sheriff" I also spritzed the large inked tombstone with water (Stampin' Spritzers - item 126185), blotting dry with paper towel - and the hat and boots were coloured with Pecan Pie ink, applied with Blending Brushes. The Sheriff skeleton was stamped on Pebbled Path cardstock (item 161722) using Craft Stampin' White Ink (item 147277) - with the ink applied to the stamp using one of the Sponge Daubers (item 133773). The foliage for "Bone-Jour" was coloured using Old Olive ink (item 147090) and Mossy Meadow ink (item 147111) - also applied using Blending Brushes; and the skeletons were stamped using Basic Gray ink - with additional Basic Gray ink sponged over the images after die cutting. The "Boo to you!" and "Bone-Jour" sentiments were both stamped on Pebbled Path cardstock using Stazon Jet Black Ink (item 101406).
For the inked/stamped background panel for "Return of the Sheriff" I started by cutting a 2 1/8" circle from a full coverage sticky note using a circle die from Stylish Shapes dies, ensuring there was plenty of space on the sticky note around the die cut circle. I used the piece of sticky note with the die cut circle opening as a stencil over the Basic White Thick cardstock panel - applying Pool Party ink (item 147107) to the panel using one of the Blending Brushes. After removing the stencil I covered the inked moon with the die cut sticky note circle and applied Basic Gray ink to the panel using Blending Brushes. I removed the sticky note circle and applied more Basic Gray ink around the edges of the moon; stamped the leafy stems (using Stazon Jet Black Ink), and stamped the splatters using the Quiet Meadow stamp set and Pool Party ink and then Basic Gray ink and then a few using Stazon Jet Black Ink. Trying to create a super blue moon!
I cut the Sheriff's scarf from a small scrap of Pecan Pie patterned Glorious Gingham 6" x 6" Designer Series Paper (item 163170), sponging the edges with Pecan Pie ink. The Sheriff was adhered to the back panel using Mini Stampin' Dimensionals (item 144108). The DSP panels for the Sheriff's box were cut from the Gingham Cottage DSP. Hopefully a few chocolates will help put meat on the Sheriff's bones!


For "Bone-Jour" I cut the daisies from watercolour paper - colouring them using Gorgeous Grape watercolour pencil (Watercolour Pencils-Assortment 2 - item 149014) and Basic Gray ink (sponged on the petal tips). The flower centers were cut from Basic Black cardstock.
The tomb "door" was cut from Pebbled Path cardstock that had been embossed using the Timber 3D Embossing Folder (item 156406) inked with Memento Tuxedo Black Ink pad (item 132708). After die cutting I sponged additional Basic Gray ink around the edges.


I used a double layer of Stampin' Dimensionals (item 104430) to attach the "door" (with the skeleton glued to the edge) to the large tombstone.


The beret was cut from Basic Black cardstock, and the bow tie from Pumpkin Pie cardstock (item 105177). I sponged a little Craft Stampin' White Ink around the edges of the beret, and a little Basic Gray ink around the edges of the bow tie. For the door's handle I used a die cut bat (Basic Black cardstock) and for the knob a small Basic Gray dot from Classic Matte Dots (item 158146). Around the edges of the "Bone-Jour" sentiment oval I sponged a little Memento Tuxedo Black Ink.


The box portions of these three milk carton treat holders measure 2" and 2 7/8" tall and all are 2" wide x 2" deep and all are basically 2 4 6 8 designs.
For the smallest milk carton I used a 6" x 8 1/2" piece of Basic Black cardstock (item 121045) - scored on the 8 1/2" side at 2", 4", 6", and 8" (1/2" tab is the glue tab); scored on the 6" side at 2", 4", and 5 1/2"; and scored again on the 8 1/2" side (with 1/2" section along the top edge) at 3" and 7" (I used a ruler and stylus to make the diagonal score lines from the bottom of the 3" and 7" score lines out to the corners of the panels below).

For the medium milk carton I used a 6 7/8" x 8 1/2" piece of Basic Gray cardstock (item 121044) - scored on the 8 1/2" side at 2", 4", 6", and 8" (1/2" tab is the glue tab); scored on the 6 7/8" side at 2", 4 7/8", and 6 3/8"; and scored again on the 8 1/2" side at 3" and 7" (with the 1/2" section along the top edge). The diagonal score lines from the bottom of the 3" and 7" score lines made as above.
For the large milk carton I used a 7 3/8" x 8 1/2" piece of Pebbled Path cardstock (item 161722) - scored on the 8 1/2" side at 2', 4", 6", and 8" (1/2" tab is glue tab); scored on the 7 3/8" side at 2", 4 7/8", and 6 7/8"; and scored again on the 8 1/2" side (with 1/2" section along the top edge) at 3" and 7" - with the diagonal score lines made as above.


Additional supplies to complete smallest milk carton treat holder:
- Basic White Thick cardstock (item 159229) for the sentiment circle - sentiment stamped using Stazon Jet Black Ink (item 101406);
- Basic Black Stampin' Write Marker (item 162481) to add splatters to sentiment circle by flicking brush tip against marker lid;
- black & white patterned paper from Zoo Crew 12" x 12" Designer Series Paper (item 161304) for the six DSP panels - each cut 1/8" smaller than corresponding cardstock panels;
- Pumpkin Pie patterned paper from Stargazing 12" x 12" Designer Series Paper (item 161175) for the matting circle;
- Basic Black cardstock for the die cut foliage; and
- three Basic Gray dots from Classic Matte Dots (item 158146) added to die cut leafy stem.


Additional supplies to complete the medium milk carton treat holder:
- Basic Black cardstock (item 121045) for the stamped/embossed skeleton and sentiment circle, witch's hat, and six matting panels - each cut 1/8" smaller than corresponding box cardstock panels,;
- Melon Mambo cardstock (item 115320) for the die cut shoes and bow tie - how scary can a skeleton wearing Melon Mambo shoes and bow tie be?;
- Craft Stampin' White Ink (item 147277) to sponge edges of witch's hat and shoes;
- :Lemon Lime Twist patterned paper from Stargazing 12" x 12" Designer Series Paper (item 161175) for the four lower DSP panels - cut 1/8" smaller than Basic Black cardstock matting panels; and
- Lemon Lime Twist patterned paper from Masterfully Made 12" x 12" Designer Series Paper (item 161192) for the two upper DSP panels - cut 1/8" smaller than Basic Black cardstock matting panels.


Additional supplies to complete the final, and largest, milk carton treat holder:
- Basic Black cardstock (item 121045) for the six matting panels - cut 1/8" smaller than corresponding box cardstock panels - and die cut foliage, fences, and flower centers;
- Pebbled Path cardstock (item 161722) for the die cut flowers and sentiment oval (sentiment stamped using Stazon Jet Black Ink - item 101406);
- Basic White Thick cardstock (item 159229) for the stamped and die cut skeletons - stamped using Stazon Jet Black Ink;
- Pumpkin Pie cardstock (item 105117) for die cut bow ties;
- Gray Granite cardstock (item 146983) for the two small tombstones; and
- Pumpkin Pie patterned paper from Gingham Cottage DSP for the six DSP panels - each cut 1/8" smaller than corresponding Basic Black cardstock matting panels.
Thank you for visiting my blog! I certainly had a lot of fun working on these projects - and am looking forward to making a few more Halloween treat holders before I "sample" too many more of the Halloween treats!
If you are interested in purchasing any of the available Stampin' Up! products I have used in my projects, and you live in Canada and do not have a Stampin' Up! demonstrator, please do not hesitate to visit my online store found on my website https://archiesatelier.stampinup.net/ at your convenience, or simply click under the "Shop With Me" tab on the right sidebar of my blog, which will take you directly to my website and online store. I very much appreciate your business! The digital version of the May 2023-April 2024 Annual Catalogue is available for browsing at your convenience on my website - and the digital version of the September-December 2023 Mini Catalogue will be available on September 6, 2023!

On September 6, 2023, Stampin' Up! will also be releasing five new Designer Series Papers - including Christmas designs - which will be available, while supplies last, as Online Exclusives. As of September 6, 2023, these new designs can be viewed in my online store under the Online Exclusives category.
Be sure to also check out at your convenience in my online store all the offerings on the Clearance Rack - there are certainly some great deals - like the Splendid Stems dies at just $11.25 CDN! - but products are only available while supplies last!
Have fun creating!
Laurel
*It has come to my attention that quite often email correspondence from me is delivered to the recipient's spam or junk mail folder - if you have corresponded with me I have replied so be sure to check your spam or junk mail folder! Thank you!!

What to do when pink bunny and brown dog move into your favourite bed . . .

Comments
Post a Comment