A Few Christmas Projects!

Hello! Today I am sharing a few Christmas projects I worked on this week - I haven't forgotten about Fall - I just was in the mood for playing with a few of my Stampin' Up! Christmas stamp and die sets, and Designer Series Paper! And as crafters we know it is never too early to start our Christmas projects!
For my projects this week I combined a few new Christmas products (Joy of Christmas 12" x 12" Designer Series Paper - item `61958, and the Joy of Noel Bundle - item 161967 - that includes the Joy of Noel stamp set - item 161959 - and co-ordinating Joy of Noel dies - item 161965 - stamp set and dies can also be purchased separately - that are all featured in the September-December 2023 Mini Catalogue - and the Online Exclusive One Horse Open Sleigh 6" x 6" Designer Series Paper - item 162118); with Christmas products from the May 2023-April 2024 Annual Catalogue (Brightest Glow stamp set - item 159542, and the Regal Reindeer stamp set - item 159722); a Christmas die set from last year that is currently available on the Clearance Rack (Window dies - item 159756); and non-Christmas stamps and dies including the Online Exclusive Nested Friends stamp set (item 160322), co-ordinating Nested Friends dies (item 160488), and Mini Pocket Envelope dies (item 159167); and the Crafting With You dies (item 161225), Tree Rings dies (item 159888), Nested Essentials dies (item 161597), and Stylish Shapes dies (item 159183) all from the Annual Catalogue.

.jpg)
Joy of Noel dies - 161965
(Bundle - 161967)


.jpg)
Window dies - 159756

.jpg)
Nested Friends dies - 160488
.jpg)
Mini Pocket Envelope dies - 159167
.jpg)
Crafting With You dies - 161225
.jpg)
Tree Rings dies - 159888 (also includes Hybrid Embossing Folder)
.jpg)
Nested Essentials dies - 161597

Stylish Shapes dies - 159183
Just a quick summary of the standard tools and supplies I used to complete this week's projects:
- Paper Trimmer (item 152392) - for cutting paper and cardstock;
- stylus and scoreboard (Simply Scored Scoring Tool - item 122334) - for scoring cardstock fold lines - to ensure sharp clean folds I also burnished the folds with my Bone Folder (item 102300);
- Stampin' Cut & Emboss Machine (item 149653) - for all die cutting;
- Paper Snips Scissors (item 103579) - sharp little scissors that are great for fussy cutting images (I chose to fussy cut the reindeer rather than using the co-ordinating Reindeer dies - item 159727), and trimming the DSP window backing panels. Stampin' Up! advises that the Paper Snips Scissors should again be available for ordering the week of September 18, 2023; and
- for the main adhesive, Multipurpose Liquid Glue (item 110755).
I used Stazon Jet Black Ink (item 101406) to stamp all images on watercolour paper, and used Classic Stampin' Ink pads (ink applied using a paint brush and a little water) to colour the images. I also used Stazon Jet Black Ink to stamp the sentiments - with the exception of "Noel" for which I used Real Red ink (item 147084) - overstamping "Noel" with the "Joyous" using Stazon Jet Black Ink. I used watercolour paper for the die cut pine branches (cut using the Joy of Noel dies), and "mistletoe" berry sprigs and leafy branches (both cut using the Tree Rings dies). I coloured the pine branches by applying Lost Lagoon ink (item 161678) and Mossy Meadow ink (item 147111) with Blending Brushes (item 153611). The stems of the "mistletoe" berry sprigs were watercoloured using Old Olive ink (item 147090) and Mossy Meadow ink (item 147111), and the entire sprigs were painted with clear glitter nail polish from Dollarama that I used as a substitute for my Wink of Stella Clear Glitter Brush (item 141897) that had run out! The leafy branches were watercoloured using Old Olive ink, Mossy Meadow ink, and Pecan Pie ink (item 161665).
On with the projects!
Christmas Star Gift Box


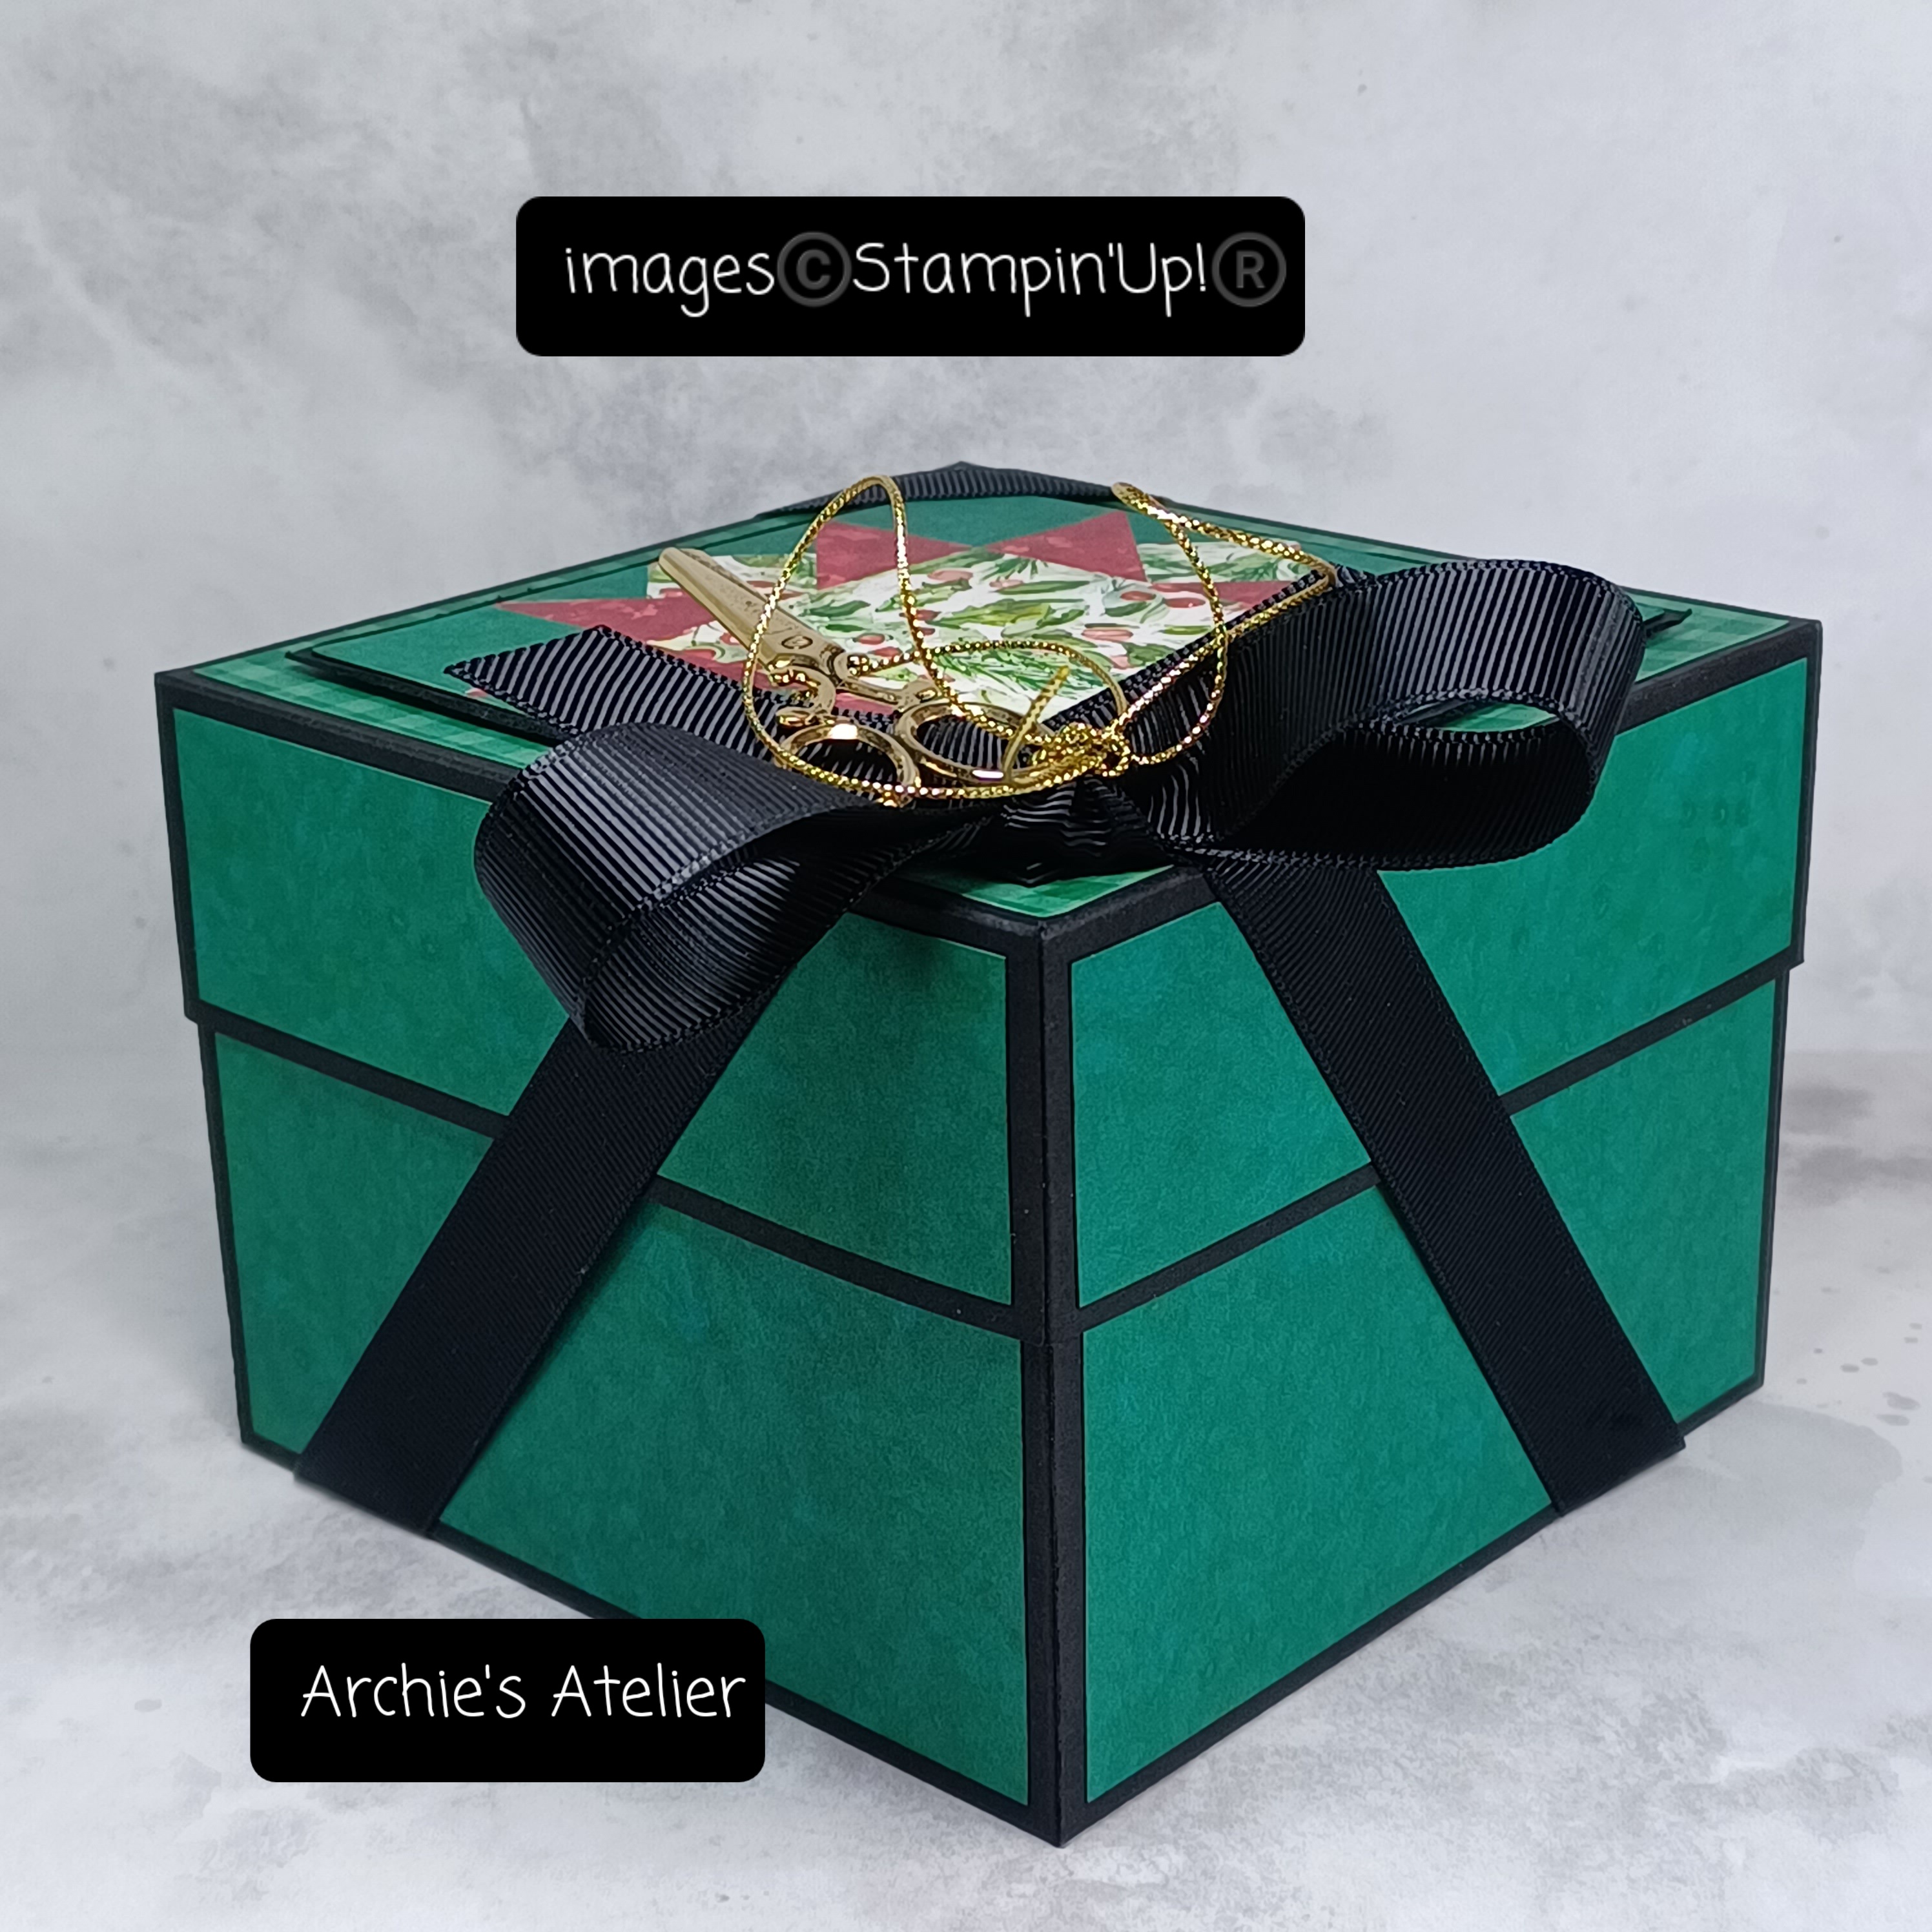

Not a quilter by any stretch of the imagination but I persist with paper quilt blocks - hopefully practice will someday make perfect! This lidded box measures 3 1/2" tall x 4 3/4" wide x 4 3/4" deep. To construct the base of the box I did use the retired Basic Black 12" x 12" cardstock (item 124267) that was featured in the July-December 2022 Mini Catalogue. Another colour of cardstock co-ordinating with the DSP could certainly be substituted for the Basic Black. For the box I cut the cardstock 11 3/4" x 11 3/4" and scored at 3 1/2" on all four sides. For the lid I cut a piece of Basic Black cardstock (item 121045) 7 13/16" x 7 13/16" and scored at 1 1/2" on all four sides. To strengthen the box (and to neaten the inside) I glued support panels to the inside sides and bottom of the box - these additional Basic Black cardstock panels were cut slightly smaller than the sides and bottom of the box.
For the DSP panels for the top and sides of the lid, and all sides of the box I cut pieces of Joy of Christmas 12" x 12" Designer Series Paper (item 161958) to be 1/8" smaller than the corresponding cardstock panels. I also used the Joy of Christmas DSP for the Christmas Star block: a 2" square for the center; four 1" squares of Real Red patterned DSP, each cut in half diagonally; four 1" squares of Shaded Spruce patterned paper for the corner squares; and two 1" squares of each of the Shaded Spruce and center square patterned papers - each cut in half diagonally and then cut in half again for the quarter triangle pieces. I glued the DSP pieces to a piece of grid paper, which I then glued to a piece of cardstock before trimming, and then matting with a piece of Basic Black cardstock, cut to allow a 1/8" border. I scraped the edges of the Basic Black cardstock matting panel with the blade of my craft knife. To tie the gold coloured scissors charm (from my stash) to the 5/8" black gross grain ribbon (from my Dollar Tree stash) bow I used some gold cord from Simply Elegant Trim (item 155766).


Additional supplies used to complete this 4" x 3 1/4" top-fold gift card:
- Basic Black cardstock (item 121045) for the card base;
- Very Vanilla Thick cardstock (item 144237) for the 3 7/8" x 3 1/8" inside panel;
- Joy of Christmas 12" x 12" Designer Series Paper (item 161958) for the two front and three inside panels/strips;
- Pecan Pie cardstock (item 161717) for the embroidery hoop - cut using the Crafting With You dies;
- Smoky Slate cardstock (item 131202) for the blades of the scissors and Shaded Spruce cardstock (item 146981) for the handles of the scissors (all cut using the Crafting With You dies) - handles trimmed and glued over the Smoky Slate cardstock full scissors;
- Basic Gray ink (item 149165) - sponged on the embroidery hoop top fastener and the blades of the scissors;
- watercolour paper for the sentiment circle - this is the inside of the embroidery hoop cut using the Crafting With You dies;
- Pecan Pie ink (item 161665) sponged around the edges of sentiment circle and applied as a watercolour wash around the sentiment letters;
- Real Red ink (item 147084), Pumpkin Pie ink (item 147086), and Pecan Pie ink to colour the bird - stamped and cut using the Nested Friends stamp set and co-ordinating Nested Friends dies respectively;
- Mini Stampin' Dimensionals (item 144108) to attach the bird;
- Black & Very Vanilla 3/8" Large Check Ribbon (item 161982 - from the Mini Catalogue) for the bow - attached with one of the Mini Glue Dots (item 103683); and
- one of the small Basic Black dots from Classic Matte Dots (item 158146) added to the scissors.
Window Scene Cards
The patterned paper used for these two cards (including the window backing scenes that were trimmed to fit behind the outer window frames) is from the One Horse Open Sleigh 6" x 6" Designer Series Paper - lots of pretty designs and scenes in this paper collection! The outer and inner window frames and ledges for each card were cut from watercolour paper (using the Window dies of course!) - the outer frames and ledge coloured using Pecan Pie ink (item 161665) - the watercolour paper pieces pressed directly into the ink pad surface. To colour the second card's bird - stamped and die cut using the Nested Friends stamp set and co-ordinating Nested Friends dies respectively - I used Pool Party ink (item 147107), Pumpkin Pie ink (item 147086), and Pecan Pie ink.


Additional supplies to complete this 5 1/4" x 4 1/4" top-fold card:
- Night of Navy cardstock (item 100867) for the card base and for the bow (cut using the Mini Pocket Envelope dies); and
- Very Vanilla Thick cardstock (item 144237) for 5 1/8" x 4 1/8" front matting panel, 5" x 4" inside matting panel, and sentiment rectangle - cut using the large divider die from Gone Fishing dies (item 161541) - edges scraped with blade of my craft knife;
.jpg)
Gone Fishing dies - 161541
The DSP front matting panel is 5" x 4"; the inside DSP panel is 4 7/8" x 3 7/8".


Additional supplies used to complete this 5" x 3 1/2" top-fold card:
- Very Vanilla Thick cardstock (item 144237) for the card base;
- Stylish Shapes dies to cut the sentiment circle; and
- Pecan Pie ink (item 161665) very lightly applied over the sentiment circle using Blending Brushes (item 153611).
The two front DSP panels measure 4 7/8" x 3 3/8" and 1 3/4" x 3 3/8"; the inside DSP strip measures 1 3/4" x 1 1/2". For the bow I used some "almost Pool Party" 1/4" soft weave ribbon with metallic thread I picked up at Dollarama - by pulling the edges of the ribbon I was able to fray the ends.
Joyous Noel Card


Additional supplies to complete this 4" x 3" top-fold card:
- Basic Black cardstock (item 121045) for the card base;
- Very Vanilla Thick cardstock (item 144237) for the 3 7/8" x 2 7/8" inside panel;
- watercolour paper for the sentiment flag - cut using the largest flag die in the Nested Essentials dies;
- Joy of Christmas DSP for the 3 7/8" x 2 7/8" front matting panel, and 2 3/4" x 3/4" inside strip;
- Basic Black Stampin' Write Marker (item 162481) to add splatters to sentiment flag and inside panel by flicking the brush tip against the marker lid;
- Real Red ink (item 147084), Pecan Pie ink (item 161665), and Pumpkin Pie ink (item 147086) to colour the bird - stamped and die cut using the Nested Friends stamp set and co-ordinating Nested Friends dies respectively; and
- three Basic Black dots from Classic Matte Dots (item 158146) added to the card front.
I made the envelope using a small leftover piece of woodgrain paper from the retired In Good Taste Designer Series Paper (item 152494) and an envelope punch board. For the bow I used Real Red ribbon from the Real Red & Garden Green 3/8" Ribbon Combo Pack (item 159577).
Wishing You A Wonderful Season Card


Additional supplies used to complete this 4 1/2" square top-fold card:
- Very Vanilla Thick cardstock (item 144237) for the card base and 3 3/4" square panel;
- Basic Black cardstock (item 121045) for the 4 1/8" square matting panel - edges scraped with the blade of my craft knife;
- Cherry Cobbler cardstock (item 119685) for the 3 7/8" square matting panel;
- watercolour paper for the sentiment circle - cut using the Stylish Shapes dies - Pecan Pie ink (item 161665) applied to circle using one of the Blending Brushes (item 153611), spritzed with water (Stampin' Spritzers - item 126185) and blotted dry with paper towel;
- watercolour paper for the two die cut Christmas trees (cut using the Window dies) - coloured using Mossy Meadow ink (item 147111) and Pecan Pie ink;
- Distressed Gold 12" x 12" Specialty Paper (item 159237) for the two die cut stars - cut using the Crafting With You dies;
- lightweight corrugated cardboard (recycled packaging) for torn circle - circle cut using the Stylish Shapes dies and then torn - Craft Stampin' White Ink (item 147277) rubbed across torn circle using one of the Sponge Daubers (item 133773);
- Real Red ink (item 147084), Old Olive ink (item 147090), and Mossy Meadow ink (item 147111) to colour the stamped and die cut festive foliage spray (stamped and die cut using the Joy of Noel stamp set and co-ordinating Joy of Noel dies respectively);
- three Very Vanilla dots from Classic Matte Dots (item 158146) added to torn corrugated cardboard circle; and
- Very Vanilla baker's twine (Baker's Twine Essentials Pack - item 155475) for the bow - bow and ends secured with tiny dabs of Multipurpose Liquid Glue.
I made the envelope using a leftover piece from the retired Festive Farmhouse Designer Series Paper (item 147820) and an envelope punch board. For the bow I used some "almost Very Vanilla" 5/8" double-sided satin ribbon from my Dollar Tree stash.
And finally . . .
Peace On Earth Card


Additional supplies used to complete this 4 1/8" x 7 1/4" top-fold card:
- Basic Black cardstock (item 121045) for the card base and two 1/2" x 6 5/8" strips (these strips were glued to the top and bottom of the DSP panel so that 1/4" would appear above and below the DSP panel);
- Very Vanilla Thick cardstock (item 144237) for the 6 15/16" x 3 3/4" front matting panel (edges scraped with the blade of my craft knife), and 6 3/4" x 3 3/4" inside panel;
- Joy of Christmas DSP for the 6 5/8" x 3" front panel, and 3" x 5/8" inside strip;
- watercolour paper for the sentiment/image circle (cut using the largest circle die from Stylish Shapes dies), and stamped and die cut reindeer - all images and sentiment from Regal Reindeer stamp set;
- Pecan Pie ink (item 161665) to colour sentiment/image circle - a few drips of water added and then blotted dry with paper towel;
- Real Red ink (item 147084), Old Olive ink (item 147090), and Mossy Meadow ink (item 147111) to colour the two large stamped and die cut festive foliage sprays (stamped and die cut using the Joy of Noel stamp set and co-ordinating Joy of Noel dies respectively);
- Pecan Pie, Mossy Meadow, Real Red, and Daffodil Delight ink (item 147094) to colour inside panel reindeer; and
- Basic Black Stampin' Write Marker (item 162481) to add splatters to inside panel by flicking brush tip against marker lid (I covered the reindeer and DSP strip with sticky notes while splattering).
Thank you for visiting my blog! I certainly had a lot of fun working on these projects and am looking forward to working on more Christmas projects! Every year I think I might decorate my tree with papercrafting projects - maybe this will be the year!
If you are interested in purchasing any of the available Stampin' Up! products I have used in my projects, and you live in Canada and do not have a Stampin' Up! demonstrator, please do not hesitate to visit my online store found on my website https://archiesatelier.stampinup.net/ at your convenience, or simply click under the "Shop With Me" tab on the right sidebar of my blog, which will take you directly to my website and online store. I very much appreciate your business and if you need any assistance please do not hesitate to contact me (lmccoyarchie@gmail.com)! The digital versions of both the May 2023-April 2024 Annual Catalogue and the September-December 2023 Mini Catalogue can be accessed at your convenience on my website!


On September 6, 2023, Stampin' Up! also released five new Designer Series Papers - including Christmas designs - which will be available, while supplies last, as Online Exclusives. These new designs, together with all additional products available as Online Exclusives, can be viewed in my online store under the Online Exclusives category.
Be sure to also check out at your convenience in my online store all the offerings on the Clearance Rack - there are certainly some great deals - such as the Window dies - but products are only available while supplies last!
Have fun creating!
Laurel
*It has come to my attention that quite often email correspondence from me is delivered to the recipient's spam or junk mail folder - if you have corresponded with me I have replied so be sure to check your spam or junk mail folder! Thank you!!

Is it really worth the exertion to get out of bed only to have to find another napping spot?
Comments
Post a Comment