No Bones About It - There Are Definitely Skeletons In These Closets!

Hello! Today I am sharing a few projects I worked on this week using the Bag of Bones Bundle (item 162219), a new Bundle that is featured in the upcoming Stampin' Up! September-December 2023 Mini Catalogue. The Bundle includes the Bag of Bones photopolymer stamp set (item 162216) and the co-ordinating Bag of Bones dies (item 162218) - although available separately, when the stamp set and dies are purchased together using the Bundle item number there will be the 10% Bundle Savings! Items from the Mini Catalogue can be purchased starting September 6, 2023 - on that date the digital version of the Mini Catalogue will be available for viewing on my website, https://archiesatelier.stampinup.net/.


Bag of Bones stamp set - 162216
(Bundle - 162219)
.jpg)
Bag of Bones dies - 162218
(Bundle - 162219)
Just a quick summary of the standard tools and supplies I used to complete my projects this week:
- Paper Trimmer (item 152392) - for cutting paper and cardstock - can also be used for scoring fold lines;
- stylus and scoreboard (Simply Scored Scoring Tool - item 122334) - for scoring fold lines - to ensure sharply creased fold lines I also burnished the fold lines with a Bone Folder (item 102300);
- Cut & Emboss Machine (item 149653) - for all die cutting and embossing;
- Paper Snips Scissors (item 103579) - a pair of sharp scissors for making a few necessary trims to die cut pieces (Stampin' Up! advises that the Paper Snips Scissors are expected to again be available for ordering the week of September 11, 2023);
- Take Your Pick Tool (item 144107) - the tacky putty tip is a tremendous help in picking up and placing small die cuts - ie bow ties, shoes, and flower centers!; and
- for the main adhesive, Multipurpose Liquid Glue (item 110755).
Since I heat embossed several of the skeletons I also used:
- Embossing Buddy (included in the Embossing Additions Tool Kit - item 159971) - to rub or pounce over the cardstock before stamping to ensure that the embossing powder does not adhere anywhere other than the stamped image - although the Embossing Buddy is a great help inevitably stray bits of embossing powder will want to stick out of bounds of the stamped image so a small dry paint brush comes in very handy to carefully brush away the stray bits before heating the embossing powder. A small brush is also included in the Embossing Additions Tool Kit;
- VersaMark Ink (item 102283) - specialized ink to which the embossing powders will stick;
- white embossing powder from Stampin' Emboss Powders - Basics (item 155554 - which also includes black and clear powders); and
- heat gun (Heat Tool - item 129053) - to melt (activate) the embossing powders a high temperature directional heat source is essential
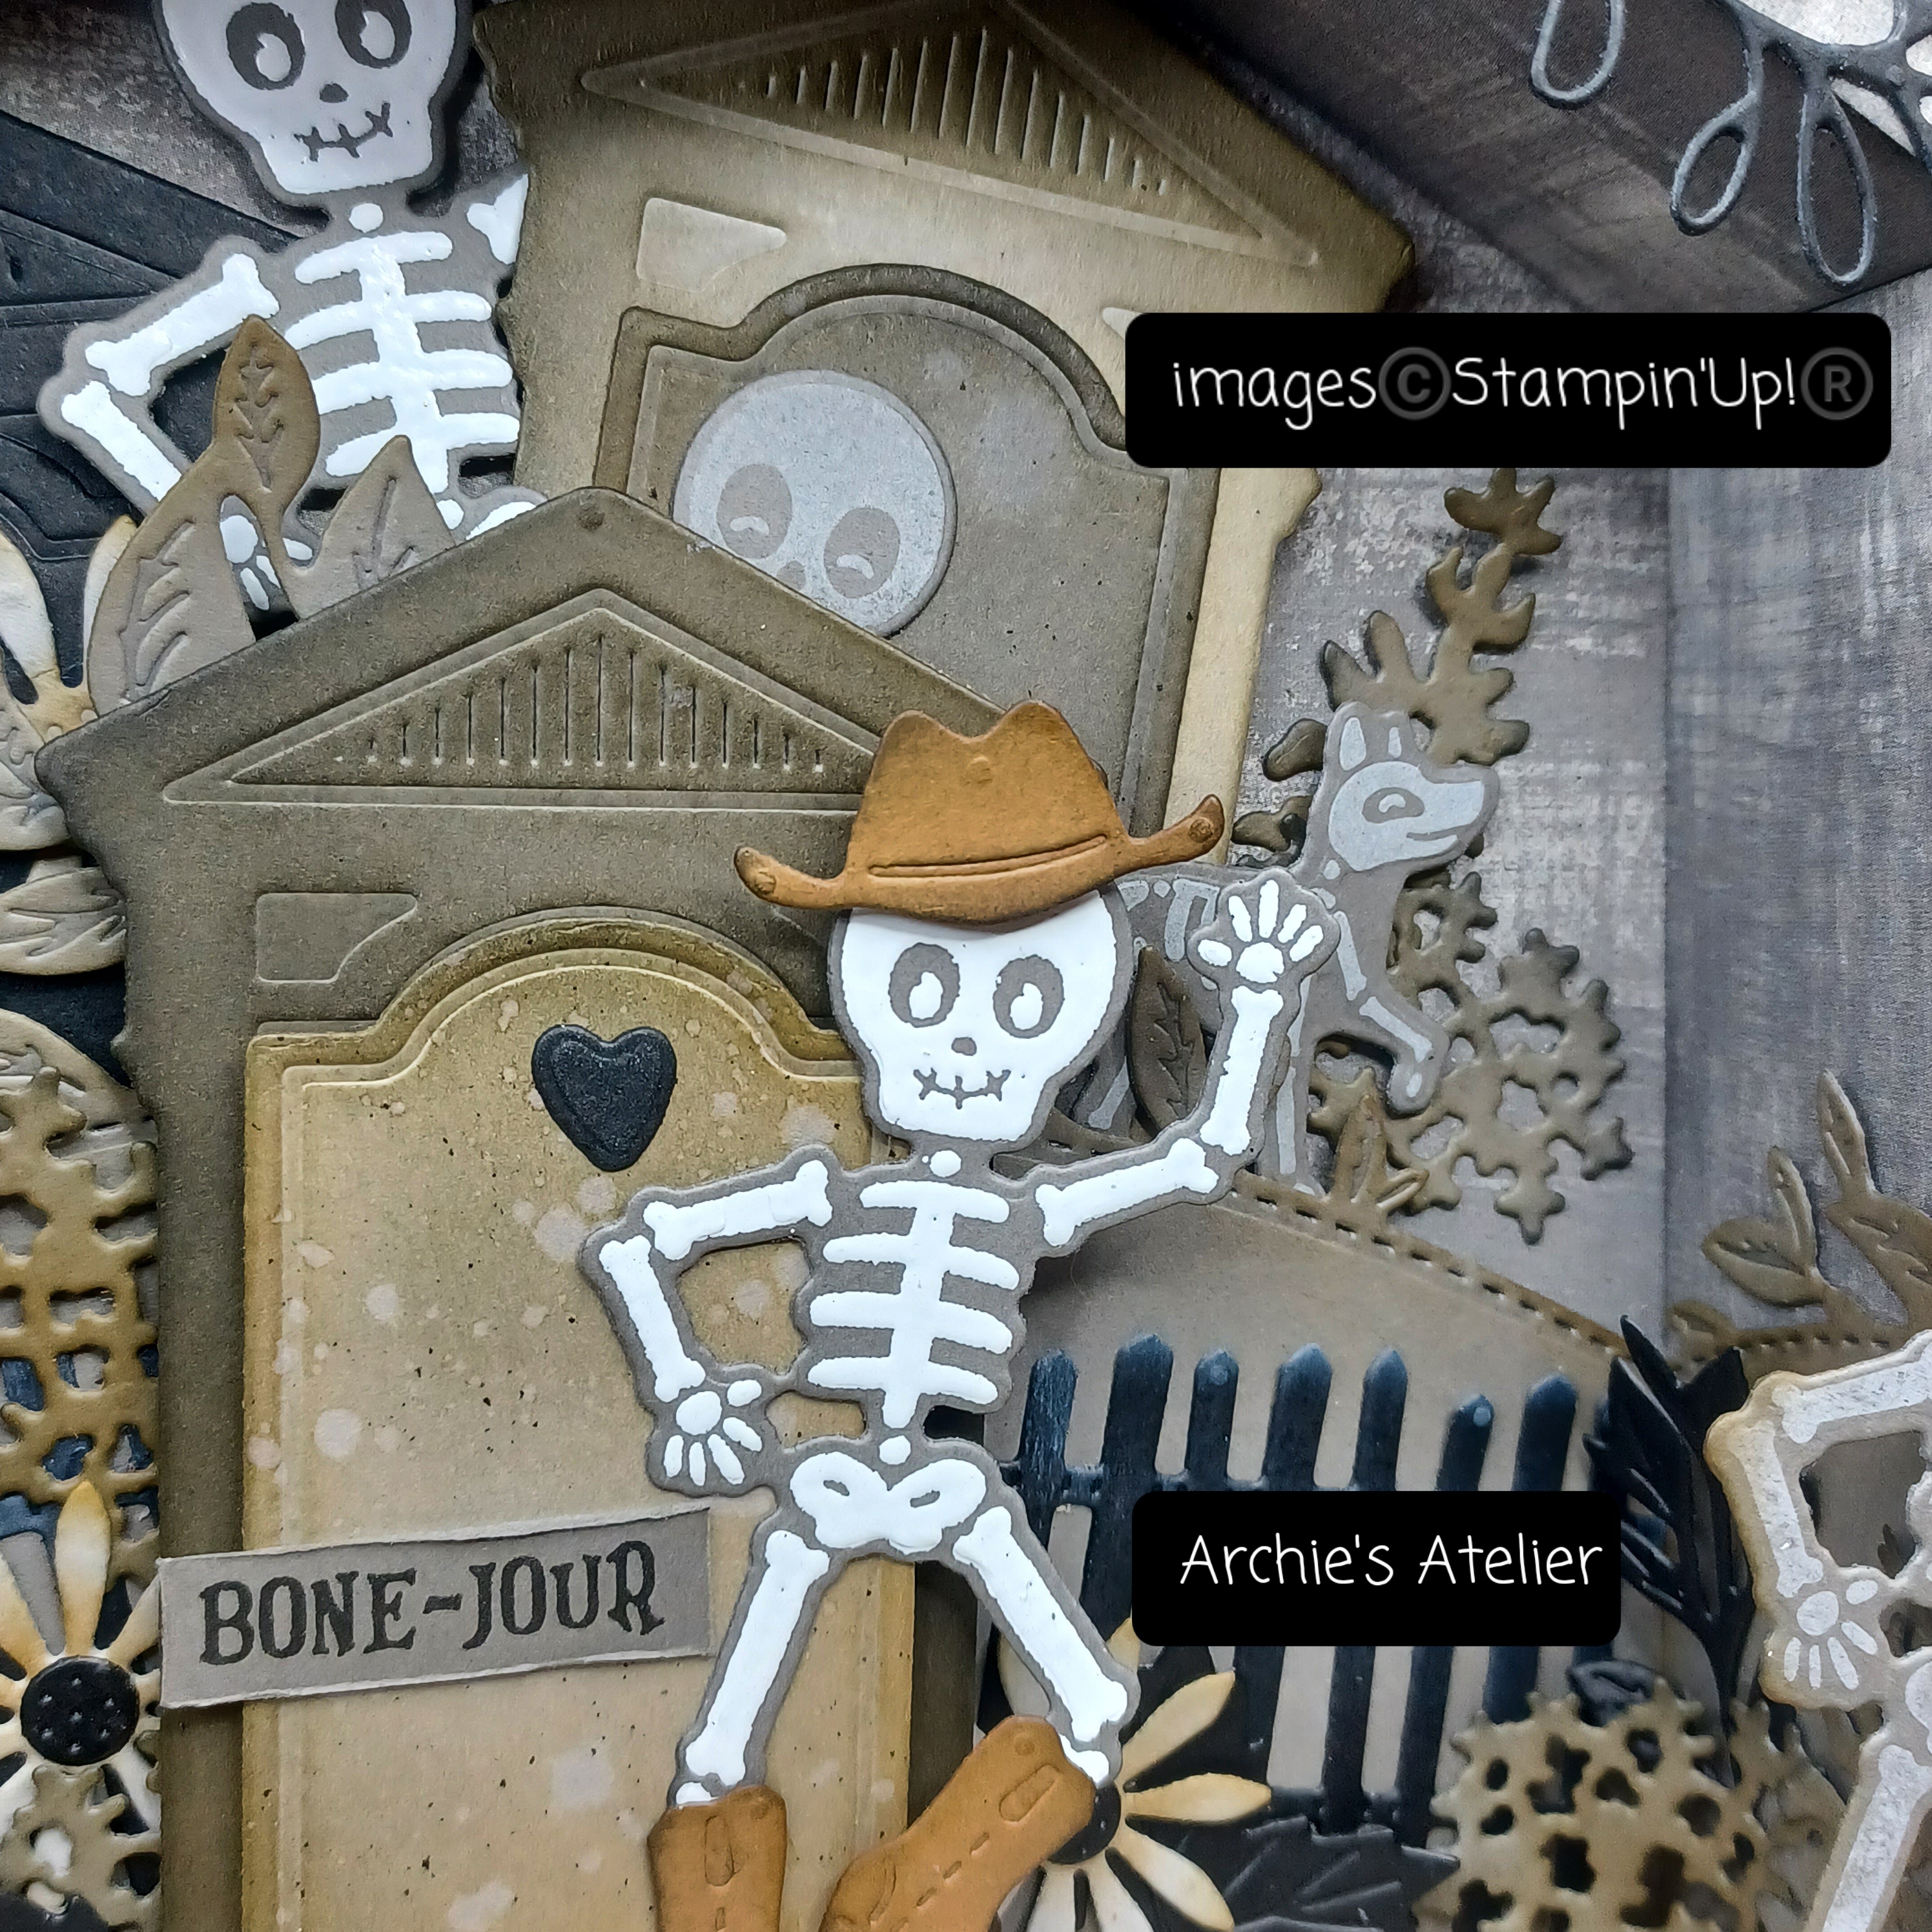
Happy Halloween Shadow Box
(skeleton party at the cemetery!)


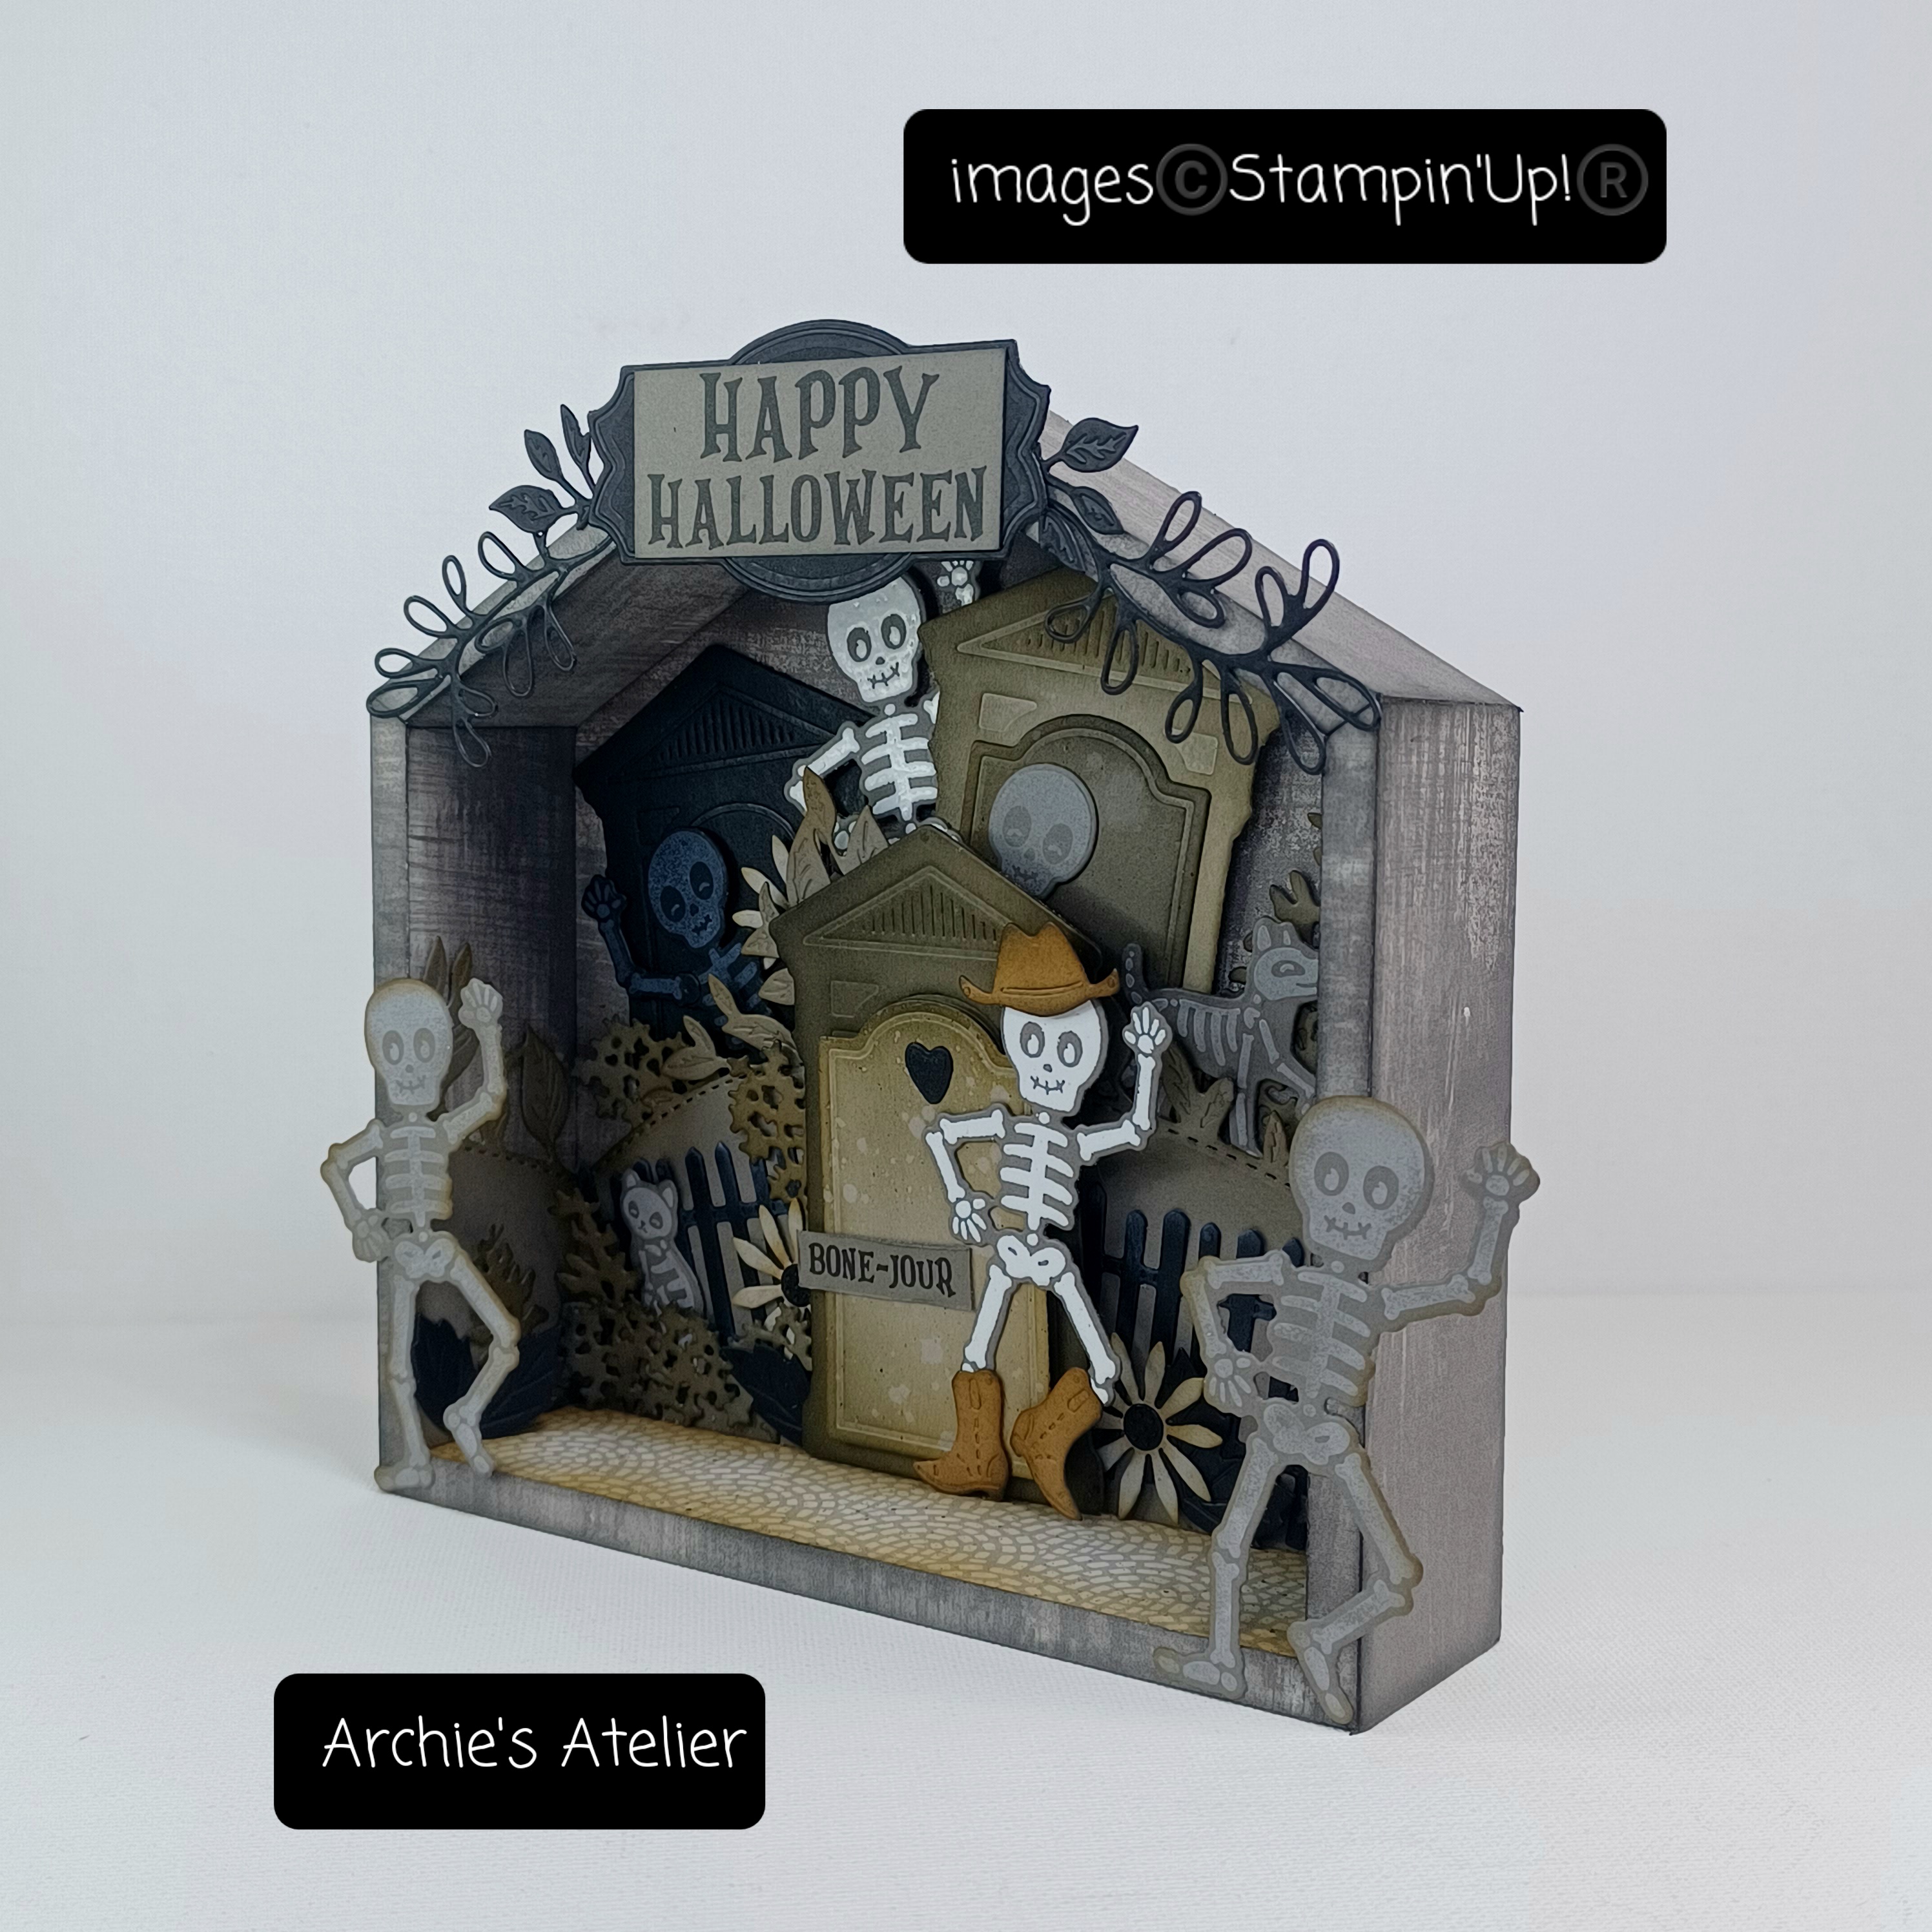
For the base for this shadow box project I used a 6" tall (to center peak) x 6" wide x 1 1/2" deep shadow box I picked up at Dollar Tree. To cover the inside and outside back panels, inside and outside side and top panels, and front edges I used Pebbled Path patterned paper from Fresh As A Daisy 12" x 12" Designer Series Paper (item 161289) - I sponged the edges of all trimmed panels and strips with Basic Gray ink (item 149165). For the inside bottom panel I used a strip of cobblestone patterned paper from Les Shoppes 12" x 12" Designer Series Paper (item 161322) - sponging the edges with Pecan Pie ink (item 161665) and adding splatters using a Basic Black Stampin' Write Marker (item 162481) by flicking the brush tip against the marker lid.


For the base "hill" I used Pebbled Path cardstock (item 161722), cut using the Around The Bend dies (item 160649), and sponged the edges with Pecan Pie ink.
.jpg)
Around The Bend dies - 160649


Additional supplies used to complete the project:
- Stazon Jet Black Ink (item 101406) to stamp the sentiments on Pebbled Path cardstock - I scraped the edges of the "Bone-Jour" strip with the blade of my craft knife, and inked the edges of the "Happy Halloween" strip with Basic Gray ink;
- Basic Black cardstock (item 121045) for the die cut fences (tips sponged with Craft Stampin' White Ink - item 147277), "Happy Halloween" backing label (cut using the label die from Natural Prints dies - item 158800), die cut small and large leafy sprigs (cut using Around The Bend dies), die cut loopy leafy sprigs (cut using the Splendid Stems dies - item 159676 - a recent addition to the Clearance Rack), die cut leaves (cut using the Around The Bend dies), large die cut tombstone, small die cut heart, die cut flower centers (cut using the Dainty Delight dies - item 160674), and one stamped and die cut skeleton;
.jpg)
.jpg)
Splendid Stems dies - 159676 (Clearance Rack)
.jpg)
Dainty Delight dies - 160674
- Pebbled Path cardstock for one large and one small die cut tombstone, two stamped/embossed and die cut full skeletons, two stamped and die cut full skeletons (edges sponged with Pecan Pie ink), one stamped and die cut partial skeleton, stamped and die cut feline and canine skeletons, and die cut bushy foliage (cut using the Dainty Delight dies and sponged with Pecan Pie and Basic Gray inks);
- Gray Granite cardstock (item 146983) for one large and one small die cut tombstone, and three die cut daisies (cut using the Dainty Delight dies and sponged with Pecan Pie ink);
- Pecan Pie cardstock (item 161717) for the die cut cowboy hat and boots (edges sponged with Pecan Pie and Basic Gray inks);
- Stampin' Dimensionals (item 104430) to attach right side background large tombstone, head of background stamped/embossed and die cut skeleton, large front tombstone (double layer of Dimensionals), and front small tombstone; and
- Mini Stampin' Dimensionals (item 144108) - a trimmed Dimensional used to attach the cowboy hat.
On the two small tombstones I sponged Pecan Pie and Basic Gray inks, spritzed with water (Stampin' Spritzers - item 126185), blotted dry with paper towel, and sponged the edges with additional Basic Gray ink. To the small front tombstone I added splatters using a Basic Black Stampin' Write Marker.
For the stamped and die cut skeletons I used Craft Stampin' White Ink - applying the ink to the stamps using one of the Sponge Daubers (item 133773) - I found I was just getting way too much ink on the stamp when applying the ink directly from the stamp pad. By applying slightly more pressure to different parts of the stamp when stamping I was able to get some shading and a slightly mottled look.


Milk Carton Treat Box
(skeleton party at the crypt!)


When you want a treat box for a very special trick-or-treater you don't mind spending a little extra time and effort on the making and decorating of the treat box! This milk carton treat box measures 6" tall (box portion is 3 1/2") x 2 1/2" wide x 2 1/2" deep and I used the following additional supplies:
- for the box a 10 1/2" x 8" piece of Basic Black cardstock (item 121045), scored on the 10 1/2" side at 2 1/2", 5", 7 1/2", and 10" (1/2" tab is glue tab); scored on the 8" side at 2" (bottom flaps), 5 1/2", and 7 1/2" (1/2" is top lip); and then scored again on the 10 1/2" side at 1 1/4" and 6 1/4" from the top edge just down to the 1/2" top lip score line. Using a stylus and ruler I made the score lines in the sections immediately below the 1 1/4" and 6 1/4" score lines from the bottom of the score lines out to the right and left bottom corners of the sections as indicated on the attached template;

- for the roof base a 6 1/2" x 3" piece of Basic Black cardstock scored on the 6 1/2" side at 2 3/4", 3 1/4" (center fold), and 3 3/4";
- for the embossed panels on the box - four 2 3/8" x 3 3/8" pieces of Basic Black cardstock - I embossed these using the retired Brick & Mortar 3D Embossing Folder (item 149643) as I had forgotten to borrow my sister's Exposed Brick 3D Embossing Folder (item 161600)! Before embossing the cardstock I dragged my Craft Stampin' White Ink pad (item 147277) across the raised mortar lines on the inside of the folder - this created the slightly gray mortar lines on the embossed panels. I sponged additional Craft Stampin' White Ink over the embossed panels;
- for the embossed roof panels - two 2 7/8" x 2 5/8" pieces of Basic Black cardstock - embossed using the Stripes Embossing Folder from the Stripes & Splatters 3D Embossing Folders (item 157980) - I again sponged Craft Stampin' White Ink over the embossed panels;
- Basic Black cardstock for the stamped/embossed and die cut, and stamped and die cut, skeletons; two die cut bats; three die cut tall leafy stems (cut using the Natural Prints dies - item 158800); additional leafy stem and double-leaf (cut using the Around The Bend dies - item 160649), and matting flag for sentiment (cut using the Nested Essentials dies - item 161597);
.jpg)
Nested Essentials dies - 161597
- Gray Granite cardstock (item 146983) for the two large die cut tombstones (or crypt doors) - sponged with Pecan Pie ink (item 161665) and Basic Gray ink (item 149165);
- Pebbled Path cardstock (item 161722) for the two die cut fences - sponged with Pecan Pie, Basic Gray, and Craft Stampin' White inks; two small die cut tombstones - sponged with Pecan Pie and Basic Gray inks, spritzed with water (Stampin' Spritzers - item 126185), blotted dry with paper towel, sponged around the edges with additional Basic Gray ink. Splatters added using a Basic Black Stampin' Write Marker (item 162481);
- Pebbled Path cardstock for the sentiment flag - sentiment stamped using Stazon Jet Black Ink (item 101406) and flag cut using the Nested Essentials dies; and
- Mini Stampin' Dimensionals (item 144108) to attach the small tombstone on the embossed skeletons' panel.
The stamped and die cut skeletons were stamped using Craft Stampin' White Ink, with the ink applied to the stamps using one of the Sponge Daubers (item 133773).
To the matted sentiment flag I added an "almost Pebbled Path" eyelet. The bull dog clip used to hold the roof onto the box is from my stash, and I used black paper ribbon picked up at Dollarama to tie the matted sentiment flag to the clip.
Boo To You Card Trio


For this 4" x 3" top-fold card I used the following additional supplies:
- Basic Black cardstock (item 121045) for the card base, die cut foliage (cut using the Around The Bend dies - item 160649), solid die cut base for large flower (cut using the Cheerful Daisies dies - item 161297), and stamped and die cut feline skeleton (Craft Stampin' White Ink - item 147277 - was used to stamp the skeleton, with the ink applied to the stamp using one of the Sponge Daubers - item 133773);
.jpg)
Cheerful Daisies dies - 161296
- Pebbled Path cardstock (item 161722) for the large die cut tombstone (sponged with Pecan Pie ink - item 161665 - and Basic Gray ink - item 149165), die cut fence (sponged with Pecan Pie and Basic Gray inks), large flower's die cut detailed overlay (cut using the Cheerful Daisies dies and sponged with Basic Gray ink), and small die cut bushy foliage (cut using the Dainty Delight dies - item 160674 - and sponged with Pecan Pie and Basic Gray inks);
- Gray Granite cardstock (item 146983) for small die cut tombstone (sponged with Pecan Pie and Basic Gray inks, spritzed with water - Stampin' Spritzers - item 126185 - blotted dry with paper towel, edges sponged with additional Basic Gray ink, and splatters added using a Basic Black Stampin' Write Marker - item 162481); small daisy (cut using the Dainty Delight dies and sponged with Pecan Pie ink); and large flower's middle die cut layer - cut using the Cheerful Daisies dies and inked with Pecan Pie ink around the outer edges and Basic Gray ink in the center;
- Basic White cardstock (item 159276) for the 3 7/8" x 2 7/8" inside panel;
- Stazon Jet Black Ink (item 101406) to stamp the sentiment;
- Stampin' Dimensionals (item 104430) to attach the large tombstone (Dimensionals placed down the center so that die cut foliage and fence could be slipped under the tombstone); and
- Wink of Stella Clear Glitter Brush (item 141897) - splatters added by whacking the Brush against a Bone Folder.


Additional supplies used for this 4" x 3" top-fold card:
- Basic Black cardstock (item 121045) for the card base; stamped and die cut skeleton (stamped using Craft Stampin' White Ink - item 147277 - applied to stamp using one of the Sponge Daubers - item 133773); two die cut leafy sprigs (cut using the Around The Bend dies - item 160649); and die cut flower center (cut using the Dainty Delight dies - item 160674);
- Pebbled Path cardstock (item 161722) for the two die cut tombstones - each sponged with Pecan Pie ink (item 161665) and Basic Gray ink (item 149165), spritzed with water (Stampin' Spritzers - item 126185), blotted dry with paper towel, edges sponged with additional Basic Gray ink, and splatters added using a Basic Black Stampin' Write Marker (item 162481);
- Pumpkin Pie cardstock (item 105117) for the die cut daisy (cut using the Dainty Delight dies), and die cut bow tie - each die cut sponged with Pumpkin Pie ink (item 147086);
- Stazon Jet Black Ink (item 101406) to stamp the sentiment; and
- Wink of Stella Clear Glitter Brush (item 141897) - a little Halloween sparkle added to the leaves, petals, flower center, and bow tie.
And finally . . .


Additional supplies to complete this 3 1/4" x 2 1/2" top-fold card:
- Basic Gray cardstock (item 121044) for the card base;
- Basic Black cardstock (item 121045) for the stamped/embossed and die cut skeleton; die cut hat, bow tie, and shoes; and 3 1/8" x 1 5/8" matting panel;
- Lemon Lime Twist patterned paper from Stargazing 12" x 12" Designer Series Paper (item 161175) for the 3" x 1 1/2" strip - sentiment stamped using Stazon Jet Black Ink (item 101406); and
- Wink of Stella Clear Glitter Brush (item 141897) - a little glitter added to the hat band, bow tie, and shoes - because even a skeleton needs glitter on their dancing shoes!
The two little googly eyes were from my stash.
I have attached a sheet showing the various die cuts (apart from those made using the Bag of Bones dies) used on my projects - Dainty Delight, Cheerful Daisies, Natural Prints, Splendid Stems, and, last but certainly not least, Around The Bend:

Thank you for visiting my blog! I certainly had a lot of fun working on these projects and am definitely looking forward to making more Halloween treats with the Bag of Bones Bundle! I think that the slightly pebbled finish on the white embossed skeletons adds to that pitted bone look - and any stray embossing powder bits not caught before heating can be considered bone spurs!
If you are interested in purchasing any of the available Stampin' Up! products I have used in my projects, and you live in Canada and do not have a Stampin' Up! demonstrator, please do not hesitate to visit my online store found on my website https://archiesatelier.stampinup.net/ at your convenience, or simply click under the "Shop With Me" tab on the right sidebar of my blog, which will take you directly to my website and online store. I very much appreciate your business! The digital version of the May 2023-April 2024 Annual Catalogue is available for browsing at your convenience on my website - and the digital version of the September-December 2023 Mini Catalogue will be available on September 6, 2023!
Don't forget that the coupons earned during the July Bonus Days must be redeemed on orders placed during August (until August 31, 2023)! When placing your orders be sure to include the coupon codes that Stampin' Up! provided to you by email upon placement of your qualifying July orders!

Be sure to check out at your convenience in my online store all the offerings on the Clearance Rack - there are certainly some great deals - like the Splendid Stems dies at just $11.25 CDN! - but products are only available while supplies last!
Have fun creating!
Laurel
*It has come to my attention that quite often email correspondence from me is delivered to the recipient's spam or junk mail folder - if you have corresponded with me I have replied so be sure to check your spam or junk mail folder! Thank you!!

Keeping the important things close!
.
These projects are amazing. I love the detail that you put in. So very nice. Thanks for sharing
ReplyDeleteThank you very much!
Delete