Playing With The Heat Embossing Resist Technique
Hello! Today I am sharing a few card projects I worked on this week using the heat embossing resist technique - I am certainly no expert but I had a lot of fun playing with this technique that I have not tried for quite a while! I used watercolour paper to stamp and emboss my images, and applied the Stampin' Up! inks over the embossed images either with a paint brush and water or using the Blending Brushes (item 153611) and Small Blending Brushes (item 160518). I did not add any sentiments to these cards as I intended them to be either note cards or gift enclosure cards. A sentiment can always be added at a later date!
The following are the basic tools used for heat embossing:
- Embossing Buddy (anti-static pouch) - this is a little bag/pouch containing a moisture absorbing powder - i.e. cornstarch - that is wiped/pounced over the paper before the image is stamped to remove static and excess moisture from the paper, helping to ensure that the embossing powder will not stick to areas of the paper that have not been stamped. Once the embossing powder is heated it becomes permanent - whether on the stamped image or not!;
- VersaMark Ink (item 102283) - a slow drying clear pigment ink to which the embossing powder will stick;
- embossing powders - when heated the embossing powders become shiny and slightly raised. For my projects I used the white and black embossing powders from the Stampin' Emboss Powders Basics (item 155554) and the gold embossing powder from the Stampin' Emboss Powders Metallics (item 155555);
- a small clean paint brush - this is very handy for carefully clearing away errant bits of embossing powder before activating (melting) the embossing powder with a heat tool;
- a clean piece of paper or small tray - if the embossing powder is poured over the stamped image over a clean piece of paper or small tray the excess embossing powder can be returned to it's container for future use; and
- heat gun (Heat Tool - item 129053) - a specialized heat gun is required to activate (melt) the embossing powder.
The Embossing Additions Tool Kit (item 159971) includes an Embossing Buddy, a small tray, a small brush, and reverse tweezers (very handy for preventing burned fingers while heat embossing your images!).
After allowing the heated embossing powders to cool (very little time required) I then applied the Stampin' Up! inks over the stamped and embossed images - the embossed areas repel (resist) the ink. After completing the inking I "buffed" the embossed areas with a clean paper towel just to bring back the shine! For a few of the projects I lightly spritzed the inked areas with water (Stampin' Spritzers - item 126185) and blotted dry with paper towel.
For the embossed rounded corner rectangles on several of the cards I used an old die cutting cutting machine with a rubber embossing mat and the rounded corner rectangle dies from Nested Essentials dies (item 161597) - I am experimenting to see if I can get the same effect using the Stampin' Cut & Emboss Machine . . .
Just a quick summary of the additional basic tools and supplies used to complete the projects:
- Paper Trimmer (item 152392) - for cutting cardstock and paper - can also be used for scoring fold lines;
- stylus and scoreboard (Simply Scored Scoring Tool - item 122334) - for scoring cardstock fold lines - to ensure crisp folds I also burnished the folded score lines with my Bone Folder (item 102300);
- Stampin' Cut & Emboss Machine (item 149653) - for all die cutting and embossing;
- Take Your Pick Tool (item 144107) - the tacky putty tip came in very handy for picking up and placing small embellishments; and
- for the main adhesive, Multipurpose Liquid Glue (item 110755).
On with the projects!
Additional supplies used to complete this 5 1/2" x 4 1/2" top-fold card:
- Boho Blue cardstock (item 161724) for the card base; and inside panel;
- Copper Clay cardstock (item 161721) for the inside matting panel;
- watercolour paper for the die cut leafy sprig - cut using the Gorgeously Made dies (item 161292);
Gorgeously Made dies - 161202
- Queen Bee stamp set (item 160476 - available as one of the Online Exclusives) for the embossed bee image;
- Misty Moonlight ink (item 153118) blended over the embossed image;
- Misty Moonlight ink and Pecan Pie ink (item 161665) blended over the die cut leafy sprig - also lightly spritzed with water and blotted dry with paper towel;
- black & white patterned paper from Zoo Crew 12" x 12" Designer Series Paper (item 161304) for the front and inside panel strips;
- Copper Clay 3/8" Textured Ribbon (item 161629) for bow on front panel and strip on inside panel; and
- three Boho Blue dots from 2023-2025 In Colour Dots (item 161620) added to front panel - one of each of the three sizes.


Additional supplies to complete this 4" square top-fold card:
- Basic White Thick cardstock (item 159229) for the card base;
- Crumb Cake cardstock (item 120953) for the die cut lattice - cut using the Chic dies (item 158815);
Chic dies - 158815
- largest circle die from Stylish Shapes dies (item 159183) to cut the watercolour paper embossed panel;
- Quiet Meadow stamp set (item 155082) for the embossed flower images - Stampin' Up! advises that this stamp set will again be available for ordering the week of July 31, 2023;
- Gorgeously Made stamp set (item 161193) for the embossed fractured text images;
- Lighting The Way dies (item 160496) to cut the three sections of the large flying insect - lower and main body cut from watercolour paper, and wings from Vellum 8 1/2" x 11" Cardstock (item 101856);
- Pecan Pie ink (item 161665) for splatters added to card front, and sponged around edges of lattice die cut;
- Daffodil Delight ink (item 147094) and Pecan Pie ink to colour the insect's lower body;
- Basic Gray ink (item 149165) to colour the insect's upper body;
- Daffodil Delight and Pecan Pie inks to colour the insides of the embossed flower images;
- Lost Lagoon ink (item 161678) and Pecan Pie ink to colour the embossed panel - additional Lost Lagoon ink sponged around the edges; and
- Wink of Stella Clear Glitter Brush (item 141897) - vellum wings "painted" to add a little shimmer.
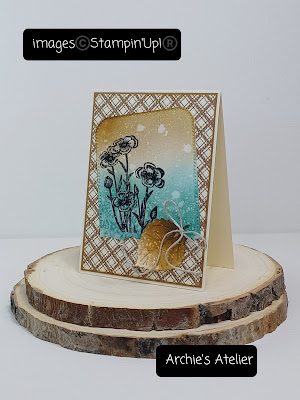
Additional supplies used to complete this 4" x 3" top-fold card:
- Very Vanilla Thick cardstock (item 144237) for the card base;
- Pecan Pie cardstock (item 161717) for the matting panel;
- Pecan Pie/Very Vanilla patterned paper from Let's Go Fishing 12" x 12" Designer Series Paper (item 161534) for the front panel;
- large rounded corner rectangle die from Nested Essentials dies (item 161597) to cut the embossed panel - bottom torn after embossing the image;
- small leaf die from Aspen Tree dies (item 159798) to cut the watercolour paper leaf;
- Quiet Meadow stamp set (item 155082) for the embossed flower image;
- Pecan Pie ink (item 161665) to colour the die cut leaf - spritzed with water and blotted dry with paper towel;
- Lost Lagoon ink (item 161678) and Pecan Pie ink to colour the embossed image panel; and
- Linen Thread (item 104199) for the leaf's bow - ends secured with tiny dabs of Multipurpose Liquid Glue.

Additional supplies used to complete this 5 1/2" x 4 7/8" side-fold card:
- Orchid Oasis cardstock (item 159267) for the card base;
- Basic White cardstock (item 159276) for the inside panel and the die cut leafy sprig (cut using the Gorgeously Made dies - item 161202);
- Nested Essentials dies (item 161597) to cut the embossed panel;
- Bird's Eye View stamp set (item 161436) for the stamped and coloured bird image - stamped on watercolour paper using Stazon Jet Black Ink (item 101406) and coloured using Daffodil Delight ink (item 147094), Starry Sky ink (item 159212), and Pumpkin Pie ink (item 147086) - "fussy" cut using Paper Snips Scissors (item 103579);
- Lighting The Way stamp set (item 160868) for the stamped/embossed circles;
- Starry Sky ink and Pecan Pie ink (item 161665) to colour the embossed panel;
- Stampin' Dimensionals (item 104430) to adhere embossed panel and tail end of bird;
- Linen Thread (item 104199) for the bow - ends secured with tiny dabs of Multipurpose Liquid Glue; and
- nine of the Orchid Oasis/Starry Sky shaded dots from the recently retired 2022-2024 In Colour Matte Decorative Dots (item 159186) added to the embossed panel (including the center of the bow).
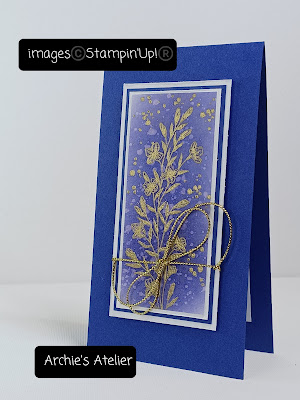
Additional supplies used to complete this 5 1/2" x 3" top-fold card:
- Starry Sky cardstock (item 159263) for the card base and matting panel;
- Basic White Thick cardstock (item 159229) for the inside panel and the front matting panels (2) - I scraped the edges of the matting panels with the blade of my craft knife;
- Queen Bee stamp set (item 160476) for the stamped/embossed flower image;
- Quiet Meadow stamp set (item 155082) for the stamped/embossed splatter dots;
- Starry Sky ink (item 159212) to colour the embossed panel;
- gold cord from Simply Elegant Trim (item 155766) for the bow tied around the fully matted embossed panel; and
- Stampin' Dimensionals (item 104430) to adhere the fully matted embossed panel to the card front.
Additional supplies I used to complete this 4 1/8" square top-fold card:
- Basic White Thick cardstock (item 159229) for the card base;
- Pretty Peacock patterned paper from Earthen Elegance 12" x 12" Designer Series Paper (item 161503) for the 4" square panel;
- Pretty Peacock/Lost Lagoon patterned paper from Bright & Beautiful 6" x 6" Designer Series Paper (item 161449) for the 2 1/2" x 1 5/8" strip;
- largest rounded corner rectangle die from Nested Essentials dies (item 161597) to cut the embossed panel;
- Gorgeously Made stamp set (item 161193) for the stamped/embossed image;
- Pecan Pie ink (item 161665) and Lost Lagoon ink (item 161678) to colour the embossed panel;
- Copper Clay 3/8" Textured Ribbon (item 161629) for strip and knot on embossed panel - I used two strips of ribbon - one strip wrapped around the front and the two ends secured to the back of the panel with Mini Glue Dots (item 103683) - a second strip used to tie the knot - I used another of the Mini Glue Dots to secure the ribbon to the left of the knot; and
- Stampin' Dimensionals (item 104430) to adhere the embossed panel.
For each of these two cards I used the Queen Bee stamp set (item 160476) for the stamped/embossed bee image; the Quiet Meadow stamp set (item 155082) for the stamped/embossed splatter dots; the largest rounded corner rectangle die from the Nested Essentials dies (item 161597) to cut the embossed panels; small pieces of black & white patterned paper from the Zoo Crew 12" x 12" Designer Series Paper (item 161304); Sweet Sorbet shaded dots from the recently retired 2022-2024 In Colour Matte Decorative Dots (item 159186); and Sweet Sorbet ink (item 159216) - and Daffodil Delight ink (item 147094) on the first card - to colour the embossed panels.
Additional supplies used to complete the first card (3 1/2" x 5 1/4" top-fold):
- Sweet Sorbet cardstock (item 159268) for the card base;
- Crushed Curry patterned paper from the "cut apart" design sheet included with the Fresh As A Daisy 12" x 12" Designer Series Paper (item 161289) for the 4" x 2 3/4" panel;
- black & white striped paper from the Black & White Designs 12" x 12" Designer Series Paper (item 159861 - although a recent addition to the Clearance Rack, now unfortunately sold out) for the 2 1/2" x 1 3/8" strip; and
- Stampin' Dimensionals (item 104430) to adhere the embossed panel.
Additional supplies used to complete the second card (4" x 5" top-fold):
- Basic White Thick cardstock (item 159229) for the card base; and
- black & white patterned paper from the Clearance Rack's All Together 6" x 6" Designer Series Paper (item 160039) for the bottom strip.
And finally . . .
I refer to this card trio as the "domino" cards since the smaller of the rounded corner rectangle dies from the Nested Essentials dies (item 161597) I used to cut the embossed panels remind me of dominoes! For the stamped/embossed image on the Early Espresso cardstock (item 119686) 4 1/4" x 2 3/4" top-fold card I used the Gorgeously Made stamp set (item 161193); for the stamped/embossed images on the Basic White Thick cardstock (item 159229) 4 1/8" x 2 1/2" top-fold card, and the Shaded Spruce cardstock (item 146981) 3" x 2 1/8" top-fold card, I used the Lighting The Way stamp set (item 160868). To colour the embossed panels on both the Early Espresso and Shaded Spruce cards I used Lost Lagoon ink (item 161678) and Pecan Pie ink (item 161665); and on the Basic White card, Sweet Sorbet ink (item 159216). For the inside panels for the Early Espresso and Shaded Spruce cards I used Basic White cardstock (item 159276), adding splatters with Pecan Pie ink on the Early Espresso card's panel. On the Basic White card I added a 2 13/16" x 1 5/16" strip of black & white patterned paper from the Clearance Rack's All Together 6" x 6" Designer Series Paper (item 160039), and four Sweet Sorbet shaded dots from the recently retired 2022-2024 In Colour Matte Decorative Dots (item 159186).
Thank you for visiting my blog! I certainly had a lot of fun working on these projects! I have lots of "leftover" embossed pieces for future projects too!
If you are interested in purchasing any of the available Stampin' Up! products I have used in my projects, and you live in Canada and do not have a Stampin' Up! demonstrator, please do not hesitate to visit my online store found on my website https://archiesatelier.stampinup.net/ at your convenience, or simply click under the "Shop With Me" tab on the right sidebar of my blog, which will take you directly to my website and online store. I very much appreciate your business! The digital version of the May 2023-April 2024 Annual Catalogue is available for browsing at your convenience on my website.
Don't forget that Bonus Days, and your chance to earn a $6.00 CDN coupon for every $60.00 CDN spent (before applicable taxes and shipping), will end on July 31, 2023! These coupons are redeemable on orders placed between August 1 and August 31, 2023, and since Stampin' Up! will send the coupon codes upon placement of qualifying orders be sure to save those emails!!
Be sure to also check out at your convenience in my online store all the offerings on the Clearance Rack - some great deals but products are only available while supplies last! - and the full selection of products available as Online Exclusives.
Have fun creating!
Laurel
*It has come to my attention that quite often email correspondence from me is delivered to the recipient's spam or junk mail folder - if you have corresponded with me I have replied so be sure to check your spam or junk mail folder! Thank you!!

.jpg)


.jpg)


.jpg)


.jpg)


Comments
Post a Comment