Sending Handmade Hugs!
(four cards using the Crafting With You Bundle)
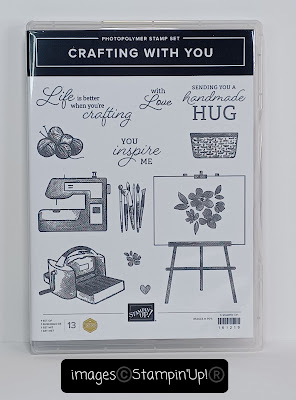
Hello! Today I am sharing four cards I worked on this week using the new Stampin' Up! Crafting With You Bundle (item 161226) that is featured in the May 2023-April 2024 Annual Catalogue. The Bundle includes the Crafting With You stamp set (item 161219) and the Crafting With You dies (item 161225) - each of which can also of course be purchased separately (although when purchased together using the Bundle item number there is the 10% Bundle Savings - which is always a good thing!)
Crafting With You stamp set - 161219
(Bundle - 161226)
Crafting With You dies - 161225
(Bundle - 161226)
As crafters we are usually interested in quite a wide variety of crafts and it is always fun when we can combine a few of our favourites in one project. When going through some of my supplies I unearthed several small cross stitch projects I had worked on several years ago but never found a home for - and they were just the perfect size to use with the embroidery hoop die! So . . .
Just a quick summary of the basic tools and supplies I used to complete my projects this week:
- Paper Trimmer (item 152392) - for cutting cardstock and paper - can also be used for scoring;
- stylus and scoreboard (Simply Scored Scoring Tool - item 122334) - for scoring cardstock;
- Bone Folder (item 102300) - for burnishing score lines to ensure crisp folds;
- Stampin' Cut & Emboss Machine (item 149653) - for all die cutting and embossing;
- Take Your Pick Tool (item 144107) - the paper piercer and tacky putty tips are a tremendous help in picking up and placing embellishments and small die cuts; and
- for the main adhesive, Multipurpose Liquid Glue (item 110755).
Envelopes were made using an envelope punch board and left-over pieces of retired Designer Series Paper (for each project I will provide the name and item number of the retired DSP). I backed each cross stitch piece after it was glued to the back of a completed die cut embroidery hoop with a cardstock circle cut using the 1 7/8" circle die from the retired Layering Circle dies (item 151770) - this cardstock circle made it easier to glue die cut foliage to the back of the embroidery hoop.
Now on with the projects!
Additional supplies used for this 5 1/4" x 4 1/8" top-fold card:
- Crumb Cake cardstock (item 120953) for the card base, cross stitch backing circle, and embossed square (embossed using the Timber 3D Embossing Folder - item 156406 - and then cut using the largest square die from the Stylish Shapes dies - item 159183);
- Basic Black cardstock (item 121045) for the matting panel - cut to allow a 1/16" border - I scraped the blade of my craft knife along the edges;
- Very Vanilla Thick cardstock (item 144237) for the inside panel;
- Pecan Pie cardstock (item 161717) for the die cut hoop - edges sponged with Pecan Pie ink (item 161665);
- Silver Foil 12" x 12" Specialty Pack (item 156457 - now one of the Online Exclusives) - tiny scrap of foil finish to cut the hoop's closure; and
- Memento Tuxedo Black Ink (item 132708) to stamp the sentiment.
Forever Greenery Designer Series Paper (item 152492) was used for the envelope, and for the bow I used Garden Green 3/8" ribbon from the Real Red & Garden Green 3/8" Ribbon Combo Pack (item 159577).
For this 3 3/4" x 3 3/4" top-fold welcome to new baby card I used the following additional supplies:
- Very Vanilla Thick cardstock (item 144237) for the card base, cross stitch backing circle, embossed square (embossed using the Timber 3D Embossing Folder - item 156406 - and cut using the largest square die from the Stylish Shapes dies - item 159183), sentiment tag, and die cut flowers and leaves;
- Crumb Cake cardstock (item 120953) for the die cut embroidery hoop - sponged with Pecan Pie ink (item 161665);
- Dainty Delight dies (item 160674) to cut the two daisies;
- Around The Bend dies (item 160649) to cut the three leafy stems and two double leaves;
- Memento Tuxedo Black Ink (item 132708) to stamp the sentiment, from the Quiet Meadow stamp set (item 155082);
- small tag die from Meadow dies (item 155852) to cut the sentiment tag;
- Pecan Pie ink to sponge the edges of the sentiment tag;
- Linen Thread (item 104199) to tie the sentiment tag to the embroidery hoop closure (the tag is secured to the edge of the hoop with a little dab of Multipurpose Liquid Glue);
- Very Vanilla dots from Classic Matte Dots (item 158146) - three large dots and one small dot added to the card front (including two large dots used for the flower centers); and
- Stampin' Dimensionals (item 104430) to attach the embossed die cut square to the card front.
For the envelope I used some leftover Petal Pink patterned paper from the Sale-A-Bration Dandy Designs 12" x 12" Designer Series Paper (item 160836), and the "almost Very Vanilla" 5/8" gross grain ribbon used for the bow was from my dollar store ribbon stash.
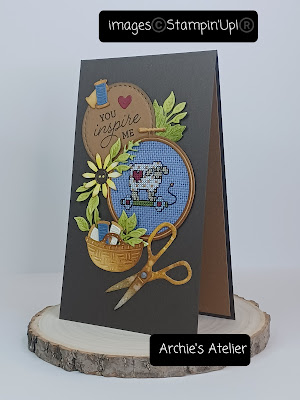
Additional supplies used for this 5 1/4" x 3 1/4" top-fold card:
- Pool Party cardstock (item 122924) for the card base, die cut thread, and sentiment circle (the circle is the center portion of the embroidery hoop die cut - now I have a Pool Party cardstock hoop to use in another project!);
- Basic Black cardstock (item 121045) for the approximately 3 3/4" long x 2 1/2" wide torn chalkboard effect backing panel - there are several ways to create the chalkboard effect but the technique I used is very simple: after using Craft Stampin' White Ink (item 147277) to stamp the sentiment several times down the cardstock panel I lightly rubbed over the panel with a sponge with very little of the Craft Stampin' White Ink applied to the sponge - the slight blurring of the stamped sentiments helps add to the dusty/much erased look of a chalkboard. Before sponging I tore the top and bottom of the panel;
- Real Red cardstock (item 102482) for the die cut button and heart;
- Very Vanilla cardstock (item 101650) for the cross stitch backing circle;
- watercolour paper for the die cut embroidery hoop, spools, scissors, daisy, daisy center, leafy stems, and small branch sprig (this small sprig is actually the center vein section of the leaf from the large three flower and one leaf die from the new Cheerful Daisies dies - item 161296);
- Dainty Delight dies (item 160674) to cut the daisy and daisy center;
- Around The Bend dies (item 160649) to cut the two leafy stems;
- Pecan Pie ink (item 161665) to colour the embroidery hoop, spools, flower center, and the tips of the flower petals (after flower was coloured using Daffodil Delight ink - item 147094);
- Old Olive ink (item 147090) to colour the leafy stems and small branch sprig;
- Basic Gray ink (item 149165) and Pumpkin Pie ink (item 147086) to colour the blades and handles of the scissors - I lightly spritzed the coloured sections with water (Stampin' Spritzers - item 126185) and blotted dry with paper towel;
- Pool Party ink (item 147107) to stamp the sentiment;
- small Basic Gray dot from Classic Matte Dots (item 158146) used for the scissors pivot screw; and
- Linen Thread (item 104199) - wrapped twice around the top of the card front.
Pool Party/white striped paper from Peaceful Poppies Designer Series Paper (item 151324) was used for the envelope. For the bow I used some of the retired (from several years ago) Crumb Cake 1/2" Ribbon Seam Binding (item 122332).
And finally . . .
For this 5 1/2" x 3 1/4" top-fold card I used the following additional supplies:
- Early Espresso cardstock (item 119686) for the card base, and die cut button (used for the flower center);
- Pecan Pie cardstock (item 161717) for the sentiment circle (the center section of the embroidery hoop die cut), and inner panel;
- Misty Moonlight cardstock (item 153081) for die cut thread (2), and cross stitch backing circle;
- Basic White cardstock (item 159276) for die cut thread (2);
- Cherry Cobbler cardstock (item 119685) for the die cut heart;
- watercolour paper for the die cut embroidery hoop, spools, basket, daisy, scissors, foliage and small branch sprig (this small sprig is actually the center vein section of the leaf from the large three flower and one leaf die from the new Cheerful Daisies dies - item 161296);
- Memento Tuxedo Black Ink (item 132708) to stamp the sentiment;
- Pecan Pie ink (item 161665) to colour the embroidery hoop, basket, spools, handles of the scissors, and tips of petals (after flower was coloured using Daffodil Delight ink - item 147094), and to sponge edges of sentiment circle;
- Old Olive ink (item 147090) to colour the foliage and small branch sprig;
- Basic Gray ink (item 149165) to colour the blades of the scissors - I lightly spritzed all coloured sections of the scissors with water (Stampin' Spritzers - item 126185), blotting them dry with paper towel - trying to give them a well-worn look;
- Dainty Delight dies (item 160674) to cut the daisy;
- Around The Bend dies (item 160649) to cut all foliage; and
- small Basic Gray dot from Classic Matte Dots (item 158146) - used for the scissors pivot screw.
Thank you for visiting my blog! I had a lot of fun working on my projects - and to reiterate last week's sentiment - life is definitely better when you are crafting! Most things can be made better - at least a little bit - with a handmade hug!
If you are interested in purchasing any of the available Stampin' Up! products I have used in my projects, and you live in Canada and do not have a Stampin' Up! demonstrator, please do not hesitate to visit my online store found on my website https://archiesatelier.stampinup.net/ at your convenience, or simply click under the "Shop With Me" tab on the right sidebar of my blog, which will take you directly to my website and online store. I very much appreciate your business! The digital version of the May 2023-April 2024 Annual Catalogue is available for browsing at your convenience on my website. Don't forget to also check out the good deals on the Clearance Rack and the full selection of the products available as Online Exclusives!
Have fun creating!
Laurel
*It has come to my attention that quite often email correspondence from me is delivered to the recipient's spam or junk mail folder - if you have corresponded with me I have replied so be sure to check your spam or junk mail folder! Thank you!!


Comments
Post a Comment