Having Some Fun With The Lighting The Way Bundle!

Hello! Today I am sharing a few projects I worked on this week using the Stampin' Up! Lighting The Way Bundle - item 160497(C)/162381 (P) - which includes the Lighting The Way stamp set (item 160491/160868) and the Lighting The Way dies (item 160496). The stamp set is one of several in the January-April 2023 Mini Catalogue that is available either as cling mounted (C) or photopolymer (P) [clear]. When I ordered the Bundle I selected the photopolymer stamps (for the photopolymer stamps the Bundle item is 162381). As with all Bundles you may also purchase just the stamp set or just the dies (but when purchased together there is the 10% Bundle Savings!)

Lighting The Way dies - 160496

Lighting The Way stamp set - 160491 (C)
160868 (P)
When I first saw the dies I was very excited about the possibilities for the lantern - and I am not disappointed! By cutting the die cut apart you can get quite a few variations - including a garden urn/flower pot when the lantern base is turned upside down! For the lamp portion of the lantern, on the paper/vellum that I wanted to back the lamp portion I traced around the lamp portion of the main die cut with a pencil and then used a sharp pair of scissors (Paper Snips Scissors - item 103579) to cut out the lamp backer - adhering the backer with glue (this is when transferring the Multipurpose Liquid Glue - item 110755 - to a small fine tipped bottle with a pin stopper really helps!)

The firefly ("lightning bug") can also just be a winged insect! An entomologist I definitely am not and until I saw the assembly of the firefly demonstrated in a video by SU demonstrator Tina Zinck (serenestamper.com) I probably would have been at a loss - even though there are just three dies for the insect: top body (including one set of wings), lower body, and wings!

Just a quick summary of the basic tools and supplies I used to complete my projects:
- Paper Trimmer (item 152392) for cutting all paper and cardstock (can also be used for scoring);
- score board and stylus (Simply Scored Scoring Tool - item 122334) for scoring fold lines on paper and cardstock;
- Bone Folder (item 102300) for burnishing score lines;
- Take Your Pick Tool (item 144107) - the paper piercer and tacky putty tips are a tremendous help in picking up and placing small embellishments and die cuts;
- Stampin' Cut & Emboss Machine (item 149653) for all die cutting and embossing; and
- Stamparatus (item 146276) - a stamp positioning platform that comes with two hinged plates and two magnets that is a great help to me in ensuring a crisp final image as it allows me to stamp several impressions of a single image or sentiment - and certainly helps me reduce my paper waste because I couldn't get a decent stamped image on my first attempt!
On with the projects!


I know that not too many of us are thinking Christmas projects at this time of the year but I was anxious to try a red Christmas lantern! For this project I began with a wooden frame with a 5" x 7" opening and then used the following additional supplies to complete the project:
- for the die cut lantern - Brushed Metallic 12" x 12" Cardstock (item 153524) - bronze (1 full lantern) - and Real Red cardstock (item 102482) trimmed die cut glued over the full die cut. Before gluing on the Real Red cardstock portions I lightly sanded the Brushed Metallic Cardstock die cut;
- Texture Chic 12" x 12" Specialty Designer Series Paper (item 158808) for the background panel and for the backer for the lamp;
- watercolour paper (Fluid 100 5" x 7" Watercolour Paper - item 149612) for the die cut bow and evergreen boughs - both cut using the retired Decorated Pine dies (item 159710);
- Soft Suede cardstock (item 115318) for the die cut deer - cut using the Grove dies (item 157844);
- Crumb Cake cardstock (item 120953) for the embossed rectangle panel - cut using the Stitched Rectangles dies (item 151820). Before cutting the rectangle I embossed the cardstock using the Timber 3D Embossing Folder (item 156406);
- Early Espresso cardstock (item 119686) for the matting panel and the sentiment panels - the "Wishing You A Season Of Hope & Light" panel was cut using the Stitched Rectangles dies and I scraped the blade of my craft knife along the edges of the trimmed "Season's Greetings" panel;
- Brightest Glow stamp set (item 159542) for the two sentiments - each of which were stamped and heat embossed using VersaMark Ink (item 102283) and gold embossing powder (Stampin' Emboss Powders - Metallics - item 155555);
- Soft Suede ink (item 147115) to sponge the embossed panel, the die cut deer, the branches of the evergreen boughs, and the Real Red cardstock lantern portions;
- Evening Evergreen ink (item 155576) to colour the die cut bow and the evergreen boughs;
- Mossy Meadow ink (item 147111) - sponged over the evergreen boughs;
- Craft Stampin' White Ink (item 147277) - sponged on the die cut deer;
- Wink of Stella Clear Glitter Brush (item 141897) - added to the die cut bow, evergreen boughs, and splattered on the sentiment panels; and
- Rustic Metallic Adhesive-Backed Dots (item 159082) - two added to each of the sentiment panels.


For this project - more BIG flowers! - I began with a house-shaped chalkboard/whiteboard shallow shadow box frame from Dollar Tree which measures 7 3/4" tall (base to top point of "roof") x 4 3/4" wide x 3/4" deep and used the following additional supplies to complete the project:
- Abigail Rose 12" x 12" Designer Series Paper (item 159037) for the ledger-patterned background and side panels;
- Sale-A-Bration Dainty Flowers 12" x 12" Designer Series Paper (item 160834) for the "grass" paper - cut using the Basic Borders dies (item 155558);
- watercolour paper for the die cut lantern, daffodils (flowers and stems), grasses, and long curved leafy stem;
- Daffodil dies (item 157794) to cut the daffodil flowers and stems;
- Honeybee Blooms dies (item 157951) to cut the grasses;
- Dainty Delight dies (item 160674) to cut long curved leafy stem;
- Basic White cardstock (item 159276) for the daisies (cut using the Dainty Delight dies);
- Soft Suede cardstock (item 115318) for die cut daisy centers - also cut using the Dainty Delight dies;
- Old Olive cardstock (item 100702) and Mossy Meadow cardstock (item 133676) - for trimmed curved leafy stems (also cut using the Dainty Delight dies);
- Pear Pizzazz cardstock (item 131201) and Mossy Meadow cardstock for the double leaf die cuts - cut using the Nested Friends dies (item 160488);

- Mossy Meadow cardstock for the 2 large single leaf die cuts - cut using the large leaf die from the Full Basket dies (item 158679);
- scrap of Crushed Curry patterned paper from Tea Boutique 6" x 6" Designer Series Paper (item 158659) and scrap of Vellum 8 1/2" x 11" Cardstock (item 101856) for lamp backer;
- Soft Suede ink (item 147115) to colour top and base of lantern, and to sponge all edges of Abigail Rose DSP, around edges of daisies, daisy centers, and edges of daffodil flowers;
- Basic Gray ink (item 149165) to colour the lantern handles;
- Mango Melody ink (item 147093) to colour the daffodil flower die cut pieces - I also sponged over the top of the detail pieces to darken the colour;
- Old Olive ink (item 147090) to colour the grasses;
- Mossy Meadow ink (item 147111) to colour the daffodil stems and long curved leafy stem, and to sponge the grasses and die cut cardstock leaves, and edges of the Dainty Flowers DSP;
- Rustic Metallic Adhesive-Backed Dots (item 159082) - 7 added - including 1 for the center of the lamp portion of the lantern; and
- Linen Thread (item 104199) for the lantern's bow.

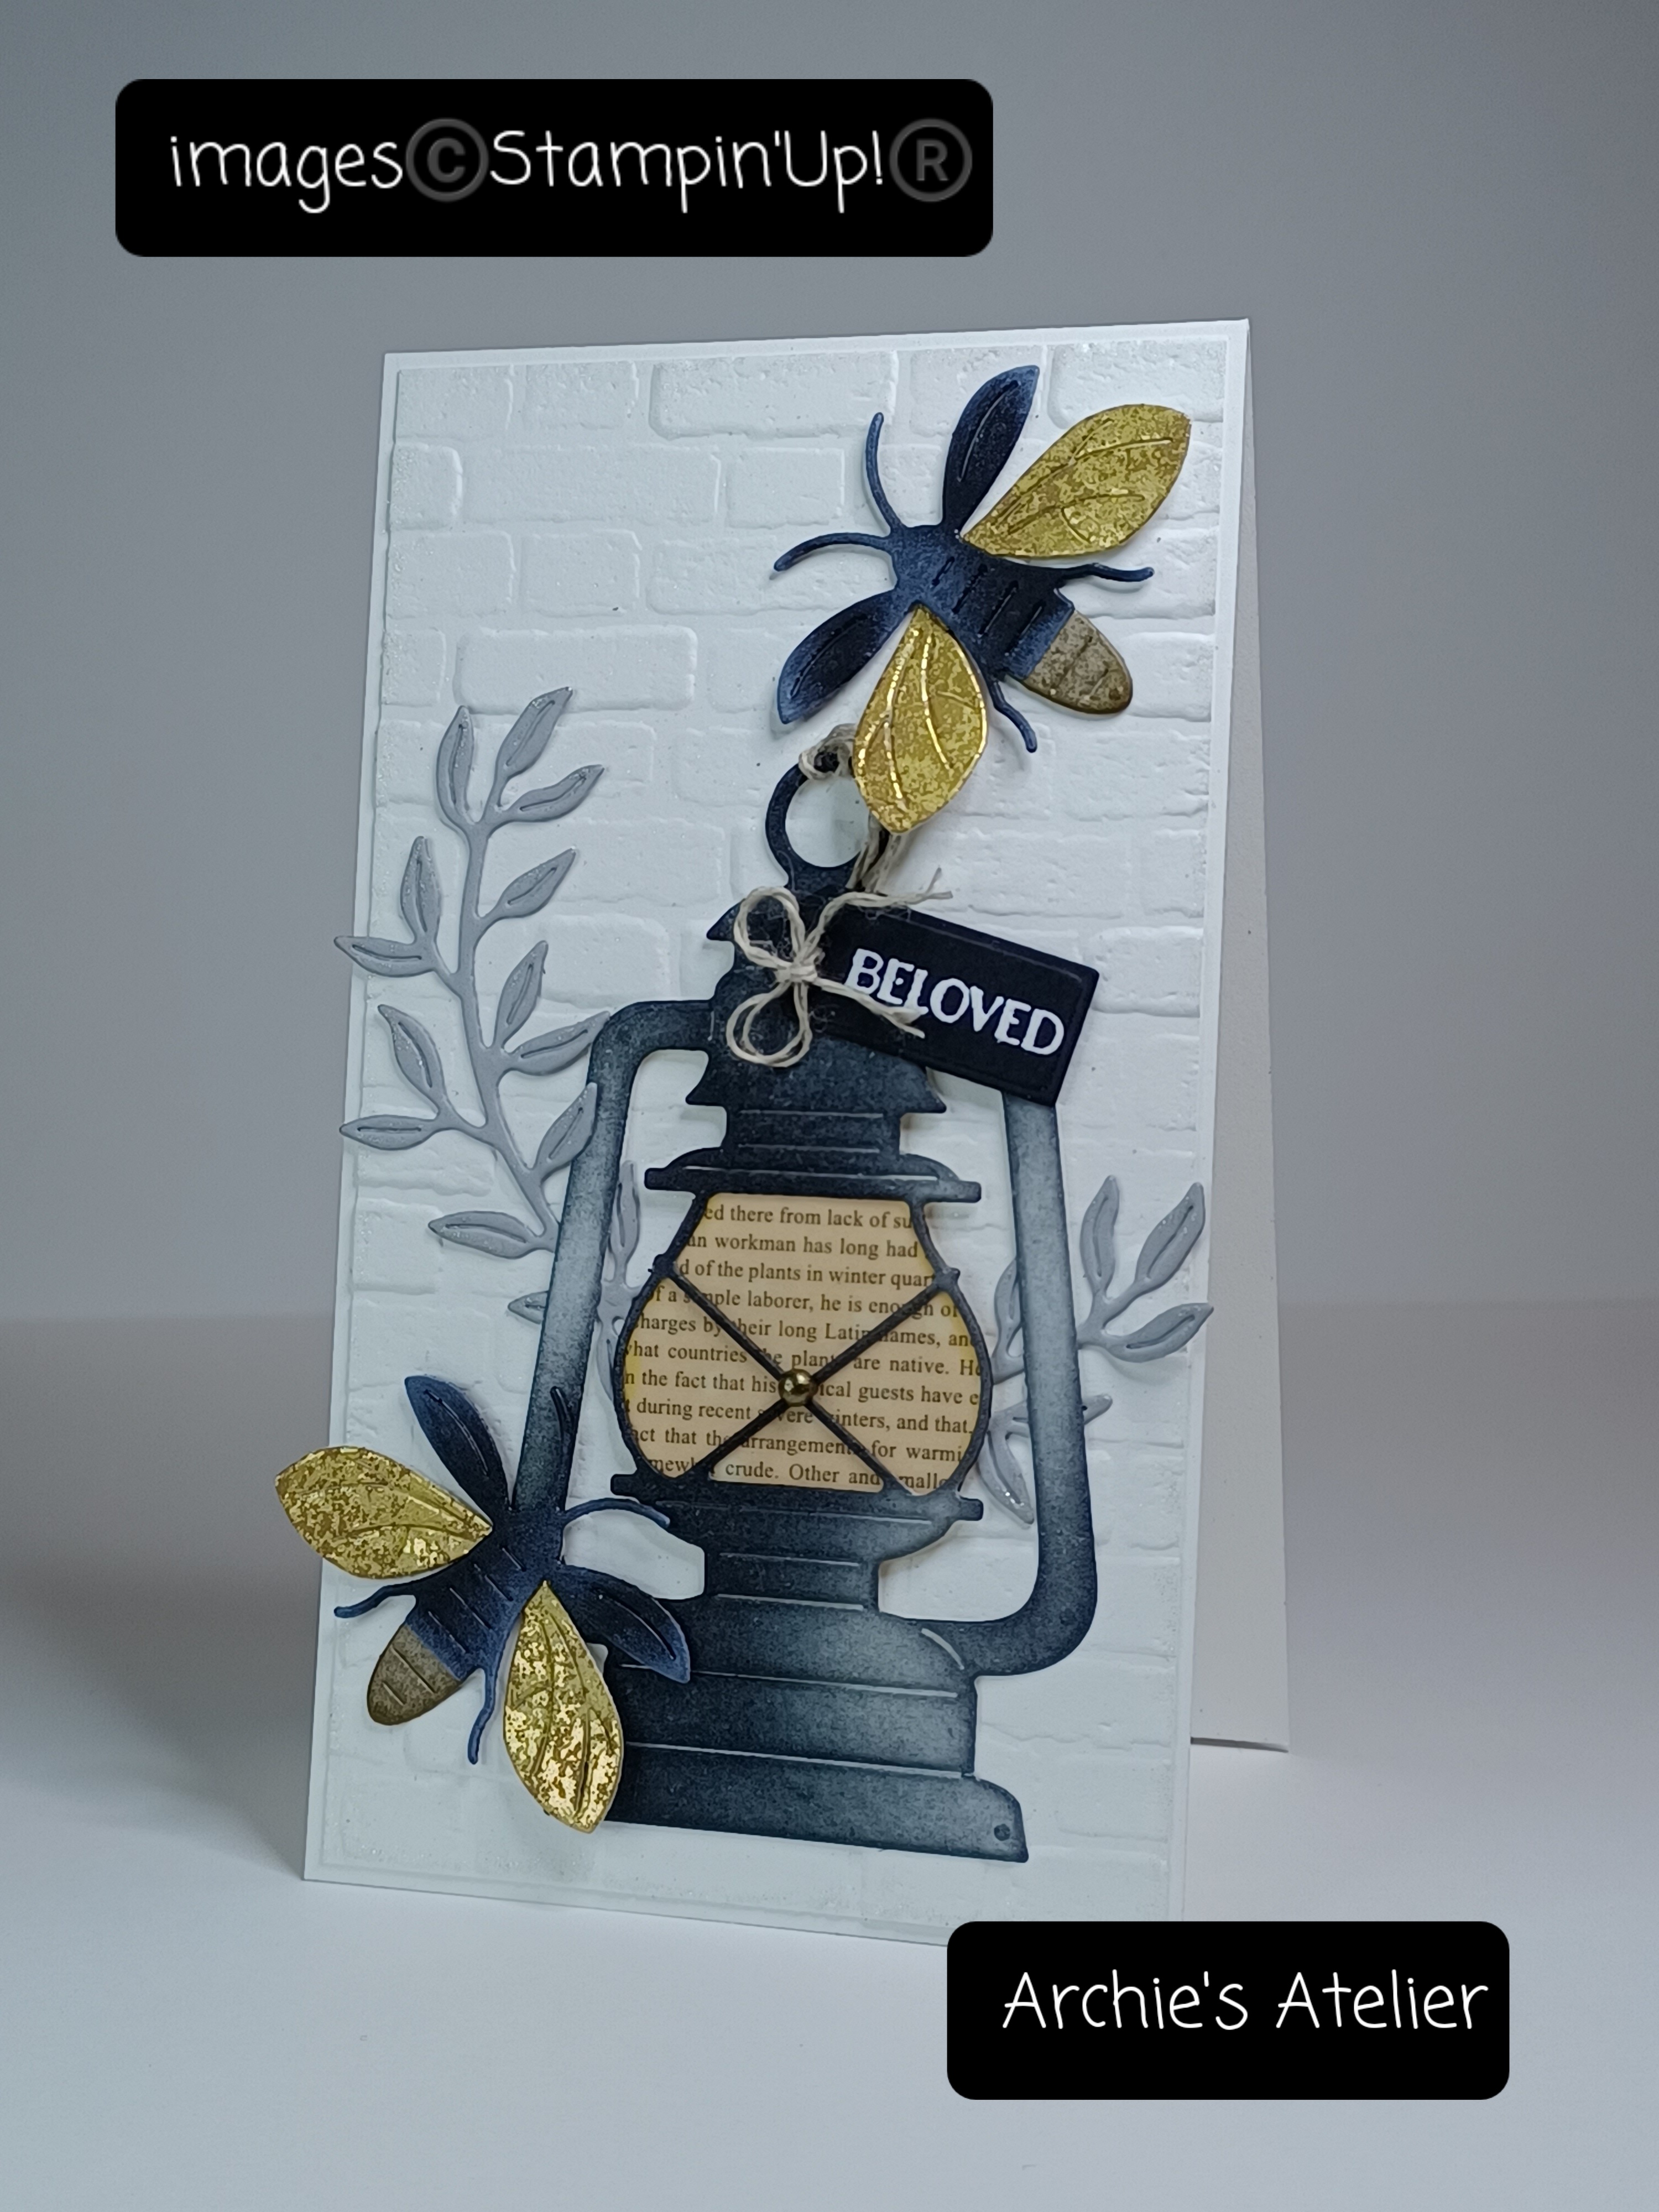

For this 5" x 2 7/8" top-fold card I used the following additional supplies:
- Basic White Thick cardstock (item 159229) for the card base and embossed panel (embossed using the Brick & Mortar 3D Embossing Folder - item 149643);
- watercolour paper for the lantern;
- Basic Black cardstock (item 1`21045) for the insects' top body sections, and for the sentiment tag (cut using the tag die from the Mini Pocket Envelope dies - item 159167);
- Gray Granite cardstock (item 146983) for the insects' lower body sections;
- Distressed Gold 12" x 12" Specialty Paper (item 159237) for the insects' wings;
- Smoky Slate cardstock (item 131202) for the curved leafy stem - cut using the Queen Bee dies (item 160485)

- scrap of Daffodil Delight patterned paper from 6" x 6" Designer Series Paper Assortments - Brights (item 159258) and scrap of Vellum 12"x 12" Layering Designs (item 157764) - black type text - for lamp backer;
- Queen Bee stamp set (item 160476) for "Beloved" sentiment - stamped and heat embossed using VersaMark Ink (item 102283) and white embossing powder (Stampin' Emboss Powders - Basics - item 155554);
- Wink of Stella Clear Glitter Brush (item 141897) - "painted" around edges of embossed panel, and on tips of leafy stem;
- Soft Suede ink (item 147115) to sponge insects' lower bodies;
- Basic Gray ink (item 149165) and Memento Tuxedo Black Ink (item 132708) to colour lantern and handles;
- Craft Stampin' White Ink (item 147277) to sponge edges of insects' upper bodies;
- Linen Thread (item 104199) to tie sentiment tag to top of lantern; and
- Rustic Metallic Adhesive-Backed Dots (item 159082) - one small dot added to center of lamp.


For this 4" x 3 1/8" top-fold card I used the following additional supplies:
- Basic White Thick cardstock (item 159229) for the card base;
- Basic White cardstock (item 159276) for the sentiment banner (cut using the shorter of the wider banner dies from the Stylish Shapes dies - item 159183), and the flowers;
- Dainty Delight dies (item 160674) to cut the daisy;
- Queen Bee dies (item 160484) to cut the three Basic White cardstock flowers and the Mossy Meadow cardstock (item 133676) leafy stems;
- Basic Black cardstock (item 121045) for the insect's upper body, and matting panel;
- Gray Granite cardstock (item 146983) for the insect's lower body;
- Vellum 8 1/2" x 11' Cardstock (item 101856) for the insect's wings;
- watercolour paper for the lantern and the background panel;
- Mango Melody ink (item 147093) to colour the background panel - after the ink was added (using one of the Blending Brushes - item 153611) the panel was lightly spritzed with water (Stampin' Spritzers - item 126185) and then blotted dry with paper towel;
- Mango Melody ink to sponge the die cut flowers;
- Soft Suede ink (item 147115) to sponge the insect's lower body;
- Basic Gray ink (item 149165) and Memento Tuxedo Black Ink (item 132708) to colour the lantern;
- Memento Tuxedo Black Ink to stamp the sentiment;
- Craft Stampin' White Ink (item 147277) to sponge the insect's upper body;
- scrap of Vellum 12" x 12" Layering Designs (item 157764) - white script - for lamp backer;
- Wink of Stella Clear Glitter Brush (item 141897) to "paint" the Vellum wings - Vellum and Wink of Stella are a great combination for glistening wings!;
- Crumb Cake baker's twine (Baker's Twine Essentials Pack - item 155475) for the lantern bow (the ends secured with tiny dabs of glue); and
- Enamel Dot Essentials (item 160751) - Crumb Cake dots added to sentiment banner, flower centers, and lamp center.
Using an envelope punch board I made an envelope from a piece of the Perfectly Penciled 12" x 12" Designer Series Paper (item 159244).


For this 4" x 4" top-fold card I used the following additional supplies:
- Basic White Thick cardstock (item 159229) for the card base and embossed panel (embossed using the Timber 3D Embossing Folder - item 156406);
- Basic White cardstock (item 159276) for the die cut daisies;
- Old Olive cardstock (item 100702) for the die cut leafy stem;
- Soft Suede cardstock (item 115318) for the flower centers;
- Dainty Delight dies (item 160674) to cut the flowers, flower centers, and leafy stem;
- Basic Black cardstock (item 121045) for the insect's upper body;
- Gray Granite cardstock (item 146983) for the insect's lower body;
- Distressed Gold 12" x 12" Specialty Paper (item 159237) for the insect's wings;
- Soft Suede ink (item 147115) to sponge the edges of the insect's lower body, and the flower centers;
- Craft Stampin' White Ink (item 147277) to sponge the insect's upper body;
- Memento Tuxedo Black Ink (item 132708) to stamp the sentiment;
- largest circle die from Stylish Shapes dies (item 159183) to cut circle from watercolour paper;
- Mango Melody ink (item 147093), Old Olive ink (item 147090), and Mossy Meadow ink (item 147111) applied to watercolour paper circle using Blending Brushes (item 153611);
- Mossy Meadow ink to stamp leafy stems on ink blended watercolour paper circle - this was done before the sentiment was stamped, and to sponge the Old Olive cardstock leafy stem;
- Mango Melody ink - to lightly sponge tips of flowers; and
- Brushed Metallic Dots (item 156506) - one large and one small of the gold dots added.
Using an envelope punch board I made an envelope using a piece of the Sale-A-Bration Dandy Designs 12" x 12" Designer Series Paper (item 160836).
And finally . . .


For this 4 1/8" x 6 1/2" top-fold card I used the following additional supplies:
- Soft Suede cardstock (item 115318) for the card base;
- Early Espresso cardstock (item 119686) for the matting panel, and the "soil" - cut using the Grove dies (item 157844);
- Abigail Rose 12" x 12" Designer Series Paper (item 159037) for the ledger patterned background panel, and the inside background panel;
- Crumb Cake cardstock (item 120953) for the sentiment panel - cut using the Stitched Rectangles dies (item 151820);
- watercolour paper for the die cut garden urns (trimmed bases of the lanterns);
- Soft Suede ink (item 147115) to colour the watercolour paper garden urns, to sponge all edges of the DSP, and to stamp the sentiment;
- Garden Green cardstock (item 102584) and Pear Pizzazz cardstock (item 131201) for the die cut foliage;
- Flirty Flamingo cardstock (item 141416) and Sweet Sorbet cardstock (item 159268) for the die cut flowers;
- Around The Bend dies (item 160649) for cutting the foliage and the 2 large Flirty Flamingo cardstock flowers;

- Mossy Meadow ink (item 147111) to sponge die cut foliage;
- Sweet Sorbet ink (item 159216) to sponge large Flirty Flamingo cardstock flowers;
- Enamel Dot Essentials (item 160751) - Crumb Cake dots added to flower centers; and
- Brushed Brass Butterflies (item 158136) - 5 added to the card front.
From another piece of the Abigail Rose DSP I made a co-ordinating envelope using an envelope punch board.
Thank you for visiting my blog! I had lots of fun working on these projects and am certainly looking forward to playing more with the Lighting The Way Bundle!
If you are interested in purchasing any of the available Stampin' Up! products I have used in my projects, and you live in Canada and do not have a Stampin' Up! demonstrator, please do not hesitate to visit my online store found on my website https://archiesatelier.stampinup.net/ at your convenience, or simply click under the "Shop With Me" tab on the right sidebar of my blog, which will take you directly to my website and online store. I very much appreciate your business! You can browse the PDF versions of the May 2022-April 2023 Annual Catalogue, January-April 2023 Mini Catalogue, and the Sale-A-Bration Brochure anytime on my website. Remember that Stampin' Up! will only be having this one Sale-A-Bration for 2023 and it will end on February 28, 2023 - just over one week away! When browsing online don't forget to check the Clearance Rack too!!
Have fun creating!
Laurel
*It has come to my attention that quite often email correspondence from me is delivered to the recipient's spam or junk mail folder - if you have corresponded with me I have replied so be sure to check your spam or junk mail folder! Thank you!!

Comments
Post a Comment