A Few Sale-A-Bration Projects!
Hello! Today I am sharing a few projects I worked on this week using a few of the Stampin' Up! Sale-A-Bration products - the Adorable Owls stamp set (item 160269); the Dainty Flowers 12" x 12" Designer Series Paper (item 160834); and the Dandy Designs 12" x 12" Designer Series Paper (item 160836). Sale-A-Bration runs until February 28, 2023, and the Adorable Owls stamp set and the Dainty Flowers DSP are two of the items available for free with a $60.00 CDN order (before taxes and shipping); and the Dandy Designs DSP is one of the items available for free with a $120.00 CDN order (before taxes and shipping).
For the month of February Stampin' Up! has added more items to the 2023 Sale-A-Bration promotion - at both the $60.00 and $120.00 order levels - these items are in addition to those items from the Sale-A-Bration Brochure.
Now available with an order of $60.00 CDN (before taxes and shipping) are the following items (with Sale-A-Bration item numbers):
- Kindness Cards Kit - 163998;
- Let's Party Treat Packaging Kit - 164005;
- White 3/4" Frayed Ribbon (2 spools) - 164420;
- Essential Tag Punch - 164421;
- Songbird Builder Punch - 164422 (this punch co-ordinates with the Sweet Songbirds stamp set);
- Into The Clouds Embossing Folder - 164423;
- Hive 3D Embossing Folder - 164424;
- Loveliest Layers Decorative Masks (a set of five masks) - 164426; and
- Enjoy The Journey 12" x 12" Designer Series Paper - 164425.
Now available with an order of $120.00 CDN (before taxes and shipping) is the Eden's Garden Bundle (which includes the Eden's Garden stamp set and the Eden dies) - SAB item 163999.
Just a brief summary of the standard tools and supplies I used to complete my projects:
- Stampin' Cut & Emboss Machine (item 149653) - for all die cutting;
- Stamparatus (item 146276) - stamp positioning platform that allows you to make multiple impressions of a stamped image to get a dark and crisp image;
- stylus and scoring board (Simply Scored Scoring Tool - item 122334) - for scoring paper and cardstock;
- Paper Trimmer (item 152392) - for cutting paper and cardstock - can also be used to score paper and cardstock;
- Bone Folder (item 102300) - for burnishing score lines and also for giving a slight curl to cardstock - i.e. treat holder handles;
- Paper Snips Scissors (item 103579) - sharp scissors that make "fussy cutting" a whole lot more enjoyable!;
- Take Your Pick Tool (item 144107) - the paper piercer and tacky putty tips are great for picking up and placing small embellishments and die cuts; and
- for the main adhesive - Multipurpose Liquid Glue (item 110755).
For the stamped and coloured images for my projects I stamped the images on watercolour paper (Stampin' Up offers Fluid 100 5" x 7" Watercolour Paper - item 149612) using Stazon Jet Black Ink (item 101406), and coloured them using a combination of Stampin' Up inks and Watercolour Pencils (Assortment 1 - item 141709).
On with the projects!
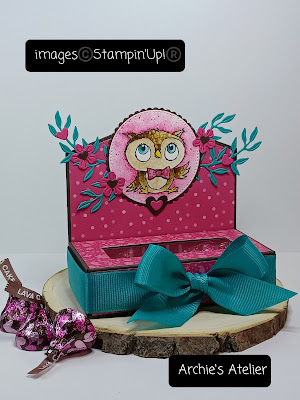
Adorable Owls Valentine Treat Box
For this treat box, which measures 4" wide x 2" deep x just under 4" tall (to the top of the back panel), I used the following additional supplies:
- for the box a 7" x 6 1/2" piece of Early Espresso cardstock (item 119686) - scored on the 7" side at 1/2", 1 1/2", 5 1/2", and 6 1/2"; and scored on the 6 1/2" side at 2", 3", 5" and 6" (the 1/2" tab is the glue tab);
- for the back panel a 4" x 4" piece of Early Espresso cardstock - the back panel (with DSP panel) was glued to the back of the completed box, with the bottom edge of the back panel flush with the bottom edge of the box;
- Basic Borders dies (item 155558) to cut the "peak" edge on the back panel (and on the Designer Series Paper panel - which was cut 1/4" smaller than the cardstock panel);
- Melon Mambo patterned paper from the 6" x 6" Designer Series Paper Assortments - Brights (item 159258) for the decorative paper panels for the back panel, and the top and front of the box, and for the fussy cut bow tie;
- Stitched Rectangles dies (item 151820) - to cut the window in the top of the box - this was done after gluing on the DSP panel and before assembling the box;
- approximately 3 1/2" x 1 3/4" piece of acetate (Window Sheets - item 142314) for the window - glued to the underside of the top panel behind rectangular window opening before completion of box assembly;
- Queen Bee dies (item 160476) for the die cut flowers, leafy stems, and small hearts (used for the flower centers and as additional "flowers" on the leafy stems);
Queen Bee dies - 160476

- Teacup dies (item 160186) for the two larger hearts glued to the bottom of the owl image circle;
- Melon Mambo cardstock (item 115320) for die cut flowers and hearts;
- Early Espresso cardstock for die cut hearts and scalloped circle (cut using the Layering Circles dies - item 151770);
- Bermuda Bay cardstock (item 131197) for the die cut leafy stems;
- Soft Suede ink (item 147115), Bermuda Bay ink (item 147096), Mango Melody ink (item 147093), and Melon Mambo watercolour pencil (Watercolour Pencils - Assortment 1 - item 141709) to colour the owl image (and background); and
- Stylish Shapes dies (item 159183) to cut the image circle.
I used a small corner rounder punch to round the corners of the end flaps of the box, and the 7/8" gross grain "almost Bermuda Bay" ribbon for the bow tied around the box was from my stash. This not-so-little treat box holds quite a few lava cake chocolate kisses for Archie's Valentine!
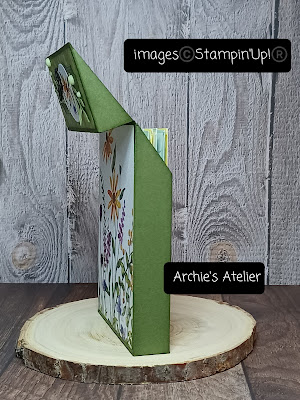
Dainty Flowers Seed Packet Holder
(with magnetic closure flip top)
For this 4 5/8" tall x 3 3/8" wide x 3/4" deep seed packet holder with magnetic closure flip top I used the following additional supplies:
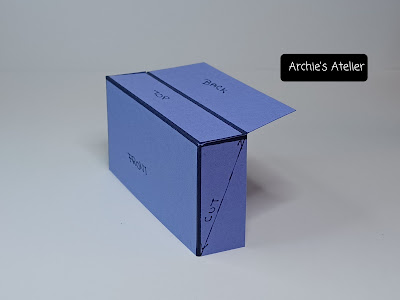
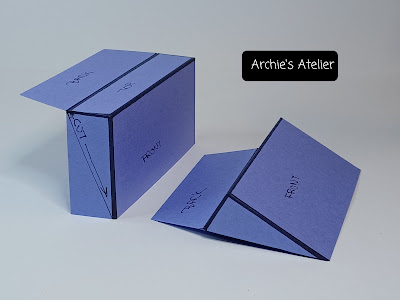
- for the box an 8 3/4" x 5 3/8" piece of Mossy Meadow cardstock (item 133676), scored on the 8 3/4" side at 3/4", 4 1/8", 4 7/8", and 8 1/4" (1/2" tab is the glue tab); and scored on the 5 3/8" side at 3/4" (bottom flaps) - additional cuts and fold lines are shown on the second template in the photo below;

- for the flip top a 3 1/2" x 4 15/16" piece of Mossy Meadow cardstock - scored on the 3 1/2" side at 1 3/4" and 2 1/2" (the 1" flap is the back flap that will be glued to the back of the box - with the back fold line of top lined up with the top edge of the back panel of the box); and scored at 3/4" from each end on the 4 15/16" side - I glued the flip top to the box before gluing on the Designer Series Paper panels to the back and front panels of the box, and before gluing on the DSP panels I glued in place the magnets (Basic Grey Small Magnetic Discs purchased at my local scrapbooking store) - that way the magnet on the front panel is hidden under the DSP panel. Additional side cuts on the top are shown on the photos below;
- Mossy Meadow ink (item 147111) - to sponge all edges of the flip top and box; and the DSP panel edges;
- Queen Bee dies (item 160476) for the die cut bee and leafy stems;
- Basic Black cardstock (item 121045) for the detailed die cut bee outline, Daffodil Delight cardstock (item 119683) for the bee body, and Vellum cardstock (item 101856) for the wings - the Daffodil Delight cardstock body and Vellum wings were trimmed from die cuts of the solid shape bee body die - to the underside of the Basic Black cardstock detailed bee die cut outline I first glued the trimmed Daffodil Delight cardstock body and then the trimmed Vellum wings. I ran a black marker around all edges of the assembled bee - just to make sure no Daffodil Delight or Vellum edges would show;
- Pear Pizzazz cardstock (item 131201) for the die cut leafy stems;
- Stylish Shapes dies (item 159183) to cut the DSP circle;
- Mossy Meadow cardstock for the die cut label - cut using the large label die from the Natural Prints dies (item 158800); and
- 2022-2024 In Colour Matte Decorative Dots (item 159186) - four of the Parakeet Party shaded dots added to the flip top front panel.
I thought this seed packet holder, which will hold at least six 4 1/2" x 3 1/4" seed packets. would make a nice little early spring gift for a gardening enthusiast!
Dandy Designs and Playing In The Rain Easter Treat Holders
For each of these four little lunch pail or purse style treat holders with magnetic closures, the construction of which I adapted from the original design by Stampin' Up! demonstrator, Angie Pyjas (Stamping With Amore), I used the Sale-A-Bration Dandy Designs Designer Series Paper, and the bunny stamp and co-ordinating die from the Playing In The Rain Bundle (item 160551). The bunny is so happy and I think we all need a little more of that!! Although available together as a Bundle (with the 10% Bundle Savings), the Playing In The Rain stamp set (item 160542) and the Playing In The Rain dies (item 160550) can of course also be purchased separate from the Bundle.
I combined the DSP with Fresh Freesia cardstock (item 155613), Granny Apple Green cardstock (item 146990), Petal Pink cardstock (item 146985), and Mango Melody cardstock (item 146989). For all die cut flowers, and the leafy stems on the Fresh Freesia, Granny Apple Green, and Petal Pink treat holders, I used the Queen Bee dies (item 160484); for the die cut tall grass on the Granny Apple Green and Mango Melody treat holders I used the Honeybee Blooms dies (item 157951); and for the die cut leafy stems on the Mango Melody treat holder I used the Mini Pocket Envelope dies (item 159167). For the Fresh Freesia holder I used Fresh Freesia cardstock and Petal Pink cardstock for the die cut flowers, and Mint Macaron cardstock (item 138337) for the leafy stems; for the Granny Apple Green holder I used Daffodil Delight patterned paper from the 6" x 6" Designer Series Paper Assortments - Brights (item 159258) for the die cut flowers, and Mossy Meadow cardstock for the die cut grass and leafy stems; for the Petal Pink holder I used Calypso Coral cardstock (item 122925) and Petal Pink cardstock for the die cut flowers, and Pear Pizzazz cardstock (item 131201) for the leafy stems; and for the Mango Melody holder I used Mango Melody cardstock and Pool Party cardstock (item 122924) for the die cut flowers, and Bermuda Bay cardstock (item 131197) for the grass and leafy stems.
The white dots used on the Fresh Freesia, Granny Apple Green, and Mango Melody treat holders are from Enamel Dot Essentials (item 160751); and the copper dots used on the Petal Pink treat holder are Brushed Metallic Dots (item 156506).
To colour bunny bodies I used either Soft Suede ink (item 147115) or Basic Gray ink (item 149165); for the noses, Sweet Sorbet ink (item 159216) - with the exception of the Petal Pink treat holder - that nose was stamped and cut from the same piece of Dandy Designs DSP as the jacket was).
For the Granny Apple Green and Mango Melody bunnies I used Granny Apple Green ink (item 147095) and Bermuda Bay ink (item 147096) respectively, to colour the jackets. The jacket for the Fresh Freesia bunny was stamped and cut from a piece of Fresh Freesia patterned Dandy Designs DSP.
For each holder I cut the front edge of the lid (and the DSP panel) using the Basic Borders dies (item 155558).
For each holder I used a set of Basic Grey Small Magnetic Discs (purchased at my local scrapbooking store). Ribbon used on all treat holders is from my stash!
For each treat holder I cut three pieces of cardstock:
- for the box a 9" x 3 1/4" piece - scored on the 9" side at 1 1/2", 4 1/4", 5 3/4", and 8 1/2" (the 1/2" tab is the glue tab); and scored on the 3 1/4" side at 1 1/2" (1 1/2" tab is the bottom);
- for the lid a 4" x 2 3/4" piece - on the back side I drew a pencil line 7/8" up from the bottom - this is the section where I applied the glue to attach the lid to the back of the box - before gluing the lid to the box but after gluing on the DSP panel I curved the lid by running it back and forth over a rounded counter edge; and
- for the handle a 4 1/4" x 1/2" wide piece - scored at 1/2" from both ends - for the Petal Pink and Mango Melody holders I also scored the handle strip lengthwise at 1/8" intervals (3 score lines).
The box portion of the holder measures 1 3/4" tall x 2 3/4" wide x 1 1/2" deep - the total height of the holder is affected by how far down on the front of the box you bring the front edge of the lid.
Thank you for visiting my blog! I had lots of fun working on these spring projects while listening to the wind howl outside!
If you are interested in purchasing any of the available Stampin' Up! products I have used in my projects, and you live in Canada and do not have a Stampin' Up! demonstrator, please do not hesitate to visit my online store found on my website https://archiesatelier.stampinup.net/ at your convenience, or simply click under the "Shop With Me" tab on the right sidebar of my blog, which will take you directly to my website and online store. I very much appreciate your business! You can browse the PDF versions of the May 2022-April 2023 Annual Catalogue, January-April 2023 Mini Catalogue, and the Sale-A-Bration Brochure anytime on my website. Remember that Stampin' Up! will only be having this one Sale-A-Bration for 2023 and it will end on February 28, 2023! Don't forget to check the Clearance Rack too!!
New Kit
Stampin' Up! has also introduced a new home decor project kit - Wreath of Blooms ($18.00 CDN). The kit includes an 8" chipboard wreath; pre-cut paper pieces that can be curled and shaped into three-dimensional blooms (for this you would need to use a bone folder); multi-coloured brads; thick twine to make the wreath hanger; and adhesive. It is recommended that to complete the project you also use a hot glue gun.
Have fun creating!
Laurel
*It has come to my attention that quite often email correspondence from me is delivered to the recipient's spam or junk mail folder - if you have corresponded with me I have replied so be sure to check your spam or junk mail folder! Thank you!!


Comments
Post a Comment