A Few More Sale-A-Bration Projects!
(Sale-A-Bration ends on February 28, 2023)
Hello! Since the Stampin' Up! annual Sale-A-Bration promotion ends next Tuesday (February 28, 2023!), today I am sharing a few projects I worked on this week using some of the Sale-A-Bration products - Dandy Designs 12" x 12" Designer Series Paper (item 160836), Adorable Owls stamp set (item 160269), Thanks A Bunch stamp set (item 160816), and Dainty Flowers 12" x 12" Designer Series Paper (item 160834). The Dandy Designs DSP is one of the products available for free with a $120.00 CDN order (before shipping and taxes); and the Adorable Owls stamp set, Thanks A Bunch stamp set, and Dainty Flowers DSP are three of the products available for free with a $60.00 CDN order (before shipping and taxes).
Just a quick summary of the basic tools and supplies I used to complete my projects:
- Paper Trimmer (item 152392) - for cutting cardstock and paper - can also be used for scoring. Since the Trimmer is marked in 1/16" increments I did use it for scoring the cardstock for the Small Lindt Bunny Box;
- scoreboard and stylus (Simply Scored Scoring Tool - item 122334) - for scoring cardstock and paper (if not using the scoring feature on the Paper Trimmer);
- Bone Folder (item 102300) - to burnish score lines for sharp creases;
- Take Your Pick Tool (item 144107) - includes 2 changeable double-ended tips with paper piercer, mini spatula, small stylus, large stylus, and the tacky putty tip. The paper piercer/mini spatula and tacky putty tips are a tremendous help in picking up and placing small embellishments and die cuts;
- Stampin' Cut & Emboss Machine (item 149653) - for all die cutting and embossing;
- Stamparatus (item 146276) - stamp positioning platform - a great help when you need to stamp an image several times for a crisp dark image;
- Paper Snips Scissors (item 103579) - a nice pair of sharp scissors helps make fussy cutting a little easier! and
- for the main adhesive, Multipurpose Liquid Glue (item 110755).
On with the projects!
Small Lindt Bunny Box
For this lidded box with window that measures 3 3/16" tall x 1 13/16" wide x 1 13/16" deep, and holds a small Lindt chocolate bunny, I used the following supplies:
- Fresh Freesia cardstock (item 155613) for the box, inset platform, and lid: - for the box a 4 15/16" x 7 3/4" piece scored on the 4 15/16" side at 1 13/16" (bottom flaps), and scored on the 7 3/4" side at 1 13/16", 3 5/8", 5 7 16", and 7 1/4" (1/2" tab is the glue tab); for the inset a 2 3/4" x 2 3/4" piece scored at 1/2" on all four sides; and for the lid a 2 15/16" x 2 15/16" piece also scored at 1/2" on all four sides;
- 1 1/4" diameter circle die from Stylish Shapes dies (item 159183) to cut the opening in the inset, and the window opening in the front panel of the box;
Stylish Shapes dies - 159183
- Fresh Freesia patterned paper from Dandy Designs DSP for the front, back and side panels of the box, and for the top and side panels of the lid (DSP pieces cut 1/8" smaller than the cardstock panels);
- small piece of acetate (Window Sheets - item 142314) - glued on the back of the front panel of the box behind the window opening;
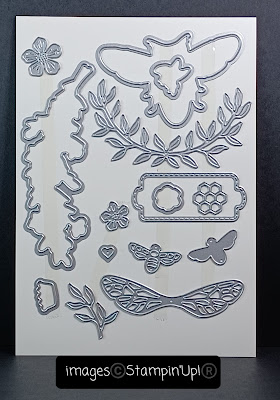
- Queen Bee dies (item 160484) to cut the two flowers and leafy stem;
Queen Bee dies - 160484
- Pear Pizzazz cardstock (item 131201) for the die cut leafy stem, and the hole reinforcer on the tag;
- scrap of watercolour paper that had been sponged with Mango Melody ink (item 147093), lightly spritzed with water (Stampin' Spritzers - item 126185) and blotted dry with paper towel, for the die cut flowers;
- Thanks A Bunch stamp set to stamp small bunch of carrots and the leaves on small piece of watercolour paper using Mango Melody ink for the carrots and Old Olive ink (item 147090) for the leaves;
- Tailor Made Tags dies (item 155563) to cut the watercolour paper tag and Pear Pizzazz cardstock hole reinforcer;
- Linen Thread (item 104199) - to tie tag to box lid; and
- large white dot from Enamel Dot Essentials (item 160751) for the flower center.
I assembled the inset platform first and then assembled the box around it - I thought because of the size of the box this might be an easier process than fitting the inset in through the bottom of the partially assembled box. I glued the DSP panel to the box front panel before cutting the window opening and then glued on the acetate window, glued on the remaining DSP panels and then assembled the box around the inset. I applied glue to the front panel of the inset and lined up the bottom edge of the inset with the score line for the bottom flap on the inside of the front panel of the box. and then "wrapped" the box around the remaining sides of the inset, finishing with the glue tab and back panel. After the inset was glued into the box I glued the bottom flaps. (The photos below do not show the DSP panels.)
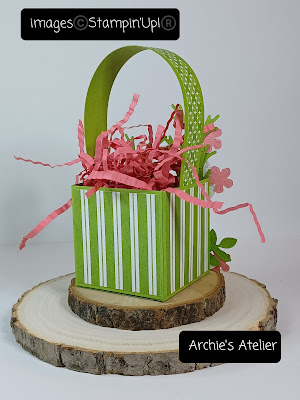
Granny Apple Green Bunny Basket
For this basket, the box portion of which measures 2" tall x 2" wide x 2" deep, I used the following supplies:
- an 8 1/2" x 4" piece of Granny Apple Green cardstock (item 146990) for the box portion, scored on the 8 1/2" side at 2', 4", 6", and 8" (1/2" tab is the glue tab), and scored on the 4" side at 2" (bottom flaps);
- an 8 1/2" x 3/4" piece of Granny Apple Green cardstock for the handle;
- Granny Apple Green patterned paper from Dandy Designs DSP for the panels on all sides of the box and for the handle panel (8 1/2" x 1/2") - the DSP panels for the box were cut 1/8" smaller than the cardstock panels;
- Playing In The Rain Bundle (item 160551), which includes the Playing In The Rain stamp set (item 160542) and Playing In The Rain dies (item 160550) for the bunny stamp, co-ordinating die, and grass dies;
- watercolour paper for the bunny - stamped using Stazon Jet Black Ink (item 101406), and coloured using Basic Gray ink (item 149165), Sweet Sorbet ink (item 159216), and Granny Apple Green ink (item 147095);
- Cup of Tea stamp set (item 158661) for the "sweet" sentiment, stamped on Flirty Flamingo cardstock (item 141416) using Sweet Sorbet ink;
- Mini Pocket Envelope dies (item 159167) to cut the sentiment label, and two leafy stems;
Mini Pocket Envelope dies - 159167
- Queen Bee dies (item 160484) to cut the flowers;
- Granny Apple Green cardstock for the die cut grasses and leafy stems;
- Flirty Flamingo cardstock for the die cut flowers; and
- white dots from Enamel Dot Essentials (item 160751) for the flower centers.
The handle was glued to the inside of the sides of the box - approximately 1" from each end of the handle.
I made the shred from some thinner cardstock that toned in with Flirty Flamingo - I cut narrow strips, ran them through a crimper and then scrunched them up in my hand. Making shred is a labour of true love!!
Four Carrots Window Box
For this box, which measures 3 1/2" tall x 4 1/2" wide x 3/4" deep, and which holds four small chocolate carrots (each secured to the inside of the box with a small strip of double-sided tape - Tear & Tape Adhesive - item 154031), I used the following supplies:
- for the base of the box a 6" x 5" piece of Mossy Meadow cardstock (item 133676), scored at 3/4" on all four sides;
- for the lid a 6 1/16" x 5 1/16" piece of Mossy Meadow cardstock, also scored at 3/4" on all four sides;
- Mossy Meadow patterned paper from Dainty Flowers DSP for the top and side panels of the lid - each DSP panel cut 1/8" smaller than the cardstock panels;
- Mossy Meadow ink (item 147111) to sponge all DSP edges - including around the die cut window opening;
- Stitched Rectangles dies (item 151820) - rectangle die with 2 1/4" x 3 9/16" opening to cut the window opening in the top of the lid (after the DSP panel was glued on);
- an approximately 4 1/8" x 3" piece of acetate (Window Sheets - item 142314) - glued behind the window opening on the lid before assembly of lid completed;
- a piece of Pumpkin Pie patterned paper from 6" x 6" Designer Series Paper Assortments - Regals (item 159256) just a shade under 4 1/2" x 3 1/2" for the box "liner";
- Thanks A Bunch stamp set for the sentiment, stamped on watercolour paper using Stazon Jet Black Ink (item 101406) - watercolour paper with stamped sentiment embossed using the Splatters Embossing Folder from the Stripes & Splatters 3D Embossing Folders (item 157980), then cut using the largest banner die from Stylish Shapes dies (item 159183). The trimmed banner was sponged with Mango Melody ink (item 147093) and Pumpkin Pie ink (item 147086); and
- small piece of Pumpkin Pie twine from Three Twine Combo Pack (item 160597 - also includes Garden Green and Coastal Cabana twine) - tied through the green button that was from my stash.
I used a 1/2" circle punch to cut the notches in two shorter sides of the lid.
Balmy Blue Bunny Box
For this lidded box that measures 4 3/4" tall x 1 3/4" wide x 1" deep, I used the following supplies:
- a 6" x 5 3/4" piece of Balmy Blue cardstock (item 146982) for the box, scored on the 6" side at 1", 2 3/4", 3 3/4", and 5 1/2" (1/2" tab is the glue tab), and scored on the 5 3/4" side at 1" (bottom flaps);
- a 3 13/16" x 3 1/16" piece of Balmy Blue cardstock for the lid, scored at 1" on all four sides;
- Balmy Blue patterned paper from Dandy Designs DSP for the panels for the front, back and sides of the box, the top and sides of the lid, and the bunny shirt (fussy cut and glued over the stamped bunny - before gluing it down I ran a black marker around the edges of the shirt);
- Playing In The Rain Bundle (item 160551) for the bunny stamp and co-ordinating die;
- Stazon Jet Black Ink (item 101406) to stamp the bunny on watercolour paper;
- Basic Gray ink (item 121044) and Sweet Sorbet ink (item 159216) to colour the bunny;
- Queen Bee dies (item 160484) to cut the flowers from Polished Pink cardstock (item 155710);
- Honeybee Blooms dies (item 157951) to cut the two grasses and trimmed flower stem silhouette from Granny Apple Green cardstock (item 146990);
Honeybee Blooms dies - 157951
- Summer Shadows dies (item 156618) to cut the double-leaf sprig from Granny Apple Green cardstock; and
Summer Shadows dies - 156618
- Parakeet Party shaded dots from 2022-2024 In Colour Matte Decorative Dots (item 159186) for the flower centers.
The almost Polished Pink and white 5/8" gingham ribbon tied around the lid is from my Dollar Tree stash!
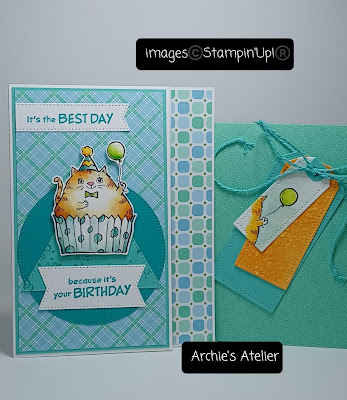
The Best Day Card
I saw this fold style of card recently demonstrated on a video tutorial and I thought it was a great style for showcasing co-ordinating Designer Series Papers - it is also a simple "fun fold" card to make which is great - so I made two! It is a "standard" size card (4 1/4" x 5 1/2") with 1" trimmed off the width of the front flap. The cardstock for the card base is 5 1/2" x 7 1/2", scored on the 7 1/2" side at 4 1/4" so that the front flap is 3 1/4" and the back flap is 4 1/4".For this card I used the following supplies:
- Basic White Thick cardstock (item 159229) for the card base;
- Dandy Designs DSP for the front panel and inside strip;
- Coastal Cabana cardstock (item 131297) for the matting panel and die cut triangle (cut using the recent addition to the Clearance Rack, Stitched Triangles dies - item 152710);
- Bermuda Bay cardstock (item 131197) for the die cut circle (cut using the largest circle die from the Stylish Shapes dies - item 159183), and the trimmed sentiment matting banner (cut using the largest banner die from the Stylish Shapes dies);
- Best Day stamp set (item 160798) for the puffy cat cupcake (who could resist?), party swirls and dots, and sentiments;
Best Day stamp set - 160798
- Stazon Jet Black Ink (item 101406) to stamp full and partial cat images on watercolour paper;
- Mango Melody ink (item 147093), Pumpkin Pie ink (item 147086), Pool Party ink (item 147107), Bermuda Bay ink (item 147096), Sweet Sorbet ink (item 159216), and Granny Apple Green ink (item 147095) to colour full cat image;
- Mango Melody ink, Pumpkin Pie ink, and Granny Apple Green ink to colour partial cat image for tag;
- Bermuda Bay ink to stamp sentiments on Basic White cardstock (item 159276), and the party swirls and dots on the die cut triangle;
- banner dies from Stylish Shapes dies to cut the sentiment banners;
- Mini Stampin' Dimensionals (item 144108) to attach the fussy cut full cat image to the front of the card;
- Tailor Made Tags dies (item 155563) to cut the partial cat image watercolour paper tag; the embossed watercolour paper tag (embossed using the Splatters Embossing Folder from the Stripes & Splatters 3D Embossing Folders - item 157980) then sponged with Mango Melody and Pumpkin Pie inks; and the Coastal Cabana cardstock tag and hole reinforcer;
- another piece of Dandy Designs DSP to make the envelope, using an envelope punch board; and
- Coastal Cabana twine (Three Twine Combo Pack - item 160597 - that also includes Garden Green and Pumpkin Pie twine) - tied around the envelope.
And finally . . .
Hey, There Card
- Petal Pink patterned paper from Dandy Designs DSP for the front panel and inside strip;
- Soft Suede cardstock (item 115318) for the matting panels, and the embossed die cut circle;
- Timeworn Type 3D Embossing Folder (item 156505) to emboss a piece of Soft Suede cardstock prior to die cutting the circle using the Stylish Shapes dies (item 159183);
- Queen Bee dies (item 160484) to cut the flowers (Petal Pink cardstock - item 146985) and the leafy stems (Pool Party cardstock - item 122924);
- image from Adorable Owls stamp set stamped on watercolour paper using Stazon Jet Black Ink (item 101406) and coloured using Soft Suede ink (item 147115), Basic Gray ink (item 149165), Sweet Sorbet ink (item 159216), Granny Apple Green ink (item 147095), Mango Melody ink (item 147093), and Pool Party ink (item 147107);
- Stylish Shapes dies to cut owl image square;
- Soft Suede ink to stamp the "Hey, there" sentiment from Thanks A Bunch stamp set on Basic White cardstock (item 159276) - sentiment banner cut using the smallest banner die from the Stylish Shapes dies;
- Crumb Cake dots from Enamel Dot Essentials (item 160751) - for flower centers, and one of each of the three sizes added to the bottom of the front panel; and
- Linen Thread (item 104199) - before it was glued to the inside of the card I added an approximate 5 3/4" length of Linen Thread to matted inside panel - securing the ends to the top and bottom of the back of the matted panel with small strips of clear tape, and then used a second piece to tie the bow.
Thank you for visiting my blog! I had lots of fun working on these projects using some of the Sale-A-Bration products!
If you are interested in purchasing any of the available Stampin' Up! products I have used in my projects, and you live in Canada and do not have a Stampin' Up! demonstrator, please do not hesitate to visit my online store found on my website https://archiesatelier.stampinup.net/ at your convenience, or simply click under the "Shop With Me" tab on the right sidebar of my blog, which will take you directly to my website and online store. I very much appreciate your business! You can browse the PDF versions of the May 2022-April 2023 Annual Catalogue, January-April 2023 Mini Catalogue, and the Sale-A-Bration Brochure anytime on my website. Remember that it is not too late to take advantage of the Sale-A-Bration promotion - but you should hurry as it ends on February 28, 2023!! When browsing online don't forget to check the Clearance Rack too for some great deals - Stampin' Up! has recently included quite a few stamp sets, including the following:
- Home & Garden (item 157910);
- Flowering Rain Boots (item 157689);
- Kite Delight (item 157748);
- On The Horizon (item 157770);
- Nuts & Bolts (item 157650);
- Welcoming Window (item 158237);
- Hey Birthday Chick (item 154464);
- Wild Roses Background Stamp (item 154363); and
- Garden Wishes (item 154408).
Have fun creating!
Laurel
*It has come to my attention that quite often email correspondence from me is delivered to the recipient's spam or junk mail folder - if you have corresponded with me I have replied so be sure to check your spam or junk mail folder! Thank you!!
Don't be sad that Sale-A-Bration is almost over - there will be lots of exciting new products coming very soon!


Comments
Post a Comment