Playing With Designer Series Paper!

Hello! Today I am sharing a few projects I worked on this week featuring some of the Stampin' Up! Designer Series Papers. I have a bad habit (this is but one of many!) of stockpiling my Designer Series Papers - afraid to use them until I find just the right project! One of my art and crafting resolutions for this new year is to go ahead and use the paper!!
In my projects I have used two of the Designer Series Papers featured in the May 2022-April 2023 Annual Catalogue - Abigail Rose 12" x 12" DSP (item 159037) and Awash In Beauty 12" x 12" DSP (item 158973), as well as the very pretty Sale-A-Bration Dainty Flowers 12" x 12" DSP (item 160834). During Sale-A-Bration (January 5, 2023-February 28, 2023) the Dainty Flowers DSP is one of the products available for free with a $60.00 CDN (before taxes and shipping) order - and it co-ordinates of course with the Dainty Delight Bundle (item 160675) featured in the January-April 2023 Mini Catalogue! In a couple of my projects I have also used the stamped images and dies from another new Bundle - the Playing In The Rain Bundle (item 160551), which includes the Playing In The Rain stamp set (item 160542) and the Playing In The Rain dies (item 160550) - another stamp set with some very cute animal characters!

Playing In The Rain stamp set
(160542)

Playing In The Rain dies
(160550)
Just a brief summary of the standard tools and supplies I used to complete the projects:
- Stampin' Cut & Emboss Machine (item 149653) - for all die cutting;
- Paper Trimmer (item 152392) - for cutting and scoring paper and cardstock;
- Bone Folder (item 102300) - for burnishing score lines;
- Paper Snips Scissors (item 103579) - for "fussy" cutting - keeping a sharp pair of scissors strictly for this purpose certainly helps make this little chore a lot easier for me!;
- Take Your Pick tool (item 144107) - the paper piercer and putty tips are very handy in picking up and placing small die cuts and embellishments;
- Stamparatus (item 146276) - a stamp positioning tool; and
- Multipurpose Liquid Glue (item 110755) - for the main adhesive.
For images that I have watercoloured I have stamped the images on watercolour paper (Fluid 100 5" x 7" Watercolour Paper - item 149612) using Stazon Jet Black Ink (item 101406).
On with the projects!
Folios
For the construction of the folios I followed the instructions provided by Maymay Made It Crafts in her May 21, 2022, You Tube video, "I Cannot Stop Making These!" and I have provided the link to her video here
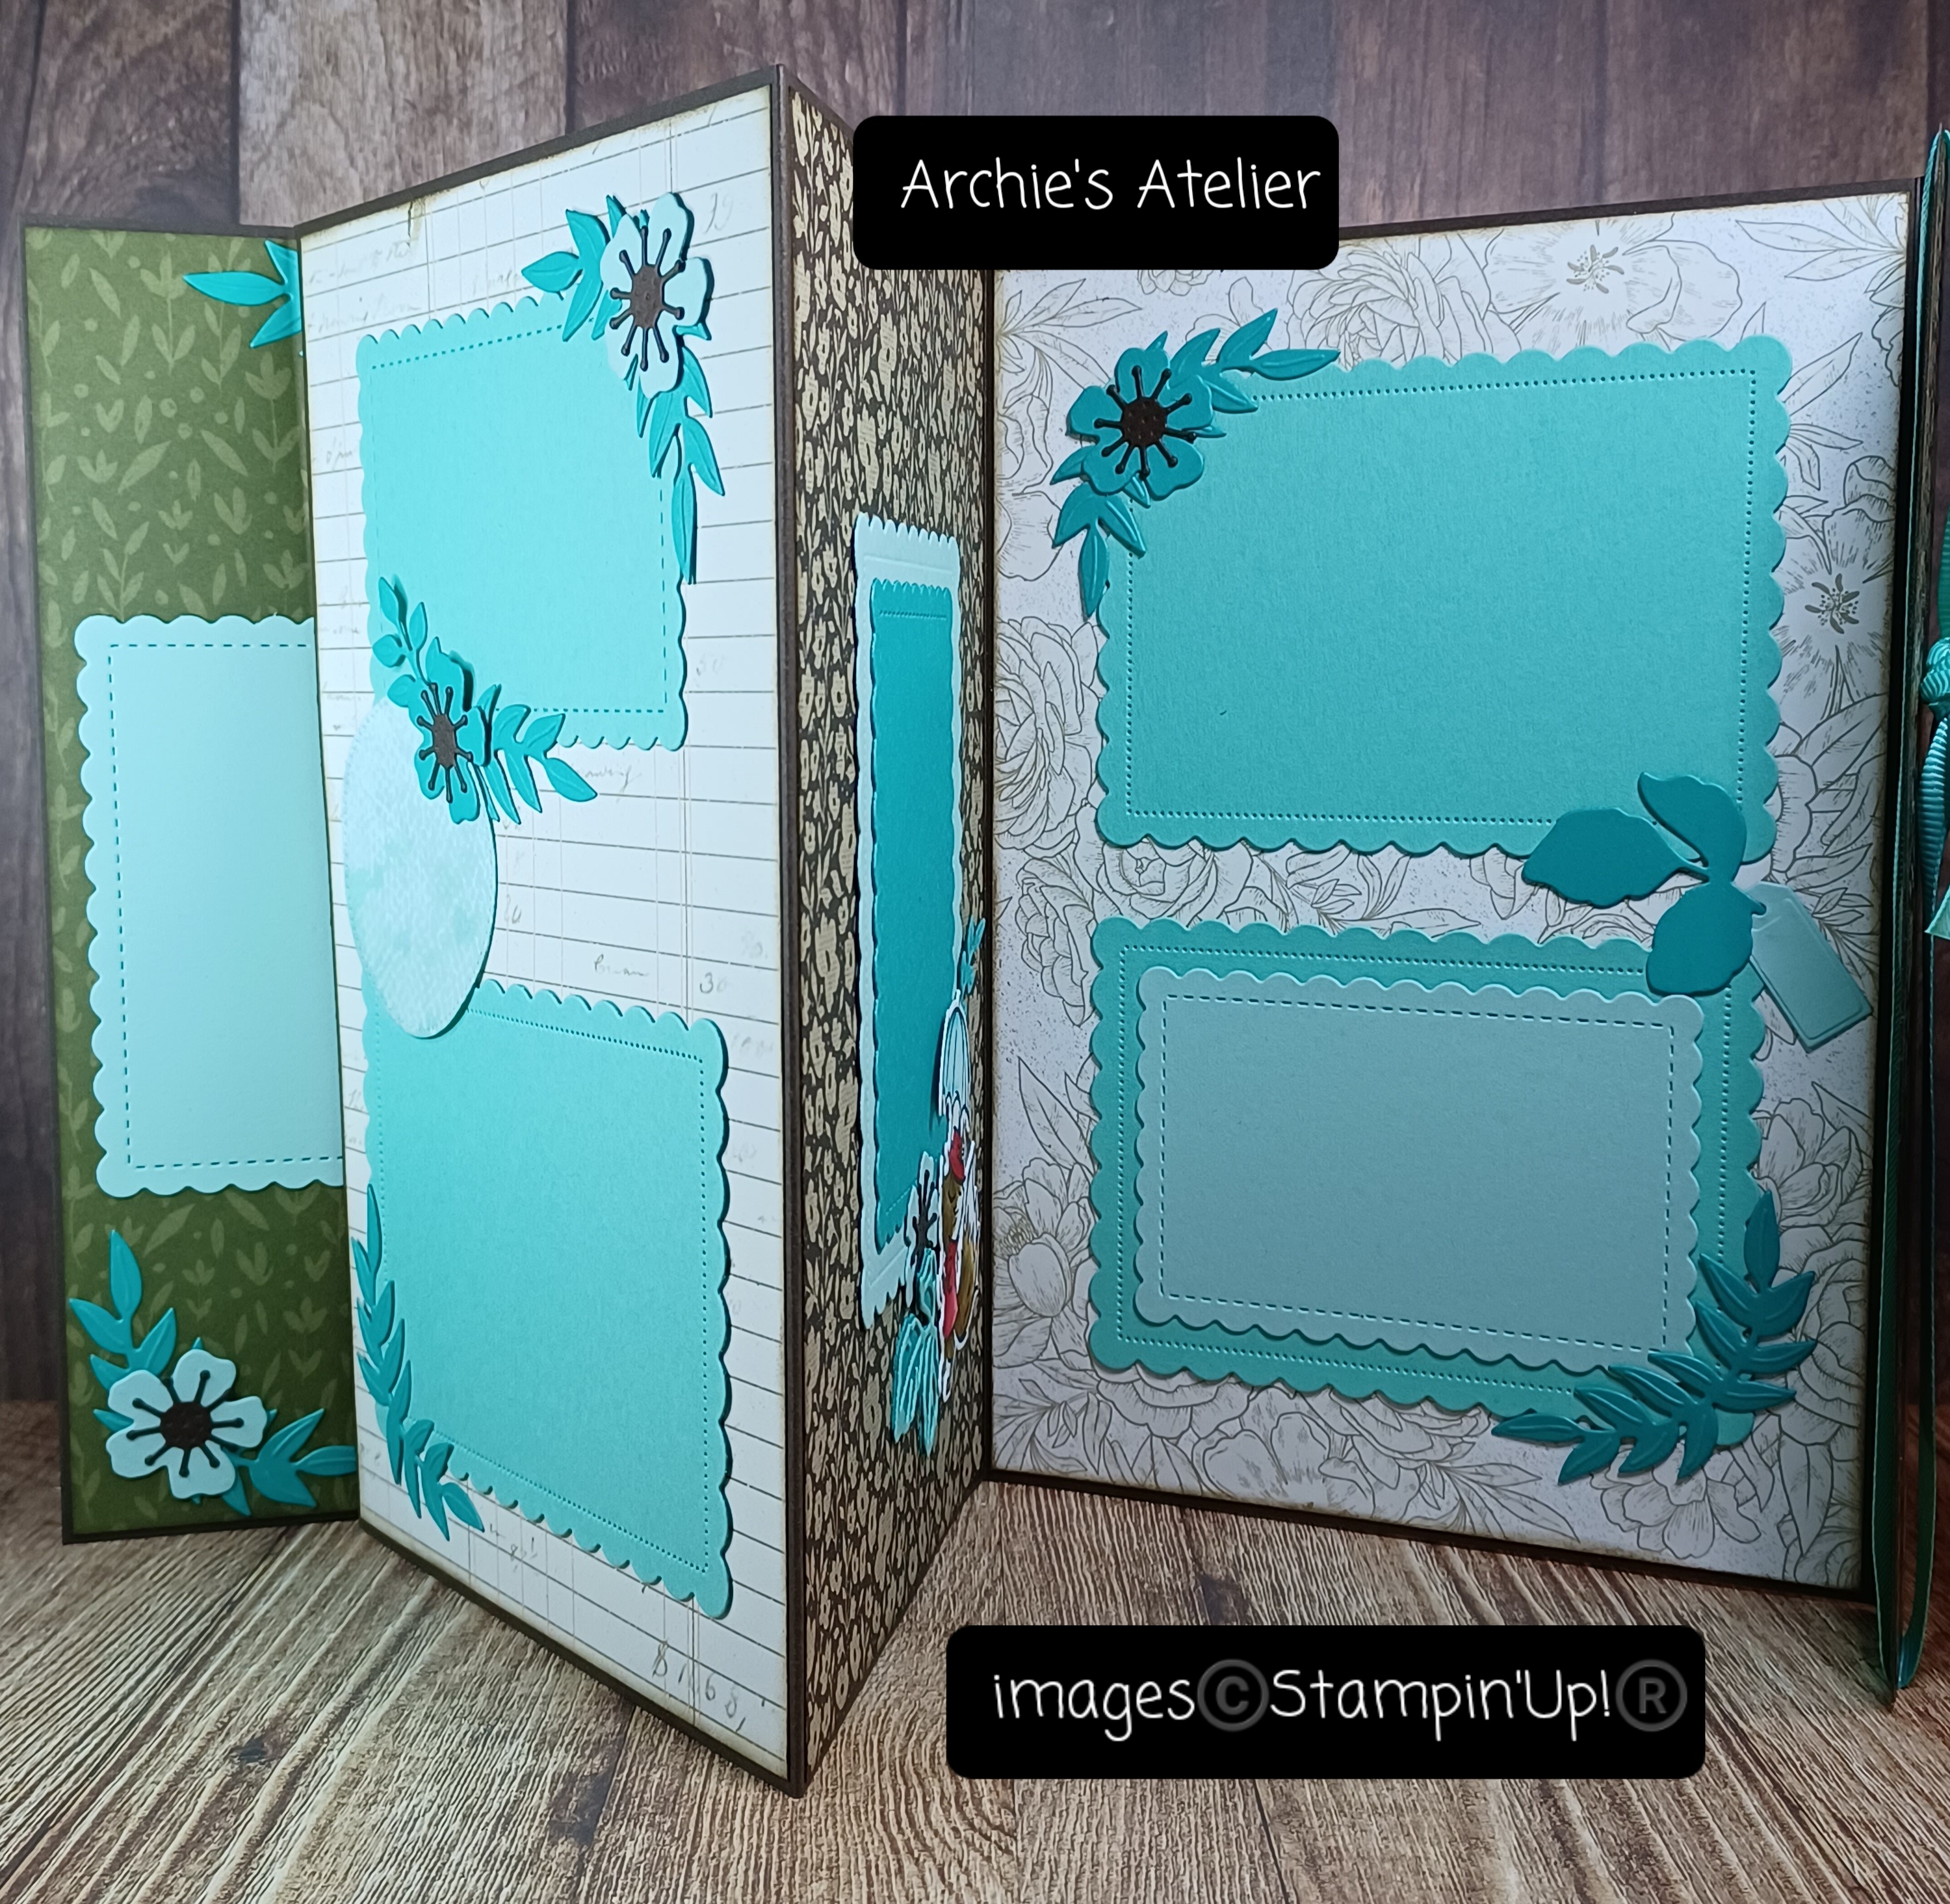
Three sheets of cardstock are needed for the folio base - for the Abigail Rose folio I used three 8 1/2" x 11" sheets: two sheets are scored on the 11" side at 3", 9", and 9 1/4"; and the third sheet is scored in half at 5 1/2". For the Dainty Flowers square folio I trimmed the cardstock sheets to 6" x 11" - still scoring as for the first folio. For the magnetic closure for each folio I used two Basic Grey small magnets (a "+" and a "-"), which I purchased at my local scrapbooking shop - and they are covered by the DSP panels. I used the Scalloped Contours dies (item 155560) to cut all the photo mats for both folios. The decorative pieces added around the photo mats are not completely glued down so that photos can be slipped under the sections that overlap onto the photo mats. I used a corner rounder punch on the corners of the closure tab and tab DSP panel on both folios.


Closed, the Abigail Rose folio measures 8 1/2" tall x 6" wide with a 1/4" spine.


For this folio I used the following additional supplies:
- Early Espresso cardstock (item 119686) for the folio base, flower centers (cut using the Poppy Moments dies - item 151594), and cover tag hole re-enforcer (cut using the Tailor Made Tags dies - item 155563);
- Awash In Beauty 12" x 12" Designer Series Paper (item 158973) - for the Mossy Meadow patterned paper used on the inside flaps;
- Bermuda Bay cardstock (item 131197), Coastal Cabana cardstock (item 131297), and Pool Party cardstock (item 122924) - photo mats, flowers, leaves, and cover tag (cut using the Tailor Made Tags dies);
- Stylish Shapes dies (item 159183) to cut the watercolour paper circles - to create the texture on these circles the circles were sponged with Pool Party ink (item 147107) and then a very damp paper towel was pressed into the ink;
- leaf sprig dies from Grove dies (item 157844), and Mini Pocket Envelope dies (item 159167), solid and outline leaf dies from Summer Shadows dies (item 156618), and semi-circle leaf sprig from Forever Flourishing dies (item 152714) to cut the foliage;
- small flower die from Summer Shadows dies to cut the flowers;
- Layering Circle dies (item 151770) to cut the Bermuda Bay cardstock image matting scalloped circle for the front cover tag;
- small tag die from Mini Pocket Envelope dies to cut the small Pool Party cardstock tag;
- Soft Suede ink (item 147115) - to sponge all edges of DSP panels;
- Soft Suede ink, Sweet Sorbet ink (item 159216), Real Red ink (item 147084), Mango Melody ink (item 147093), and Bermuda Bay ink (item 147096) to colour the animal images; and
- Crumb Cake baker's twine (Baker's Twine Essentials Pack - item 155475) for the tag bow.
Closed, the Dainty Flowers folio measures 6" x 6", with a 1/4" spine.


Additional supplies used to complete the folio:
- Mossy Meadow cardstock (item 133676) for the folio base and photo mats;
- Dainty Delight dies (item 160674) for the flowers, flower centers, stems and leaves, and Queen Anne's Lace stalks (the QAL "flowers" were sponged using Craft Stampin' White Ink - item 147277);

- leaf sprig dies from Grove dies (item 157844) and Mini Pocket Envelope dies (item 159167), and semi-circle leaf sprig from Forever Flourishing dies (item 152714) to cut the foliage;
- Mango Melody cardstock (item 146989), Highland Heather cardstock (item 146986), Orchid Oasis cardstock (item 159267), and Starry Sky cardstock (item 159263) for flowers;
- Mango Melody cardstock and Early Espresso cardstock (item 119686) for flower centers;
- Old Olive cardstock (item 100702) and Pear Pizzazz cardstock (item 131201) for foliage;
- Crumb Cake cardstock (item 12-953) and Early Espresso cardstock for the cover tag and cover tag hole re-enforcer respectively, both of which were cut using the Tailor Made Tags dies (item 155563);
- Pumpkin Pie watercolour pencil (Watercolour Pencils - Assortment 1 - item 141709) to shade the Mango Melody flower centers - the pencil was used just as a colour pencil - no water added;
- Mango Melody ink (item 147093) - to sponge the petals of the Mango Melody cardstock flowers;
- Starry Sky ink (item 159212) to sponge the petals of the Highland Heather cardstock flowers and of the Orchid Oasis and Starry Sky cardstock flower stalks;
- Soft Suede ink (item 147115) to sponge all edges of all DSP panels and to add splatters to front cover Crumb Cake cardstock tag;
- Soft Suede ink, Old Olive ink (item 147090), Mossy Meadow ink (item 147111), and Mango Melody ink to colour the turtle image - although I think the little turtle character is adorable I am not sure I would be thrilled to have one visit me in the garden - even if he was bearing flowers!; and
- Crumb Cake baker's twine (Baker's Twine Essentials Pack - item 155475) to wrap around the outside flap.
To fit with the garden theme of the folio I also used a few retired dies from last year to cut the garden implements - the Rain Boots dies (item 157690) for the little cultivator, and the Garden dies (item 157918) for the shovels and shears. For all handles I used Crumb Cake cardstock, which I had embossed using the Timber 3D Embossing Folder (item 156406); for the shovel handles I used Basic Black cardstock (item 121045), and for all blades Basic Gray cardstock (item 121044). The embossed handles were sponged with Soft Suede ink, and the blades with Craft Stampin' White Ink (item 147277) and a bit of Soft Suede ink.
Double Gate-Fold Cards
For these two cards I started with an 8 1/2" x 10 1/2" piece of Merry Merlot cardstock (item 146979), scored on the 10 1/2" side at 1 3/4", 3 1/2", 7", and 8 3/4". I then cut the cardstock on the 8 1/2" side at 5 1/2". The closed dimensions for the two cards are: 5 1/2" x 3 1/2", and 3" x 3 1/2". I also used Merry Merlot cardstock for the belly bands (1/2" wide), and additional matting panels.


For the first card I used the following additional supplies:
- Balmy Blue cardstock (item 146982) for matting panels, base of belly band decoration, and sentiment tag's hole re-enforcer;
- the retired, and recent addition to the Clearance Rack, Flowering Fields 12" x 12" Designer Series Paper (item 157670) for the DSP panels for the outer panels, and the "friend" sentiment strip;
- Awash In Beauty 12" x 12" Designer Series Paper (item 158973) for the center and back DSP panels, the DSP panels for the panels flanking the center panel, and the "fussy" cut bouquet on the belly band decoration;
- Dainty Flowers DSP - Mossy Meadow patterned paper for the background for the "fussy" cut bouquet;
- Dainty Delight stamp set (item 161078) for the "Sending love during this season of growth" sentiment - stamped on Basic White cardstock (item 159276) using Memento Tuxedo Black Ink (item 132708);
- Happiness Abounds stamp set (item 159238) for the "friend" sentiment, stamped on the DSP strip using Memento Tuxedo Black Ink;
- Tailor Made Tags dies (item 155563) to cut the sentiment tag and Balmy Blue cardstock hole re-enforcer;
- white baker's twine (Baker's Twine Essentials Pack - item 155475) - for the tag loop; and
- Opal Rounds (item 154289) - three added to the belly band decoration.


- Dainty Flowers 12" x 12" Designer Series Paper (Sale-A-Bration item 160834) for all DSP panels;
- Merry Merlot patterned paper from the 6" x 6" Designer Series Paper Assortments - Neutrals (item 159257) for the matting panel for the center panel;
- Basic White cardstock (item 159276) for the back panel;
- Dainty Delight stamp set (item 161078) for the "The best is yet to come" sentiment - stamped on the DSP using Memento Tuxedo Black Ink (item 132708). This sentiment brings to mind my grandmother's rather ominous version: "keep smiling the worst is yet to be"! - I think we would all prefer the best is yet to come!!; and
- Linen Thread (item 104199) - for the bow tied around the matted DSP panel on the bellyband decoration.
And finally . . .


Thank you for visiting my blog! I had lots of fun working on these projects!
If you are interested in purchasing any of the available Stampin' Up! products I have used in my projects, and you live in Canada and do not have a Stampin' Up! demonstrator, please do not hesitate to visit my online store found on my website https://archiesatelier.stampinup.net/ at your convenience, or simply click under the "Shop With Me" tab on the right sidebar of my blog, which will take you directly to my website and online store. I very much appreciate your business! You can browse the PDF versions of the May 2022-April 2023 Annual Catalogue, January-April 2023 Mini Catalogue, and the Sale-A-Bration Brochure anytime on my website. Stampin' Up! will only be having this one Sale-A-Bration for 2023!

Have fun creating!
Laurel
*It has come to my attention that quite often email correspondence from me is delivered to the recipient's spam or junk mail folder - if you have corresponded with me I have replied so be sure to check your spam or junk mail folder! Thank you!!

Comments
Post a Comment