A Few Heart Projects!
(getting started on Valentine projects)

Hello! Today I am sharing a few early Valentine projects I worked on this week featuring Stampin' Up! products and supplies from the May 2022-April 2023 Annual Catalogue, the January-April 2023 Mini Catalogue, and a little bit of Sale-A-Bration Designer Series Paper! For the hearts in my projects I used the following:
- Heart Punch Pack (item 151292) - this pack includes two heart punches - a plain edge heart (approximately 2" across), and a scallop edge heart (approximately 2 1/8" across), which is a perfect frame for the plain edge heart - these punches are fairly recent additions to my collection so I was looking forward to making use of them in my Valentine projects - and I certainly did as I used them in all of the projects!; and

- Teacup dies (item 160186) - there are two sizes of heart dies - the larger heart is approximately 1/2" across, and the smaller heart is approximately 1/4" across.

Teacup dies - 160186
For flowers and leaves I used the following dies:
- for leaves and two sizes of flowers the Queen Bee dies (item 160484) - the Queen Bee Bundle (item 160485), featured in the Mini Catalogue, includes the Queen Bee dies and the Queen Bee stamp set - but the dies and stamp set can of course be purchased individually as well. There is also a tiny heart die included with the dies; and

Queen Bee dies - 160484
- for additional leaves the leafy sprig die from the Mini Pocket Envelope dies (item 159167).

Mini Pocket Envelope dies - 159167
A quick summary of the standard tools and supplies I used to complete my projects:
- Paper Trimmer (item 152392) - for paper and cardstock trimming - can also be used for scoring;
- scoreboard and stylus (Simply Scored Scoring Tool - item 122334) - for scoring paper and cardstock;
- Bone Folder (item 102300) - for burnishing all score lines to ensure sharp creases;
- Take Your Pick Tool (item 144107) - the paper piercer and tacky putty tips are very handy for placing small embellishments and die cuts;
- Stampin' Cut & Emboss Machine (item 149653) - for all die cutting and embossing; and
- for the main adhesive - Multipurpose Liquid Glue (item 110755) - I transfer the glue to a small fine-tipped bottle that has a pin that keeps the tip clear and free from drying glue - I purchase these little fine-tipped bottles at my local scrapbooking store - the fine tip certainly helps when you want a narrow bead or tiny dab of glue.
On with the projects!
Lidded Treat Boxes
I made three slightly different sizes of lidded treat boxes.


For this box that measures 2 3/4" x 2 3/4" x 3/4" deep I used the following additional supplies:
- for the box a 4 1/4" x 4 1/4" piece of Sweet Sorbet cardstock (item 159268), scored at 3/4" on all four sides;
- for the lid a 4 5/16" x 4 5/16" piece of Sweet Sorbet cardstock, also scored at 3/4" on all four sides;
- Basic White cardstock (item 159276) for the lid's matting square (cut using the Stylish Shapes dies - item 159183), and for the embossed punched heart (embossed using the Timeworn Type 3D Embossing Folder - item 156505);
- Sweet Sorbet cardstock for the lid's panel - the plain edge heart was cut out of this panel and then the embossed Basic White cardstock heart was glued into the opening;
- Sweet Sorbet patterned paper from the 2022-2024 In Colour 6" x 6" Designer Series Paper Assortments (item 159253) for the decorative paper panels for the sides of the lid, and for the scallop heart frame on the top of the lid (the heart frame was cut by first punching out the plain edge heart and then lining the scallop edge punch over the opening to punch the narrow frame);
- Coastal Cabana cardstock (item 131297) for the bow, which was cut using the Mini Pocket Envelope dies (item 159167);
- Flirty Flamingo cardstock (item 141416) for the two small hearts (cut using the Teacup dies);
- Bermuda Bay cardstock (item 131197) for the sentiment tag (cut using the small tag die from the Mini Pocket Envelope dies) - the "sweet" sentiment, from the Cup of Tea stamp set (item 158661), was stamped using Bermuda Bay ink (item 147096);
- Classic Matte Dots (item 158146) - one large and two small of the white dots added to the lid (large dot used in the center of the bow); and
- Wink of Stella Clear Glitter Brush (item 141897) - by slapping the brush against the Bone Folder I splattered the matted lid panel before adding the two little hearts and the sentiment label.
I used a 1" circle punch to cut little thumb notches in two sides of the lid.


For this box, which measures 2 3/4" x 2 3/4" x 3/4" deep, I used the following additional supplies:
- for the box a 4 1/4" x 4 1/4" piece of Sweet Sorbet cardstock (item 159268), scored at 3/4" on all four sides;
- for the lid a 3 13/16" x 3 13/16" piece of Crumb Cake cardstock (item 120953), scored at 1/2" on all four sides;
- Early Espresso cardstock (item 119686) for the lid's large square matting panel (cut using the Stylish Shapes dies - item 159183), and the scallop edge punched heart;
- Sweet Sorbet cardstock for the lid's smaller square matting panel (also cut using the Stylish Shapes dies), and the embossed punched heart (embossed using the Timeworn Type 3D Embossing Folder - item 156505);
- Pear Pizzazz cardstock (item 131201) for the two leafy sprigs cut using the leafy sprig die from the Mini Pocket Envelope dies (item 159167);
- Mossy Meadow cardstock (item 133676) for the two leafy stems cut using the Queen Bee dies (item 160484);
- Flirty Flamingo cardstock (item 141416) and Sweet Sorbet cardstock for the large and small flower respectively, cut using the Queen Bee dies;
- 2022-2024 In Colour Matte Decorative Dots (item 159186) - four of the Sweet Sorbet shaded dots used on the lid (large dot for the flower center); and
- Abigail Rose 12" x 12" Designer Series Paper (item 159037) - a piece just under 2 3/4" square used for the box "liner".

These three lidded window boxes each measure 3" x 3" x 3/4" deep and hold one Lindt chocolate heart (the hearts came in a package of three). For each box I used a 4 1/2" x 4 1/2" piece of cardstock - scored at 3/4" on all four sides; and for each lid a 4 9/16" x 4 9/16" piece of cardstock, also scored at 3/4" on all four sides. The circle and square window openings in the lids were all cut using the Stylish Shapes dies (item 159183) - the windows cut after I had glued on the DSP panel to the top of the lid. Behind each window, on the inside of the lid, I glued a piece of acetate (Window Sheets - item 142314) just under 3" square. The leaves and flowers were all cut using the Queen Bee dies (item 160476), and the hearts using the Teacup dies (item 160186). I used Pearl Basic Jewels (item 144219) for the flower centers. For the inside bottom of each box I cut a "liner" (just under 3" square), on which I glued the two punched hearts - the fully wrapped chocolate hearts were secured to the center of the punched hearts with a few strips of double-sided tape (Tear & Tape Adhesive - item 154031).


Additional supplies used for the first box:


 Additional supplies for the third box:


 For this 4 1/2" x 4 1/2" top-fold card I used the following additional supplies:
 For this 4 1/8" x 5 1/4" top-fold card I used the following additional supplies:


 For this 3 1/2" x 5" top-fold card I used the following additional supplies:
 Yes, actually I am in charge!
- Pale Papaya cardstock (item 155668) for the box, lid, and flowers;
- Basic White cardstock (item 159276) for the leaves, lid matting panel, and punched scallop heart;
- Fresh Freesia cardstock (item 155613) for the die cut hearts, sentiment strip; and punched heart;
- Fresh Freesia patterned paper from the 2021-2023 In Colour Designer Series Paper Assortments (item 159254) for the lid's side DSP panels, and the box "liner";
- Sale-A-Bration Dandy Designs 12" x 12" Designer Series Paper (item 160836) for the lid's top DSP panel - during Sale-A-Bration (on now until February 28, 2023) the Dandy Designs DSP (a package of 48 sheets - 4 each of 12 double-sided designs) is available for free with a $120.00 CDN order [before taxes and shipping] - lots of pretty designs and colours for spring projects!;
- for the white heat embossed "love you" sentiment I used the "I love you snow much" sentiment from the recently retired Snowman Magic stamp set (item 159816) - using sticky notes I covered the balance of the sentiment when inking the stamp with VersaMark Ink (item 102283) - I used white embossing powder from the Stampin' Emboss Powders - Basics (item 155554); and
- Wink of Stella Clear Glitter Brush (item 141897) - I "painted" the hearts and flowers liberally, and added just touches to the leaves.
For the bow I used some 3/8" white gross grain ribbon from my stash.


Additional supplies for the second box:
- Early Espresso cardstock (item 119686) for the box, lid, and punched scallop heart;
- Garden Green cardstock (item 102584) for the leaves;
- Poppy Parade cardstock (item 119793) for the die cut hearts;
- Basic White cardstock (item 159276) for the flowers;
- Distressed Gold 12" x 12" Specialty Designer Series Paper (item 159237) for the lid's DSP panel, the punched heart, and box "liner";
- Wink of Stella Clear Glitter Brush (item 141897) - the flowers "painted"; and
- gold cord from Simply Elegant Trim (item 155766) for the bow.


- Cherry Cobbler cardstock (item 119685) for the box, lid, large flower, sentiment tag (cut using the small tag die from the Mini Pocket Envelope dies - item 159167), and punched scallop heart;
- Cherry Cobbler patterned paper from the 6" x 6" Designer Series Paper Assortments - Regals (item 159256) for the lid's DSP panel, and box "liner";
- Distressed Gold 12" x 12" Specialty Designer Series Paper (item 159237) for the small flower, leaves, and punched heart;
- Cup of Tea stamp set (item 158661) for the "sweet" sentiment - stamped using Memento Tuxedo Black Ink (item 132708); and
- gold cord from Simply Elegant Trim (item 155766) for the bow.
I used a 1/2" circle punch to cut the thumb notches on two sides of the lid.
Cards
For each of my three simple cards I used the heart punches - for my first card I used both punches and for the other two cards I used just the plain edge heart.


- Cherry Cobbler cardstock (item 119685) for the card base;
- Early Espresso cardstock (item 119686) for the matting panel;
- Crumb Cake cardstock (item 120953) for the front and inside square panels (cut using the Stylish Shapes dies - item 159183) - I added the splatters to the front panel by flicking Soft Suede ink (item 147115) with a wet paint brush;
- Soft Suede cardstock (item 115318) for the punched scallop heart - the edges sponged heavily with Soft Suede ink;
- Very Vanilla cardstock (item 101650) for the punched and embossed heart - embossed using the Timeworn Type 3D Embossing Folder (item 156505) and sponged with Soft Suede ink;
- Linen Thread (item 104199) - wrapped around the embossed heart - as I wrapped the thread around the heart I secured it on the back with a few strips of clear tape;
- Stampin' Dimensionals (item 104430) - to attach the embossed heart to the scallop heart;
- Enamel Dot Essentials (item 160751) - to the front of the card I added two of the large and two of the small Crumb Cake dots; and
- a button from my stash - actually a Stampin' Up! Cherry Cobbler button from several years ago!


- Basic White Thick cardstock (item 159229) for the card base;
- Basic Black cardstock (item 121045) for the punched heart - which I heat embossed using the splatter stamp from the Quiet Meadow stamp set (item 155082), VersaMark Ink (item 102283), and silver embossing powder (Stampin' Emboss Powders - Metallics - item 155555);
- Basic Black cardstock for the matting panel;
- Basic White cardstock (item 159276) for the die cut heart (cut using the Teacup dies - item 160186);
- silver cord from Simply Elegant Trim (item 155766) to wrap around the heart (again I secured the cord at the back of the heart with short strips of clear tape);
- watercolour paper (Fluid 100 5" x 7" Watercolour Paper - item 149612) pieces that had been coloured using Mango Melody ink (item 147093) and Bermuda Bay ink (item 147096) respectively - the Mango Melody square panel was cut using the Stylish Shapes dies (item 159183) and the Bermuda Bay rectangular panel was cut using the Stitched Rectangles dies (item 151820);
- Basic Black Stampin' Write Marker (item 100082) to add a few splatters to the Mango Melody watercolour panel by flicking the brush tip against the marker lid;
- Bermuda Bay cardstock (item 131197) for the sentiment label (cut using the Stylish Shapes dies);
- Cup of Tea stamp set (item 158661) for the "sweet" sentiment - stamped using Bermuda Bay ink; and
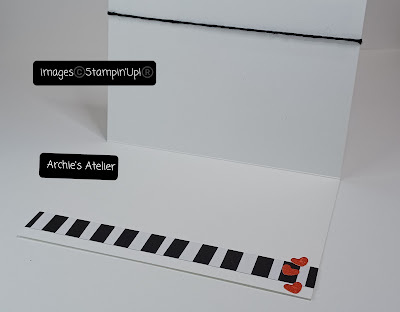
- for the black and white striped patterned paper panels - the recent addition to the Clearance Rack, All Together 6" x 6" Designer Series Paper (item 160039).
Using an envelope punch board I made a co-ordinating envelope using a piece of the Perfectly Penciled 12" x 12" Designer Series Paper (item 159244) - and wrapped around the envelope an almost Bermuda Bay 7/8" gross grain ribbon from my stash.
And finally . . .


- Basic White Thick cardstock (item 159229) for the card base;
- watercolour paper (Fluid 100 5" x 7" Watercolour Paper - item 149612) for the punched heart - I sponged the heart with Real Red ink (item 147084), spritzed lightly with water (Stampin' Spritzers - item 126185), and blotted dry with a paper towel - I did the same for the watercolour paper scrap from which I die cut the three small hearts for the inside of the card (hearts cut using the Teacup dies - item 160186);
- All Together 6" x 6" Designer Series Paper (item 160039) - recent addition to the Clearance Rack! - for the black and white striped paper panels;
- black baker's twine (Baker's Twine Essentials Pack - item 155475) - for the bow tied around the card - I secured the ends with a tiny dab of Multipurpose Liquid Glue (item 110755); and
- Classic Matte Dots (item 158146) - one large and one small black dot added to the heart.
Thank you for visiting my blog! As always I had lots of fun working on these projects! When looking for a variety of heart dies to use in your Valentine projects don't forget about retired "seasonal" dies that you might have in your collection - such as the Snowman dies (item 159817), Gingerbread House dies (item 159718), and Celebrations Tag dies (item 159866)! Last year's Bouquet of Love Hybrid Embossing Folder (item 157641) is also a recent addition to the Clearance Rack!
If you are interested in purchasing any of the available Stampin' Up! products I have used in my projects, and you live in Canada and do not have a Stampin' Up! demonstrator, please do not hesitate to visit my online store found on my website https://archiesatelier.stampinup.net/ at your convenience, or simply click under the "Shop With Me" tab on the right sidebar of my blog, which will take you directly to my website and online store. I very much appreciate your business! You can browse the PDF versions of the May 2022-April 2023 Annual Catalogue, January-April 2023 Mini Catalogue, and the Sale-A-Bration Brochure anytime on my website. Remember that Stampin' Up! will only be having this one Sale-A-Bration for 2023 and it will end on February 28, 2023! Don't forget to check the Clearance Rack too!!
Have fun creating!
Laurel
*It has come to my attention that quite often email correspondence from me is delivered to the recipient's spam or junk mail folder - if you have corresponded with me I have replied so be sure to check your spam or junk mail folder! Thank you!!

Comments
Post a Comment