Snowman Magic!
(playing with the Snowman Magic Bundle)

Hello! Today I am sharing a few projects I worked on this week featuring the Stampin' Up! Snowman Magic Bundle (item 159818) from the July-December 2022 Mini Catalogue. The Bundle includes the Snowman Magic stamp set (item 159816) and the Snowman dies (item 159817). The stamp set and the dies can of course be purchased separately, but, when purchased together using the Bundle item number there is the 10% Bundle Savings - always a good thing! I had a lot of fun playing with these stamps and dies - there are so many possibilities!

For each of my projects I used my Stampin' Cut & Emboss Machine (item 149653) for all die cutting; my Paper Trimmer (item 152392) for cutting and scoring paper; and, for the main adhesive, Multipurpose Liquid Glue (item 110755). To burnish all score lines I use a bone folder (Bone Folder - item 102300), and using the putty tip on the Take Your Pick tool (item 144107) is a great help in picking up and positioning small embellishments. For the black stamped images I used Stazon Jet Black Ink (item 101406). I also find a stamping platform, such as the Stamparatus (item 146276), a very handy tool as I quite often find that, not being an overly confident stamper, I need to stamp an image several times to get a nice crisp and clean image. On a few of the projects I used heat embossing, which requires a heat gun so the Heat Tool (item 129053) also becomes a very valuable tool!
On with the projects!
Gift Box With Inset Shaker Frame


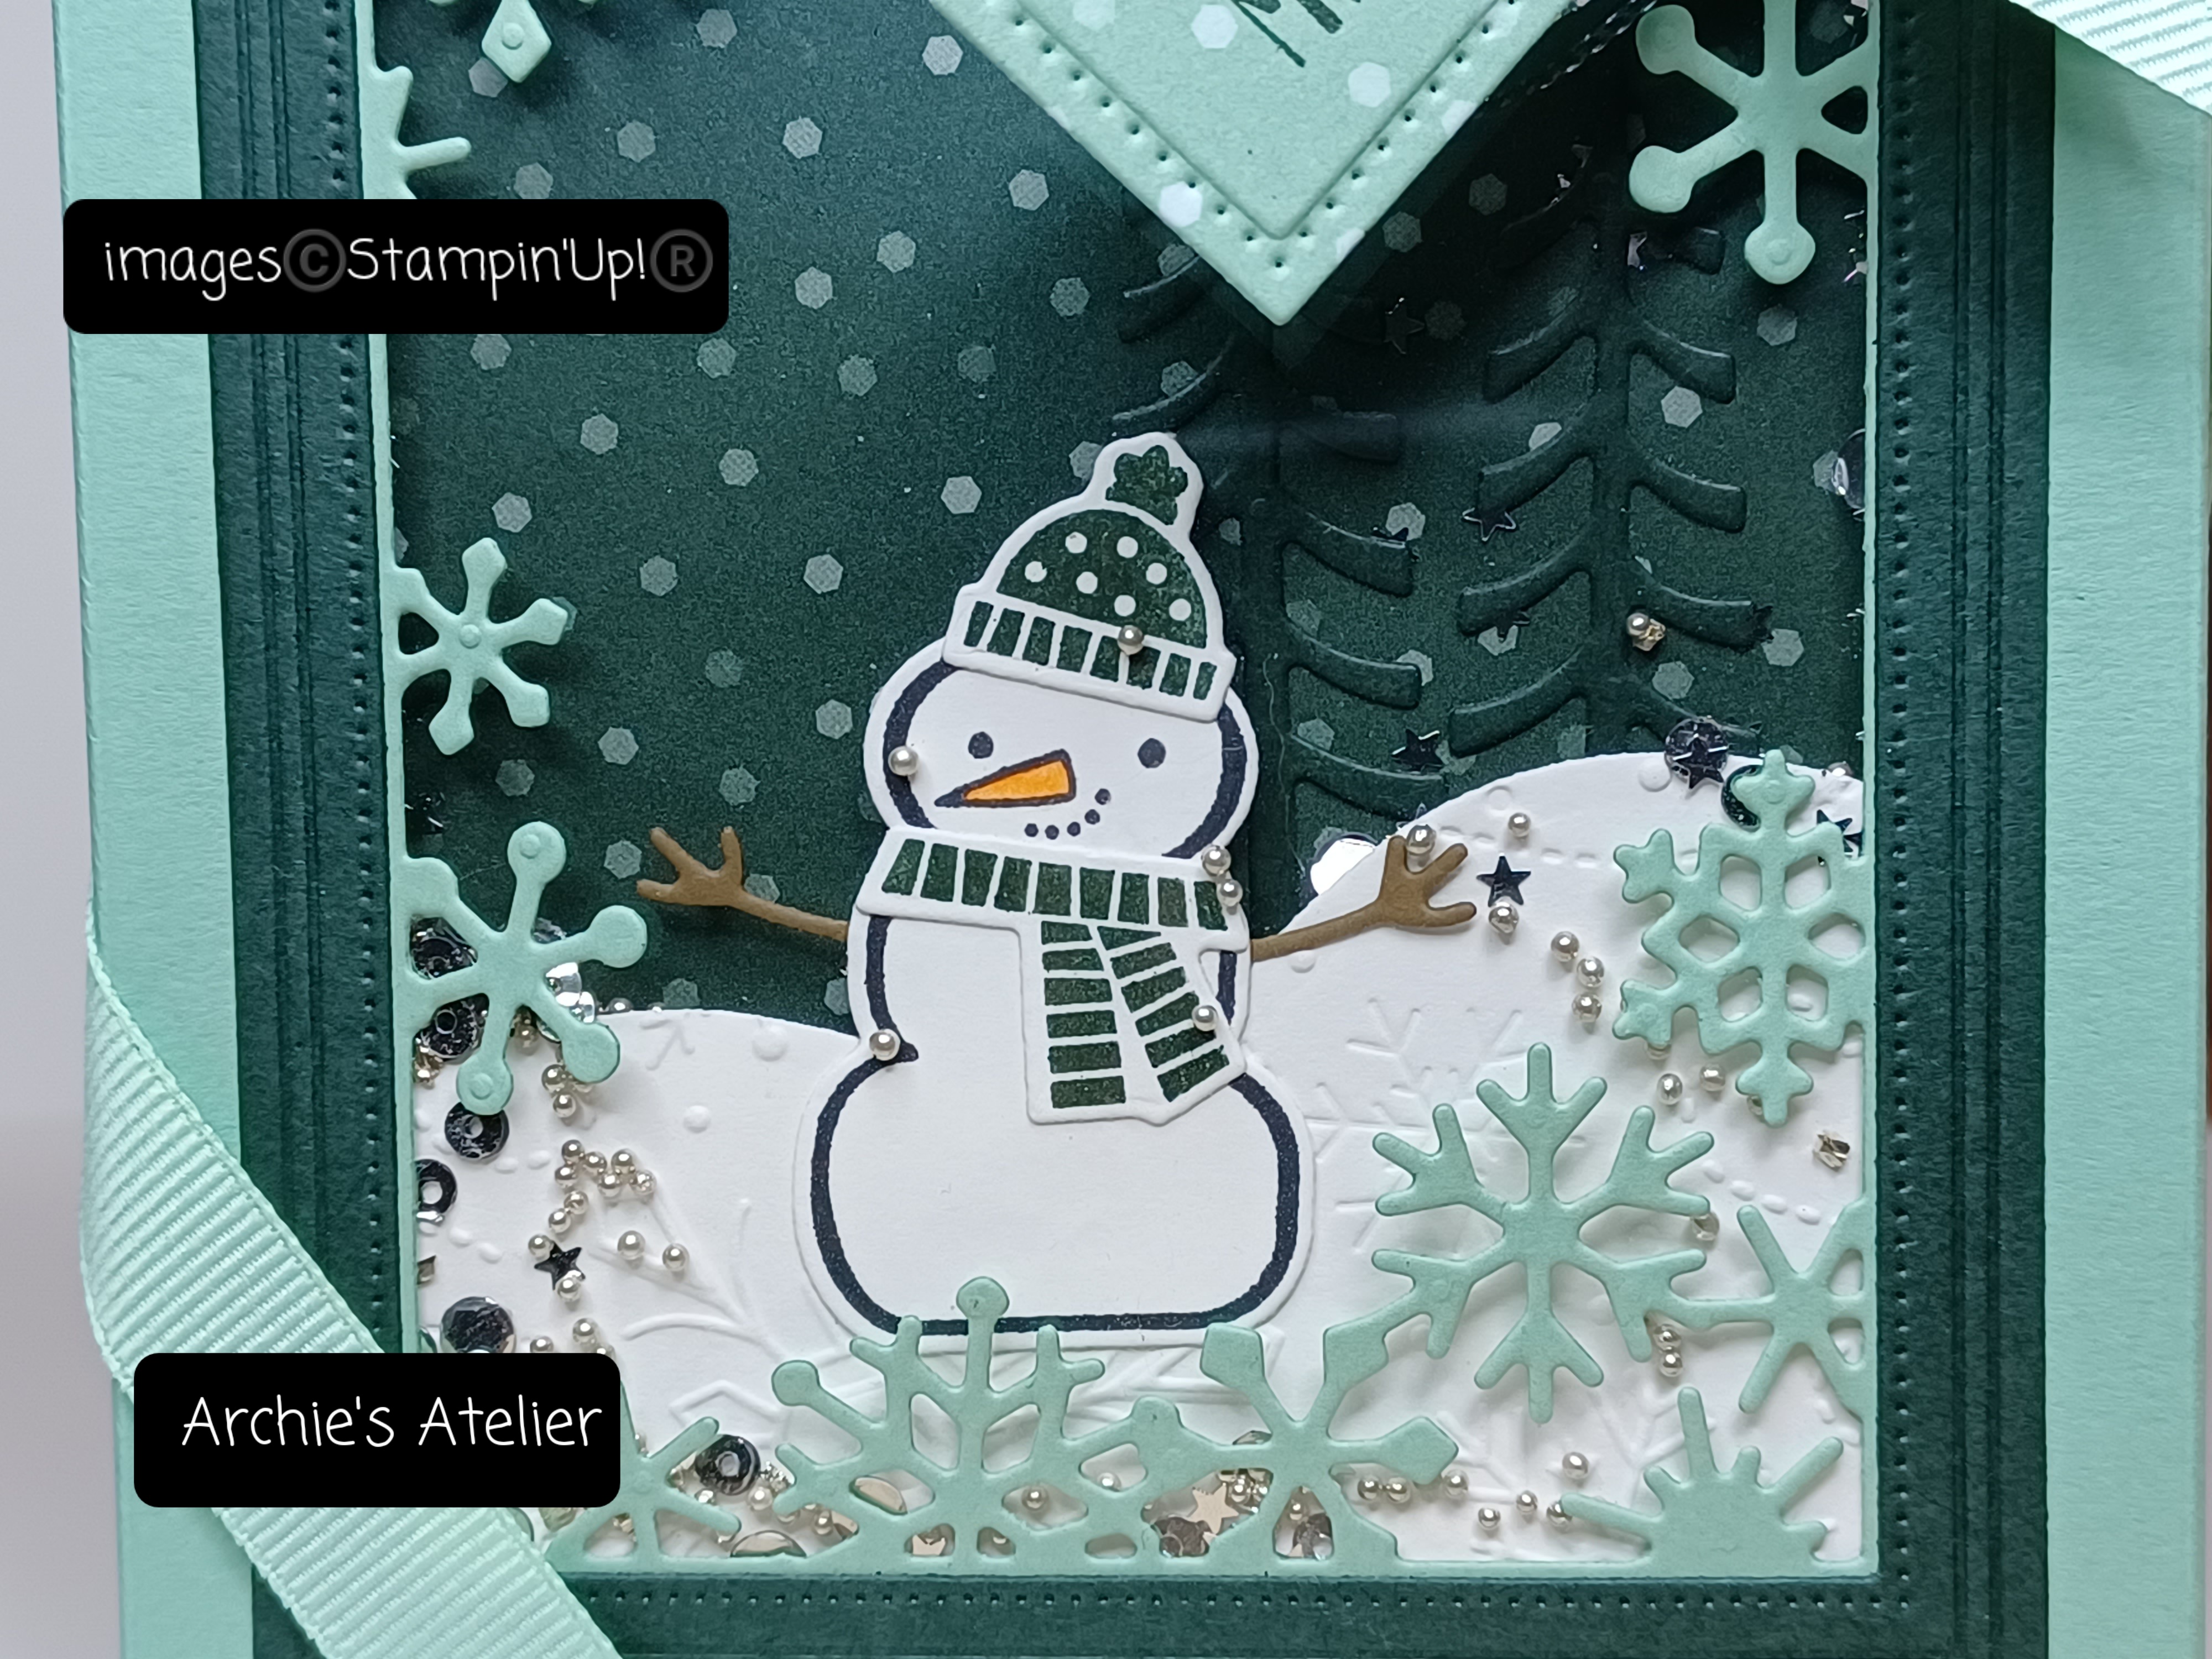


For this lidded gift box that measures 4 1/4" wide x 5 1/2" long x 1 1/2" deep with an inset shaker frame in the lid I used the following additional supplies:
- for the box base a 4 3/16" x 5 7/16" piece of Evening Evergreen cardstock (item 155574), scored at 1" on all four sides;
- for the lid a 4 1/4" x 5 1/2" piece of Mint Macaron cardstock (item 138337), also scored at 1" on all four sides - before assembling the lid I cut the rectangular opening in the center of the top panel to accommodate the completed shaker frame - using a ruler, pencil, and craft knife I marked and cut the opening from the inside of the top panel. After the lid was assembled and the shaker frame inserted - adding a line of glue around the underside edge of the Evening Evergreen cardstock frame - I glued a piece of Mint Macaron cardstock that was just shy of 4 1/4" x 5 1/2" to the underside of the lid to neaten everything up;
- Mint Macaron cardstock to cut the snowflake frame;
- Fabulous Frames dies (item 159163) to cut the Evening Evergreen cardstock frame - to the back of which I glued the Mint Macaron cardstock snowflake frame. The sizing of the Fabulous Frames die allows for a narrow border of the snowflake frame to show around the inside edges of the Evening Evergreen cardstock frame;
- Evening Evergreen cardstock to cut the two stylized evergreen trees (these two trees were glued towards the right side of the backing Designer Series Paper panel);
- Basic White Thick cardstock (item 159229) for the snow hill - I embossed a piece of the cardstock using the snowflake pattern embossing folder from the Wintry 3D Embossing Folders (item 155433) and then cut the "hill" using the snow hill die from the Gingerbread House dies (item 159718) - trimming the piece to fit behind the Evening Evergreen cardstock frame;
- Basic White cardstock (item 159276) for the stamped snowman, hat, and scarf;
- Pumpkin Pie watercolour pencil (Watercolour Pencils - Assortment 1 - item 141709) and blender pen (Blender Pens - item 102845) to colour the snowman's nose;
- Soft Suede cardstock (item 115318) to cut the snowman's arms;
- Evening Evergreen ink (item 155576) to stamp the hat and scarf;
- Evening Evergreen patterned paper from the 6" x 6" Designer Series Paper Assortments - 2021-2023 In Colour (item 159254) for the shaker frame's decorative paper background panel;
- acetate panel (Window Sheets - item 142314) - cut to fit behind the Evening Evergreen cardstock frame;
- Foam Adhesive Strips (item 141825) - applied around the back of the Evening Evergreen cardstock frame after the Mint Macaron cardstock snowflake frame and acetate panel had been glued to the Evening Evergreen cardstock frame;
- Window Wishses stamp set (item 159751) for the "Merry Wishes" sentiment, which was stamped on a piece of Mint Macaron patterned paper from the 6" x 6" Designer Series Paper Assortments - Subtles (item 159255) using Stazon Jet Black Ink (item 101406), The tag was cut using the Tailor Made Tags dies (item 155563); and
- silver cord from Simply Elegant Trim (item 155766) to tie the sentiment tag to the 1/2" gross grain ribbon from my Dollar Tree stash - an almost perfect match to Mint Macaron!
Three Tuques Lidded Gift Box


For this lidded gift box that measures 3 7/8" long x 1 7/8" wide x 1" deep I used the following additional supplies:
- for the box a 3 13/16" x 5 13/16" piece of Evening Evergreen cardstock (item 155574) scored at 1" on all four sides;
- for the lid a 3 7/8" x 5 7/8" piece of Evening Evergreen cardstock also scored at 1" on all four sides;
- a piece of Evening Evergreen patterned paper from the 6" x 6" Designer Series Paper Assortments - 2021-2023 In Colour (item 159254) for the lid's decorative paper panel - cut using the Stitched Rectangles dies (item 151820);
- Evening Evergreen cardstock and Real Red cardstock (item 102482) for the matting squares - cut using the smallest square die from the Stylish Shapes dies (item 159183);
- Basic White cardstock (item 159276) for the stamped hats and holly;
- Evening Evergreen ink (item 155576) to stamp one tuque and holly leaves;
- Real Red ink (item 147084) to stamp two tuques;
- Cherry Cobbler watercolour pencil (Watercolour Pencils - Assortment 2 - item 149014) to colour the holly berries - I just used the watercolour pencil as a coloured pencil - no water added; and
- Real Red 3/8" Mini Ruffled Ribbon (item 156323) for the bow tied around the box.
A Few Cards and Tags


For this 5 1/2" x 4 1/4" side-fold card I used the following additional supplies:
- Merry Merlot cardstock (item 146979) for the card base and embossed panel;
- Timeworn Type 3D Embossing Folder (item 156505) to emboss the Merry Merlot cardstock panel and the gold cardstock die cut floral stem (which was cut using the Ranunculus dies - item 157976);
- Very Vanilla Thick cardstock (item 144237) for the matting panel - the edges of which I distressed by scraping the blade of my craft knife along the edges, the inside panel, sentiment circle, and stamped/embossed/die cut leaf sprig;
- VersaMark Ink (item 102283) and gold embossing powder (Stampin' Emboss Powders - Metallics - item 155555) for the sentiment and stamped/embossed/die cut leaf sprig;
- Cup of Tea Bundle (item 158667) - which includes the Cup of Tea stamp set (item 158661) and the Teacup dies (item 160186) - to stamp and die cut the stamped/embossed and die cut leaf sprig;
- Grove dies (item 157844) to cut the gold cardstock 5-leaf sprigs;
- Brushed Metallic 12" x 12" Cardstock (item 153524) for the gold cardstock die cut floral stem, 5-leaf sprigs, and snowflakes;
- Stylish Shapes dies (item 159183) to cut the sentiment circle;
- Wink of Stella Clear Glitter Brush (item 141897) - by tapping the brush against my bone folder I splattered the embossed Merry Merlot cardstock panel; and
- Opal Rounds (item 154289) - I added four to the card front/sentiment panel because I wanted a little more sparkle!


- Mint Macaron cardstock (item 138337) for the card base and snowflake frame (including the partial frame used on the inside panel);
- Real Red cardstock (item 102482) for the frame (cut using the Fabulous Frames dies - item 159163), the sentiment panel, and the heart;
- Real Red patterned paper from the 6" x 6" Designer Series Paper Assortments - Regals - item 159256) for the background decorative paper panel;
- Basic White cardstock (item 159276) for the stamped snowman, hat and scarf, and the inside panel;
- Soft Suede cardstock (item 115318) for the snowman's die cut arms;
- Real Red ink (item 147084) to stamp the hat and scarf;
- Pumpkin Pie watercolour pencil (Watercolour Pencils - Assortment 1 - item 141709) and blender pen (Blender Pens - item 102845) to colour the snowman's nose;
- Brightest Glow stamp set (item 159542) - from the July-December 2022 Mini Catalogue - for the sentiment; and
- VersaMark Ink (item 102283) and gold embossing powder (Stampin' Emboss Powders - Metallics - item 155555) to stamp and emboss the sentiment.


- Basic White Thick cardstock (item 159229) for the card base and the front panel;
- Basic Black cardstock (item 121045) for the matting panel;
- Brushed Metallic 12" x 12" Cardstock (item 153524) for the gold cardstock die cut stylized evergreen tree;
- Stitched Rectangles dies (item 151820) to cut the window in the Basic White Thick cardstock panel and the Melon Mambo cardstock (item 115320) insert;
- Brightest Glow stamp set (item 159542) for the sentiment;
- VersaMark Ink (item 102283) and gold embossing powder (Stampin' Emboss Powders - Metallics - item 155555) to stamp and emboss the sentiment;
- Black & White 1/4" Gingham Ribbon (item 156485) to tie bow around the matted front panel before the matted front panel was adhered to the card base; and
- gold cord from Simply Elegant Trim (item 155766) for the bow tied to the center of the ribbon bow.

For each of the last three tags I used the Tailor Made Tags dies (item 155563) to cut the tags; the snowflake patterned embossing folder from Wintry 3D Embossing Folders (item 155433); Craft Stampin' White Ink (item 147277) to lightly sponge over the embossed areas to help accentuate the embossed design; and Pumpkin Pie watercolour pencil (Watercolour Pencils - Assortment 1 - item 141709) and a blender pen (Blender Pens - item 102845) to colour the snowmen noses.


For this tag I used the following additional supplies:
- Starry Sky cardstock (item 159263) for the base tag;
- Real Red cardstock (item 102482) for the die cut heart and sentiment panel - after stamping and embossing the sentiment on the cardstock I glued the Real Red cardstock to a piece of Starry Sky cardstock and then die cut the tag. After die cutting I embossed the Starry Sky cardstock portion of the tag;
- Brightest Glow stamp set (item 159542) for the sentiment;
- VersaMark Ink (item 102283) and gold embossing powder (Stampin' Emboss Powders - Metallics - item 155555) to stamp and emboss the sentiment;
- Basic White cardstock (item 159276) for the stamped snowman;
- Early Espresso cardstock (item 119686) for the die cut arms and hole re-enforcer;
- Starry Sky ink (item 159212) to stamp the hat;
- Mini Stampin' Dimensionals (item 144108) to attach the snowman to the tag;
- Wink of Stella Clear Glitter Brush (item 141897) to add splatters to the tag, and to paint the tag edges and die cut heart; and
- gold cord from Simply Elegant Trim (item 155766) to tie a bow through the knot of the 5/8" sheer ribbon from my Dollar Tree stash (a lucky match to Starry Sky!).


- Night of Navy cardstock (item 100867) for the tag;
- Wink of Stella Clear Glitter Brush (item 141897) to add splatters to the tag;
- Early Espresso cardstock (item 119686) for the die cut arms and hole re-enforcer;
- watercolour paper (Fluid 100 5" x 7" Watercolour Paper - item 149612) for the stamped snowman and accessories;
- Old Olive ink (item 147090) to stamp the holly leaves;
- Real Red ink (item 147084) to stamp the bird and to colour the holly berries;
- Basic Gray ink (item 149165) to add shading on the snowman;
- Mini Stampin' Dimensionals (item 144108) to attach the snowman to the tag; and
- Real Red 3/8" Ribbon from Real Red & Garden Green 3/8" Ribbon Combo Pack (item 159577) and Linen Thread (item 104199( for the tag's bows.


- Real Red cardstock (item 102482) for the larger tag - before die cutting the tag I embossed the cardstock using the Timeworn Type 3D Embossing Folder (item 156505);
- Evening Evergreen cardstock (item 155574) for the smaller embossed tag - which was attached to the larger tag using Stampin' Dimensionals (item 104430);
- Soft Suede cardstock (item 115318) for the die cut arms;
- Basic White cardstock (item 159276) for the stamped snowman, hat, holly leaves, and die cut snowflake;
- Evening Evergreen ink (item 155576) to stamp the hat and holly leaves;
- Real Red ink (item 147084) to colour the holly berries;
- Pearl Basic Jewels (item 144219) - a small pearl added to the center of the snowflake; and
- Crumb Cake baker's twine (Baker's Twine Essentials Pack - item 155475) for the double bow tied through the holes of both tags.
Thank you for visiting my blog! I certainly had a lot of fun working on these projects - I am certainly looking forward to playing more with the Snowman Magic Bundle!
If you are interested in purchasing any of the available Stampin' Up! products I have used in my projects, and you live in Canada and do not have a Stampin' Up! demonstrator, please do not hesitate to visit my online store found on my website https://archiesatelier.stampinup.net/ at your convenience, or simply click under the "Shop With Me" tab on the right sidebar of my blog, which will take you directly to my website and online store. I very much appreciate your business! You can browse the PDF versions of the July-December 2022 Mini Catalogue and the May 2022-April 2023 Annual Catalogue anytime on my website. Don't forget to also check out the Clearance Rack!

If you are interested in joining Stampin' Up! as a demonstrator - whether you want to enjoy the product discount as a hobbyist or whether you want to start a home-based business - from October 4 through to October 31, 2022, Stampin' Up! is running the Starter Kit Promotion, during which you will recieve, in addition to a selection of free business supplies, $206.00 CDN worth of products of your choice for only $135.00 CDN. There is also free shipping on your Starter Kit. Now is a great time to join Stampin' Up! and I would be very pleased to have you join my team!
Have fun creating!
Laurel
.jpg)
Comments
Post a Comment