Playing With Butterflies!
(a few projects using the Brilliant Wings dies and the Butterfly Brilliance stamp)

"Just like the butterfly, I too will awaken in my own time."
Deborah Chaskin
Hello! Today I am sharing a few projects I worked on this week featuring the Stampin' Up! Brilliant Wings dies (item 155523) and/or the co-ordinating Butterfly Brilliance stamp (item 155092). I wanted to take a little break from Halloween and Christmas projects (mostly)! Although I have used the Brilliant Wings dies quite often I only recently added the Butterfly Brilliance stamp to my collection and was anxious to try it out!


There are a lot of dies in the Brilliant Wings dies - including detailed butterfly dies and the large outline die that will cut the individual stamped butterflies - of course if you don't want to stamp and cut all of the butterflies at one time you can just ink and cut select ones.
For each of my projects I used my Stampin' Cut & Emboss Machine (item 149653) for all die cutting; my Paper Trimmer (item 152392) for cutting paper and cardstock; a scoring board and stylus (Simply Scored Scoring Tool - item 122334) for paper/cardstock scoring; a bone folder (Bone Folder - item 102300) to burnish all score lines; and, for the main adhesive, Multipurpose Liquid Glue (item 110755). I also find a stamping platform, such as the Stamparatus (item 146276), a very handy tool for stamping images and sentiments. On a few of the projects I used heat embossing, which requires a heat gun so the Heat Tool (item 129053) also becomes a very valuable tool!
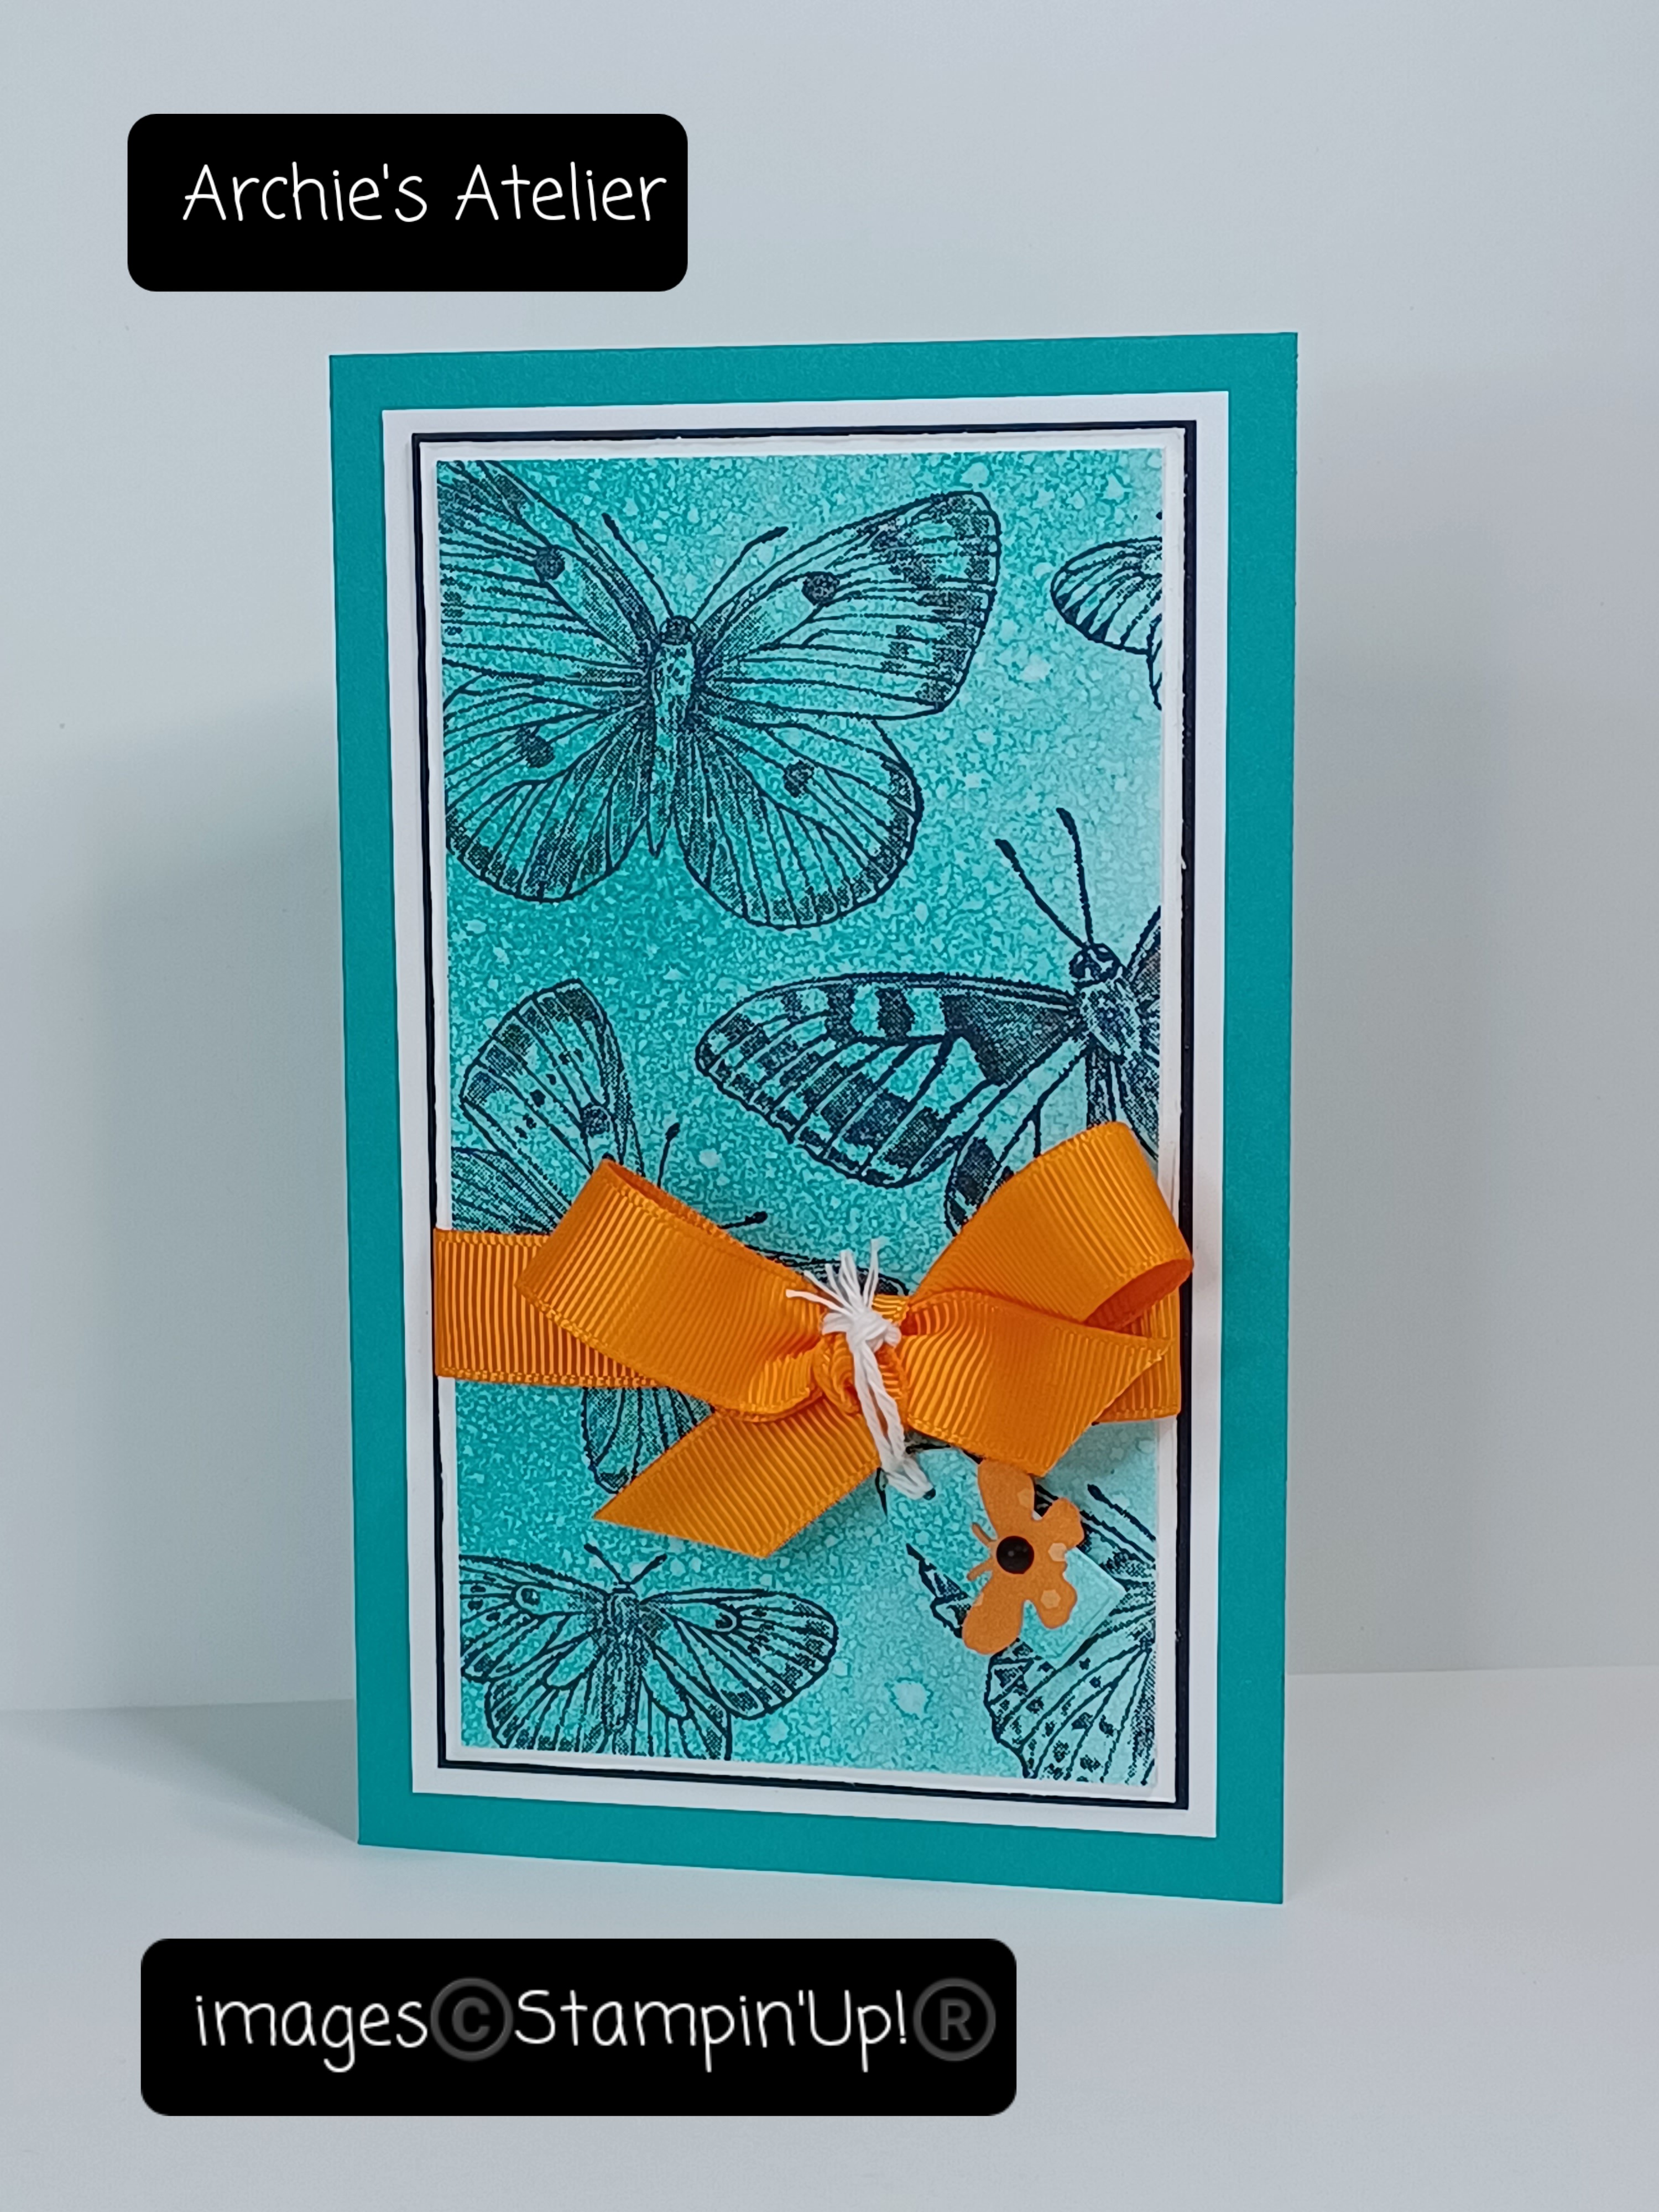
Happy Birthday Shaker Card


In her September 13, 2022, You Tube video - "Shaker Die Cut Background [Unique Look!]" - https://www.youtube.com/watch?v=-1azpAFQdhs - Jennifer McGuire (www.jennifermcguireink.com) demonstrated the technique of using a large die with multiple openings (like the large butterfly outline die) to create a card with individual shaker compartments and I was anxious to try it out! To build up the layers (which would form the "walls" for the shaker compartments) for my 7 3/8" tall x 6" wide side-fold card I used the large outline die to cut four sheets of watercolour paper - rather than using Jennifer's technique of initially cutting the sheets to the same size and using the first cut piece as the template I just cut each sheet individually and then after gluing the four together trimmed the entire stack down to the size I needed to fit over the stamped and embossed layer. After gluing the trimmed die cut watercolour paper stack over the stamped and embossed panel I added the shaker bits - some fine white glitter that I had on hand and some tiny gold beads I had picked up at Dollarama. After placing the shaker bits into the compartments I glued on a piece of acetate (Window Sheets - item 142314) - cut slightly smaller than the stack. Over the acetate panel I glued the die cut, scored, and splattered piece of cardstock, which I cut to be approximately 1/8" larger on each side than the stack - after die cutting I scored the panel - very carefully! - at every 1/4" and then added splatters using a Wink of Stella Clear Glitter Brush (item 141897). Around the completed panel I tied a bow using 5/8" off-white gross grain ribbon from my Dollar Tree stash, and through the center of the ribbon bow tied a bow with gold cord from Simply Elegant Trim (item 155766). I then glued the panel to a 6 13/16" x 5 5/8" piece of gold cardstock (Brushed Metallic 12" x 12" Cardstock - item 153524) - from the center of which I had cut a piece to use in other projects! - and finally glued the matted panel to the Basic Black cardstock (Basic Black 12" x 12" Cardstock - item 124267) card base.
Additional supplies I used to complete this card:
- Mint Macaron cardstock (item 138337) for the top cardstock panel, sentiment strip, and inside matting panel;
- Basic White cardstock (item 159276) for the stamped and embossed butterfly panel;
- watercolour paper for the inside panel;
- gold cardstock (Brushed Metallic 12" x 12" Cardstock - item 153524) for the inside matting panel;
- Basic Black cardstock for the sentiment strip matting panel;
- Happiness Abounds stamp set (item 159238) for the sentiment; and
- VersaMark Ink (item 102283) and gold embossing powder (Stampin' Emboss Powders - Metallics - item 155555) to stamp and emboss the butterflies and the sentiment.
I am looking forward to playing more with this technique!
Hello Card


For this 8" x 3 5/8" side-fold slimline card I used the following additional supplies:
- Basic Black cardstock (item 121045) for the card base, sentiment banner, circles, and inside panel strip;
- Stylish Shapes dies (item 159183) to cut the sentiment banner and the circles;
- Basic White cardstock (item 159276) for the die cut butterflies, inside panel, and the stamped and die cut butterfly (inside panel);
- Stazon Jet Black Ink (item 101406) for the stamped butterfly;
- Forever Fern stamp set (item 152559) for the sentiment;
- VersaMark Ink (item 102283) and white embossing powder (Stampin' Emboss Powders - Basics - item 155554) to stamp and emboss the sentiment;
- watercolour paper coloured with Mango Melody ink (item 147093) and lightly spritzed with water (Stampin' Spritzers - item 126185) for the front panel - additional strips trimmed from this panel were added to the inside panel; and
- Stampin' Dimensionals (item 104430) to attach the sentiment banner.
Happy Birthday Card


For this 6 1/4" x 4" side-fold card I used the following additional supplies:
- Bermuda Bay cardstock (item 131197) for the card base;
- Basic White cardstock (item 159276) for the inside panel and the two front matting panels (the first one I "ruffled" the edges of by running the blade of my craft knife along the edges);
- Basic Black cardstock (item 121045) for front matting panel;
- watercolour paper coloured with Bermuda Bay ink (item 147096) and lightly spritzed with water (Stampin' Spritzers - item 126185) for the stamped panel and the small tag - a small piece trimmed from the panel was also added to the inside panel;
- Stazon Jet Black Ink (item 101406) to stamp the butterflies on the coloured and spritzed watercolour paper panel;
- Peaceful Moments stamp set (item 151595) for the sentiment;
- Bermuda Bay ink to stamp the sentiment and to add the splatters to the inside panel;
- small tag die from the Mini Pocket Envelope dies (item 159167) to cut the tag;
- Pumpkin Pie patterned paper from the 6" x 6" Designer Series Paper Assortments - Regals (item 159256) for the die cut butterflies and inside panel strip;
- Matte Black Dots (item 154284) - one small dot added to the die cut butterfly on the tag;
- Mini Stampin' Dimensionals (item 144108) - two stacked to attach the tag;
- 5/8" orange gross grain ribbon from my Dollarama stash (a great match to Pumpkin Pie!) was tied around the stamped panel with first matting panel before it was glued to the Basic Black cardstock matting panel; and
- white baker's twine (Baker's Twine Essentials Pack - item 155475) looped through the tag and tied to the center of the ribbon bow.
Friend Card


For this 4 1/4" x 4 1/4" side-fold card I used the following additional supplies:
- Basic White Thick cardstock (item 159229) for the card base;
- Basic White cardstock (item 159276) for the die cut butterfly;
- Vellum cardstock (Vellum 8 1/2" x 11" Cardstock - item 101856) for the die cut "solid" backing butterfly - when gluing the Basic White cardstock butterfly to the Vellum butterfly I only applied glue to the center of the cardstock butterfly, which allowed the cardstock butterfly's wings to be gently pulled up to provide a little dimension;
- Basic Black cardstock (item 121045) for wreath, which was cut using the Natural Prints dies (item 158800);
- Happiness Abounds stamp set (item 159238) for the sentiments;
- Stazon Jet Black Ink (item 101406) to stamp the sentiments;
- Basic Black Stampin' Write Marker (item 100082) to add the splatters to the front and inside panels by flicking the brush tip against the marker lid; and
- Matte Black Dots (item 154284) - one large and one small dot added to the butterfly body.
With an envelope punch board I made a co-ordinating envelope from a piece of the Perfectly Penciled 12" x 12" Designer Series Paper (item 159244), and around the envelope I tied a bow using 3/8" black gross grain ribbon from my stash.
Just For You Glittered Butterfly Box


For this lidded box that measures 4" x 4" x 2" deep I used the following additional supplies:
- for the base of the box an 8" x 8" piece of Blushing Bride cardstock (item 131198) scored at 2" on all four sides;
- for the lid of the box an 8 1/16" x 8 1/16" piece of Blushing Bride cardstock, also scored at 2" on all four sides;
- Blushing Bride patterned paper from the 6" x 6" Designer Series Paper Assortments - Subtles (item 159255) for the matting panels for the sides and top of the lid;
- Basic White cardstock (item 159276) for the die cut butterflies and the matting panel for the top of the lid. To attach the butterflies to the box I again only applied glue to the bodies allowing the wings to be gently pulled up to add a little dimension and movement;
- Blushing Bride cardstock for the sentiment tag - cut using the Tailor Made Tags dies (item 155563);
- small scrap of gold cardstock (Brushed Metallic 12" x 12" Cardstock - item 153524) for the tag hole re-enforcer (also cut using the Tailor Made Tags dies);
- Ranunculus Romance stamp set (item 157968) for the sentiment;
- VersaMark Ink (item 102283) and white embossing powder (Stampin' Emboss Powders - Basics - item 155554) to stamp and emboss the sentiment;
- Wink of Stella Clear Glitter Brush (item 141897) to "paint" the die cut butterflies; and
- gold cord from Simply Elegant Trim (item 155766) to tie the tag to the center of the bow of the 5/8" satin ribbon tied around the box - more ribbon from my Dollar Tree stash and this time a lucky match to Blushing Bride!
And finally . . . a switch back to a Christmas project!
Time For Tea Festive Teabag Holder


For this teabag holder that holds teabags from a selection of festive flavoured teas - a seasonal treat for a tea lover - and which measures 3 1/2" tall (excluding the handle) x 3" wide x 1" deep, I used the following additional supplies:
- for the box portion an 8 1/2" x 4 1/2" piece of Shaded Spruce cardstock (item 146981) scored on the 8 1/2" side at 1", 4", 5", and 8" (the 1/2" tab is the glue tab), and scored on the 4 1/2" side at 1" (bottom flaps);
- for the handle two pieces of Shaded Spruce cardstock - one 8 1/2" x 3/4" wide (base strip), and one 6" x 1/2" wide - the smaller strip I embossed using the pine embossing folder from the Wintry 3D Embossing Folders (item 155433) and then glued over the larger strip, centered from edge to edge and end to end. When gluing the handle to the inside sides of the box I applied the glue to the base strip up to the embossed panel so that the actual length of the handle is 6";
- Shaded Spruce patterned paper from the 6" x 6" Designer Series Paper Assortments - Regals (item 159256) for the front, back, and side matting panels;
- Cup of Tea Bundle (item 158667), which includes the Cup of Tea stamp set (item 158661) and Teacup dies (item 160186), for the stamped/embossed/die cut teacup, stamped and die cut teabag tag, and stamped and die cut flowers;
- Real Red cardstock (item 102482) for the teacup;
- VersaMark Ink (item 102283) and gold embossing powder (Stampin' Emboss Powders - Metallics - item 155555) to stamp and emboss the teacup;
- Real Red ink (item 147084) and Very Vanilla cardstock (item 101650) for the flowers;
- Mint Macaron cardstock (item 138337) for the leaves (cut using the Grove dies - item 157844), the teabag tag, and shred (thin strips cut and run through a crimper and then scrunched up);
- Shaded Spruce ink (item 147088) to stamp the sentiment and tag outline;
- Shaded Spruce cardstock for the small pine branches, cut using the Decorated Pine dies (item 159710) - I also sponged a little Shaded Spruce ink on the die cut branches;
- gold cardstock (Brushed Metallic 12" x 12" Cardstock - item 153524) for the butterflies;
- Vellum cardstock (Vellum 8 1/2" x 11" Cardstock - item 101856) for the "solid" backing butterfly - again when attaching the gold cardstock detailed butterfly to the Vellum butterfly I only applied glue to the body of the cardstock butterfly to allow for the wings to be gently pulled upwards;
- Linen Thread (item 104199) - tied through the hole I punched in the top of the teabag tag - ends glued to the inside of the teacup; and
- Pearl Basics Jewels (item 144219) - coloured with an alcohol marker that was a very close match to Mango Melody - added to the centers of each flower.
To the handle I tied a bow - yes using more ribbon from Dollar Tree! - this one a very close match to Shaded Spruce!
Thank you for visiting my blog! I had a lot of fun working on these projects!
If you are interested in purchasing any of the available Stampin' Up! products I have used in my projects, and you live in Canada and do not have a Stampin' Up! demonstrator, please do not hesitate to visit my online store found on my website https://archiesatelier.stampinup.net/ at your convenience, or simply click under the "Shop With Me" tab on the right sidebar of my blog, which will take you directly to my website and online store. I very much appreciate your business! You can browse the PDF versions of the July-December 2022 Mini Catalogue and the May 2022-April 2023 Annual Catalogue anytime on my website.
Product Inventory Update
Unfortunately Stampin' Up! advises that the Stampin' Emboss Powders - Metallics (item 155555) are not currently available for ordering but are expected to be available the week of October 24, 2022.
Have fun creating!
Laurel

Tuckered out from too much computer time!
Comments
Post a Comment