Playing With The Cheerful Basket Bundle!
(Cheerful Basket Stamp Set and Full Basket Dies)
Hello! Today I am sharing a few cards I worked on this week using the Cheerful Basket Bundle (item 158680), which is featured in the May 2022-April 2023 Annual Catalogue, and which includes the Cheerful Basket stamp set (item 158674) and the Full Basket dies (item 158679). Of course the stamp set and the dies can be purchased separately but, when purchased together using the Bundle item number, there is the 10% Bundle Savings - which is always a good thing!
Just a quick recap of the three Stampin' Up! September Promotions:
- Perfect Partners - September 1-30 - Stampin' Up! is offering six new die sets (while supplies last!) that co-ordinate with existing stamp sets from both the May 2022-April 2023 Annual Catalogue and the July-December 2022 Mini Catalogue. The dies can be purchased as Bundles together with the co-ordinating stamp sets or separately from the stamp sets (in case you already have the stamp sets!)
- Weekly Deals - September 1-28 - for each of four weeks Stampin' Up! will offer a selection of discounted products - the discounts and product selection will vary for each of the four weeks (the remaining three weeks are September 8-14, September 15-21, and September 22-28). The Weekly Deals for the second week, starting today, include the Texture Chic Memories & More Card Pack (item 159201 - $11.00), the Texture Chic Memories & More Cards & Envelopes (item 159202 - $13.20), the Rose Gold 12" x 12" Specialty Paper (item 159139 - $11.00), the White 3/4" Frayed Ribbon (item 158138 - $9.23), and the Real Red 3/8" Mini Ruffled Ribbon (item 156323 - $9.90). The full selection of discounted products for this week can be viewed on my website https://archiesatelier.stampinup.net/ by selecting the "Shop Now" tab followed by the "Specials" tab and then the "September Weekly Deals" tab.
- World Cardmaking Day Bundles - Stampin' Up! is offering three Craft-Along Bundles - and will include with any Craft-Along Bundle ordered prior to October 1, 2022 (World Cardmaking Day!) one free package of Iridescent Pearl Basic Jewels (item 158987) [one per order] - when placing an online order that includes one of these Bundles you will have to include the item number for the Iridescent Pearl Basic Jewels.
Now on with the projects!
For each of my cards I used watercolour paper (Fluid 100 5" x 7" Watercolour Paper - item 149612) to stamp and/or die cut the images. To stamp the images and sentiments I used Stazon Jet Black Ink (item 101406), and all images were coloured using Stampin' Up! Inks and/or Watercolour Pencils. For all die cutting I used my Stampin' Cut & Emboss Machine (item 149653), and the main adhesive I used was Multipurpose Liquid Glue (item 110755).
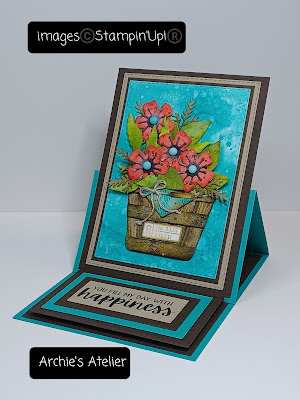
You Fill My Day With Happiness Easel Card
For this 5 1/4" x 4" easel card I used the following additional supplies:
- Bermuda Bay cardstock (item 131197) for the card base - 10 1/2" x 4", scored on the 10 1/2" side at 2 1/2" and 5 1/4" - and sentiment matting panel;
- Early Espresso cardstock (item 119686) for inside panel and matting panels;
- Crumb Cake cardstock (item 120953) for matting and sentiment panels, and for the branch sprigs - I sponged the sprigs with Soft Suede ink (item 147115);
- Stitched Rectangles dies (item 151820) to cut matting panels (including the watercolour panel);
- Summer Shadows dies (item 156618) - I used the small flower die to cut the four flowers (which were coloured using Calypso Coral ink - item 147101 - and Sweet Sorbet ink - item 159216);
- Poppy Moments dies (item 151594) to cut the flower centers from watercolour paper - I coloured them using Basic Gray ink (item 149165) and Memento Tuxedo Black Ink (item 132708);
- Quiet Meadow stamp set (item 155082) - using the splatter stamp and Sweet Sorbet ink I stamped the watercoloured flowers;
- Ranunculus Romance stamp set (item 157968) - to stamp the basket label using Soft Suede ink on watercolour paper - after inking the stamp I stamped one image on scrap paper before stamping the final image on the watercolour paper (second generation stamping);
- Soft Suede ink, Basic Gray ink, and Memento Tuxedo Black Ink to colour the basket and handle;
- Bermuda Bay ink (item 147096) to colour the watercolour panel - lightly spritzed with water (Stampin' Spritzers - item 126185);
- Bermuda Bay ink and Soft Suede ink to colour the napkin;
- Granny Apple Green ink (item 147095), Old Olive ink (item 147090), and Mossy Meadow ink (item 147111) to colour the leaves;
- Foam Adhesive Strips (item 141825) to adhere the matted sentiment panel;
- Linen Thread (item 104199) for the bow on the basket's handle; and
- 2022-2024 In Colour Matte Deorative Dots (item 159186) - I used four of the Tahitian Tide shaded dots for the flower centers.
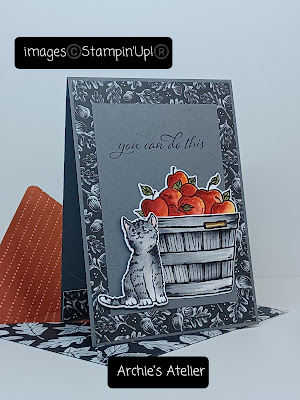
You Can Do This Top-Fold Card
For this 5 1/2" x 3 7/8" top-fold card I used the following additional supplies:
- Basic Gray cardstock (item 121044) for the card base and sentiment panel;
- Forever Fern stamp set (item 152559) for the sentiment;
- Rustic Harvest 12" x 12" Designer Series Paper (item 159633) for the black and white oak leaf/acorn patterned paper used for the front matting panel (I also added a strip along the bottom of the inside panel);
- Basic Gray ink (item 149165) and Memento Tuxedo Black Ink (item 132708) to colour the basket, and the body of the cat;
- Soft Suede ink (item 147115) to colour the basket handle;
- Flirty Flamingo Watercolour Pencil - Watercolour Pencils - Assortment 2 (item 149014) to colour the inside of the cat's ears;
- Real Red ink (item 147084) and Mango Melody ink (item 147093) to colour the apples;
- Old Olive ink (item 147090) and Mossy Meadow ink (item 147111) to colour the leaves;
- Basic Black Stampin' Write Marker (item 100082) to add splatters to front sentiment panel by flicking the brush end of the marker against the marker lid; and
- Mini Stampin' Dimensionals (item 144108) - used to adhere the die cut cat - applying them to the back bottom and left side.
Inspired By You Art Supplies In A Basket Card
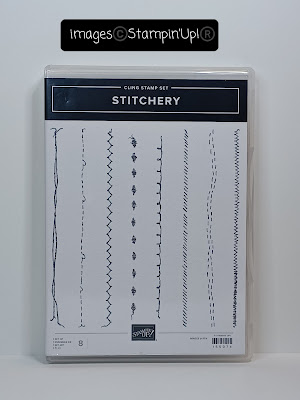
Inspired by an idea that I saw on the internet, in an attempt to create a distressed fulscap paper matting panel I used the Stitchery stamp set (item 155074) to stamp the Bermuda Bay ink (item 147096) horizontal lines and the Sweet Sorbet ink (item 159216) vertical line on a piece of watercolour paper - using the second generation stamping technique to stamp the lines.
For the torn spiral notebook edge I used the spiral notebook edge die from the Blossoming Happiness dies (item 158823) and then tore pieces from the die cut edge of the watercolour panel. I sponged the edges with Soft Suede ink (item 147115) and lightly spritzed the entire panel with water (Stampin' Spritzers - item 126185) - blotting with a paper towel.
I used the following additional supplies for this 4 1/2" x 4 1/8" side-fold card:
- Basic Black cardstock (item 121045) for the card base;
- Stitched Rectangles dies (item 151820) to cut the watercolour panel that was coloured with Bermuda Bay ink (item 147096);
- Stylish Shapes dies (item 159183) to cut the sentiment circle (which was lightly sponged with Soft Suede ink);
- Gingerbread House dies (item 159718) to cut the two large hearts;
- Sweet Sorbet ink to colour the watercolour paper from which all the hearts were cut;
- Best Witches stamp set (item 159860) to stamp the frog - coloured using Granny Apple Green ink (item 147095) and cut out using my Paper Snips Scissors (item 103579);
- Granny Apple Green ink. Old Olive ink (item 147090), and Mossy Meadow ink (item 147111) to colour the leaves;
- Soft Suede ink and Basic Gray ink (item 149165) to colour the basket;
- Granny Apple Green ink, Bermuda Bay ink, Basic Gray ink, Mango Melody ink (item 147093) and Watercolour Pencils (Melon Mambo and Pumpkin Pie from Watercolour Pencils - Assortment 1 - item 141709; and Garden Green, Flirty Flamingo, and Gorgeous Grape from Watercolour Pencils - Assortment 2 - item 149014) to colour the art supplies;
- Basic Black Stampin' Write Marker (item 100082) to add splatters to the art supplies and basket by flicking the brush end of the marker against the marker lid; and
- Granny Apple Green ink to colour the second watercolour panel (tucked behind the basket and under the Bermuda Bay panel).
Using an envelope punch board I made an envelope using a piece of black and white patterned paper from Rustic Harvest 12" x 12" Designer Series Paper (item 159633).
Sending You Some Get Well Cheer Gift Card
For this 3" x 4" side-fold gift card I used the following additional supplies:
- Basic Black cardstock (item 121045) for the card base - 8" x 4" and scored at 4" on the 8" side;
- Basic White cardstock (item 159276) for the inside sentiment panel;
- Garden Green patterned papers from the 6" x 6" Designer Series Paper Assortments - Regals (item 159256) for the front panel;
- Pumpkin Pie ink (item 147086) to colour the cat's body;
- Calypso Coral ink (item 147101) to colour the inside of the cat's ears;
- Soft Suede ink (item 147115) and Basic Gray ink (item 149165) to colour the basket and handle;
- Real Red ink (item 147084), Sweet Sorbet ink (item 159216), Mango Melody ink (item 147093), and Granny Apple Green ink (item 147095) to colour the apples;
- Old Olive ink (item 147090) and Mossy Meadow ink (item 147111) to colour the leaves;
- Ranunculus Romance stamp set (item 157968) - to stamp the basket label using Soft Suede ink on watercolour paper - after inking the stamp I stamped one image on scrap paper before stamping the final image on the watercolour paper (second generation stamping);
- Mini Stampin' Dimensionals (item 144108) to adhere the die cut cat;
- Classic Matte Dots (item 158146) - two large and two small of the Basic Black dots added to the front of the card; and
- Basic Black Stampin' Write Marker (item 100082) to add splatters to the inside sentiment panel (by flicking the brush end of the marker against the marker lid).
Using an envelope punch board I made the envelope from a piece of Real Red patterned paper from the 6" x 6" Designer Series Paper Assortments - Regals (159256). Around the envelope I tied a bow using Real Red ribbon from the Real Red & Garden Green 3/8" Ribbon Combo Pack (item 159577). Through the center of the ribbon bow I tied a bow using Linen Thread (item 104199). I like to add bows to the envelopes of cards that will be hand delivered!
And finally . . .
Take Care of Yourself Get Well Cheer Card
For this 6 3/8" x 3 7/8" top-fold card I used the following additional supplies:- Starry Sky cardstock (item 159263) for the card base;
- Crumb Cake cardstock (item 120953) for front matting panel, front sentiment strip, and inside sentiment panel;
- Orchid Oasis cardstock (item 159267) for front stamped matting panel;
- Painted Poppies stamp set (item 151599) - using the large splatter stamp and Starry Sky ink (item 159212) I stamped around the Orchid Oasis cardstock panel;
- Cup of Tea stamp set (item 158661) for the inside "Take care of yourself" sentiment;
- Soft Suede ink (item 147115) and Basic Gray ink (item 149165) to colour the basket and handle;
- Starry Sky ink and Soft Suede ink to colour the napkin;
- Real Red ink, Sweet Sorbet ink (item 159216), Mango Melody ink (item 147093), Granny Apple Green ink (item 147095), Soft Suede ink, and Old Olive ink (item 147090) to colour the die cut apples and leaves; and
- Foam Adhesive Strips (item 141825) to adhere the apple-filled basket to the front of the card.
Thank you for visiting my blog! As always I had a lot of fun working on these projects!
If you are interested in purchasing any of the available Stampin' Up! products I have used in my projects, and you live in Canada and do not have a Stampin' Up! demonstrator, please do not hesitate to visit my online store found on my website https://archiesatelier.stampinup.net/ at your convenience, or simply click under the "Shop With Me" tab on the right sidebar of my blog, which will take you directly to my website and online store. I very much appreciate your business! You can browse the PDF versions of the July-December 2022 Mini Catalogue and the May 2022-April 2023 Annual Catalogue anytime on my website. Don't forget to check in regularly to see the September Weekly Deals too!
Have fun creating!
Laurel


_0001.jpg)
_0002.jpg)
.jpg)


Comments
Post a Comment