Love At First Bite - Halloween Happiness!
(a few Halloween projects)

Hello! Today I am sharing a few Halloween projects I worked on this week using the Stampin' Up! Best Witches stamp set (item 159860), and the Scary Cute Bundle (item 159852), which includes the Scary Cute stamp set (item 159850) and the Scary Silhouettes dies (item 159851). The Scary Cute stamp set and the Scary Silhouettes dies can of course be purchased separately, but, when purchased together using the Bundle item number there is the 10% Bundle Savings!

Best Witches stamp set - item 159860

Scary Cute Bundle - item 159852
Just before I start on the projects a quick reminder about the ongoing Stampin' Up! promotions for September:
.jpg)
- September Weekly Deals - September 1-28 - for each of four weeks Stampin' Up! will offer a selection of discounted products - the discounts and product selection will vary for each of the four weeks and the final week begins today (September 22, 2022) and runs until next Wednesday (September 28, 2022), A few of the Weekly Deals for this fourth and final week include Evening Evergreen 3/8" Windowpane Check Ribbon (item 158135 - $8.20), Matte Black Dots (item 154284 - $8.78), Pastel Pearls (item 154571 - $8.10), Heart Pearls (item 159190 - $9.35), and Festive Foils 12" x 12" Specialty Designer Series Paper (item 159536 - $11.00). The full selection of discounted products for this week can be viewed on my website https://archiesatelier.stampinup.net/ by selecting the "Shop Now" tab followed by the "Specials" tab and then the "September Weekly Deals" tab.

- World Cardmaking Day Bundles - Stampin' Up! is offering three Craft-Along Bundles - and will include with any Craft-Along Bundle ordered prior to October 1, 2022 (World Cardmaking Day!) one free package of Iridescent Pearl Basic Jewels (item 158987) [one per order] - when placing an online order that includes one of these Bundles you will have to include the item number for the Iridescent Pearl Basic Jewels.
_0001.jpg)
_0002.jpg)
- Perfect Partners - September 1-30 - Stampin' Up! is offering six new die sets (while supplies last!) that co-ordinate with existing stamp sets from both the May 2022-April 2023 Annual Catalogue and the July-December 2022 Mini Catalogue. The dies can be purchased as Bundles together with the co-ordinating stamp sets or separately from the stamp sets (in case you already have the stamp sets!)
For my projects I have used my Stampin' Cut & Emboss Machine (item 149653) for all die cutting; my Paper Trimmer (item 152392) for cutting and scoring paper; a bone folder (Bone Folder - item 102300) for burnishing all score lines, and, for the main adhesive, Multipurpose Liquid Glue (item 110755). An additional tool that certainly came in handy is the Take Your Pick Tool (item 144107). All images were stamped on watercolour paper (Fluid 100 5" x 7" Watercolour Paper - item 149612) using Stazon Jet Black Ink (item 101406), and, as applicable, coloured using Stampin' Up! inks and Watercolour Pencils. I also used Stazon Jet Black Ink to stamp all sentiments.
Cards


For this 3 1/2" x 3 1/2" side-fold card I used the following additional supplies:
- Basic Black cardstock (item 121045) for the card base, and the die cut hearts;
- heart die from the Gingerbread House dies (item 159718) to cut the Basic Black cardstock hearts (the Sweet Gingerbread Bundle - item 159719 - includes the Gingerbread House dies and the Sweet Gingerbread stamp set);

Sweet Gingerbread Bundle - item 159719
- Melon Mambo cardstock (item 115320) for the embossed square on the front panel, and for the card's inside sentiment square;
- Stripes & Splatters 3D Embossing Folders (item 157980) - I used the Splatters embossing folder to emboss a piece of Melon Mambo cardstock before die cutting the square;
- Basic Gray cardstock (item 121044) for the front panel's stamped square;
- Stylish Shapes dies (item 159183) to cut the Melon Mambo and Basic Gray cardstock squares and the image circle;
- I used the small splatter stamp from the Painted Poppies stamp set (item151599) and Basic Gray ink (item 149165) to stamp around the sides of the Basic Gray cardstock square;

Painted Poppies stamp set - item 151599
- Basic Gray ink, Rich Razzleberry ink (item 147091), Calypso Coral ink (item 147101), Mango Melody ink (item 147093), Soft Suede ink (item 147115), and Memento Tuxedo Black Ink (item 132708) to colour the image;
- small scraps of Basic Gray patterned paper from 6" x 6" Designer Series Paper Assortments - Neutrals (item 159257) - which I attached to the image circle with tiny staples;
- Stampin' Dimensionals (item 104430) to attach the image circle; and
- Classic Matte Dots (item 158146) - I added one large and one small of the Basic Gray dots to the bottom of the embossed Melon Mambo cardstock square.


- Granny Apple Green cardstock (item 146990) for the card base - 11" x 4 1/8" scored on the 11" side at 2", 3 1/2", and 9", the die-cut squares (3 squares were cut - one was cut in half and glued to the back of the front panel's square just to "tidy up" the back view when the card was opened), the leaves, and the hearts;
- Basic Black cardstock (item 121045) for the matting panel for the sentiment square, the flower centers, and the circle;
- Gorgeous Grape cardstock (item 146987) for the flowers;
- Stylish Shapes dies (item 159183) to cut the Granny Apple Green cardstock squares, the Basic Black cardstock circle, and the image circle;
- Summer Shadows dies (item 156618) to cut the Gorgeous Grape cardstock flowers;
- Poppy Moments dies (item 151594) to cut the Basic Black cardstock flower centers, and the Granny Apple Green cardstock leaves;
- little heart dies from the Full Basket dies (item 158679) to cut the three Granny Apple Green cardstock hearts;
- Black & White Designs 12" x 12" Designer Series Paper (item 159861) for the decorative paper panels;
- Basic Gray ink (item 149165), Granny Apple Green ink (item 147095), Mango Melody ink (item 147093), Soft Suede ink (item 147115), Calypso Coral ink (item 147101), and Gorgeous Grape and Cajun Craze watercolour pencils (Watercolour Pencils - Assortment 2 - item 149014) to colour the image;
- Basic Black Stampin' Write Marker (item 100082) to add splatters to image circle by flicking the brush tip of the marker against the marker lid; and
- Classic Matte Dots (item 158146) - I added a large Basic Black dot to each of the three points of the front panel's Granny Apple Green cardstock square.


For this 6" x 4" side-fold card I used the following additional supplies:
- Gorgeous Grape cardstock (item 146987) for the card base and sentiment banner;
- Basic Black cardstock (item 121045) for the matting panels;
- Basic Gray cardstock (item 121044) for the image matting square;
- Pumpkin Pie cardstock (item 105117) for the "spell" sentiment (before inking the stamp for the additional "spell" I masked off the rest of the sentiment using post-it notes - remembering to remove the post-it notes before stamping!);
- Stylish Shapes dies (item 159183) to cut the image square, and the sentiment banner;
- Gorgeous Grape patterned paper from 6" x 6" Designer Series Paper Assortments - Brights (item 159258) for the decorative paper panel;
- Basic Gray ink (item 149165), Granny Apple Green ink (item 147095), Pumpkin Pie ink (item 147086), Mango Melody ink (item 147093), Soft Suede ink (item 147115), Memento Tuxedo Black Ink (item 132708), and Gorgeous Grape watercolour pencil (Watercolour Pencils - Assortment 2 - item 149014) to colour the image;
- Basic Black Stampin' Write Marker (item 100082) to add splatters to the image by flicking the brush tip of the marker against the marker lid; and
- Matte Black Dots (item 154284) - I added two large dots to the sentiment banner.
Treat Boxes


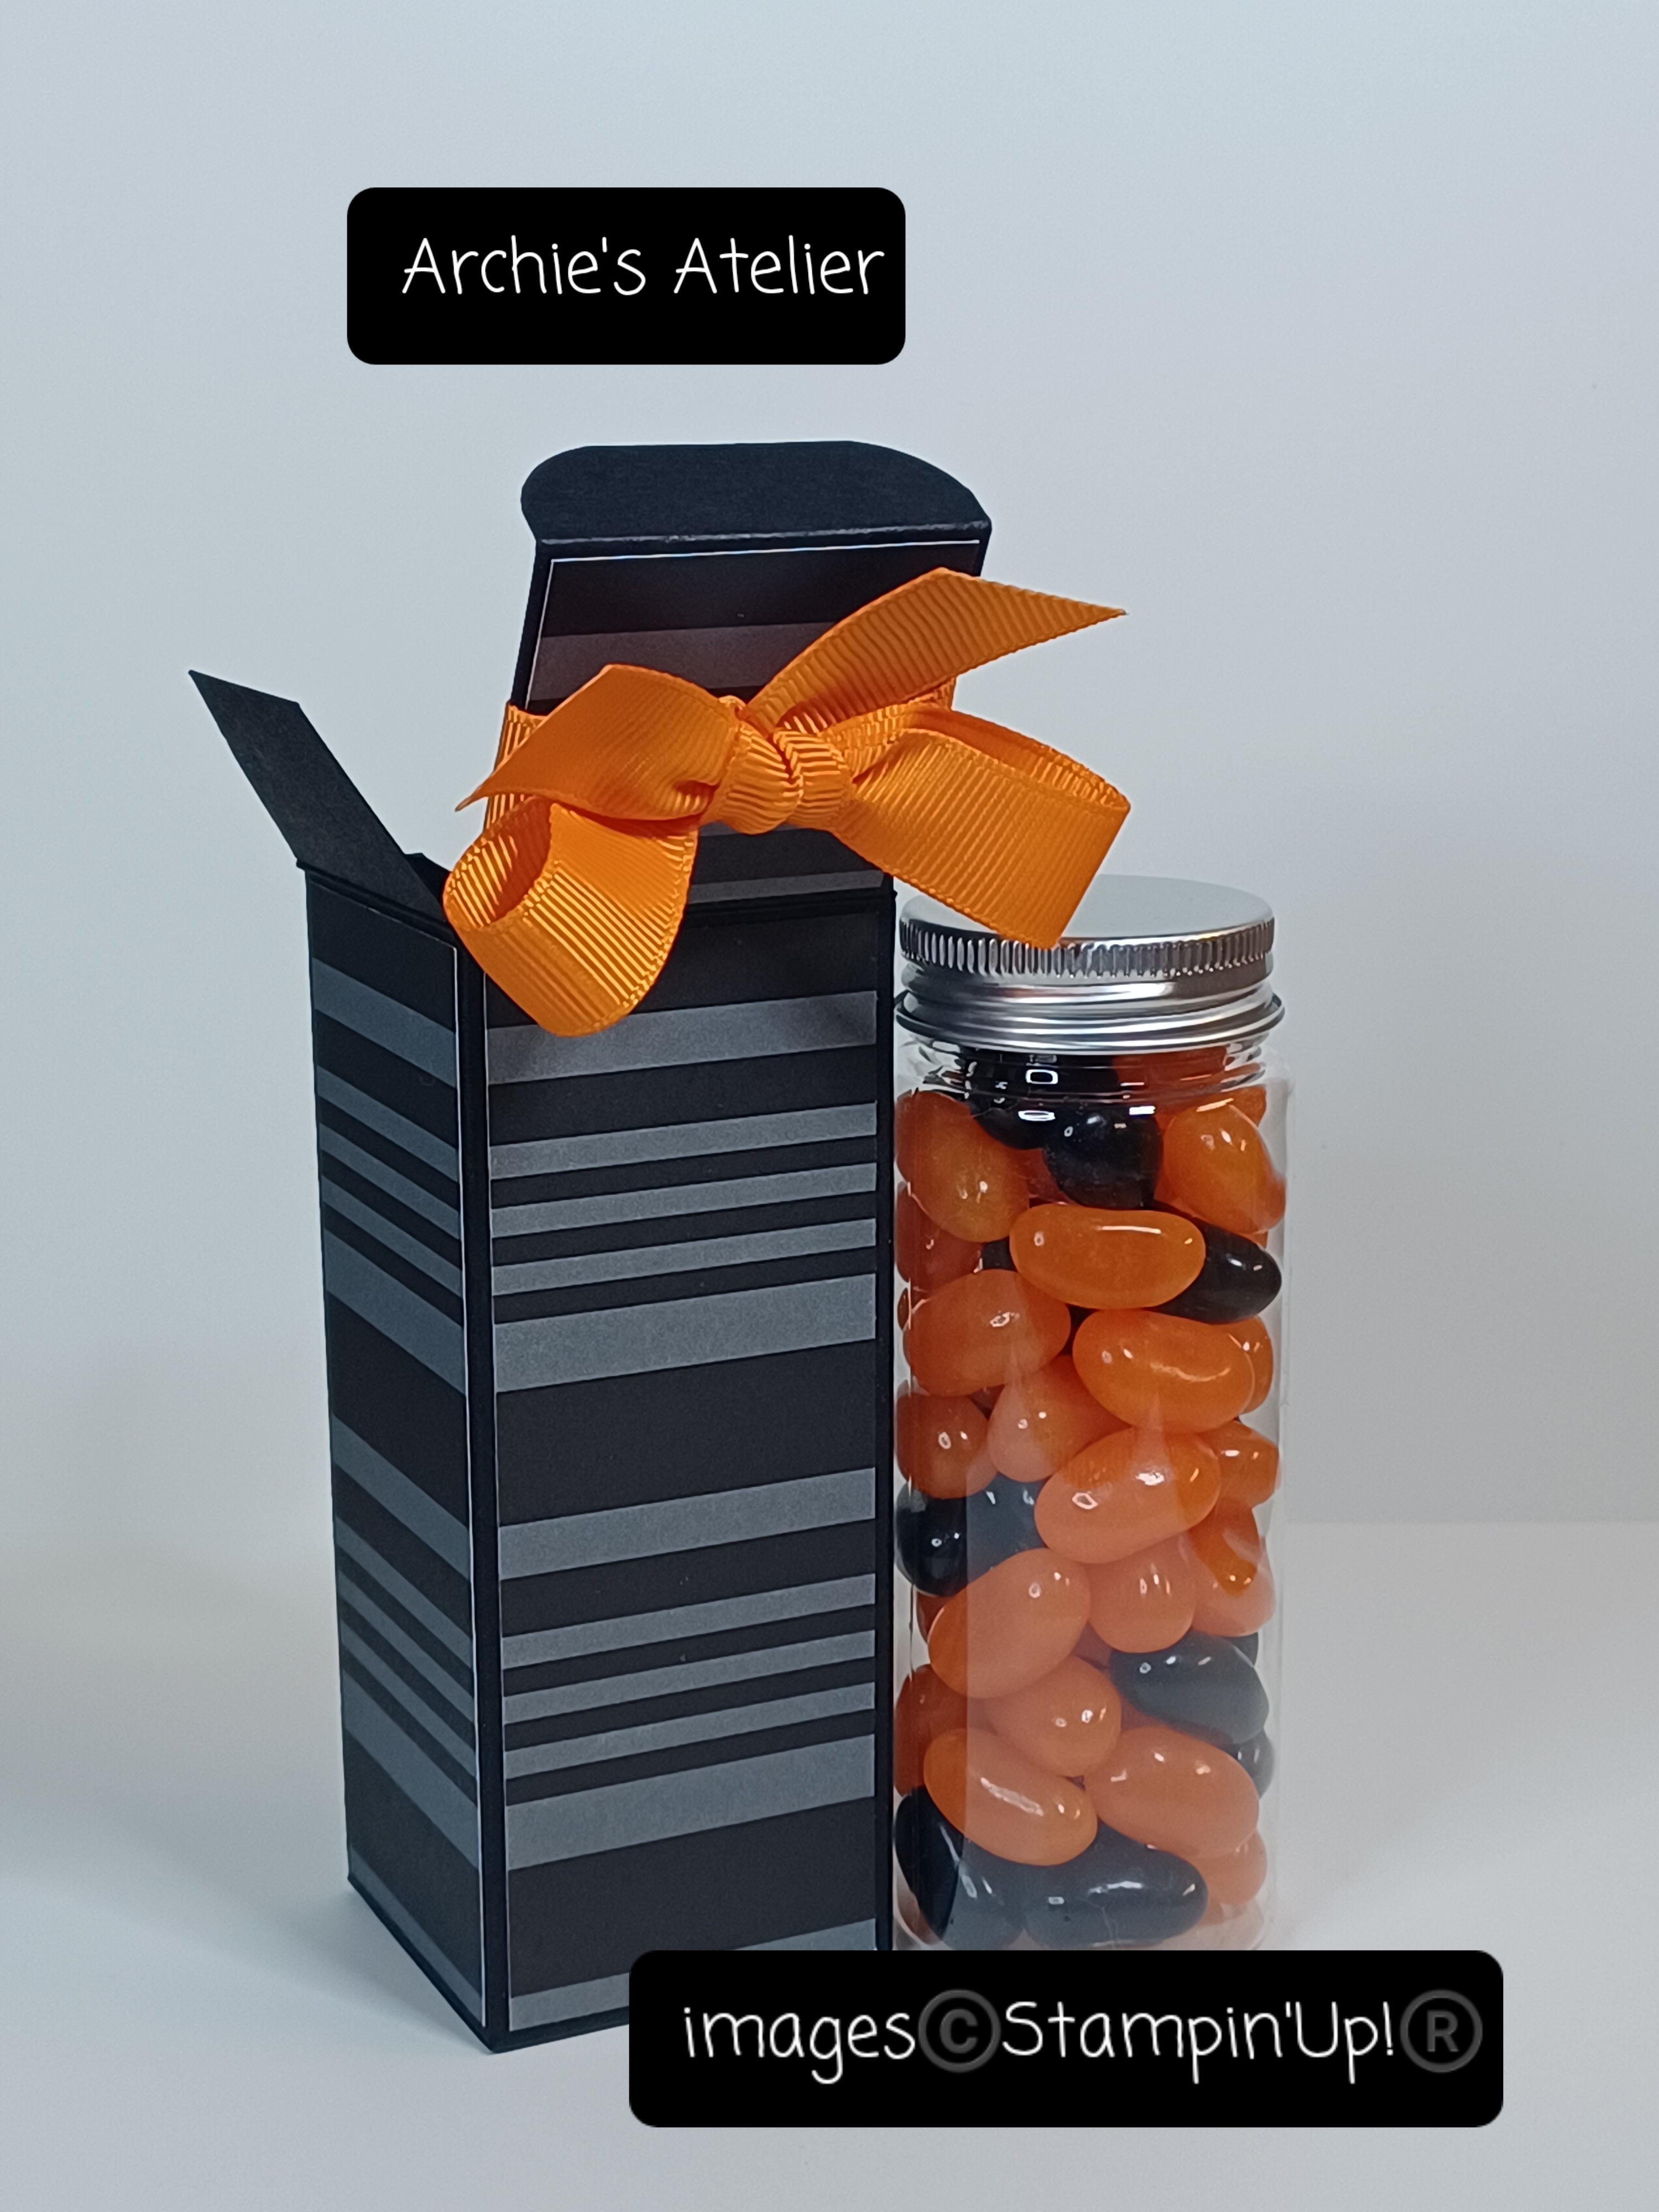

Hand sanitizer may be the perfect treat but a jar of jellybeans is a pretty close second in my book! (followed of course by chocolate . . . )
For this flip-top window box that measures 4 1/2" tall x 1 3/4" wide x 1 3/4" deep I used the following additional supplies:
- for the base of the box a 7 1/2" x 8 1/2" piece of Basic Black cardstock (item 121045), scored on the 7 1/2" side at 1 3/4", 3 1/2", 5 1/4", and 7" (the 1/2" tab is the glue tab); and scored on the 8 1/2" side at 1 3/4" (the bottom flaps), 6 1/4", and 8" (the 1/2" will be the fold-in flap for the top of the box);
- Tailor Made Tags dies (item 155563) to cut the window opening in the front panel (I cut the window opening before adhering any of the decorative paper panels);
- an approximately 1 5/8" x 4" piece of acetate (Window Sheets - item 142314) to be glued to the inside of the front panel behind the window opening - done before completing assembly of the box;
- Black & White Designs 12" x 12" Designer Series Paper (item 159861) for the decorative paper panels (quite a few of the designs in this double-sided DSP include a black & white design on one side and a Basic Gray/black design on the other);
- Gorgeous Grape cardstock (item 146987) for the sentiment circle (cut using the Stylish Shapes dies - item 159183); and
- Pumpkin Pie cardstock (item 105117) for the die-cut hearts (cut using the little heart dies from the Full Basket dies - item 158679).
I used a 1" circle punch to cut the thumb notch in the top of the front panel.


For this 4" tall (excluding the handle) x 2" wide x 1" deep treat holder I used the following additional supplies:
- for the box a 6 1/2" x 5" piece of Basic Gray cardstock (item 121044), scored on the 6 1/2" side at 1", 3", 4", and 6" (the 1/2" tab is the glue tab); and scored on the 5" side at 1" (bottom flaps);
- for the handle - a 3/4" x 6 1/2" piece of Basic Gray cardstock, and a 1/2" x 6 1/2" piece of Basic Black cardstock (item 121045) - before attaching the handle to the box I slightly curled the cardstock using my bone folder - I attached the handle to the inside of the box sides by applying glue approximately 1/2" from each end of the handle;
- Basic Black cardstock to cut the tag (using the Tailor Made Tags dies - item 155563), the heart (using the small heart die from the Full Basket dies - item 158679), the bow (using the Decorated Pine dies - item 159710), and the scallops (using the scallop edge die from the Scalloped Contours dies - item 155560);
- Gorgeous Grape cardstock (item 146987) for the image rectangle (cut using the Stitched Rectangles dies - item 151820), and the sentiment circle (cut using the Stylish Shapes dies - item 159183);
- Basic Gray patterned paper from 6" x 6" Designer Series Paper Assortments - Neutrals (item 159257) for the decorative paper panels; and
- Classic Matte Dots (item 158146) - one large Basic Gray dot added to the center of the Basic Black cardstock bow.
And finally . . .
Variations on a Theme - Shopping Bag Treat Holders


For these 2 1/2" tall x 2" wide x 3/4" deep shopping bag treat holders I used the following additional supplies:
- a 6" x 3 1/4" piece of Kraft 6" x 6" Paper (item 156325) scored on the 6" side at 3/8", 3/4", 2 3/4", 3 1/8", 3 1/2", and 5 1/2" (the 1/2" is the glue tab - because of the side folds I trimmed the tab down to 1/4" before gluing); and scored on the 3 1/4" side at 3/4" (bottom flaps);
- a scrap of the Kraft Paper to cut the "bat tag" using the small tag die from the Meadow dies (item 155852);
- Basic Black cardstock (item 121045) to cut the bats;
- Linen Thread (item 104199) for the bows on the handles; and
- Basic Black Stampin' Write Marker (item 100082) to add the splatters by flicking the brush tip of the marker against the marker lid.
I also tried two variations of this shopping bag treat holder - keeping the same dimensions for the bag/box but removing the side score lines (by omitting the 3/8" and 3 1/8" score lines on the 6" side of the cardstock and keeping the side glue tab at 1/2"). On the haunted house version I used two circle dies from the Stylish Shapes dies (item 159183) to create circle frames for the handles (frames glued to the inside of the front and back panels at approximately the half-way point on the frames). To prepare for die-cutting the circle frames I positioned the two circle dies and held them together with some washi tape before placing them and the cardstock in the die cutting machine.

For each of these two treat holders I used the label die from the Fabulous Frames dies (item 159163) to cut the "trick or treat" sentiment labels. Since I did not want to include the full sentiment from the trick or treat stamp, before inking the stamp I masked off the rest of the sentiment using post-it notes.


I used the following additional supplies for this treat holder:
- Basic Black cardstock (item 121045) for the box and cat silhouette (for a little sparkle I added a light coat of black glitter nail polish to the die-cut cat silhouette);
- a small scrap of Granny Apple Green cardstock (item 146990) glued behind the eye openings on the die-cut cat silhouette;
- Pumpkin Pie cardstock (item 105117) for the backing circle for the die-cut cat silhouette (cut using the Stylish Shapes dies - item 159183), and the sentiment label;
- small piece of star patterned paper from Black & White Designs 12" x 12" Designer Series Paper (item 159861) for the decorative paper panel for the front of the box - the edges of which I sponged with Basic Gray ink (item 149165); and
- Classic Matte Dots (item 158146) - two small Basic Black dots added to the sentiment label.


- Granny Apple Green cardstock (item 146990) for the box, and circle frame handles;
- Basic Black cardstock (item 121045) for the die-cut haunted house silhouette, and bats (I added just a little of the black glitter nail polish to the bat wings);
- Gorgeous Grape cardstock (item 146987) for the circle (cut using the Stylish Shapes dies - item 159183), the sentiment label, and the grass (cut using the Honeybee Blooms dies - item 157951);
- Pumpkin Pie cardstock (item 105117) for the two hearts (cut using the small heart die from the Full Basket dies - item 158679);
- Basic Gray cardstock (item 121044) for the matting banner (cut using the Stylish Shapes dies);
- Black & White 12" x 12" Designer Series Paper (item 159861) for the striped patterned paper for the front and back decorative paper panels;
- Basic Black Stampin' Write Marker (item 100082) to add splatters by flicking the brush tip of the marker against the marker lid; and
- Classic Matte Dots (item 158146) - two small Basic Black dots added to the sentiment label.
Thank you for visiting my blog! I certainly had a lot of fun working on these Halloween projects! I will admit that I did sample a few of the treats too - just for quality control purposes!
If you are interested in purchasing any of the available Stampin' Up! products I have used in my projects, and you live in Canada and do not have a Stampin' Up! demonstrator, please do not hesitate to visit my online store found on my website https://archiesatelier.stampinup.net/ at your convenience, or simply click under the "Shop With Me" tab on the right sidebar of my blog, which will take you directly to my website and online store. I very much appreciate your business! You can browse the PDF versions of the July-December 2022 Mini Catalogue and the May 2022-April 2023 Annual Catalogue anytime on my website. Don't forget to also check out the Clearance Rack!
Have fun creating!
Laurel

Comments
Post a Comment