A Few Favour/Treat Holders
(for Christmas, Fall, Halloween . . . )
Hello! Today I am sharing a few favour/treat holders I worked on this week featuring a few of the new Stampin' Up! Designer Series Papers, Halloween stamp sets, and Christmas stamp and die sets.
Just a quick reminder about the current Stampin' Up! promotions - there is a lot going on this month!
- 24 Hour Stamp Sale - September 15, 2022 - for today only stamps from the May 2022-April 2023 Annual Catalogue (with the exception of the Host stamp sets) are available for 15% off - a great opportunity to add to your stamp set collection!
- September Weekly Deals - September 1-28 - for each of four weeks Stampin' Up! will offer a selection of discounted products - the discounts and product selection will vary for each of the four weeks (the remaining two weeks are September 15-21, and September 22-28). The Weekly Deals for the third week, starting today, include the Perfectly Penciled 12" x 12" Designer Series Paper (item 159244 - $13.20), Masking Paper (item 155480 - $7.80), Vellum 12" x 12" Layering Designs (item 157764 - $11.00), Eden Dies (item 157831 - $38.40), Pearlized Enamel Effects Basics (item 156310 - $18.90), and Soft Pastels Assortment (item 154585 - $11.03). The full selection of discounted products for this week can be viewed on my website https://archiesatelier.stampinup.net/ by selecting the "Shop Now" tab followed by the "Specials" tab and then the "September Weekly Deals" tab.
- Perfect Partners - September 1-30 - Stampin' Up! is offering six new die sets (while supplies last!) that co-ordinate with existing stamp sets from both the May 2022-April 2023 Annual Catalogue and the July-December 2022 Mini Catalogue. The dies can be purchased as Bundles together with the co-ordinating stamp sets or separately from the stamp sets (in case you already have the stamp sets!)
- World Cardmaking Day Bundles - Stampin' Up! is offering three Craft-Along Bundles - and will include with any Craft-Along Bundle ordered prior to October 1, 2022 (World Cardmaking Day!) one free package of Iridescent Pearl Basic Jewels (item 158987) [one per order] - when placing an online order that includes one of these Bundles you will have to include the item number for the Iridescent Pearl Basic Jewels.
Although the three styles of boxes included with this week's projects were designed to hold bottles of hand sanitizer they could certainly be used to hold other "treats"! For my projects I have used my Stampin' Cut & Emboss Machine (item 149653) for all die cutting; my Paper Trimmer (item 152392) for cutting and scoring paper; a bone folder (Bone Folder - item 102300) for burnishing all score lines, and, for the main adhesive, Multipurpose Liquid Glue (item 110755). Additional tools that definitely come in handy are the Take Your Pick Tool (item 144107), and Paper Snips Scissors (item 103579).
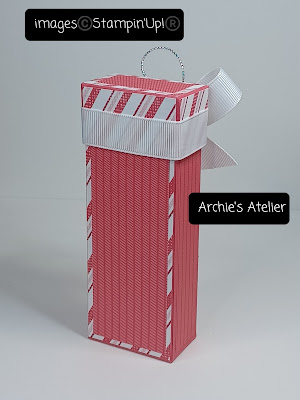
These two lidded boxes measure 4 3/4" tall x 1 3/4" wide x 1" deep and I used two pieces of cardstock cut and scored as follows for each box:
- for the base - a 6" x 5 3/4" piece scored on the 6" side at 1", 2 3/4", 3 3/4", and 5 1/2" (the 1/2" tab is the glue tab), and scored at 1" on the 5 3/4" side; and
- for the lid - a 3 13/16" x 3 1/16" piece scored at 1" on all four sides.
- Sweet Sorbet cardstock (item 159268) for the base and lid of the box, and the die-cut heart;
- Sweetest Christmas 12" x 12" Designer Series Paper (item 159559) for the multi-hued diagonal striped decorative paper panels;
- Sweet Sorbet patterned paper from the 6" x 6" Designer Series Paper Assortments - 2022-2024 In Colour (item 159253) for the tone-on-tone striped decorative paper panels;
- Basic White cardstock (item 159276) for the body of the stamped snowman, stamped hat and scarf, and die-cut snowflakes;
- Soft Suede cardstock (item 115318) for the snowman's die-cut arms;
- Stazon Jet Black Ink (item 101406) to stamp the snowman;
- Sweet Sorbet ink (item 159216) to stamp the hat and scarf;
- Blender Pens (item 102845) to lightly blend the Sweet Sorbet ink on the hat and scarf;
- Pumpkin Pie Watercolour Pencil (Watercolour Pencils - Assortment 1 - item 141709) to colour the snowman's nose - I did not add any water, just using the watercolour pencil as a colour pencil;
- Snowman Magic Bundle (item 159818), which includes the Snowman Magic stamp set (item 159816) and the Snowman dies (item 159817) to stamp and cut the snowman, snowman arms, hat, scarf, heart, and snowflakes. Of course the stamp set and the dies can be purchased separately (but when purchased together as a Bundle there is the 10% Bundle Savings!). There are lots of fun dies in this set that I am certainly looking forward to playing with more!
- Pearl Basic Jewels (item 144219) - four added to the front panel; and
- silver cord from Simply Elegant Trim (item 155766) to tie the bow around the center of the white ribbon bow tied around the lid. (The 5/8" gross grain white ribbon I picked up at Dollar Tree).
- Garden Green cardstock (item 102584) for the base and lid of the box, and for the front panel's stitched rectangle (cut using the Stitched Rectangles dies - item 151820);;
- Sweetest Christmas 12" x 12" Designer Series Paper (item 159559) for the decorative paper panels;
- Brushed Metallic 12" x 12" Cardstock (item 153524) - gold - and Real Red cardstock (item 102482) for the ornaments;
- Decorated Pine dies (item 159710) to die cut the ornaments;
- gold cord from Simply Elegant Trim (item 155766) for the ornament bows; and
- Garden Green 3/8" Ribbon from the Real Red & Garden Green 3/8" Ribbon Combo Pack (item 159577) for the bow around the lid.
- for the base of the box a 9" x 6 3/4" piece scored on the 9" side at 1 1/8", 4 1/4", 5 3/8", and 8 1/2" (the 1/2" tab is the glue tab), and scored on the 6 3/4" side at 1 1/8" on both ends; and
- for the flip-top a 3 1/8" x 3 1/8" piece scored on one of the 3 1/8" sides at 1 1/8". After slightly trimming the back top flap on the box base I glued the flip-top to the outside of the top flap - lining up the scored edge of the top flap with the bottom edge of the flip-top.
For each magnetic closure I used one positive and one negative of the Basic Grey small magnetic discs (package purchased at my local scrapbooking store) - gluing one magnet to the underside of the flip-top and one magnet to the front panel before adding the decorative paper panels.
For this box I used the following additional supplies:- Texture Chic 12" x 12" Specialty Designer Series Paper (item 158808) for the snowflake design decorative paper panels;
- Evening Evergreen patterned paper from the 6" x 6" Designer Series Paper Assortments - 2021-2023 In Colour (item 159254) for additional striped and polka-dot decorative paper panels;
- 1 1/2" Metallic Mesh Ribbon (item 153550) for bow tied around the front panel of the flip-top;
- silver cord from Simply Elegant Trim (item 155766) for the bow tied around the center of the Metallic Mesh Ribbon bow;
- Silver Foil 12" x 12" Specialty Pack (item 156457) for the die-cut snowflake (cut using the Chic dies - item 158815) - which was tied to the Metallic Mesh Ribbon bow with the silver cord; and
Chic dies - item 158815
- Pearl Basic Jewels (item 144219) - eight added to the front of the box (including one for the center of the Silver Foil die-cut snowflake).
Additional supplies used for this box:
- Evening Evergreen patterned paper from the 6" x 6" Designer Series Paper Assortments - 2021-2023 In Colour (item 159254) for decorative paper panels;
- Cherry Cobbler patterned paper from the 6" x 6" Designer Series Paper Assortments - Regals (item 159256) for box front's additional decorative paper panel;
- Cherry Cobbler cardstock (item 119685) for the sentiment circle (cut using the Stylish Shapes dies - item 159183), and the scallop strip (cut using the long scallop die from the Scalloped Contours dies - item 155560);
- watercolour paper (Fluid 100 5" x 7" Watercolour Paper - item 149612) for the die-cut pine bough (cut using the Decorated Pine dies - item 159710);
- Evening Evergreen ink (item 155576) and Soft Suede ink (item 147115) to watercolour the die-cut pine bough;
- Crumb Cake baker's twine (Baker's Twine Essentials Pack - item 155475) for the pine bough bow;
- Brightest Glow stamp set (item 159542) for the sentiment - stamped using Stazon Jet Black Ink (item 101406);
- Layering Circles dies (item 151770) to cut the Evening Evergreen cardstock matting circle; and
- Rustic Metallic Adhesive-Backed Dots (item 159082) - two added to the Cherry Cobbler cardstock sentiment circle.
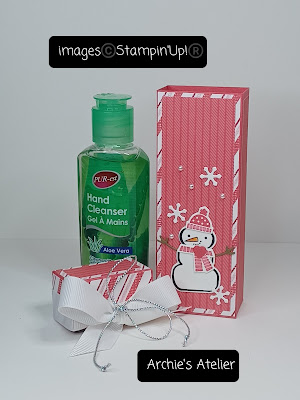
For these two boxes, which measure 3 1/2" tall x 1 1/2" wide x 1 1/2" deep, and which hold one smaller and "squatter" hand sanitizer bottle, I used a 6 1/2" x 7" piece of cardstock scored on the 6 1/2" side at 1 1/2", 3", 4 1/2", and 6" (the 1/2" tab is the glue tab), and scored on the 7" side at 1 1/2", 5", and 6 1/2". I have included a photo of the scoring/cutting template:
I used a 1" circle punch to cut the thumb notches in the front panels.
- Sahara Sand cardstock (item 121043) for the box and sentiment label;
- Quiet Meadow stamp set (item 155082) for the sentiment - stamped using Stazon Jet Black Ink (item 101406);
- Meadow dies (item 155852) to cut the sentiment label;
- Boughs of Holly 12" x 12" Designer Series Paper (item 159600) for the decorative paper panels - the decorative paper for the band is the reverse side of the DSP used for the box panels; and
- Crumb Cake baker's twine from Baker's Twine Essentials Pack (item 155475) for the bow.
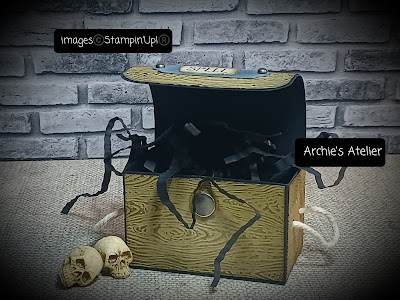
- Basic Black cardstock (item 121045) for the box;
- Rustic Harvest 12" x 12" Designer Series Paper (item 159633) for the black and white oak leaf/acorn patterned paper panels;
- Cajun Craze cardstock (item 119684) for the stitched rectangle matting panel (cut using the Stitched Rectangles dies - item 151820); and
- silver cord from Simply Elegant Trim (item 155766) for the bow tied through the center of the bow of the almost perfect match to Cajun Craze ribbon (picked up on clearance at a local craft store!) tied around the box under the center panel.
For my two final little Halloween treat holder projects (the box portions of which measure 1 3/4" tall x 2 3/4" wide x 1 1/2" deep) I was inspired by the very cute original lunchbox treat holder design of Stampin' Up! demonstrator Angie Pyjas (Stamping With Amore), which she shared in her September 11, 2022, You Tube video https://www.youtube.com/watch?v=a3uxSDn-snk. For each of my treat holders I used two pieces of Basic Black cardstock (item 121045): for the box a 9" x 3 1/4" piece scored on the 9" side at 1 1/2", 4 1/4", 5 3/4", and 8 1/2" (1/2" tab is the glue tab), and scored on the 3 1/4" side at 1 1/2" (bottom flaps); and, for the "lid", a 4" x 2 3/4" piece. I "shaped" the lid by curling it over a rounded countertop edge. I glued the back of the lid approximately half-way down on the back of the box. I used two of the small Basic Grey magnetic disks for each closure - gluing one magnet to the underside of the lid and one to the front of the box. For the purse treat holder handle I used a 4 1/4" x 1/2" piece of Basic Black cardstock scored at 1/2" from each end.
Additional supplies used for the purse treat holder:- Black & White Designs 12" x 12" Designer Series Paper (item 159861) for the decorative paper panels;
- Pumpkin Pie cardstock (item 105117) for the sentiment label (cut using the Fabulous Frames dies (item 159163)
Fabulous Frames dies - item 159163
- Scary Cute stamp set (item 159850) for the sentiment, stamped using Stazon Jet Black Ink (item 101406);
- Summer Shadows dies (item 156618) to cut the Gorgeous Grape cardstock (item 146987) flowers and large three-leafed Granny Apple Green cardstock (item 146990) leaf sprig;
- Full Basket dies (item 158679) to cut the three Parakeet Party cardstock (item 159259) leaves, and three Basic Black cardstock branch sprigs;
- Poppy Moments dies (item 151594) to cut the two Basic Black cardstock flower centers;
- Classic Matte Dots (item 158146) - two white dots used on the handle; two Basic Gray dots used for the flower centers; and two Basic Black dots used on the sentiment label; and
- Black & White 1/4" Gingham Ribbon (item 156485) for the handle bow.
- Crumb Cake cardstock (item 120953) for the embossed panels, and the torn sentiment strip;
- Timber 3D Embossing Folder (item 156406) to emboss the Crumb Cake cardstock panels;
- Soft Suede ink (item 147115) and Memento Tuxedo Black Ink (item 132708) to sponge the embossed panels to accentuate the "woodgrain";
- Best Witches stamp set (item 159860) for the sentiment - stamped using Stazon Jet Black Ink (item 101406);
- Soft Suede ink to sponge around the ripped edges of the sentiment panel;
- Fabulous Frames dies (item 159163) to cut the Basic Black cardstock sentiment matting label'
- Craft Stampin' White Ink (item 147277) to lightly sponge the Basic Black cardstock label; and
- Rustic Metallic Adhesive-Backed Dots (item 159082) - two added to the Basic Black cardstock label.
Thank you for visiting my blog! As always I had a lot of fun working on these projects!
If you are interested in purchasing any of the available Stampin' Up! products I have used in my projects, and you live in Canada and do not have a Stampin' Up! demonstrator, please do not hesitate to visit my online store found on my website https://archiesatelier.stampinup.net/ at your convenience, or simply click under the "Shop With Me" tab on the right sidebar of my blog, which will take you directly to my website and online store. I very much appreciate your business! You can browse the PDF versions of the July-December 2022 Mini Catalogue and the May 2022-April 2023 Annual Catalogue anytime on my website. Don't forget to check in regularly to see the September Weekly Deals too!
Have fun creating!
Laurel

.jpg)
.jpg)
_0001.jpg)
_0002.jpg)


Comments
Post a Comment