Playing With Wildflowers And Silhouettes
(a few watercolouring projects!)

Hello! Today I am sharing a few watercolouring projects I worked on this week - for a couple of the projects I have used several of the Stampin' Up! wildflower dies, and for two of the projects I used two of the silhouette stamps from the new Scary Cute stamp set (item 159850) that I thought were appropriate for my wildflower garden theme!

All die cutting and embossing were done using my Stampin' Cut & Emboss Machine (item 149653).
On with the projects!
Sending Love Card


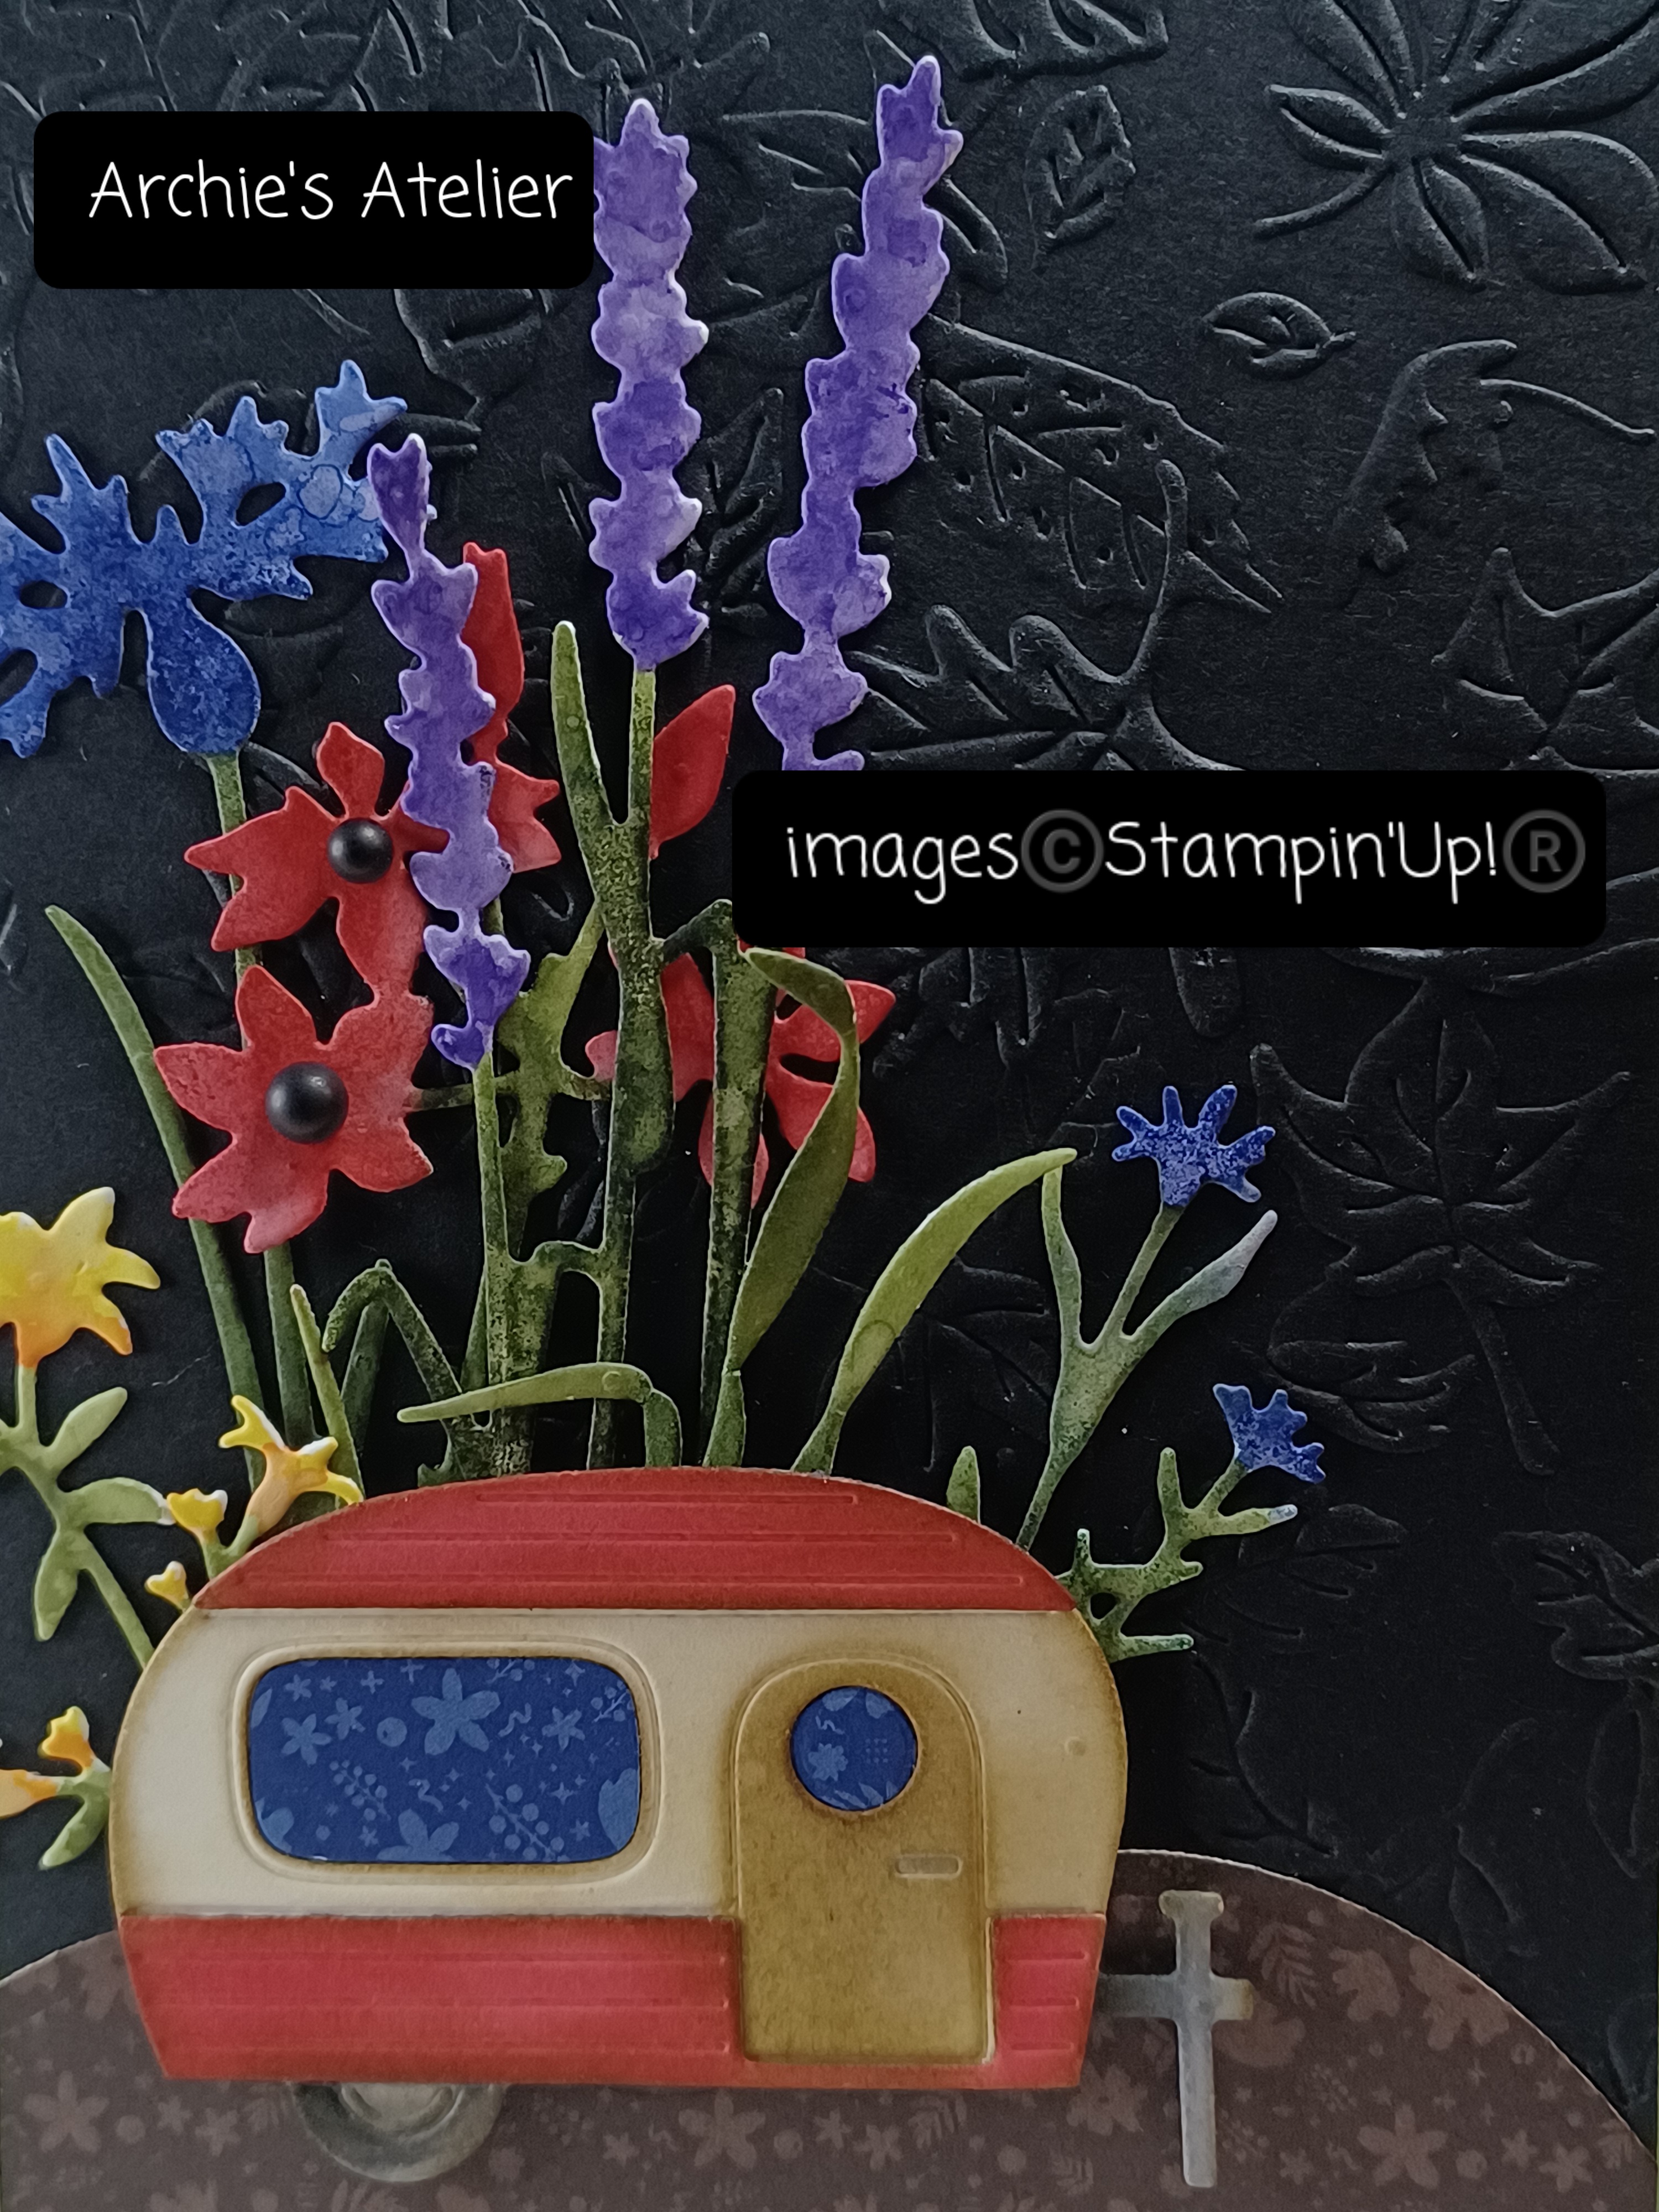

- Mossy Meadow cardstock (item 133676) for the card base;
- Pear Pizzazz cardstock (item 131201) for the front matting panel, and the inside panel;
- Basic Black cardstock (item 121045) for the embossed panel - embossed using the new Leaf Fall 3D Embossing Folder (item 159847);
- watercolour paper (Fluid 100 5" x 7" Watercolour Paper - item 149612) - to cut the wildflowers, grass, and trailer;
- Meadow dies (item 155852) and Harvest dies (item 156504) to cut the larger wildflowers;

Meadow dies - item 155852

- Honeybee Blooms dies (item 157951) to cut the smaller wildflowers and the grass;

- the Sale-A-Bration Tree Lot dies (item 159938) for the trailer (*during Sale-A-Bration, which is on now until August 31, 2022, the Tree Lot dies are available for free with a $120.00 - before taxes and shipping - CDN order);

- the new Gingerbread House dies (item 159718) to cut the "hills";

- Starry Sky patterned paper from the 6" x 6" Designer Series Paper Assortments - In Colour 2022-2024 (item 159253) for the trailer's window and door inserts;
- Early Espresso patterned paper from the 6" x 6" Designer Series Paper Assortments - Neutrals (item 159257) for the "hills";
- Starry Sky ink (item 159212) to colour the blue flowers;
- Sweet Sorbet ink (item 159216) to colour the pinky red flowers, and the top and lower portions of the trailer;
- Mango Melody ink (item 147093) and Pumpkin Pie ink (item 147086) to colour the daylilies;
- Mossy Meadow ink (item 147111) to colour the flower stems and the grasses, and to stamp the sentiment;
- the new Sweet Gingerbread stamp set (item 159714) for the "Sending Love" sentiment (*if you would like both the Sweet Gingerbread stamp set and the Gingerbread House dies they are also available together as the Sweet Gingerbread Bundle - item 159719 - the Bundle provides a 10% savings over purchasing the stamp set and dies individually);

- Gorgeous Grape watercolour pencil (Watercolour Pencils - Assortment 2 - item 149014) to colour the lavender flowers;
- Soft Suede ink (item 147115) - sponged on the trailer;
- Basic Gray ink (item 149165) and Memento Tuxedo Black ink (item 132708) to colour the trailer hitch and wheel;
- Mini Stampin' Dimensionals (item 144108) to attach the trailer;
- Multipurpose Liquid Glue (item 110755); and
- Matte Black Dots (item 154284) - one large and one small used for the Sweet Sorbet flower centers.
With an envelope punch board I made a co-ordinating envelope using the Sale-A-Bration Rings of Love 12" x 12" Designer Series Paper (item 159939 - a free item available during Sale-A-Bration with a $60.00 - before shipping and taxes - CDN order).
I Miss You Gift Card


For this 4 1/4" x 3" top-fold gift card I used the following supplies:
- Crumb Cake cardstock (item 120953) for the card base, embossed front panel, and sentiment tag;
- watercolour paper (Fluid 100 5" x 7" Watercolour Paper - item 149612) - to cut the wildflowers, grass, and washtub;
- Very Vanilla cardstock (item 101650) for the inside matting panel;
- Pear Pizzazz cardstock (item 131201) for the inside embossed panel;
- Early Espresso cardstock (item 119686) for the tub's "soil" - cut using the Grove dies (item 157844);
- Meadow dies (item 155852) to cut the sentiment tag;
- Sale-A-Bration Hippo dies (item 159928) to cut the washtub (during Sale-A-Bration the Hippo dies are available for free with a $60.00 - before shipping and taxes - CDN order);
- Honeybee Blooms dies (item 157951) to cut the wildflowers and grass;
- Cup of Tea stamp set (item 158661) for the "I miss you" sentiment;
- Brick & Mortar 3D Embossing Folder (item 149643) to emboss the front panel;
- Leaf Fall 3D Emobssing Folder (item 159847) to emboss the inside panel;
- Soft Suede ink (item 147115) to stamp the sentiment, colour the tub, and add splatters to the brick embossed panel;
- White ink (item 147277) to sponge the brick embossed panel and lightly the edges of the tub;
- Mossy Meadow ink (item 147111) to colour the flower stems and grass;
- Starry Sky ink (item 159212) to colour the blue flowers;
- Mango Melody ink (item 147093) and Pumpkin Pie ink (item 147086) to colour the daylilies;
- Stampin' Dimensionals (item 104430) to attach the tub (before attaching the tub I glued the "soil" to the inside edge of the tub - the Stampin' Dimensionals were added to the side edges and bottom of the tub to allow enough space to fit in the flowers and grass);
- Multipurpose Liquid Glue (item 110755); and
- Linen Thread (item 104199) to tie the sentiment tag to the tub handle.
Using a full sheet of 6" x 6" Pear Pizzazz patterned paper from the 6" x 6" Designer Series Paper Assortments - Subtles (item 159255) I made a coin style co-ordinating envelope. I placed the 6" x 6" paper on the scoreboard (Simply Scored Scoring Tool - item 122334) with diagonally opposite corners aligned along the arbitrarily selected 5 1/2" line - and scored at 3 1/2" and 7 1/2", then turned the paper so the other set of diagonally opposite corners were aligned along the 5 1/2" line and scored at 3 7/8" and 7".
Friend Happy Birthday "Flip Flap" Card


In her July 18, 2022, You Tube video (https://www.youtube.com/watch?v=55TNF93d-Ts), Stampin' Up demonstrator Dena Rekow (The Creativity Cave) demonstrated the construction of this fun-fold style card - I have called it a "flip flap" card and have amended the dimensions she provided in order to make a square card. Folded up my card measures 4 1/4" x 4 1/4" and I used the following supplies:
- Basic Black cardstock (item 121045): for the base of the card a 4 1/4" x 11" piece scored on the 11" side at 4 1/4" and 8 1/2"; and for the small flip booklet a 3 1/4" x 6" piece scored at 3 1/4" on the 6" side; and for the flip booklet's front square matting panel;
- Mossy Meadow patterned paper from the 6" x 6" Designer Series Paper Assortments - Neutrals (item 159257) for the matting panels for the base of the card and for the front panel of the small flip booklet;
- Starry Sky patterned paper from the 6" x 6" Designer Series Paper Assortments - In Colour 2022-2024 (item 159253) for the matting panels for the inside of the small flip booklet;
- Very Vanilla Thick cardstock (item 144237) for the sentiment panels, blank panel, and fern image panel;
- watercolour paper (Fluid 100 5" x 7" Watercolour Paper - item 149612) - for the front image circle;
- Stylish Shapes dies (item 159183) to cut the "friend" banner, the "you are wonderful in every way" sentiment square, the blank square, the "Happy Birthday" square, and the image circle;
- Stitched Rectangles dies (item 151820) to cut the fern image rectangle;
- Timeworn Type 3D Embossing Folder (item 156505) to emboss the fern image rectangle;
- Mossy Meadow ink (item 147111) to stamp all sentiments and the fern;
- Basic Black Stampin' Write Marker (item 100082) to add the splatters to the sentiment panels (by flicking the brush end against the cap);
- Stazon Jet Black ink (item 101406) to stamp the silhouette stamp and all willdflower images on the watercolour circle;
- Mango Melody ink (item 147093), Starry Sky ink (item 159212), and Mossy Meadow ink (item 147111) to sponge the watercolour circle - I sponged the inks on, beginning with Mango Melody in the approximate center, then spritzed lightly with water (Stampin' Spritzers - item 126185), and after the ink was dry stamped the little boy silhouette (from the Scary Cute stamp set - item 159850) and wildflowers;
- Nature's Prints stamp set (item 158793) for the wildflowers and fern images;

- Happiness Abounds stamp set (item 159238) for the "friend" and "you are wonderful in every way" sentiments;
- Peaceful Moments stamp set (item 151595) for the "Happy Birthday" sentiment;
- Multipurpose Liquid Glue (item 110755);
- Brushed Brass Butterflies (item 158136) - one large and two small added to the image circle; and
- for the ribbon closure I used some 3/8" black ribbon from Dollar Tree.
Garden Fairy Gift Box With Shaker Pouch Lid


For this 4" x 4" x 1 1/2" deep lidded gift box I used the following supplies:
- Basic Black cardstock (item 121045): for the bottom of the box a 7" x 7" piece, scored at 1 1/2" on all four sides; and for the lid a 7 1/16" x 7 1/16" piece, also scored at 1 1/2" on all four sides;
- Tea Boutique 6" x 6" Designer Series Paper (item 158659) for the matting panels for the sides and top of the lid;
- watercolour paper (Fluid 100 5" x 7" Watercolour Paper - item 149612) for the image square;
- Stylish Shapes dies (item 159183) to cut the image square;
- Mango Melody ink (item 147093), Pumpkin Pie ink (item 147086), Sweet Sorbet ink (item 159216), and Mossy Meadow ink (item 147111) to sponge colour on watercolour square. After sponging on the inks I lightly spritzed the panel with water (Stampin' Spritzers - item 126185), allowed the panel to dry and then stamped the wildflowers and fairy silhouette (from the Scary Cute stamp set - item 159850) using Stazon Jet Black ink (item 101406). For the wildflowers I used the Nature's Prints stamp set (item 158793);
- Soft Suede ink (item 147115) to sponge around the edges of the image square (I did this after gluing on the cardboard backing square);
- acetate (Window Sheets - item 142314) to "wrap" around the image square to form the shaker pouch;
- double-sided tape (Tear & Tape Adhesive - item 154031) to attach the completed shaker pouch to the top of the lid (I also added Multipurpose Liquid Glue - item 110755 - just to be sure - a case of belt and suspenders I guess!);
- 1 1/2" Metallic Mesh Ribbon (item 153550) - knotted around the middle of the black satin ribbon bow. The 5/8" black satin ribbon was from my stash; and
- little silver star shaker sprinkles from Dollar Tree.
Thank you for visiting my blog! As always I had a lot of fun working on these projects!
If you are interested in purchasing any of the available Stampin' Up! products I have used in my projects, and you live in Canada and do not have a Stampin' Up! demonstrator, please do not hesitate to visit my online store found on my website https://archiesatelier.stampinup.net/ at your convenience, or simply click under the "Shop With Me" tab on the right sidebar of my blog, which will take you directly to my website and online store. I very much appreciate your business! You can browse the PDF versions of the July-December 2022 Mini Catalogue, the May 2022-April 2023 Annual Catalogue, and the July 1 - August 31, 2022 Sale-A-Bration Brochure, anytime on my website. Be sure to take advantage of Sale-A-Bration to get some fun and exciting free products while stocking up on your watercolouring supplies!
.jpg)

Have fun creating!
Laurel

Comments
Post a Comment