Mother's Day Projects
Hello! Since Mother's Day is fast approaching I thought I would share a few Mother's Day projects I worked on this week using current, retiring, and a few new Stampin' Up! products. At the end of the blog post I will list the retiring items from the May 2021-April 2022 Annual Catalogue - retiring items are available, while supplies last, during the Last Chance Promotion that runs until May 2, 2022. The new May 2022-April 2023 Annual Catalogue will be "live" on May 3, 2022 (and can be viewed as a PDF on my website [https://archiesatelier.stampinup.net/] as of that date) - and all new items that I used from the upcoming Annual Catalogue can be ordered starting on May 3, 2022!
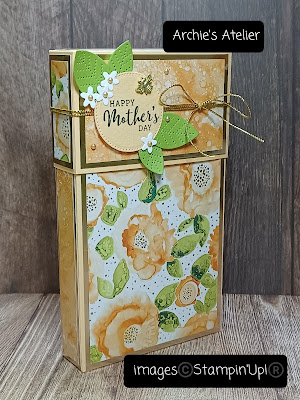
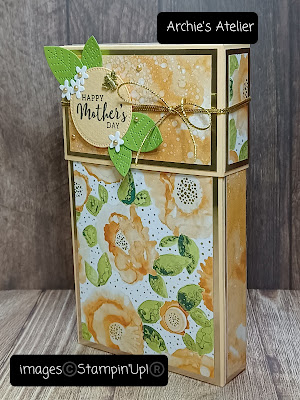
Lidded Box for Eurospa Facial Masks
This lidded box, which measures 7" tall x 4" wide x 1" deep, holds four of the Eurospa facial masks that I found at Dollarama. For the base of the box I used two 8" x 6" pieces of cardstock - each scored on the 8" side at 7"; and scored on the 6" side at 1" and 5". For the lid I used a 9 1/16" x 6 1/16" piece of cardstock - scored at 2 1/2" on all four sides. I have attached template photos showing how I cut/trimmed each piece:
For the base and lid I used Pale Papaya cardstock (item 155668) - a very pretty colour that I have not used too much of!; gold cardstock (Brushed Metallic 12" x 12" Cardstock - item 153524) for the DSP matting panels; and Expressions In Ink 12" x 12" Specialty Designer Series Paper (item 155464) for the DSP panels. The "Happy Mother's Day" sentiment, from the Daffodil Daydream stamp set (item 157786), was stamped on Pale Papaya cardstock using Stazon Jet Black Ink (item 101406). I embossed the stamped Pale Papaya cardstock using the Tasteful Textile 3D Embossing Folder (item 152718) before cutting the circle using the new Stylish Shapes dies (item 159183). I used the Pierced Blooms dies (item 154312) to cut the leaves and small small flowers - for the leaves I used Granny Apple Green cardstock (item 146990) and for the flowers I used Basic White cardstock (item 159276). Before adhering the sentiment circle, leaves, and flowers I tied a bow around the lid using gold cord (Simply Elegant Trim - item 155766). I glued the leaves to the underside of the sentiment circle, which I adhered to the front panel of the lid using Stampin' Dimensionals (item 104430). To the centers of the flowers I added gold Metallic Pearls (item 146282) - and added a few more to the front panel. To the sentiment circle I also added one of the Bumblebee Trinkets (item 155568).
Window Pouch for Charcoal Mud Mask
For this pouch that holds a charcoal mud mask I picked up at Dollar Tree I used a 10 1/2" x 6 5/8" piece of Basic Black cardstock (item 121045) scored on the 10 1/2" side at 1/2" and 5 1/2", and scored on the 6 5/8" side at 1/2". The front panel of the pouch has the 1/2" tab along the left side; and the 1/2" bottom flap is trimmed off the pouch's back. Before assembling the pouch I glued on the DSP panel to the pouch's front panel - for the DSP I used the new black & white patterned Perfectly Penciled 12" x 12" Designer Series Paper (item 159244). To cut the window I used a circle die from the new Stylish Shapes dies (item 159183) - aligning the die so that the outer edge of the die was 1/4" in from the right side of the front panel and 1 3/4" from the bottom folded edge of the front panel. I used the same circle die together with a scalloped circle die from the Layering Circles dies (item 151770) to cut the window frame. For the pouch's flap I used a 5" x 2 3/4" piece of Basic Black cardstock - scored at 1 1/8" on the 2 3/4" side (the 1 1/8" section was glued to the back of the pouch). I used the scalloped edge die from the Scalloped Contours dies (item 155560) to cut the scalloped edge - lining the die up so that the bottom of the scallops just touched the edge of the cardstock. I cut a 1" x 5" strip of the Perfectly Penciled DSP - lining up the scalloped edge die as I did with the cardstock. The "hello fabulous" sentiment, from the Dressed To Impress stamp set (item 158321), was stamped on Real Red cardstock (item 102482) using Stazon Jet Black Ink (item 101406). The sentiment circle was cut using a circle die from the Stylish Shapes dies. The Basic Black cardstock scalloped circle was cut using the Layering Circles dies. For the pouch fastener I used four black Velcro circles - purchased at Dollarama. For just a touch of bling I added one of the small Rhinestone Basic Jewels (item 144220) to the sentiment circle.
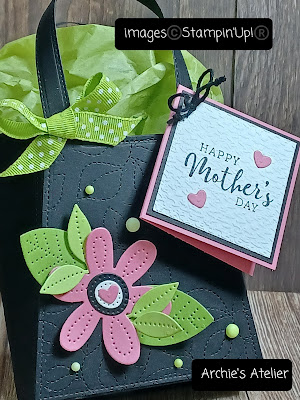
Happy Mother's Day Gift Bag
This little gift bag was made from Basic Black cardstock (item 121045) using the All Dressed Up dies (item 151665) - I cut an extra front panel, which I embossed using the Stitched Greenery die (item 155451). The flowers and leaves were cut using the Pierced Blooms dies (item 154312) - Polished Pink cardstock (item 155710) for the flower; Basic Black cardstock for the flower's large center; Basic White cardstock (item 159276) for the flower's small center; and Granny Apple Green cardstock (item 146990) and the new Parakeet Party cardstock (item 159259) for the leaves. I used Polished Pink cardstock for the base of the 2" x 2" gift card - Basic Black cardstock for the matting panel for the sentiment panel. The "Happy Mother's Day" sentiment, from the Daffodil Daydream stamp set (item 157786), was stamped on Basic White cardstock using Stazon Jet Black Ink (item 101406). The sentiment panel was embossed using the Tasteful Textile 3D Embossing Folder (item 152718). The small Polished Pink cardstock hearts were cut using the little heart dies from the new Teacup dies (item 160186). I used a 1/8" hole punch to punch a hole in the upper left corner of the gift card and tied the card to the bag handle using black baker's twine (Baker's Twine Essentials Pack - item 155475). For additional embellishments for the bag I used several of the new 2022-2024 In Colour Matte Decorative Dots (item 159186) in the Parakeet Party shades. The lime green and white polka dot ribbon used for the bow is from my ribbon stash! The All Dressed Up and Pierced Blooms dies are two of my favourite of the retiring dies - and I have used them a lot!!
It's Time For Tea Flip-Top Box
For this 3 1/2" tall x 3" wide x 1" deep flip-top box that holds several teabags, I used the new Cup of Tea Bundle (item 158667) - which includes the Teacup dies (item 160186) and the Cup of Tea stamp set (item 158661), each of which will also be available separately. The dies and stamps are a lot of fun to play with and I am looking forward to working on many more projects!
For the box I used an 11" x 5" piece of the new Starry Sky cardstock (item 159263) scored on the 11" side at 3 1/2", 4 1/2", 8", and 9"; and scored on the 5" side at 1" and 4" (for cutting/trimming template photo please see my January 6, 2022 blogpost https://archiesatelier.blogspot.com/2022/01/a-few-sale-bration-projects-hello-since.html - in referencing this blogpost I noticed that I had incorrectly indicated the dimensions of the cardstock - rather than 11 1/2" it should have read 11"). I used the following additional supplies to complete the box:
- new 2022-2024 In Colour 6" x 6" Designer Series Paper Assortments - item 159253 (the Starry Sky striped DSP used on the front and back panels of the box and the front panel of the lid);
- new Tea Boutique 6" x 6" Designer Series Paper - item 158659 (the teacup patterned paper used on the side and top panels);
- new Starry Sky Ink - item 159212 (to stamp the striped teacups - I used some dry paper towel to "lift" some of the ink from the inked stamp to create a little texture in the stripes. I also used the Starry Sky Ink to sponge all edges of the DSP panels);
- Mango Melody Ink - item 147093 (to stamp the lemon pieces);
- Old Olive Ink - item 147090 (to stamp the leaves);
- Real Red Ink - item 147084 (to stamp the flowers);
- new Sweet Sorbet cardstock - item 159268 (for sentiment circle, and three hearts); and
- Blushing Bride cardstock - item 131198 (for backing circle and two little hearts);
- Crumb Cake cardstock - item 120953 (for the "teabag");
- new Stylish Shapes dies - item 159183 (for the backing circle - which was trimmed to fit behind the teacups - and the sentiment circle);
- Stitched Greenery die - item 155451 (to emboss the Blushing Bride cardstock circle);
- Linen Thread - item 104199 (the string for the teabag);
- Memento Tuxedo Black Ink - item 132708 (to stamp the "It's time for tea" sentiment");
- Stazon Jet Black Ink - item 101406 (to stamp the "Happy Mother's Day" sentiment);
- Daffodil Delight stamp set - item 157786 (for the "Happy Mother's Day" sentiment);
- Heart & Home Doilies - item 157956 (white side - trimmed to fit behind the teacups);
- Stampin' Dimensionals - item 104430 (to attach the teacup cluster to the front panel of the lid);
- Mini Stampin' Dimensionals - item 144108 (to attach the teabag); and
- Scalloped Contours dies - item 155560 (used to cut the scalloped edge on the front flap of the lid - totally obscured once I added the teacup cluster so could have left a straight edge . . . )
In addition I used two of the small Basic Grey Magnetic Discs (purchased at my local scrapbooking shop) for the fastener - the magnet on the front panel of the box was adhered before the DSP panel was glued on; and a mini staple to "attach" the string to the teabag.
And finally . . .
Cards
I used Basic White Thick cardstock (item 159229) for the base and additional front panel of this 5 1/2" x 4 1/4" top-fold card. The front panel was embossed using the Stitched Greenery die (item 155451). I used the Pierced Blooms dies (item 154312) to cut the flowers from Flirty Flamingo cardstock (item 141416), Blushing Bride cardstock (item 131198), and the new Sweet Sorbet cardstock (item 159268). The "Happy Mother's Day" sentiment, from the Daffodil Daydream stamp set (item 157786), was stamped on Sweet Sorbet cardstock using Stazon Jet Black Ink (item 101406). The sentiment circle was cut using the Layering Circles dies (item 151770). The wreath was cut from Pear Pizzazz cardstock (item 131201) using the new Natural Prints dies (item 158800). To embellish the card front I added several of the new 2022-2024 In Colour Matte Decorative Dots (item 159186) in the Sweet Sorbet shades.
I used Early Espresso cardstock (item 119686) for the base of this 5 1/2" x 4" card, the flowers' small centers, and the scalloped frame (cut using the Scalloped Contours dies - item 155560). The image, from the Beautiful Moments stamp set (item 151677), was stamped on watercolour paper using Stazon Jet Black Ink (item 101406) and coloured using Early Espresso watercolour pencil (Watercolour Pencils - Assosrtment 1 - item 141709). The image panel was cut using the Stitched Rectangles dies (item 151820). The flowers and leaves were cut using the Pierced Blooms dies (item 154312) - for the flowers: Very Vanilla Thick cardstock (item 144237), and So Saffron cardstock (item 105118); and for the leaves - Pear Pizzazz cardstock (item 131201). I wrapped Linen Thread (item 104199) around the framed image panel before adhering it to the front of the card. The woodgrain DSP panels used on the front and interior of the card are from In Good Taste 12" x 12" Designer Series Paper (item 152494). The "Happy Mother's Day" sentiment, from the Daffodil Daydream stamp set (item 157786), was stamped on Very Vanilla Thick cardstock and the panel was cut using the Stitched Rectangle dies. To the front of the card I added several of the Classic Matte Dots (item 158146) - Very Vanilla. Using an envelope punch board I made the co-ordinating envelope from In Good Taste DSP.
For the base of this 5 9/16" x 4 3/4" card I used Crumb Cake cardstock (item 120953) - Crumb Cake cardstock was also used for the inside frame for the image and for the sentiment panel. The image, from the Beautiful Moments stamp set (item 151677), was stamped on watercolour paper using Stazon Jet Black Ink (item 101406) and coloured with watercolour pencils - Watercolour Pencils - Assortment 1 (item 141709) - Old Olive and Calypso Coral - and Watercolour Pencils - Assortment 2 (item 149014) - Balmy Blue, Gorgeous Grape, Cajun Craze, and Flirty Flamingo. The outer frame was cut from watercolour paper. Both frames were cut using the Stitched Rectangles dies (item 151820). I used Balmy Blue cardstock (item 146982) and Basic Black cardstock (item 121045) to mat the framed panel. I "ruffled" the edges of the Balmy Blue cardstock mat by scraping the blade of my craft knife along the edges. Using the Horizon dies (item 157778) I cut the grass and fences - the grass from Mossy Meadow cardstock (item 133676) and the fences from Basic White cardstock (item 159276). I dragged my Basic Gray inkpad (item 149165) down the fences and then lightly spritzed the paper with water (Stampin' Spritzers - item 126185). The tall leafy stems were cut from Mossy Meadow cardstock using the new Natural Prints dies (item 158800). The "Happy Mother's Day" sentiment, from the Dressed To Impress stamp set (item 158321), was stamped on Crumb Cake cardstock using VersaMark Ink (item 102283) and then embossed with clear embossing powder (Stampin' Emboss Powders - Basics - item 155554). The sentiment strip was cut using a banner die from the new Stylish Shapes dies (item 159183).
Here is the list of the retiring products from the April 2021-May 2022 Annual Catalogue that I used in my projects - available while supplies last during the Last Chance Promotion, which ends on May 2, 2022:
- Pierced Blooms dies - item 154312 - at 50% discount;
- Expressions In Ink 12" x 12" Specialty Designer Series Paper - item 155464;
- Metallic Pearls - item 146282;
- Bumblebee Trinkets - item 155568 - at 20% discount;
- Tasteful Textile 3D Embossing Folder - item 152718 - at 20% discount;
- Dressed To Impress stamp set - item 158321;
- All Dressed Up dies - item 151665 - at 50% discount;
- Beautiful Moments stamp set - item 151677; and
- In Good Taste 12" x 12" Designer Series Paper - item 152494 - at 40% discount.
Thank you for visiting my blog! As always I had a lot of fun working on these projects!
If you are interested in purchasing any of the available Stampin' Up! products I have used for these projects, and you live in Canada and do not have a Stampin' Up! demonstrator, please do not hesitate to visit my online store found on my website https://archiesatelier.stampinup.net/ at your convenience, or simply click under the "Shop With Me" tab on the right sidebar of my blog, which will take you directly to my website and online store. I very much appreciate your business!


Comments
Post a Comment