Bird House Gift/Treat Holders
Hello! Today I am sharing a couple of bird house themed gift/treat holders I have been working on this week in keeping with my "thinking Spring" mindset. Although it is rainy today I just try to remember that it is the Spring showers that bring the May flowers!
For this large bird house gift holder (or treat holder if you are being very generous with the treats!) I was inspired by Sam Calcott (mixedupcraft.com) and her June 21, 2019, You Tube video "DIY Bird Box Gift Bag or Storage Box" [https://www.youtube.com/watch?v=ZPiafaAhoVw]. Although I did amend the dimensions for my gift holder I did follow her instructions for assembly: my bird house is 8" tall x 4" wide x 3 1/2" deep and, for a little more stability, has been glued to a 4 1/2" x 4" light cardboard base that I wrapped with a piece of DSP from the Heart & Home 12" x 12" Designer Series Paper (item 157928). To finish the underside of the base I glued on a piece of Early Espresso cardstock (item 119686). For the bird house I cut and scored seven pieces of Early Espresso cardstock as follows:
- for the front and back panels - 2 pieces 8 1/2" x 4 1/2" - scored at 1/2" on the 8 1/2" side and at 4" on the 4 1/2" side. On the right and left sides of both the front and the back panels I made a mark 2 1/2" down from the top edge; I marked the center point of the top edge (2" because the 1/2" side tab is not included in the calculation), and then using a ruler and stylus scored from the 2" center point to each of the 2 1/2" points on the sides (this creates the "triangle"). Using my ruler and craft knife I then cut a 1/2" tab out from each score line:
- for the two side panels - 2 pieces 6 1/2" x 4" - scored on the 6 1/2" side at 1/2" and 6", and scored on the 4" side at 3 1/2"
- for the roof - 2 pieces 4 1/2" x 4 1/2" - each scored on one side at 3 3/4"On the underside of each roof piece, on each side perpendicular to the 3/4" score line, I marked a line 1/2" in from the edge - this was my guide in lining up the roof on the bird house;
and
- for the roof tab cover (the piece that holds the two roof tabs together), a piece 1 1/2" x 4 1/2", scored down the center at 3/4".
Each roof panel is glued only to the top tabs on each of the two side panels - the roof only rests on the top tabs of the front and back panel - this way, after removing the piece holding the two roof panels together, the roof opens allowing access
Using a binder clip I held the roof tab cover in place over the roof panels and, using a crop-a-dile, cut the ribbon holes through all layers of cardstock/DSP approximately 3/4" from each end. I did add eyelets to reinforce the holes in the roof tab cover.
I also used In Good Taste DSP for the DSP panels on the roof and roof tab cover. I used Bumblebee 1/4" Gingham Ribbon (item 153658) for the bow.
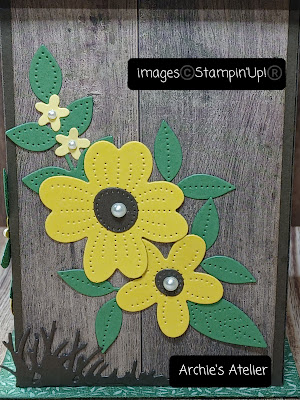
To cut the flowers and leaves I used the Pierced Blooms dies (item 154312) - for the flowers I used Bumblebee cardstock (item 153077) and So Saffron cardstock (item 105118); for the leaves I used Garden Green cardstock (item 102584); and for the flower centers Early Espresso cardstock. The Early Espresso "grass" was cut using the grass die from the Horizon dies (item 157778). To the center of the flowers I added various sizes of Pearl Basic Jewels (item 144219) and, finally to the front panel I added one of the Bumblebee Trinkets (item 155568).
I also made a co-ordinating 5" x 5" book binding style card - the 10" x 5" Early Espresso cardstock was scored at 5" and 6". Again I used the In Good Taste and Heart & Home Designer Series Paper. The Early Espresso scalloped rectangle was cut using the Stitched So Sweetly dies (item 151690), and the flowers and leaves were cut using the Pierced Blooms dies (item 154312). For the inside panel I used Crumb Cake cardstock (item 120953). To match the roof tab cover I also added eyelets to the ribbon holes. For the bow I used Bumblebee 1/4" Gingham Ribbon and added Basic Pearl Jewels to the flowers' centers.
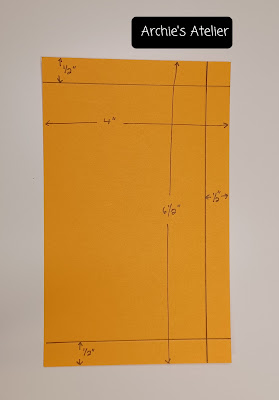
For this 6 1/2" tall x 2 1/2" x 2 1/2" milk carton bird house treat holder I cut and scored the Early Espresso cardstock as follows: 10 1/2" x 8 1/2" - scored on the 10 1/2" side at 2 1/2", 5", 7 1/2", and 10"; and scored on the 8 1/2" side at 2", 6", and 8" (with additional scores along the top of the 10 1/2" side at 1 1/4" and 6 1/4" and diagonal scores from the 1 1/4" and 6 1/4" marks as indicated on the photo below):
I again used woodgrain paper from the In Good Taste DSP for the six decorative paper panels. For the "roof" I cut a piece of Early Espresso cardstock 6 1/2" x 3", scored on the 6 1/2" side at 3 1/4". On the underside of the roof, along both long edges, I marked a line 1/4" in from the edge - this helped guide me in the placement of the roof. As I did for the large gift box I held the roof in place with a binder clip while I punched the ribbon holes with a crop-a-dile, and then added eyelets to reinforce the holes. The roof is simply tied on to the milk carton - nothing is glued. For the roof tie I used Mossy Meadow 3/16" Braided Linen Trim (item 154298 and currently available on the Clearance Rack!) For each roof panel I cut a piece of Silver Foil (Silver Foil 12" x 12" Specialty Pack - item 156457) 3" x 2 3/4", which I embossed using the stripes 3D embossing folder (Stripes & Splatters 3D Embossing Folders - item 157980). After embossing I lightly sanded the foil panels and then sponged them with Soft Suede Ink (item 115318) - I was trying to get the look of an aged galvanized tin roof.
Before assembling the box I glued the DSP panel to the front panel and cut the window using the Layering Circle dies (item 151770). The Early Espresso cardstock window frame was also cut using the Layering Circle dies and was glued on before I glued the approximately 2" x 2" acetate panel (Window Sheets - item 142314) to the inside of the front panel behind the window opening.
The "live life in full bloom" sentiment, from the Flowering Rain Boots stamp set (item 157689), was stamped on Pool Party cardstock (item 122924) using Soft Suede Ink. After embossing with the Tasteful Textile 3D Embossing Folder (item 152718), the label was cut using the "pocket" die from the All Dressed Up dies (item 151665). The flowers were cut using the Meadow dies (item 155852) - the blooms cut from Polished Pink cardstock (item 155710) and Highland Heather cardstock (item 146986) and the "bases" from Mossy Meadow cardstock (item 133676). For the grasses I used the following dies: Meadow, Dandy Wishes (item 154315), Birds & More (item 152721), and Horizons (item 157778) - and Mossy Meadow cardstock, Old Olive cardstock (item 100702), and Early Espresso cardstock. The butterflies were cut using the little butterfly die from the Daffodil dies (item 157794) - using Bermuda Bay cardstock (item 131197) and Early Espresso cardstock. I "painted" each butterfly using Wink of Stella Clear Glitter Brush (item 141897). The shovel and shears were cut using the Garden dies (item 157918) - for both the shovel blade and the blades of the shears I used Silver Foil - again sanding slightly and sponging with Soft Suede Ink. I cut one complete shovel from Crumb Cake cardstock (item 120953), lightly sponging with Soft Suede Ink; the shovel handle from Early Espresso cardstock; the shears from Basic Gray cardstock (item 121044), also lightly sponged with Soft Suede Ink. To the shears I added a small black dot from Classic Matte Dots (item 158146).
Yesterday Stampin' Up! released the list of retiring products from the May 2021-April 2022 Annual Catalogue, and several of the products I used in my projects are on the list - the good news is that some of these products are available at a substantial discount - the sale is on now but it will only be while supplies last! The following is the list of the retiring products that I used:
- Bumblebee cardstock (item 153077);
- In Good Taste 12" x 12" Designer Series Paper (item 152494 - 40% off [$17.40 CDN]);
- Bumblebee Trinkets (item 155568 - 20% off [$8.20 CDN]);
- Tasteful Textile 3D Embossing Folder (item 152718 - 20% off [$9.80 CDN]);
- All Dressed Up dies (item 151665 - 50% off [$24.00 CDN]);
- Birds & More dies (item 152721 - 40% off [$27.60 CDN]);
- Dandy Wishes dies (item 154315 - 50% off [$24.00 CDN]);
- Pierced Blooms dies (item 154312 - 50% off [$25.00 CDN]);
- Stitched So Sweetly dies (item 151690); and
- Bumblebee 1/4" Gingham Ribbon (item 153658 - 20% off [$7.60 CDN])
Thank you for taking the time to visit my blog! As always I had a lot of fun working on these projects! If you are interested in purchasing any of the available Stampin' Up! products I have used for this project, and you live in Canada and do not have a Stampin' Up! demonstrator, please do not hesitate to visit my online store found on my website https://archiesatelier.stampinup.net/ at your convenience, or simply click under the "Shop With Me" tab on the right sidebar of my blog, which will take you directly to my website and online store. I very much appreciate your business! Don't forget that the Savings Are In Bloom! promotion, featuring several die and stamp bundles as well as the Mini Stampin' Cut & Emboss Machine (item 150673), runs until March 31, 2022!
Have fun creating!
Laurel


.jpg)
Comments
Post a Comment