A few more Sale-A-Bration projects!
Hello! Unfortunately Stampin' Up! Sale-A-Bration ends on February 28, 2022, so I thought I would share a few more projects I worked on this week featuring some of the Sale-A-Bration products.
Easter Blessings Milk Carton Treat Holder/Gift Box - Sunshine & Rainbows 6" x 6" Designer Series Paper (item 158126)
For this 5 1/4" tall x 2 1/2" x 2 1/2" Pool Party cardstock (item 122924) milk carton treat holder or gift box I followed the instructions provided by U.K. Stampin' Up! demonstrator, Sam Hammond Donald (Pootles), in her February 21. 2022, blog post and You Tube video "How to make a gift box for Yankee candles" ( https://pootles.co.uk/2022/02/21/stampin-up-how-to-make-a-gift-box-for-yankee-candles/) - including using Basic White cardstock (item 159276) to mat the DSP panels - the Basic White cardstock panels measure 2 1/4" x 3 1/4" and the Sunshine & Rainbows DSP panels measure 2" x 3". The Pool Party cardstock measures 8 1/4" x 10 1/2" - scored on the 8 1/4" side at 2", 6", and 7 1/2"; and scored on the 10 1/2" side at 2 1/2", 5", 7 1/2", and 10". The "Easter Blessings" sentiment, from the Daffodil Daydream stamp set (item 157786), was stamped using Stazon Jet Black Ink (item 101406) on Pool Party cardstock. The sentiment label was cut using the label die from the Pierced Blooms dies (item 154312) and embossed using the Tasteful Textile 3D Embossing Folder (item 152718). The "leaves" were cut from Bermuda Bay cardstock (item 131197) using the Birds & More dies (item 152721). The little flowers were cut from Flirty Flamingo cardstock (item 141416) using the little trio flower die from the Pierced Blooms dies (item 154312) and to the center of each flower I added one of the small white Classic Matte Dots (item 158146). I also used my crop-a-dile to punch the holes and used the White 1/4" Crinkled Seam Binding Ribbon (item 151326) for the bow.
For You Three Window Gumball Treat Holder - Friendly Hello 12" x 12" Designer Series Paper (which is combined with the Friendly Hello Stamp Set for one Sale-A-Bration product - item 159990)
For this three-windowed little box that measures 2 1/2" tall x 2" x 2" I copied the dimensions of a Hershey's Kisses box - don't discard the packaging just because the chocolate has been eaten! I cut my Petal Pink cardstock (item 146985) 8 1/2" x 6 1/4" - scored on the 8 1/2" side at 2", 4", 6", and 8"; and scored on the 6 1/4" side at 1/2", 2 1/2", and 5". I have also included a template photo showing where I further cut the cardstock to create the flaps: 
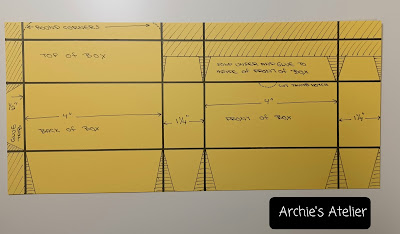
Best Birthday Treat Box - Sunshine & Rainbows 6" x 6" Designer Series Paper and Friendly Hello Stamp Set (which is combined with the Friendly Hello 12" x 12" Designer Series Paper for one Sale-A-Bration product - item 159990)
For this 4" x 2" x 1 1/4" box I cut the Misty Moonlight cardstock (item 153081) 11" x 5" - scored on the 11" side at 1/2", 4 1/2", 5 3/4". and 9 3/4"; and scored on the 5" side at 1 1/4", 3 1/4", and 4 1/2". I have also attached a template photo showing where I made additional cuts to create the flaps: I glued on the Misty Moonlight Sunshine & Rainbows DSP panels to the front, back, top, and sides of the box, before I assembled the box, and after gluing down the tab along the top of the front panel to the inside of the front panel I cut the thumb notch using a 1" circle punch. The "Hope you have the best birthday" sentiment (from the Friendly Hello stamp set) was stamped on Misty Moonlight cardstock using Versamark Ink (item 102283) to create a subtle tone on tone effect. The sentiment tag was cut using the Tailor Made Tags dies (item 155563). The flowers and leaves were cut using the Pierced Blooms dies (item 154312) - the flowers from Bumblebee cardstock (item 153077); the flower centers from Misty Moonlight cardstock; and the leaves from Shaded Spruce cardstock (item 146981). I added four Pearl Basic Jewels (item 144219) - two large, one medium, and one small. Around the box at one end I tied a bow using Night of Navy baker's twine - which happens to be a very good match for the Misty Moonlight cardstock! - (Fan Baker's Twine - item 158143) and which can be easily slipped off to open the box.
For You Lidded Window Treat Box - Sunshine & Rainbows 6" x 6" Designer Series Paper (item 158126)This 3 1/2" x 1" x 3" lidded window box holds a small package of the Hershey's Eggies - a nice bright Easter treat holder! I used Magenta Madness cardstock (item 153080) for both the lid and bottom of the box: the bottom is 5 1/2" x 5", scored at 1" on all four sides; and the lid is 5 9/16" x 5 1/16", also scored at 1" on all four sides. Before assembling the lid I added the bold striped Sunshine & Rainbows DSP panel, matted with Basic White cardstock (item 159276) to allow a 1/8" border, and then cut the window using the Stitched Rectangles dies (item 151820), and then glued an approximately 2" x 3" piece of acetate (Window Sheets - item 142314) onto the inside of the lid behind the window opening. After assembling the lid I used a 1" circle punch to cut the thumb notches in the front and back sides. The "for you" sentiment, from the What's Cookin' stamp set (item 154491), was stamped using Stazon Jet Black Ink (item 101406) on a small piece of Pool Party cardstock (item 122924), which was then cut using the small stitched heart die included with the Bouquet of Love Hybrid Embossing Folder (item 157641). I cut the flowers and leaves using the Pierced Blooms dies (item 154312) - the large flower from Magenta Madness cardstock; the small flowers from Bumblebee cardstock (item 153077); and the leaves from Bermuda Bay cardstock (item 131197). To embellish the flowers I added one large and two small white Classic Matte Dots (item 158146).
Love And Support Pocket Card - Friendly Hello Stamp Set + Friendly Hello 12" x 12" Designer Series Paper (item 159990)
To make this pocket card I followed the instructions provided by Stampin' Up! demonstrator Jackie Bolhuis in her December 14, 2021, You Tube video https://www.youtube.com/watch?v=-dGdjCE0zUk. I used Basic Black cardstock (item 121045) for the pocket. Before assembling the pocket I glued the Friendly Hello DSP panel to the front side of the pocket and then cut the circle opening using the Layering Circle dies (item 151770). The flowers and flower centers were cut using the Pierced Blooms dies (item 154312) - the flowers from Petal Pink cardstock (item 146985) and the centers from Basic Black cardstock. To the center of each flower I added one of the small white Classic Matte Dots (item 158146). The Basic Black cardstock leaves were cut using the Forever Flourishing dies (item 152714). Around the pocket I tied a bow using the Black & White 1/4" Gingham Ribbon (item 156485). For the insert card, I stamped the bird/branch image from the Friendly Hello stamp set on Basic White cardstock (item 159276) using Memento Tuxedo Black Ink (item 132708) and coloured the images using my alcohol markers. The Basic White cardstock circle and Basic Black cardstock scalloped circle were both cut using the Layering Circle dies. The "You have my love and support" sentiment was stamped on Petal Pink cardstock also using Memento Tuxedo Black Ink. To create the small flicks of gray on the Petal Pink cardstock I flicked the brush end of my gray alcohol marker against the marker lid. I matted the Petal Pink cardstock with Basic Black cardstock - allowing for a very narrow border. I used a 1" circle punch to cut the thumb notch in the top of the pocket.
Greetings Kind Human Card - Sunshine & Rainbows 6" x 6" Designer Series Paper (item 158126) and Simply Marbleous 6" x 6" Designer Series Paper (item 158128)
For this 5 1/2" (including the sentiment strip) x 3 1/2" card I selected the So Saffron shades from each of the sets of DSP and cut them into strips of various widths. I glued the strips, allowing for a 1/16" gap between each, to a piece of Basic White Thick cardstock (item 159229) and then cut the cardstock panel (3" x 4 3/8") using the Stitched Rectangle dies (item 151820). I cut the circle window using the Layering Circle dies (item 151770). The robot image, from the Nuts & Bolts stamp set (item 157650), was stamped on Basic White cardstock (item 159276) using Memento Tuxedo Black Ink (item 132708) and coloured with alcohol markers. After gluing the image panel to the back of the "stripped" cardstock panel, I matted the panel with Basic Black cardstock (item 121045) and then Basic Gray cardstock (item 121044) - allowing for a 1/16" border each time. The fully matted panel was then glued to the Basic White Thick cardstock card base (the card base was cut 9 3/4" x 3 1/2" and scored in half on the 9 3/4" side). The "Greetings kind human" sentiment, also from the Nuts & Bolts stamp set, was stamped on a strip of Basic White Thick cardstock using Stazon Jet Black Ink (item 101406) and the sentiment strip was then glued to a 2 7/8" x 1 1/8" piece of Basic Black cardstock, which was then glued to the inside right edge of the card front (allowing a 1/8" border above and below the Basic White cardstock sentiment strip). The flowers, flower centers, and leaves were cut using the Pierced Blooms dies (item 154312) - the flowers from Bumblebee cardstock (item 153077) and So Saffron cardstock (item 105118); the flower centers from Basic Black cardstock and Basic White cardstock; and the leaves from Garden Green cardstock (item 102584). I used a die from the Dandy Wishes dies (item 154315) to cut the Garden Green cardstock flower stem - I just didn't have a steady enough hand to cut the stem free hand! I did trim the stem to try to make it appear that the robot was holding the stem in his "hand". The little butterflies were cut from Highland Heather cardstock (item 146986) using the small butterfly die from the Daffodil dies (item 157794). For a little extra embellishment I added three small and two large gray Classic Matte Dots (158146).
Hello My Friend Card - Awesome Otters stamp set (item 158087) and Simply Marbleous 6" x 6" Designer Series Paper (item 158128)
I used Early Espresso cardstock (item 119686) for the base of this 6" x 4" top-fold card - and also for the tag hole reinforcer, the mat for the Simply Marbleous DSP panel, and the matting label for the inside of the card sentiment circle. The little otter was stamped on watercolour paper using Stazon Jet Black Ink (item 101406) and coloured using watercolour pencils - Early Espresso and Basic Gray (flicked spots) from Watercolour Pencils - Assortment 1 (item 141709) and Flirty Flamingo from Watercolour Pencils - Assortment 2 (item 149014). The tag was cut using the Tailor Made Tags dies (item 155563). The "Hello" sentiment, from the Forever Fern stamp set (item 152559), and the "my friend" sentiment, from the Easter Friends stamp set (item 157337), were both stamped using Stazon Jet Black Ink. The tag was glued to the Simply Marbleous DSP panel (Flirty Flamingo), which was then matted with Early Espresso cardstock (the edges of which I ruffled by running the side of my craft knife blade along the edges). To the base of the card front I glued a panel of woodgrain DSP from the In Good Taste 12" x 12" Designer Series Paper (item 152494). I tied a Linen Thread (item 104199) bow to the tag. To add a little more embellishment to the card front I added two small and one large of the vanilla Classic Matte Dots (item 158146). To the inside of the card I glued a piece of the Flirty Flamingo Simply Marbleous DSP and added a 1" strip of the In Good Taste woodgrain DSP. For the inside of the card, the "you are otterly awesome" sentiment, from the Awesome Otters stamp set, was stamped using Stazon Jet Black Ink on watercolour paper, which was then cut using the Layering Circle dies (item 151770). The sentiment circle was glued over an Early Espresso cardstock label that was cut using the Stitched So Sweetly dies (item 151690). For more embellishment I added two more small and one large of the vanilla Classic Matte Dots.
And finally . . .
Celebrate Every Beautiful Thing Gift Card and Envelope - Sunshine & Rainbows 6" x 6" Designer Series Paper (item 158126) and Catching Butterflies Stamp Set (item 158108)
I used Pool Party cardstock (item 122924) for the base of this 2 3/4" x 2 3/4" gift card. The Bermuda Bay striped Sunshine & Rainbows DSP panel was matted with a Basic White cardstock (item 159276) panel, allowing for a 1/16" border - I ruffled the edges of the Basic White cardstock panel using the edge of the blade of my craft knife. The "celebrate every beautiful thing" sentiment, from the Catching Butterflies stamp set, was stamped using Stazon Jet Black Ink (item 101406) on a piece of Pool Party cardstock, which was cut using the Layering Circle dies (item 151770). The flowers and leaves were cut using the Pierced Blooms dies (item 154312) - Magenta Madness cardstock (item 153080) for the flowers; Bermuda Bay cardstock (item 131197) for the flowers' centers, and for the leaves used on the envelope; Basic White cardstock for the flowers' small centers; and Granny Apple Green cardstock (item 146990) for the leaves for the front of the card. For more embellishment I added two small and two large of the white Classic Matte Dots (item 158146). Using an envelope punch board I made the co-ordinating envelope from a Granny Apple Green patterned piece of the Sunshine & Rainbows DSP.
As always, I certainly had a lot of fun working on these projects! It was certainly nice to be working with the bright colours on days when it was freezing rain!
Thank you for visiting my blog! If you are interested in purchasing any of the available Stampin' Up! products I have used and want to take advantage of Sale-A-Bration and the opportunity to get some exciting and fun free products, and you live in Canada and do not have a Stampin' Up! demonstrator, please do not hesitate to visit my online store found on my website https://archiesatelier.stampinup.net/ at your convenience, or simply click under the "Shop With Me" tab on the right sidebar of my blog, which will take you directly to my website and online store. I very much appreciate your business! Don't miss out on Sale-A-Bration - it ends on February 28, 2022!!
Have fun creating!
Laurel
It is supper time now, right?


Comments
Post a Comment