It's just "Nuts . . . & Bolts"
Hello! Today I am sharing a few projects featuring the new Stampin' Up! stamp set "Nuts & Bolts" (item 157650) from the January-June 2022 Mini Catalogue.
Although this cute stamp set may not be my usual style I certainly had a lot of fun working on these projects! All images were stamped on watercolour paper using Stazon Jet Black Ink (item 101406) and coloured using Stampin' Up! watercolour pencils (Assortment 1 - item 141709 and Assortment 2 - item 149014). All sentiments were also stamped using Stazon Jet Black Ink. For this 3" x 3" x 1 1/2" deep lidded box I used Flirty Flamingo cardstock (item 141416) for the lid, first mat for the robot image, and the tag hole re-enforcer; and Highland Heather cardstock (item 146986) for the box bottom, second mat, and sentiment tag. I cut the cardstock for the lid 6" x 6" and scored 1 1/2" on all four sides; I cut the cardstock for the bottom 5 15/16" x 5 15/16" and also scored 1 1/2" on all four sides. After assembling the lid I glued on the Flirty Flamingo designer series paper decorative panels (6" x 6" Designer Series Paper Assortments - Brights item 155228) and then, using a 1" circle punch, cut the thumb notches on two sides. After stamping the "HB2U" on the Highland Heather cs I cut the tag using the Tailor Made Tags dies (item 155563).
Shortening the tag: Since the original tag was too long I was able to shorten the tag by repositioning the die on the cut tag ensuring that the metal protrusions on the die that create the "holes" along the edges of the tag caught on existing holes in the cut tag, and then ran it through the Stampin' Cut & Emboss machine (item 149653) only far enough to cut the bottom edge (instead of advancing the cutting sandwich all the way through the machine I only partially advanced the cutting sandwich and then reversed by turning the handle backwards). Using my scissors I snipped a tiny sliver off the bottom edge of the recut tag since a portion of holes were showing beyond the holes on the side edges of the tags. I hope the following photos help clarify my muddled explanation!
Cards
I used Highland Heather cardstock (item 146986) for the base of this 5" x 3 1/2" top-fold card and for the sentiment panel. The robot panel was cut using the Stitched Rectangles dies (item 151820). I used Basic Black cardstock (item 121045) for the base mat for the front panel, and for the sentiment panel mat. I embossed the Gorgeous Grape cardstock (item 146987) panel using the Splatter embossing folder from the new Stripes & Splatters 3D Embossing Folders (item 157980) and used the "debossed" side facing up. To complete the front of the card I also added strips of Granny Apple Green and Crushed Curry DSP (from the 6" x 6" Designer Series Paper Assortments - Brights (item 155228) and Regals (item 155227) respectively; and four Matte Black Dots (item 154284). On the inside of the card I added another strip of the Crushed Curry DSP and a Gorgeous Grape cardstock stitched heart (cut using the smaller of the two heart dies included with the Bouquet of Love Hybrid Embossing Folder - item 157641). Using an envelope punch board I made a co-ordinating envelope from Gorgeous Grape cardstock, which I decorated with more strips of the Crushed Curry and Granny Apple Green DSP and a small Highland Heather cardstock heart, cut using the small heart from the Birds & More dies (item 152721).
For the base and image mat/sentiment panel of this 3 1/2" x 5 1/2" card I used Poppy Parade cardstock (item 119793). For the decorative paper panel I used a sheet from the Sale-A-Bration Sunshine & Rainbows 6" x 6" Designer Series Paper (item 158126) - I really like using the Poppy Parade and Bermuda Bay colour combination! I also used Basic Black cardstock (item 121045) for additional mats. Using an envelope punch board I made a co-ordinating envelope using Bermuda Bay cardstock (item 131197).
More Poppy Parade . . .
In addition to Poppy Parade cardstock (item 119793) I also used the following items for this 4" x 4" card: - Layering Circle dies (item 151770) to cut the image circle and the Basic Black cardstock (item 121045) scalloped circle (Basic Black cs was also used for the mats for the DSP panels);
- Poppy Parade DSP from the 6" x 6" Designer Series Paper Brights Assortment (item 155228);
- Crushed Curry DSP from the 6" x 6" Designer Series Paper Regals Assortment (item 155227); and
- Matte Black Dots (item 154284).
I used some retired DSP (Flower & Field Designer Series Paper) I had in my stash to make the co-ordinating envelope using an envelope punch board.
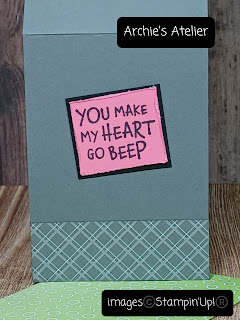
You Make My Heart Go Beep
For this 3 1/4" x 4 3/4" top-fold card I used Basic Black cardstock (item 121045) for the card base and the image mat. The sentiment was stamped on Bermuda Bay cardstock (item 131197), which was also used on the inside of the card. The decorative panel on the front of the card and the mat for the Bermuda Bay panel on the interior of the card are both papers from Sale-A-Bration Sunshine & Rainbows 6" x 6" Designer Series Paper (item 158126). The stitched heart was cut from Magenta Madness cardstock (item 153080) using the smaller of the two heart dies included with the Bouquet of Love Hybrid Embossing Folder (item 157641). In the space between the DSP and Bermuda Bay cs panels on the front of the card I wrapped some White Baker's Twine (Baker's Twine Essentials Pack - item 155475). I also glued some Dollar Tree googly eyes to the robot's eyes! The Bumblebee cardstock (item 153077) envelope was made using an envelope punch board (surprise!) and was decorated with a panel of the Sunshine & Rainbows DSP and a Bumblebee 1/4" Gingham Ribbon (item 153658) bow. 
And finally . . .
Again I used Basic Gray cardstock (item 121044) for the base of this 4" x 4" card. The sentiment was stamped on Polished Pink cardstock (item 155710). I used Gray Granite DSP from the 6" x 6" Designer Series Paper Neutrals Assortment (item 155226) for the front DSP panel (also a strip on top of the Polished Pink cs strip on the inside of the card). I used the Layering Circle dies (item 151770) to cut the image circle, the Basic Black cardstock (item 121045) circles, and the Gray Granite cardstock (item 146983) scalloped circle. Two of the Matte Black Dots (item 154284) were used to "bookend" the sentiment strip. I used Basic Gray cs to make the envelope, again using an envelope punch board!, and for some decoration stamped the robot and heart images in Stazon Jet Black Ink and added a few splatters using the Basic Gray watercolour pencil (Watercolour Pencils Assortment 1 - item 141709).
Thank you for taking the time to visit my blog! If you are interested in purchasing any of the available Stampin' Up! products I have used, and you live in Canada and do not have a Stampin' Up! demonstrator, please do not hesitate to visit my online store found on my website, https://archiesatelier.stampinup.net/, or click under the "Shop With Me" tab on the right sidebar of my blog. I very much appreciate your business! Don't forget that Sale-A-Bration runs until February 28, 2022, and is a great opportunity to get some exciting free products while stocking up on your paper-crafting supplies! Both the January-June 2022 Mini Catalogue and the Sale-A-Bration Catalogue can be viewed online at your convenience on my website.
Have fun creating!
Laurel
We all need to find our spot of sunshine!


Comments
Post a Comment