It's all here in Black & White . . . with a little colour added too!
Part 1 of 2
Hello! Today I am sharing a few projects giving a sneak peek of the new Stampin' Up! black and white patterned All Together 6" x 6" Designer Series Paper (item 160039), which will be available as of February 1, 2022! Part of the new All Together Collection, the DSP will be available from February 1, 2022 until May 2, 2022, while supplies last!
I had a lot of fun working on these projects - I really enjoy working with black and white patterned paper and couldn't resist adding some colour too!
3" x 3" x 3/4" Valentine Window Treat Box
For this little lidded window treat box, which holds four Dollar Tree chocolate hearts, I cut and scored two pieces of Basic Black cardstock (item 121045) as follows: - for the lid: 4 9/16" x 4 9/16" - scored at 3/4" on all four sides; and
- for the bottom: 4 1/2" x 4 1/2" - also scored at 3/4" on all four sides.
Before cutting the window opening in the lid (using the Layering Circle dies - item 151770) I glued the 2 7/8" x 2 7/8" DSP panel to the lid. After cutting the window opening, and before assembling the lid, to the inside of the lid I glued a piece of acetate (Window Sheets - item 142314) measuring just shy of 3" square behind the opening. After assembling the lid I glued the 2 7/8" x 5/8" DSP panels to each side of the lid. In two sides I cut a thumb notch using a 1/2" circle punch. I tied a bow around the box using the Real Red 3/8" Faux Linen Ribbon (item 158129).5 1/2" x 4 1/4" Top-Fold Bridge Card The base for this Basic Black cardstock (item 121045) top-fold bridge card measures 5 1/2" x 8 1/2", scored on the 8 1/2" side at 4 1/4". Two cuts are made on the front flap - 1 1/4" from each side from the score line to the bottom edge. The "bridge" flap (1 1/4" x 5 1/2") is glued to the back of the front flaps created by the two cuts (I did this after adhering the DSP panel to the front of the center section). To decorate the front of the "bridge" flap I cut a heart using the larger of the two heart dies included with the Bouquet of Love Hybrid Embossing Folder (item 157641) from Poppy Parade cardstock (item 119793). Before cutting the heart I embossed the cardstock using the stripes embossing folder from the new Stripes & Splatters 3 D Embossing Folders (item 157980). To the center of the heart I glued a black button from my stash through which I tied some white baker's twine (Baker's Twine Essentials Pack - item 155475) - the twine knot was glued to the back of the button before I glued the button to the heart.


Hello Friend Accordion Tri-Fold Card
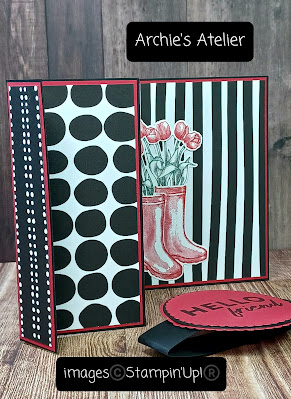

To make this pocket card I followed the instructions again provided by Jackie Bolhuis - this time in her December 14, 2021, You Tube video https://www.youtube.com/watch?v=-dGdjCE0zUk. (I was watching quite a few of her videos!) Since I was not intending my card to fit into another envelope, and was therefore not concerned about adhering to strict dimension guidelines, I added a rather large pull tab to my card - I used two sizes of dies from the Tailor Made Tags dies (item 155563) - the larger tag was cut from Basic Black cardstock (item 121045) and the next smaller tag was cut from the DSP. I also added an eyelet to the pull tag and completed the tag with some Black & White 1/4" Gingham Ribbon (item 156485) tied with a white baker's twine (Baker's Twine Essentials Pack - item 155475) bow. I glued the completed tag to the back of the insert card.

The "Happy Birthday" sentiment, from the Peaceful Moments stamp set (item 151595), was stamped in Stazon Jet Black Ink (item 101406). I used the Pierced Blooms dies (item 154312) to cut the flowers and leaves for the front of the pocket: Polished Pink cardstock (item 155710) for the flowers; Granny Apple Green cardstock (item 146990) for the leaves; Basic White Thick cardstock for the flowers' large centers; and Basic Black cardstock for the flowers' small centers.
Love and Support Gift Card

And finally for today . . .
Hello Fabulous Tag Card
I used Basic Black cardstock (item 121045) for the base of this 5" x 3" top-fold card. After adhering the strip of DSP to a piece of Basic White Thick cardstock (item 159229) I cut the tag using the Tailor Made Tags dies (item 155563). The tag hole re-enforcer was cut from Basic Black cardstock. I used the Pierced Blooms dies (item 154312 - and one of my favourite dies!) to cut the flowers and leaves: Polished Pink cardstock (item 155710) and Daffodil Delight cardstock (item 119683) for the flowers; Granny Apple Green cardstock (item 146990) for the leaves; Basic White Thick cardstock for the flower's large center; and Basic Black cardstock for the flower's small center. I tied white baker's twine (Baker's Twine Essentials Pack - item 155475) to the tag. The "Hello Fabulous" sentiment, from the Dressed To Impress stamp set (item 158321), was stamped using Memento Tuxedo Black Ink (item 132708). The Granny Apple Green cardstock front panel was embossed using the Stitched Greenery die (item 155451). To complete the front of the card I added one large and one small of the Matte Black Dots (item 154284). I used Basic White Thick cardstock for the interior panel, and added a strip of DSP along the bottom.
I made a co-ordinating envelope from Expressions In Ink 12" x 12" Specialty Designer Series Paper (item 155464) using an envelope punch board.
Thank you for visiting my blog! If you are interested in purchasing any of the available Stampin' Up! products I have used, and you live in Canada and do not have a Stampin' Up! demonstrator, please do not hesitate to visit my online store on my website https://archiesatelier.stampinup.net/, or click under the "Shop With Me" tab on the right sidebar of my blog. I very much appreciate your business!
Have fun creating!
Laurel


Comments
Post a Comment