Clearance Rack Projects!

Hello! Today I am sharing several projects featuring products and/or using tools that were recently added to the Stampin' Up! Clearance Rack. Some of the items may no longer be available as all items on the Clearance Rack are only while supplies last, and with a good sale popular items may not last too long! But maybe you already have some of these products or tools, and just have not used them for awhile or were waiting for just the right project!
Mini Curvy Keepsakes Box Dies (item 150644)
These little boxes are the perfect size to hold a few Hershey Kisses or a few wrapped mints, and would be great for table favours or to share a few treats with co-workers and are very easy to assemble (in order to get a nice curve on each side, gently shape each panel using your bone folder):

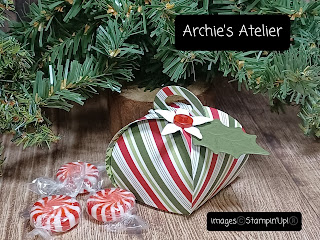

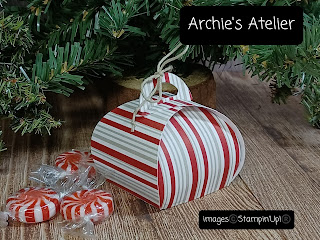

In addition to the Mini Curvy Keepsakes Box dies (which includes the star tag die) I used the following items:
- Cherry Cobbler cardstock (item 119685);
- Mossy Meadow cardstock (item 133676);
- Mossy Meadow 3/8" Diagonal Stripe Ribbon (item 153542 - also a Clearance Rack item!);
- Poinsettia dies (item 153522);
- Peaceful Prints 12" x 12" Designer Series Paper (from August 3 - September 30 2021 Sale-A-Bration);
- Heartwarming Hugs 12" x 12" Designer Series Paper (item 153492);
- Tidings of Christmas 6" x 6" Designer Series Paper (item 155718);
- White 1/4" Crinkled Seam Binding Ribbon (item 151326);
- Brushed Metallic 12" x 12" cardstock (item 153524) - for the small gold star tag;
- baker's twine - Baker's Twine Essentials Pack (item 155475); and
- a couple of little buttons from my stash.
Hydrangea Hill Designer Series Paper (item 154570)
This paper was part of the Hydrangea Hill Suite offered in the January - June 2021 Mini Catalogue.


The box is 4" high x 2" deep, and I adapted the instructions I found posted online by Jennie Harper for a Scor-pal Valentine's Day box (2016). For the base of the box you need a piece of cardstock 6" x 8 1/2" - scored at 2" on the 6" side; and at 2" 4" 6" and 8" on the 8 1/2" side. For the lid you need a 4 1/8" square piece of cardstock, which is scored at 1" on all sides. The "You're Too Kind" sentiment (from the Quiet Meadow stamp set - item 155082) was stamped with Memento Tuxedo Black ink on Blushing Bride cs, which was then cut using the Tailor Made Tags dies (item 155563). The tag was tied to the Crinkled Seam Binding bow with some gold cord from the Simply Elegant Trim pack (item 155766) and a gold Brushed Metallic Adhesive-Backed Dot (item 156506) was added.
For the Hydrangea Hill easel calendar/sticky note holder, and for the easel calendar/stick note holders made using the Dandy Garden DSP, I adapted the instructions provided by Tracy Elsom in her October 26, 2019, blogpost "Updating My Easel Calendar" (www.papercraftwithme.com/updating-my-easel-calendar/). For the base of the Hydrangea Hill calendar I used Gorgeous Grape cardstock (item 146987), and Basic White cs for mats.


Dandy Garden 6" x 6" Designer Series Paper


Scalloped Tag Topper Punch (item 133324)


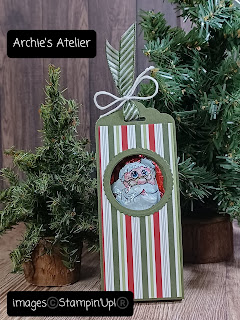


Although the peanut butter Santas are a little smaller than the double crisp Santas I used the same measurements for all holders: a piece of cardstock measuring just under 2" wide by 10 1/2" long, scored at 5" and 5 1/2". I used the Layering Circle dies (item 151770) to cut both the openings for the faces and for the scalloped circle frames around the openings. I also used the following items:
- Basic Black cardstock (item 121045);
- Peaceful Prints DSP;
- Poinsettia dies (item 153522);
- Mossy Meadow cardstock (item 133676);
- Real Red cardstock (item 102482);
- Giving Gifts dies (item 156563);
- Hydrangea Hill DSP (green patterned);
- Mossy Meadow Diagonal Stripe Ribbon (Clearance Rack item!);
- baker's twine (Baker's Twine Essentials Pack - item 155475);
- Tidings of Christmas DSP (item 155718);
- Heartwarming Hugs DSP (item 153492);
- Pierced Blooms dies (154312) - Real Red cs bow;
- Brushed Metallic Adhesive-Backed Dots (item 156506);
- Black & White 1/4" Gingham Ribbon (item 156485); and
- black button from my Dollar Tree stash!
I secured the Santas in the treat holders using a couple of strips of double-sided tape on the back of the Santa.
Golden Garden Designer Specialty Acetate (item 154557) and Subtle 3D Embossing Folder (item 151775)


And finally . . .


Thank you for visiting my blog! If you would like to check out the Clearance Rack or purchase any other available Stampin' Up! products I have used in these projects, and you reside in Canada and do not have a Stampin' Up! demonstrator, please do not hesitate to visit my online store on my website https://archiesatelier.stampinup.net/, or click under the "Shop With Me" tab on the right sidebar of my blog. I very much appreciate your business!
Have fun creating!
Laurel

We all need friends!
Comments
Post a Comment